2020 TESLA MODEL Y display
[x] Cancel search: displayPage 117 of 232

WARNING: Forward Collision Warning may
provide a warning in situations where the
likelihood of collision may not exist. Stay alert and
always pay attention to the area in front of Model
Y so you can anticipate whether any action is
required.
WARNING: Forward Collision Warning operates
only when driving between approximately 7 mph
(10 km/h) and 90 mph (150 km/h).
WARNING: Forward Collision Warning does not
provide a warning when the driver is already
applying the brake.
Automatic Emergency Braking
The forward looking camera(s) and the radar sensor are designed to determine the distance from a detected object traveling in front of
Model Y. When a frontal
collision is considered unavoidable, Automatic Emergency Braking is designed to apply the brakes to
reduce the severity of the impact.
When Automatic Emergency Braking applies the brakes,
the
touchscreen displays a visual warning and sounds a
chime. You may also notice abrupt downward movement of the brake pedal. The brake lights turn on to alert other road users that you are slowing down.
If driving 35 mph (56 km/h) or faster, the brakes are
released after Automatic Emergency Braking has reduced your driving speed by
30 mph (50 km/h). For
example, if Automatic Emergency Braking applies braking when driving
56 mph (90 km/h), it releases the
brakes when your speed has been reduced to
26 mph
(40 km/h).
Automatic Emergency Braking operates only when driving between approximately
7 mph (10 km/h) and 90
mph (150 km/h).
Automatic Emergency Braking does not apply the
brakes, or stops applying the brakes, when:
Page 119 of 232
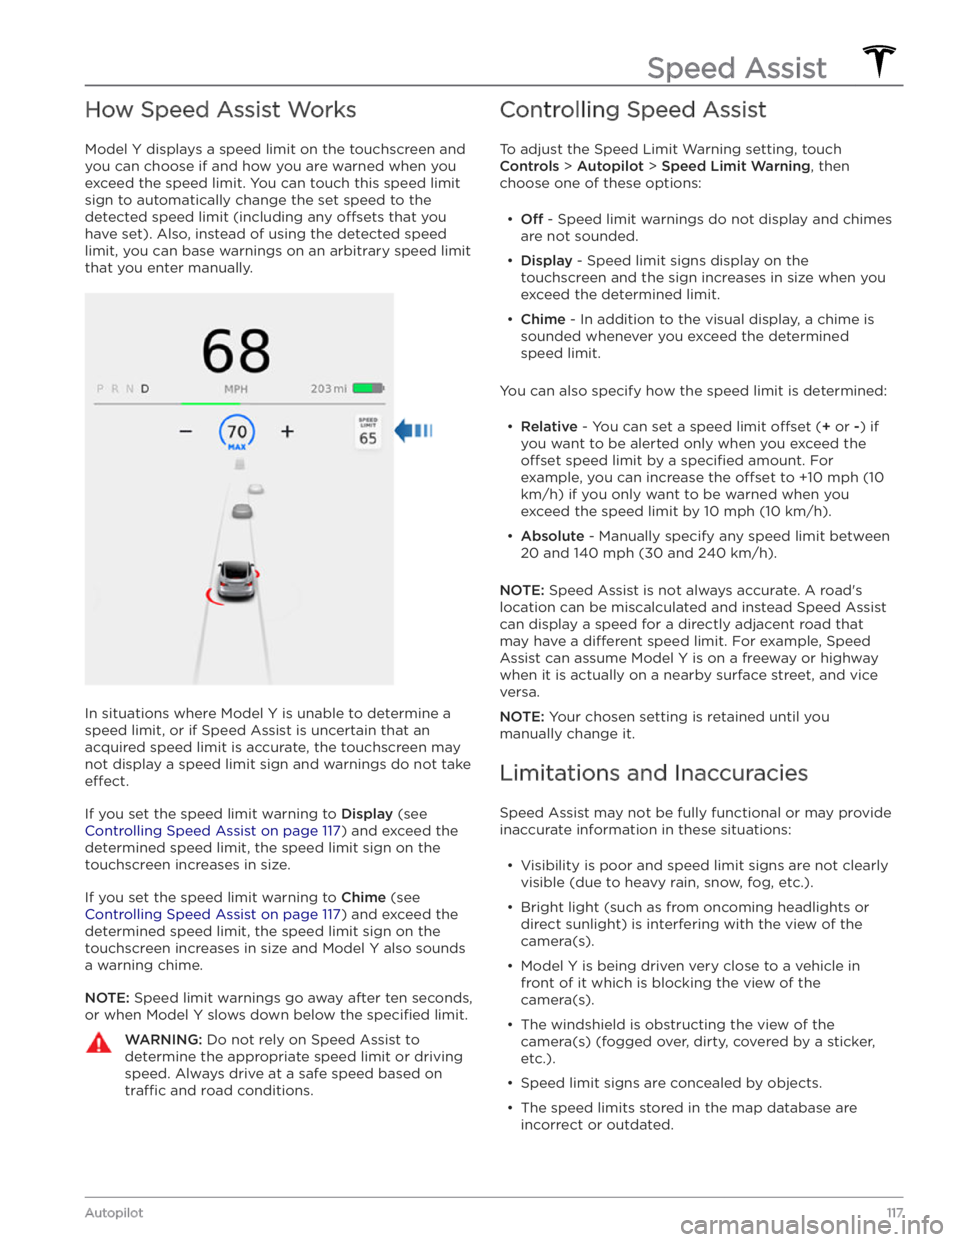
How Speed Assist Works
Model Y displays a speed limit on the touchscreen and
you can choose if and how you are warned when you exceed the speed limit.
You can touch this speed limit
sign to automatically change the set speed to the
detected speed limit (including any offsets that you
have set). Also, instead of using the detected speed
limit, you can base warnings on an arbitrary speed limit that you enter manually.
In situations where Model Y is unable to determine a
speed limit, or if Speed Assist is uncertain that an acquired speed limit is accurate, the
touchscreen may
not display a speed limit sign and warnings do not take
effect.
If you set the speed limit warning to Display (see
Controlling Speed Assist on page 117) and exceed the
determined speed limit, the speed limit sign on the
touchscreen increases in size.
If you set the speed limit warning to Chime (see
Controlling Speed Assist on page 117) and exceed the
determined speed limit, the speed limit sign on the
touchscreen increases in size and Model Y also sounds
a warning chime.
NOTE: Speed limit warnings go away after ten seconds,
or when
Model Y slows down below the specified limit.
WARNING: Do not rely on Speed Assist to
determine the appropriate speed limit or driving
speed. Always drive at a safe speed based on
tra
Page 121 of 232
OverviewTouch Controls on the bottom corner of
the touchscreen to control features and
customize
Model Y to suit your
preferences. The Controls window
appears over the map. Touch an option on the left side of the window to display the associated controls and settings. By
default,
Quick Controls displays for
quicker access to commonly used
settings.
To close the Controls window, touch the
X in the top left corner, touch Controls
again, or swipe down on the window.
When an information icon displays beside a
specific setting, touch it to display a
popup that provides helpful details about
the associated setting.
NOTE: The following illustrations are for demonstration
purposes only. Depending on vehicle options, software version and market region, the options available may be
different.
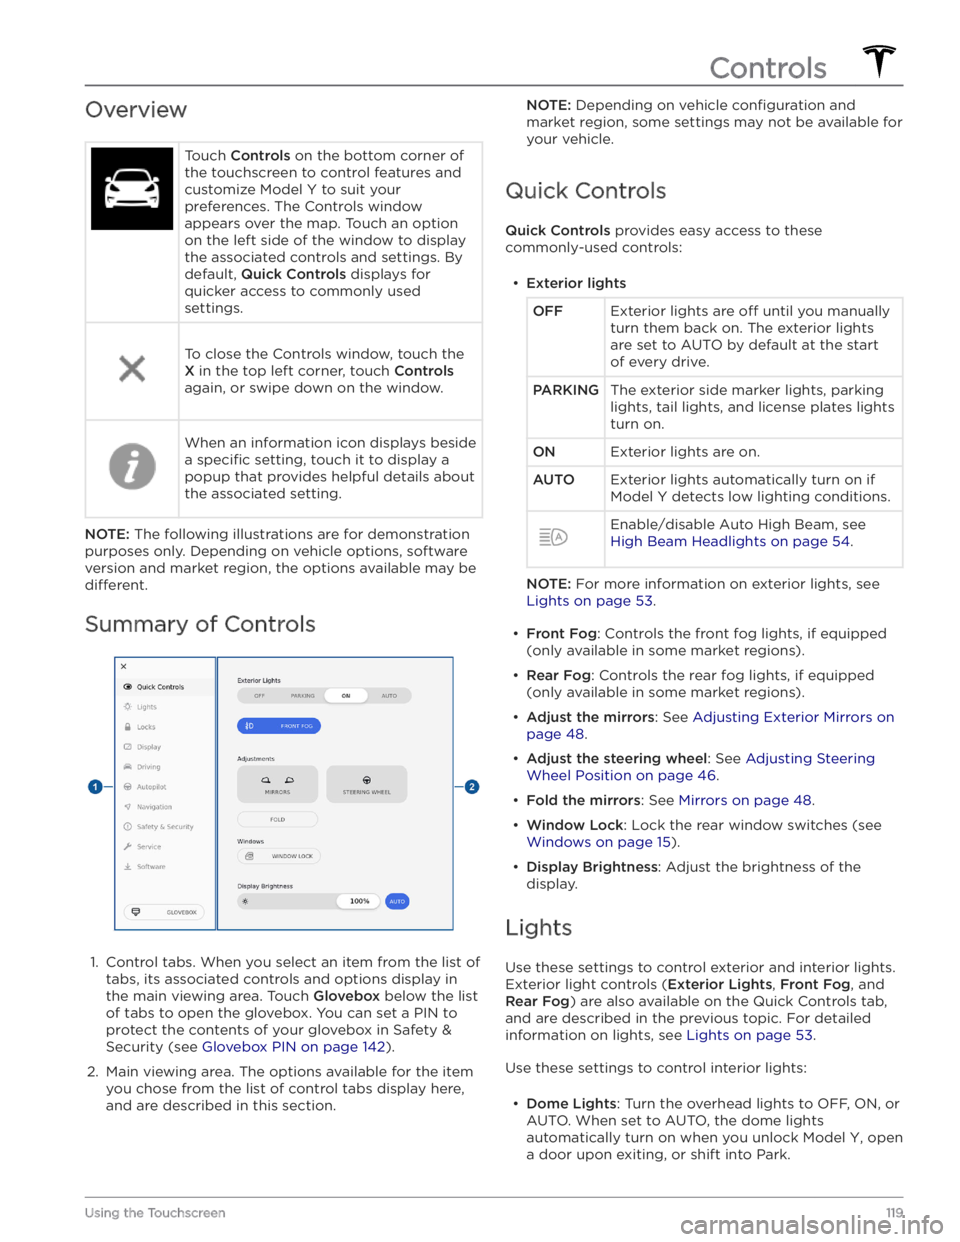
Summary of Controls
1.
Control tabs. When you select an item from the list of tabs, its associated controls and options display in the main viewing area. Touch
Glovebox below the list
of tabs to open the glovebox. You can set a PIN to
protect the contents of your glovebox in Safety & Security (see
Glovebox PIN on page 142).
2.
Main viewing area. The options available for the item you chose from the list of control tabs display here, and are described in this section.
NOTE: Depending on vehicle configuration and
market region, some settings may not be available for your vehicle.
Quick Controls
Quick Controls provides easy access to these
commonly-used controls:
Page 123 of 232
Driving
Acceleration: Adjust the amount of acceleration. Chill
limits acceleration for a slightly smoother and gentler
ride, whereas
Standard or Sport (depending on vehicle
configuration) provides the normal level of acceleration.
NOTE: When Chill is selected, Chill displays on the
touchscreen above the driving speed.
Steering Mode: Adjust the amount of effort required to
turn the steering wheel.
Sport feels more responsive
whereas
Comfort feels easier to drive and park (see
Adjusting Steering Effort on page 46).
Stopping Mode: Choose how you want Model Y to
behave once regenerative braking has reduced the driving speed to a very low speed, a driving gear is still
engaged, and both the accelerator and brake pedals are
released. See
Stopping Mode on page 61. You can adjust
this setting only when
Model Y is in Park.
Slip Start: Turn Slip Start ON to disable traction control
and allow wheels to spin to make it easier to dislodge the vehicle when stuck in mud, snow, ice, etc. (see
Traction Control on page 63).
Off-Road Assist: Turn Off-Road Assist ON to disable
traction control and allow wheels to spin when driving
off-road (see Traction Control on page 63).
Trailer Mode: (Available only if equipped with the tow
package) Must always be active when towing a trailer.
Some Autopilot features and rear sensor functionality may not be available. See
Trailer Mode on page 75).
Autopilot
Autopilot features that provide a safer and more
convenient driving experience. Some Autopilot features
are not controlled through
Controls. See About
Autopilot on page 81 for more information.
Page 128 of 232
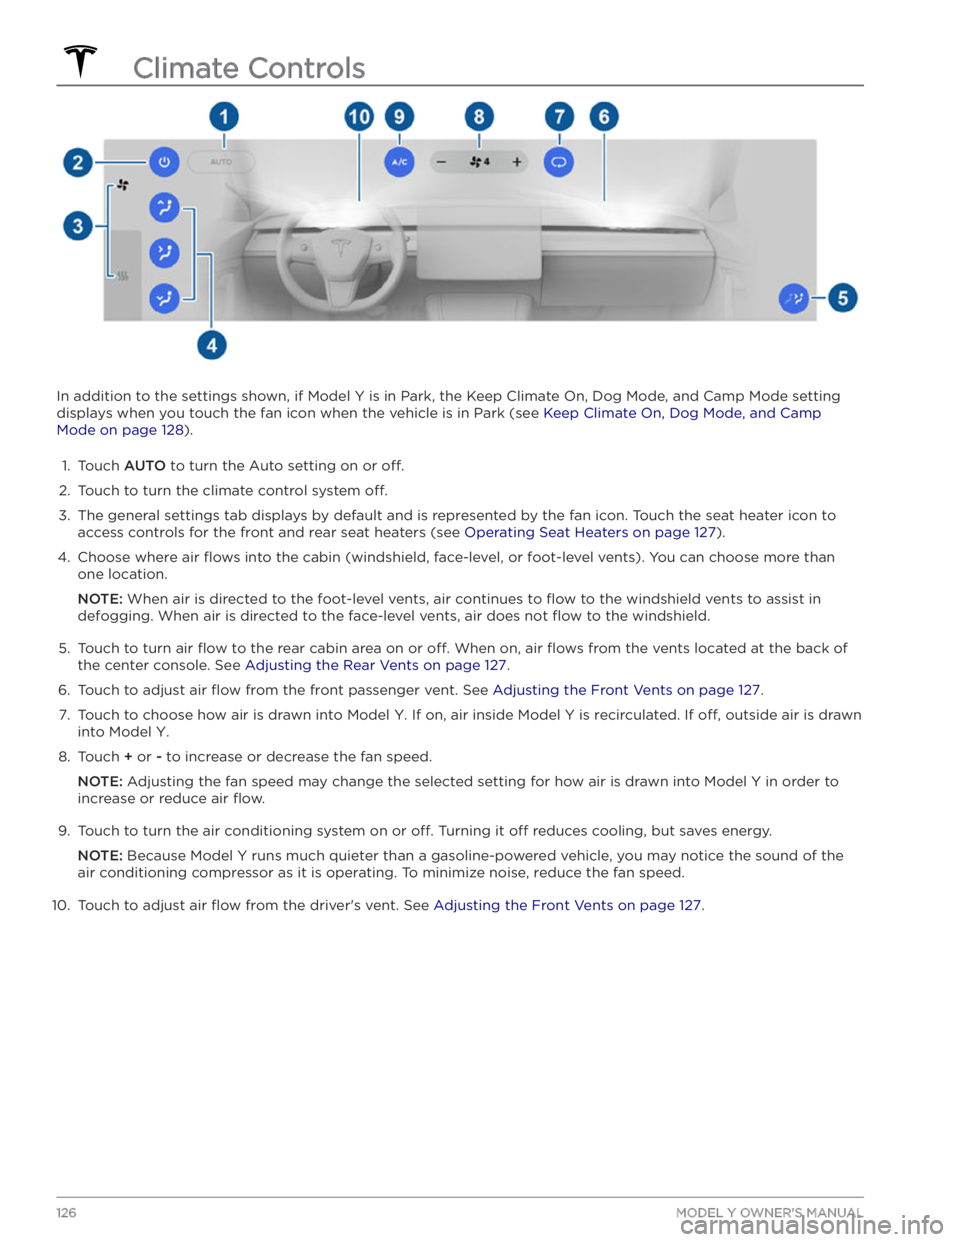
In addition to the settings shown, if Model Y is in Park, the Keep Climate On, Dog Mode, and Camp Mode setting
displays when you touch the fan icon when the vehicle is in Park (see
Keep Climate On, Dog Mode, and Camp
Mode on page 128).
1.
Touch AUTO to turn the Auto setting on or off.
2.
Touch to turn the climate control system off.
3.
The general settings tab displays by default and is represented by the fan icon. Touch the seat heater icon to
access controls for the front
and rear seat heaters (see Operating Seat Heaters on page 127).
4.
Choose where air flows into the cabin (windshield, face-level, or foot-level vents). You can choose more than
one location.
NOTE: When air is directed to the foot-level vents, air continues to flow to the windshield vents to assist in
defogging. When air is directed to the face-level vents, air does not
flow to the windshield.
5.
Touch to turn air flow to the rear cabin area on or off. When on, air flows from the vents located at the back of
the center console. See
Adjusting the Rear Vents on page 127.
6.
Touch to adjust air flow from the front passenger vent. See Adjusting the Front Vents on page 127.
7.
Touch to choose how air is drawn into Model Y. If on, air inside Model Y is recirculated. If off, outside air is drawn
into
Model Y.
8.
Touch + or - to increase or decrease the fan speed.
NOTE: Adjusting the fan speed may change the selected setting for how air is drawn into Model Y in order to
increase or reduce air
flow.
9.
Touch to turn the air conditioning system on or off. Turning it off reduces cooling, but saves energy.
NOTE: Because Model Y runs much quieter than a gasoline-powered vehicle, you may notice the sound of the
air conditioning compressor as it is operating. To minimize noise, reduce the fan speed.
10.
Touch to adjust air flow from the driver
Page 129 of 232
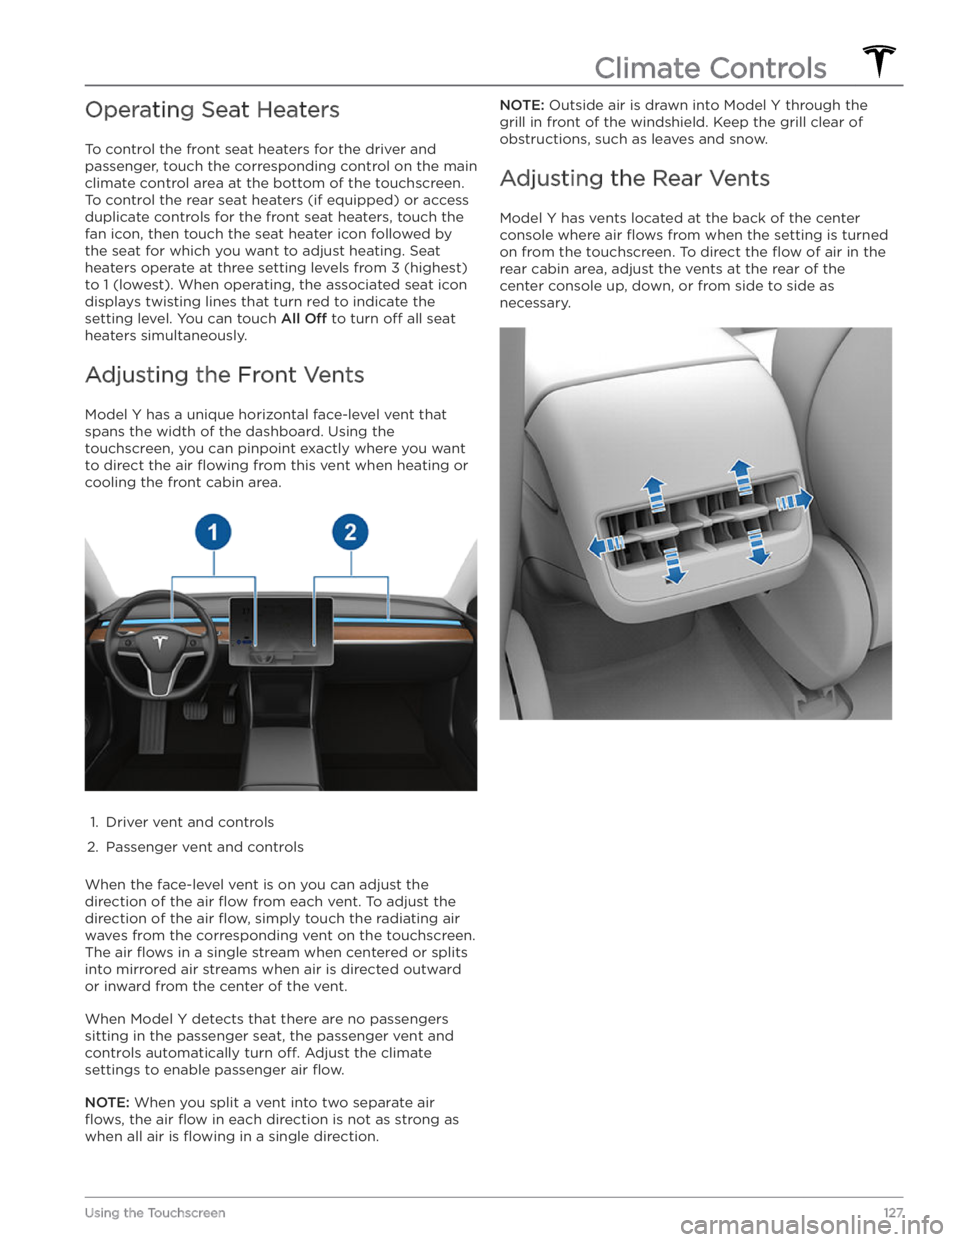
Operating Seat Heaters
To control the front seat heaters for the driver and
passenger, touch the corresponding control on the main climate control area at the bottom of the touchscreen.
To control the rear seat heaters (if equipped) or access
duplicate controls for the front seat heaters, touch the
fan icon, then touch the seat heater icon followed by
the seat for which you want to adjust heating. Seat
heaters operate at three setting levels from 3 (highest)
to 1 (lowest). When operating, the associated seat icon
displays twisting lines that turn red to indicate the setting level. You can touch
All Off to turn off all seat
heaters simultaneously.
Adjusting the Front Vents
Model Y has a unique horizontal face-level vent that
spans the width of the dashboard. Using the
touchscreen, you can pinpoint exactly where you want to direct the air
flowing from this vent when heating or
cooling the front cabin area.
1.
Driver vent and controls
2.
Passenger vent and controls
When the face-level vent is on you can adjust the direction of the air
flow from each vent. To adjust the
direction of the air
flow, simply touch the radiating air
waves from the corresponding vent on the touchscreen.
The air
flows in a single stream when centered or splits
into mirrored air streams when air is directed outward or inward from the center of the vent.
When Model Y detects that there are no passengers
sitting in the passenger seat, the passenger vent and controls automatically turn
off. Adjust the climate
settings to enable passenger air
flow.
NOTE: When you split a vent into two separate air
flows, the air flow in each direction is not as strong as
when all air is
flowing in a single direction.
NOTE: Outside air is drawn into Model Y through the
grill in front of the windshield. Keep the grill clear of
obstructions, such as leaves and snow.
Adjusting the Rear Vents
Model Y has vents located at the back of the center
console where air
flows from when the setting is turned
on from the touchscreen. To direct the
flow of air in the
rear cabin area, adjust the vents at the rear of the center console up, down, or from side to side as necessary.
Climate Controls
127Using the Touchscreen
Page 132 of 232

Overview
The touchscreen displays a map at all times. To move the map in any direction, hold and drag a
finger. To rotate
the map in any direction, hold and turn two
fingers.
To set the map
Page 133 of 232

Drop a pin by pressing and holding your finger
anywhere on the map. When you drop a pin, or touch an
existing pin, the chosen location is centered on the map,
and a popup window provides information about the location. From this popup, you can navigate to the location, call the location (if a phone number is
available) and add or remove the location from your list of favorite destinations (see
Recent, Favorite, Home and
Work Destinations on page 133).
Navigating
To navigate to a location, touch Navigate, send the
destination from your phone, or speak a voice command (see
Using Voice Commands on page 141). You can
enter or speak an address, landmark, business, etc. You can also choose a saved
Home or Work location and
select from a list of recently used locations (the most recent displays at the top of the list), including charging stations you have visited.
NOTE: To remotely start navigation from your IOS