2020 TESLA MODEL 3 ECO mode
[x] Cancel search: ECO modePage 83 of 220

performing the procedure, and do not
attempt to use tools or excessive force.
Note: Preemptively applying WD-40 to the
door handle pivot pins can help prevent ice buildup inside your door handle. See Applying
WD-40 to Door Handle Pivot Pins for
instructions.
Perform the following to remove ice from the door handle:
1. Forcefully press the rear-most part of the
door handle to initially try to open the
door handle and release light or moderate ice buildup.
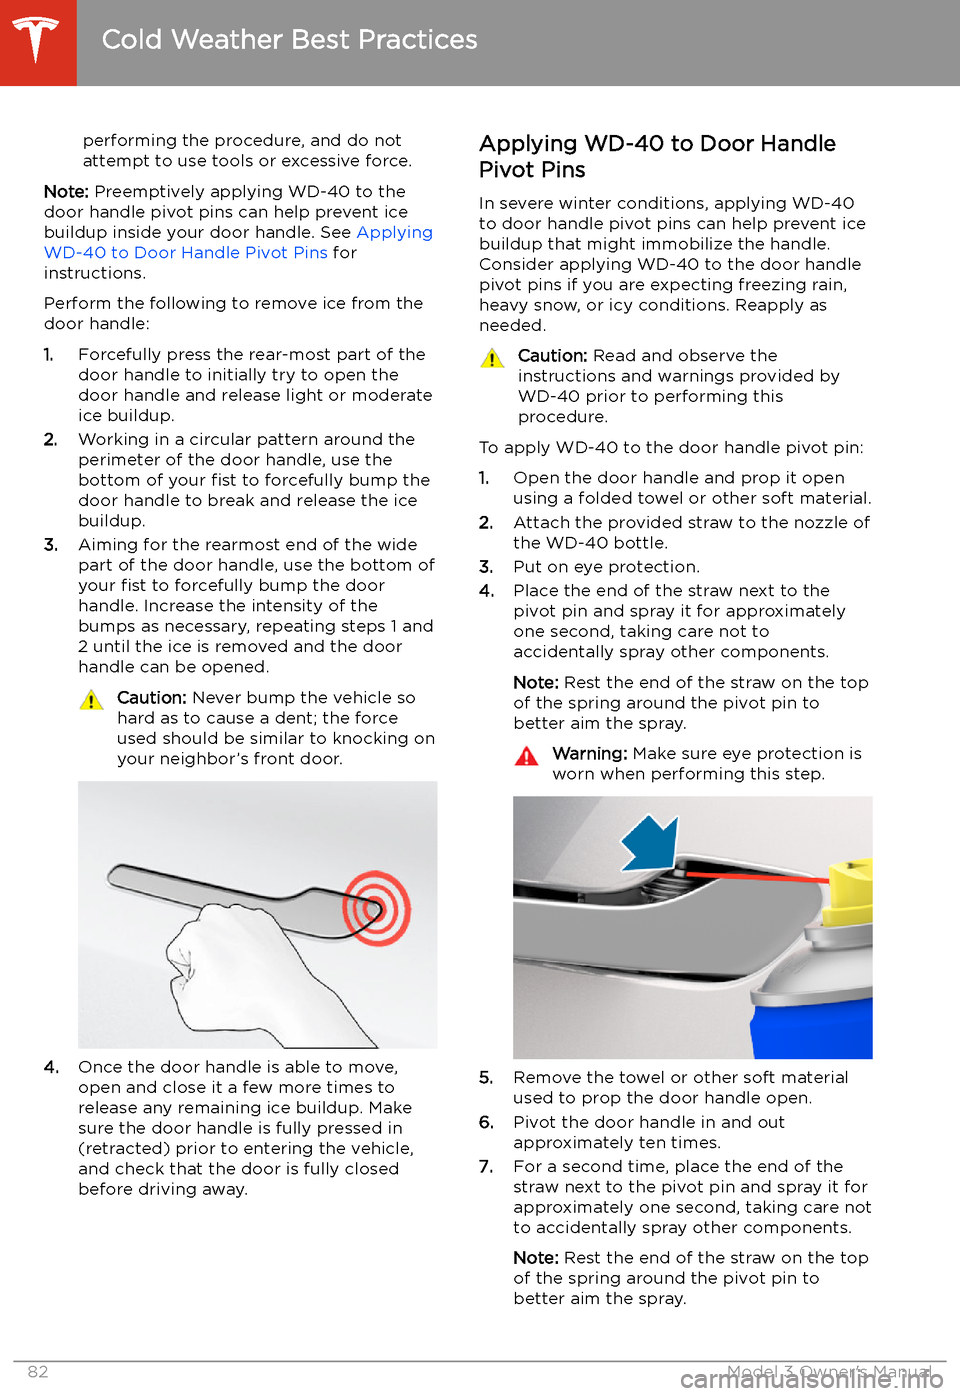
2. Working in a circular pattern around the
perimeter of the door handle, use the
bottom of your fist to forcefully bump the
door handle to break and release the ice
buildup.
3. Aiming for the rearmost end of the wide
part of the door handle, use the bottom of
your fist to forcefully bump the door
handle. Increase the intensity of the
bumps as necessary, repeating steps 1 and
2 until the ice is removed and the door
handle can be opened.
Caution: Never bump the vehicle so
hard as to cause a dent; the force
used should be similar to knocking on
your neighbor’s front door.
4. Once the door handle is able to move,
open and close it a few more times to
release any remaining ice buildup. Make
sure the door handle is fully pressed in
(retracted) prior to entering the vehicle,
and check that the door is fully closed
before driving away.
Applying WD-40 to Door Handle
Pivot Pins
In severe winter conditions, applying WD-40
to door handle pivot pins can help prevent ice
buildup that might immobilize the handle.
Consider applying WD-40 to the door handle pivot pins if you are expecting freezing rain,heavy snow, or icy conditions. Reapply as
needed.Caution: Read and observe the
instructions and warnings provided by
WD-40 prior to performing this
procedure.
To apply WD-40 to the door handle pivot pin:
1. Open the door handle and prop it open
using a folded towel or other soft material.
2. Attach the provided straw to the nozzle of
the WD-40 bottle.
3. Put on eye protection.
4. Place the end of the straw next to the
pivot pin and spray it for approximately
one second, taking care not to
accidentally spray other components.
Note: Rest the end of the straw on the top
of the spring around the pivot pin to
better aim the spray.
Warning: Make sure eye protection is
worn when performing this step.
5. Remove the towel or other soft material
used to prop the door handle open.
6. Pivot the door handle in and out
approximately ten times.
7. For a second time, place the end of the
straw next to the pivot pin and spray it for
approximately one second, taking care not
to accidentally spray other components.
Note: Rest the end of the straw on the top
of the spring around the pivot pin to better aim the spray.
Cold Weather Best Practices
82Model 3 Owner
Page 100 of 220

If Require Lane Change Confirmation is turned
on, you must engage the appropriate turn signal to confirm that you want Navigate on
Autopilot to make the lane change. If you do
not confirm the lane change within three
seconds, a chime sounds to remind you that
Navigate on Autopilot requires your
confirmation to change lanes.
Note: If you ignore a route-based lane change
suggestion (for example, you are driving in the
left lane while approaching an off-ramp on the
right side of the highway), Navigate on
Autopilot will be unable to maneuver onto the off-ramp and as a result, the navigation
system will re-route you to your destination.Warning: Navigate on Autopilot may not
always attempt to exit at an off-ramp or
change lanes, even when an exit or lane
change is determined by the navigation
route. Always remain alert and be prepared to manually steer onto an off-
ramp, or make a lane change to prepare
for, or to exit at, an off-ramp or
interchange.
Be Ready to Assist
When attempting to change lanes or
maneuver Model 3, or when approaching
construction zones, Navigate on Autopilot
may be unable to determine the appropriate
driving lane (for example, complex clover leafs
and multi-lane off-ramps) and the touchscreen
displays an alert indicating that Navigate on
Autopilot is trying to maneuver and may
require assistance. When you see the
message, be prepared to take immediate
action to ensure that it is safe and appropriate
to complete the lane change or maneuver.
Limitations
Autosteer and its associated functions are
particularly unlikely to operate as intended
when:
Page 115 of 220

Speed Assist
How Speed Assist Works
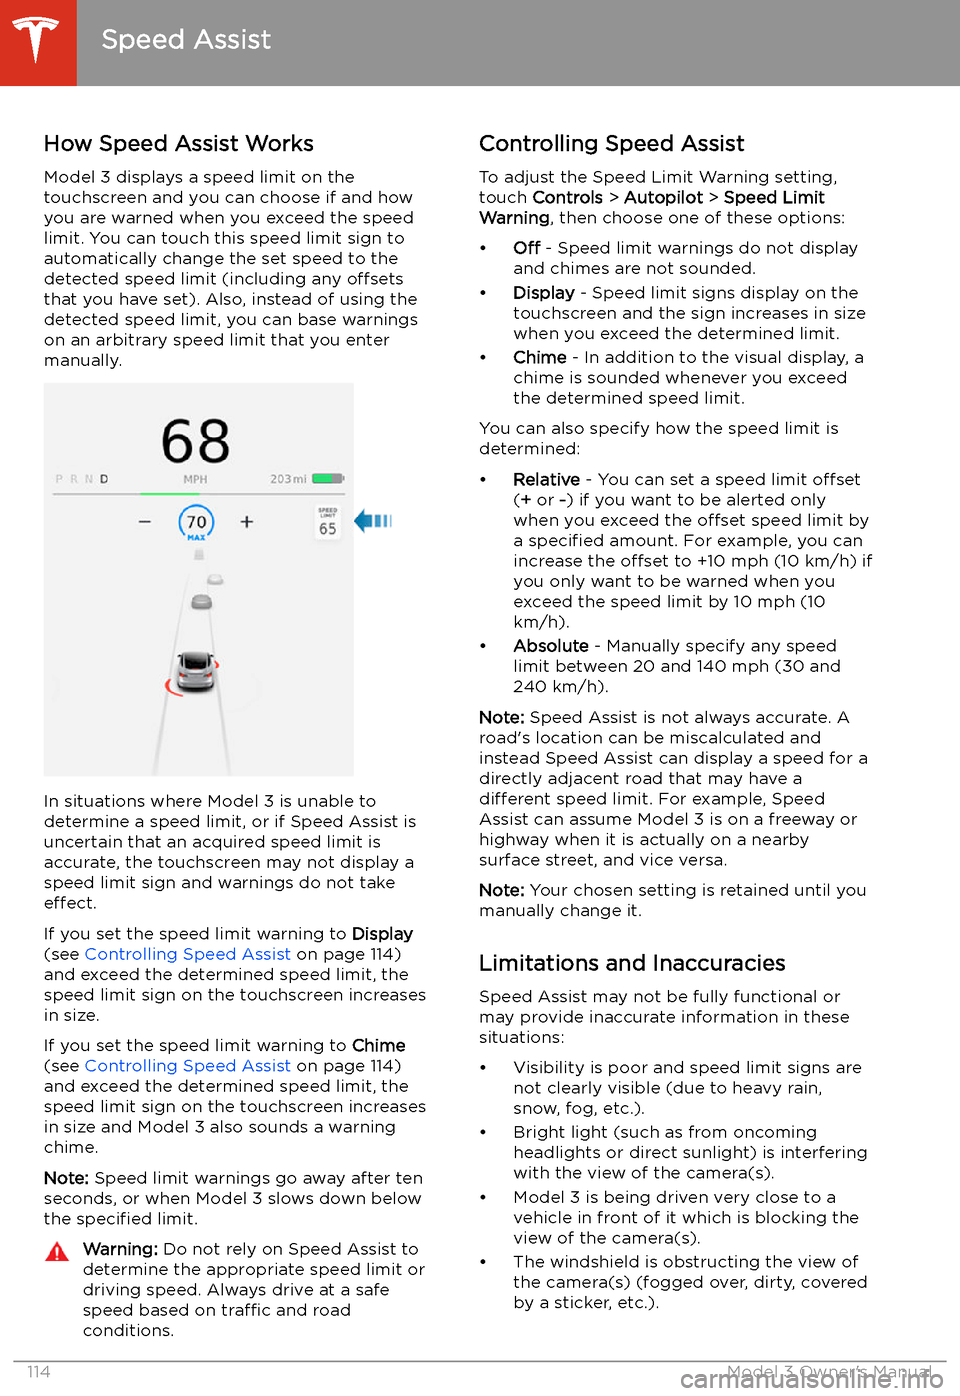
Model 3 displays a speed limit on the
touchscreen and you can choose if and how
you are warned when you exceed the speed
limit. You can touch this speed limit sign to automatically change the set speed to thedetected speed limit (including any offsets
that you have set). Also, instead of using the detected speed limit, you can base warnings
on an arbitrary speed limit that you enter manually.
In situations where Model 3 is unable to
determine a speed limit, or if Speed Assist is
uncertain that an acquired speed limit is
accurate, the touchscreen may not display a
speed limit sign and warnings do not take effect.
If you set the speed limit warning to Display
(see Controlling Speed Assist on page 114)
and exceed the determined speed limit, the
speed limit sign on the touchscreen increases
in size.
If you set the speed limit warning to Chime
(see Controlling Speed Assist on page 114)
and exceed the determined speed limit, the
speed limit sign on the touchscreen increases
in size and Model 3 also sounds a warning
chime.
Note: Speed limit warnings go away after ten
seconds, or when Model 3 slows down below
the specified limit.
Warning:
Do not rely on Speed Assist to
determine the appropriate speed limit or driving speed. Always drive at a safe
speed based on traffic and road
conditions.Controlling Speed Assist
To adjust the Speed Limit Warning setting,
touch Controls > Autopilot > Speed Limit
Warning , then choose one of these options:
Page 136 of 220

For security reasons, if you sell Model 3, it is
recommended that you delete your Home and
Work Locations. You can delete these
individually or you can perform a factory reset to erase all personal data (see Erasing
Personal Data on page 124).
Map Updates
As updated maps become available, they are
automatically sent to Model 3 over Wi-Fi. To
ensure you receive them, periodically connect Model 3 to a Wi-Fi network (see Connecting
to Wi-Fi on page 150). The touchscreen
displays a message informing you when new
maps are installed.
Maps and Navigation
Using the Touchscreen135
Page 147 of 220

Saved footage is located in either the Saved
Clips or Sentry Clips folder. Footage in the
Saved Clips folder contains all saved
recordings from dashcam, which have been
manually saved by touching the dashcam icon on the touchscreen. Sentry Clips contains all
saved footage from Sentry Mode events,
which have been automatically saved when
the Alert or Alarm state was triggered. Once
footage of a particular event is saved, the latest 10 minutes of video is archived in your
Page 151 of 220

Connecting to Wi-Fi
Wi-Fi is available as a data connection method and is often faster than cellular data networks.
Connecting to Wi-Fi is especially useful in areas with limited or no cellular connectivity.
To ensure fast, reliable delivery of software
and map updates, Tesla recommends leaving your vehicle connected to a Wi-Fi network
whenever possible (for example, if parked in
your garage overnight).
To connect to a Wi-Fi network:
1. Touch the cellular icon (usually LTE or 3G)
on the top corner of your touchscreen.
Model 3 will start scanning and display the
detected Wi-Fi networks that are within
range.
2. Select the Wi-Fi network you want to use,
enter the password (if necessary), then
touch Confirm .
3. Your vehicle connects to the Wi-Fi
network and will automatically connect to it whenever the network is within range.
You can also connect to a hidden network that
isn
Page 155 of 220

Charging Equipment
Charging equipment designed specifically to
charge your Model 3 is available from Tesla. A
Tesla Wall Connector, which installs in your
garage, is the fastest way to charge Model 3 at
home.
In most market regions, Model 3 is equipped with a Mobile Connector and the adapter(s)
needed to plug into the most commonly used power outlets. When using the MobileConnector, first plug the Mobile Connector
into the power outlet, and then plug in Model 3. For more information about your Mobile
Connector, see the Mobile Connector Owner’s
Manual (available on the touchscreen).
Additional adapters can be purchased from
Tesla.
Tesla offers adapters (for example, J1772 and
CHAdeMO) to allow you to plug into the most commonly used public charging stations in
your region. Open the charge port door using the touchscreen (see Charging Instructions on
page 157), plug the adapter into the charging
port on Model 3, and then connect the
station
Page 156 of 220

Battery Information
About the Battery
Model 3 has one of the most sophisticated
battery systems in the world. The most
important way to preserve the Battery is to LEAVE YOUR VEHICLE PLUGGED IN when
you are not using it. This is particularly important if you are not planning to drive
Model 3 for several weeks. When plugged in,
Model 3 wakes up when needed to
automatically maintain a charge level that
maximizes the lifetime of the Battery.
Note: When left idle and unplugged, your
vehicle periodically uses energy from the Battery for system tests and recharging the
12V battery when necessary.
There is no advantage to waiting until the
Battery’s level is low before charging. In fact, the Battery performs best when charged
regularly.
Note: If you allow the Battery to discharge to
0%, other components may become damaged
or require replacement (for example, the 12V
battery). In these cases, you are responsible for repair and/or transporting expenses.
Discharge-related expenses are not covered
by the warranty or under the Roadside
Assistance policy.
The peak charging rate of the Battery may
decrease slightly after a large number of DC
Fast Charging sessions, such as those at
Superchargers. To ensure maximum driving
range and Battery safety, the Battery charge
rate is decreased when the Battery is too cold,
when the Battery’s charge is nearly full, and when the Battery conditions change with
usage and age. These changes in the condition of the Battery are driven by battery physics
and may increase the total Supercharging
duration by a few minutes over time.
Battery Care
Never allow the Battery to fully discharge.
Even when Model 3 is not being driven, its
Battery discharges very slowly to power the
onboard electronics. The Battery can
discharge at a rate of approximately 1% per day, though the discharge rate may vary
depending on environmental factors (such as
cold weather), vehicle configuration, and your
selected settings on the touchscreen.
Situations can arise in which you must leave
Model 3 unplugged for an extended period of time (for example, at an airport when
traveling). In these situations, keep the 1% in
mind to ensure that you leave the Battery with a sufficient charge level. For example, over a
two week period (14 days), the Battery may
discharge by approximately 14%.
Discharging the Battery to 0% may result in
damage to vehicle components. To protect
against a complete discharge, Model 3 enters
a low-power consumption mode when the
displayed charge level drops to approximately
0%. In this mode, the Battery stops supporting
the onboard electronics and auxiliary 12V
battery. Once this low-power consumption
mode is active, immediately plug in Model 3 to
prevent a jump-start and 12V battery
replacement.
Note: If the vehicle is unresponsive and will
not unlock, open, or charge, then the 12V
battery may have become discharged. In this
situation, contact Tesla.
Temperature Limits
For better long-term performance, avoid
exposing Model 3 to ambient temperatures
above 140