2020 TESLA MODEL 3 ECO mode
[x] Cancel search: ECO modePage 37 of 220

Choosing a Child Safety SeatAll children age 12 and under should ride in the second and third row seats. Always use a child
safety seat suitable for a young child’s age and weight. The following table is based on child
safety seat recommendations determined by the National Highway Traffic Safety Administration
(NHTSA) in the United States (for more information, go to www.nhtsa.gov/ChildSafety/Guidance).InfantsToddlersYoung
childrenAgeBirth to 1 year*Over 1 year*4 years and
older, and
less than 57
in. (145 cm)
tallWeightUp to at least 20 lbs (9 kg)**Over 20 lbs (9 kg) (minimum)
and up to 40 lbs (18 kg)*Over 40 lbs
(18 kg)Type of child
safety seatRear facing (or convertible)Forward facing (or
convertible)*Seat belt
retained
booster
seatSeat positionRear facing only*Forward facing*Forward
facingRecommended
attachment
methodIf combined weight of child
and safety seat is up to 65
lbs (29.5 kg), attach using
either LATCH** (lower anchor
only) or the seat belt only.***
If combined weight of child
and safety seat is over 65 lbs
(29.5 kg), attach using the
seat belt only.***If combined weight of child
and safety seat is up to 65 lbs
(29.5 kg), attach using either
LATCH** (both lower anchors
and top tether anchor), or the
seat belt and upper tether
strap.*** If combined weight of
child and safety seat is over 65
lbs (29.5 kg), attach using the
seat belt and upper tether
strap.***Attach
booster
seats using
the seat
belt only.* Many child safety seats currently available allow children to ride rear-facing using the child
safety seat’s integrated 5-point harness for a longer period of time BASED UPON SPECIFIC
HEIGHT AND WEIGHT LIMITS. Keep your child in a rear facing seat for as long as possible.
CHECK THE CHILD SAFETY SEAT MANUFACTURER’S INSTRUCTIONS AND CAREFULLY
FOLLOW ALL INSTRUCTIONS
** ISOFIX is the international standard for attachment points for child safety seats in passenger
cars. The system has other regional names including LATCH ("Lower Anchors and Tethers for
Children") in the United States and LUAS ("Lower Universal Anchorage System") or Canfix in
Canada. It has also been called the "Universal Child Safety Seat System" or UCSSS.
*** Subject to instructions provided by the child safety seat manufacturer.Warning: Laws that govern how and where children should be carried when traveling in a
vehicle are subject to change. It is the driver’s responsibility to keep up to date on, and
comply with, all current regulations in the region(s) where Model 3 is driven. To check the
child passenger safety laws for states in the U.S., go to: http://www.ghsa.org/html/stateinfo/
laws/childsafety_laws.html.Warning: Do not use LATCH/Isofix/i-Size anchors with child restraint system or booster seats
that have an integral safety belt where the combined weight of the child plus the child restraint system exceeds 65 lbs (29.5 kg).
Child Safety Seats
36Model 3 Owner
Page 40 of 220

For dual-strap tethers, position a strap oneach side of the head support.
For single-strap tethers at the outboard
seating positions, run the strap over the outside-facing side of the head support (sameside of the head support as the seat belt
retraction mechanism).
For a single-strap tether in the center seating
position, fully lower the head support (see Raising/Lowering the Rear Center HeadSupport on page 29) and run the strap over
the top center of the head support.
Testing a Child Safety Seat
Before seating a child, always make sure the
child safety seat is not loose:
1. Hold the child safety seat by the belt path
and try to slide the safety seat from side
to side and front to back.
2. If the seat moves more than one inch
(2.5 cm), it is too loose. Tighten the belt or
reconnect the LATCH retained child safety
seat.
3. If you are unable to reduce slack, try a
different seat location or try another child
safety seat.
Child Safety Seat Warnings
Warning: Extreme hazard! Do not seat a
child on the front passenger seat even if
you are using a child safety seat. This seat
has an airbag in front of it. Although this airbag is disabled when Model 3 detects a
lightweight passenger, do not rely on technology to protect your child.Warning: Child restraint systems are
designed to be secured in vehicle seats
by lap belts or the lap belt portion of a lap-shoulder belt. Children could be
endangered in a crash if their child restraints are not properly secured in the
vehicle.Warning: According to collision statistics,
children are safer when properly
restrained in the rear seating positions
than in the front seating positions.Warning: Do not use a forward facing
child safety seat until your child weighs
over 20 lbs (9 kg) and can sit
Child Safety Seats
Seating and Safety Restraints39
Page 55 of 220

Starting and Powering
Off
Starting When you open a door, Model 3 powers on the
touchscreen and you can operate all controls.
To drive Model 3:
1. PRESS THE BRAKE PEDAL - Model 3
powers on and is ready to drive.
2. SELECT A GEAR - Move the gear lever all
the way down for Drive and all the way up
for Reverse. See Shifting Gears on page
56.
Note: If the PIN to Drive feature is enabled
(see PIN to Drive on page 143), you must also
enter a valid PIN on the touchscreen before
you can drive Model 3.
Note: If Passive Entry is off and you do not
press the brake pedal to start Model 3 within
approximately five minutes, a message
displays on the touchscreen and you must use
the key to lock then unlock Model 3 again before starting the vehicle.
Everything you need to know when driving
Model 3 displays on the touchscreen.
Drive Disabled - Requires Authentication
If Model 3 does not detect a key when you
press the brake (an authenticated phone is not
detected, or 30 seconds has passed since you
used the key card), the touchscreen displays a
message telling you that driving requires
authentication.
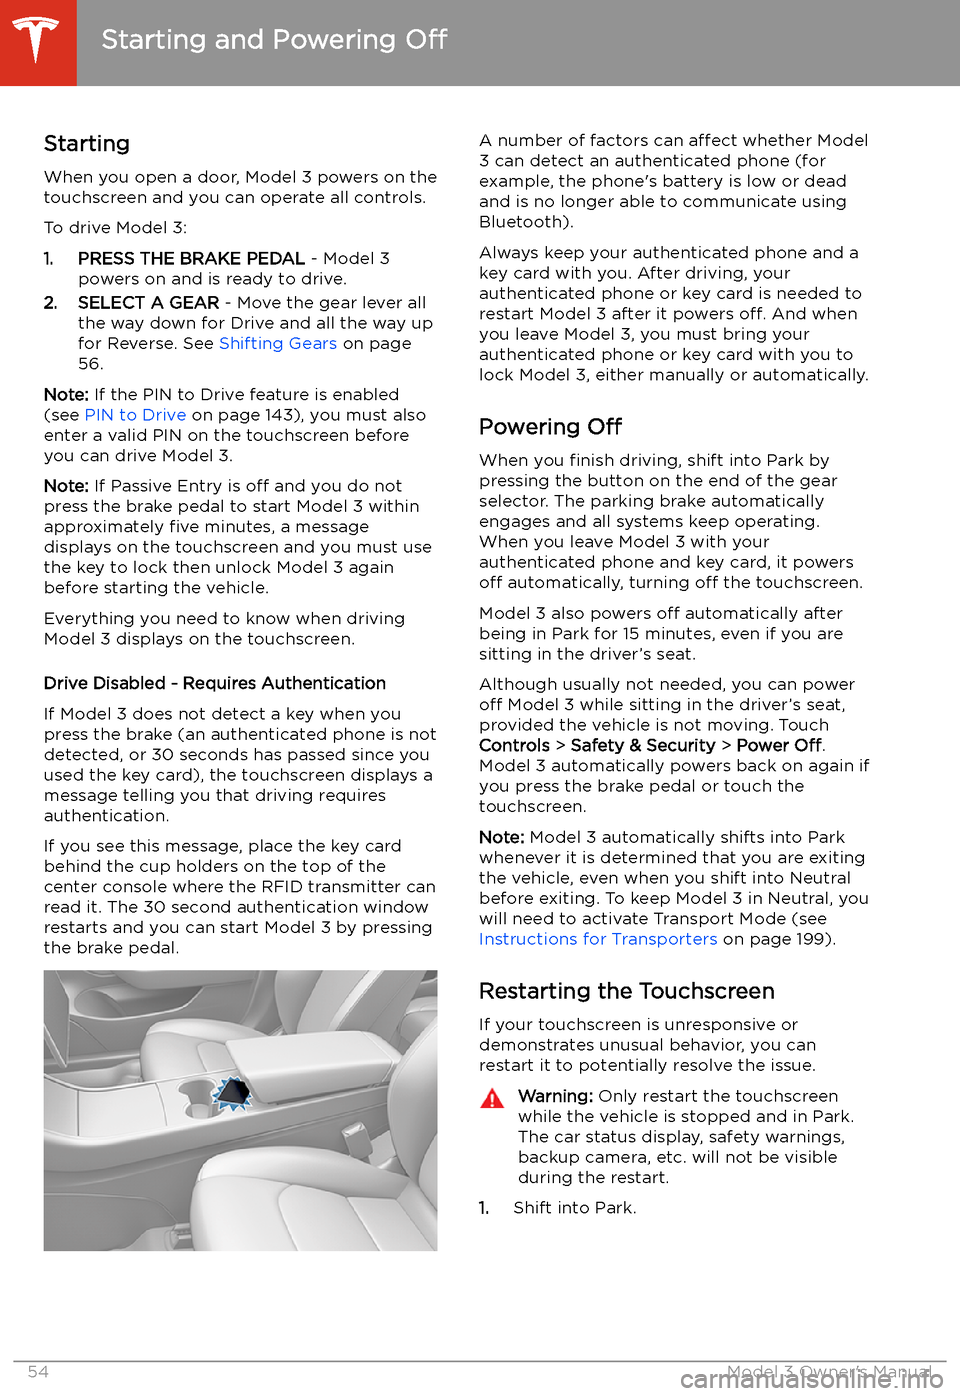
If you see this message, place the key card
behind the cup holders on the top of the center console where the RFID transmitter canread it. The 30 second authentication window
restarts and you can start Model 3 by pressing
the brake pedal.
A number of factors can affect whether Model
3 can detect an authenticated phone (for
example, the phone
Page 56 of 220

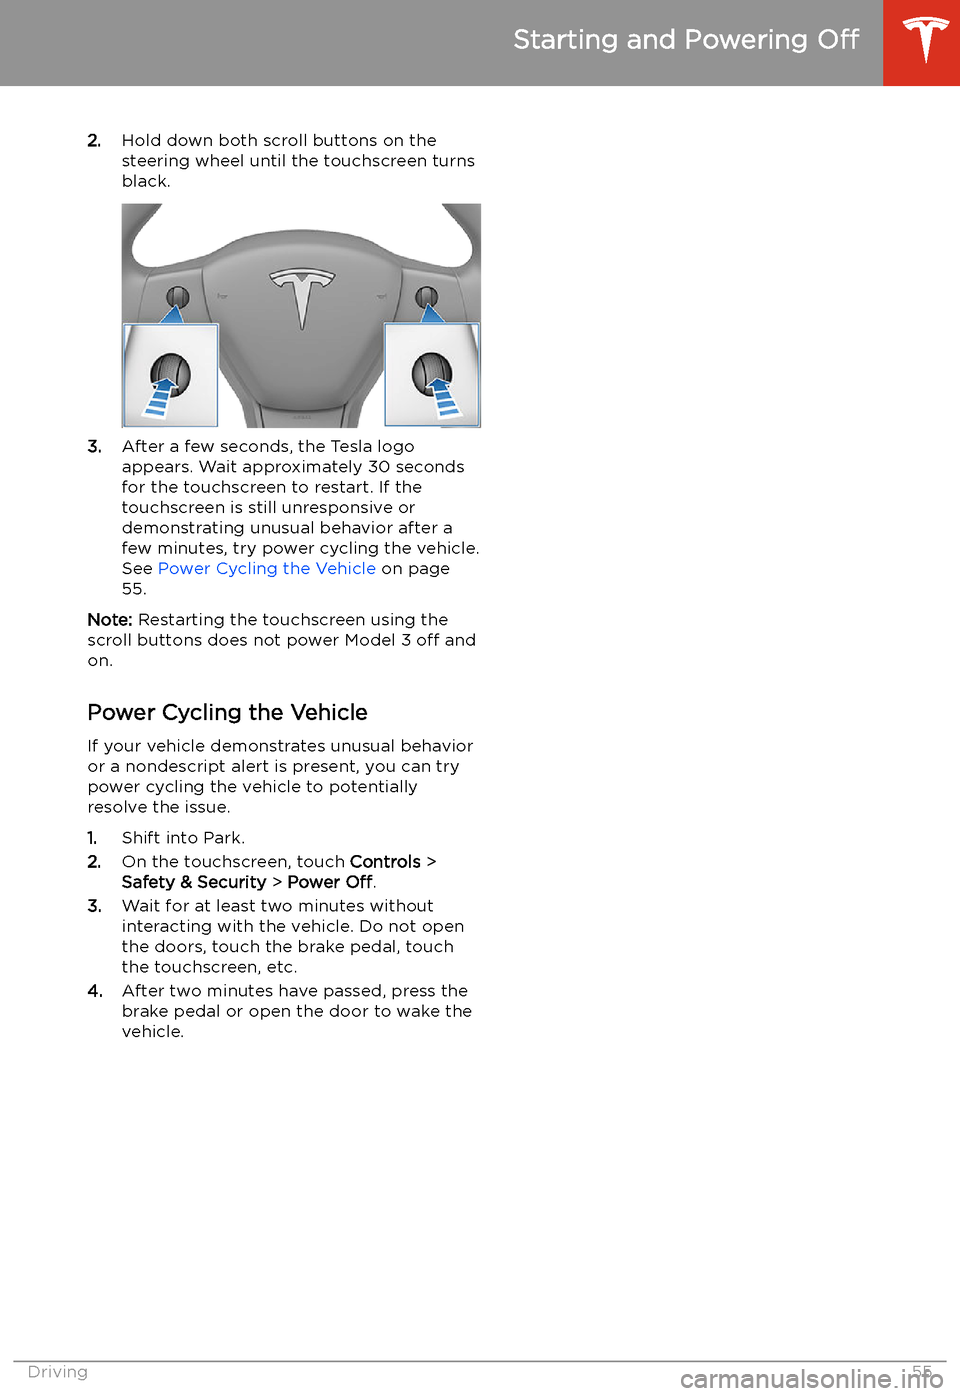
2.Hold down both scroll buttons on the
steering wheel until the touchscreen turns
black.
3. After a few seconds, the Tesla logo
appears. Wait approximately 30 seconds for the touchscreen to restart. If the
touchscreen is still unresponsive or
demonstrating unusual behavior after a
few minutes, try power cycling the vehicle.
See Power Cycling the Vehicle on page
55.
Note: Restarting the touchscreen using the
scroll buttons does not power Model 3 off and
on.
Power Cycling the Vehicle
If your vehicle demonstrates unusual behavior or a nondescript alert is present, you can try
power cycling the vehicle to potentially
resolve the issue.
1. Shift into Park.
2. On the touchscreen, touch Controls >
Safety & Security > Power Off.
3. Wait for at least two minutes without
interacting with the vehicle. Do not open
the doors, touch the brake pedal, touch the touchscreen, etc.
4. After two minutes have passed, press the
brake pedal or open the door to wake the
vehicle.
Starting and Powering Off
Driving55
Page 57 of 220

Gears
Shifting Gears When Model 3 is in Park, you must press the
brake to shift to another gear.
Move the lever up or down to change gears.
If you try to shift into a gear that the current
driving speed prohibits, a chime sounds and
the gear does not change.
Reverse
Push the lever all the way up and release. You
can only shift into Reverse when Model 3 is stopped or moving less than 5 mph (8 km/h).If moving less than 1 mph (1.6 km/h), you must
press the brake.
Neutral
Push the lever up or down to the first position
and hold it there for more than 1 second to shift into Neutral. Neutral allows Model 3 to
roll freely when you are not pressing the brake
pedal.
Model 3 automatically shifts into Park when
you leave the driver
Page 67 of 220

Caution: If the brakes are not functioning
properly, stop the vehicle as soon as safety permits and contact Tesla Service.
See Park on page 56 for information on
using the Park button to stop the vehicle
in case of emergency.Warning: Always maintain a safe driving
distance from the vehicle in front of you
and be cautious in hazardous driving
conditions. Do not rely on brake disc
wiping or hydraulic fade compensation to act as a substitute for adequate braking.
Regenerative Braking
Whenever Model 3 is moving and your foot is
off the accelerator, regenerative braking slows
down Model 3 and feeds any surplus energy back to the Battery.
By anticipating your stops and reducing or
removing pressure from the accelerator pedal
to slow down, you can take advantage of regenerative braking to increase driving range.
Of course, this is no substitute for regular braking when needed for safety.
Note: If regenerative braking is aggressively
slowing Model 3 (such as when your foot is
completely off the accelerator pedal at
highway speeds), the brake lights turn on to
alert others that you are slowing down.
Note: Installing winter tires with aggressive
compound and tread design may result in
temporarily-reduced regenerative braking
power. However, your vehicle is designed to continuously recalibrate itself, and after changing tires it will increasingly restore
regenerative braking power after some
moderate-torque straight-line accelerations.
For most drivers this occurs after a short
period of normal driving, but drivers who
normally accelerate lightly may need to use
slightly harder accelerations while the
recalibration is in progress.
Warning: In snowy or icy conditions
Model 3 may experience traction loss
during regenerative braking, particularly
when in the Standard setting and/or not
using winter tires. Tesla recommends
using the Low setting (see To Set the
Regenerative Braking Level on page 66)
in snowy or icy conditions to help maintain vehicle stability.The amount of energy fed back to the Battery
using regenerative braking can depend on the
current state of the Battery and the charge
level setting that you are using. For example,
regenerative braking may be limited if the Battery is already fully charged or if the
ambient temperature is too cold.
Note: If regenerative braking is limited, a
dashed line displays on the energy bar (see
Driving Status on page 63).
To Set the Regenerative Braking Level
You can use the touchscreen to change the
level of regenerative braking:
1. Touch Controls > Driving > Regenerative
Braking .
2. Choose from two levels:
Page 69 of 220

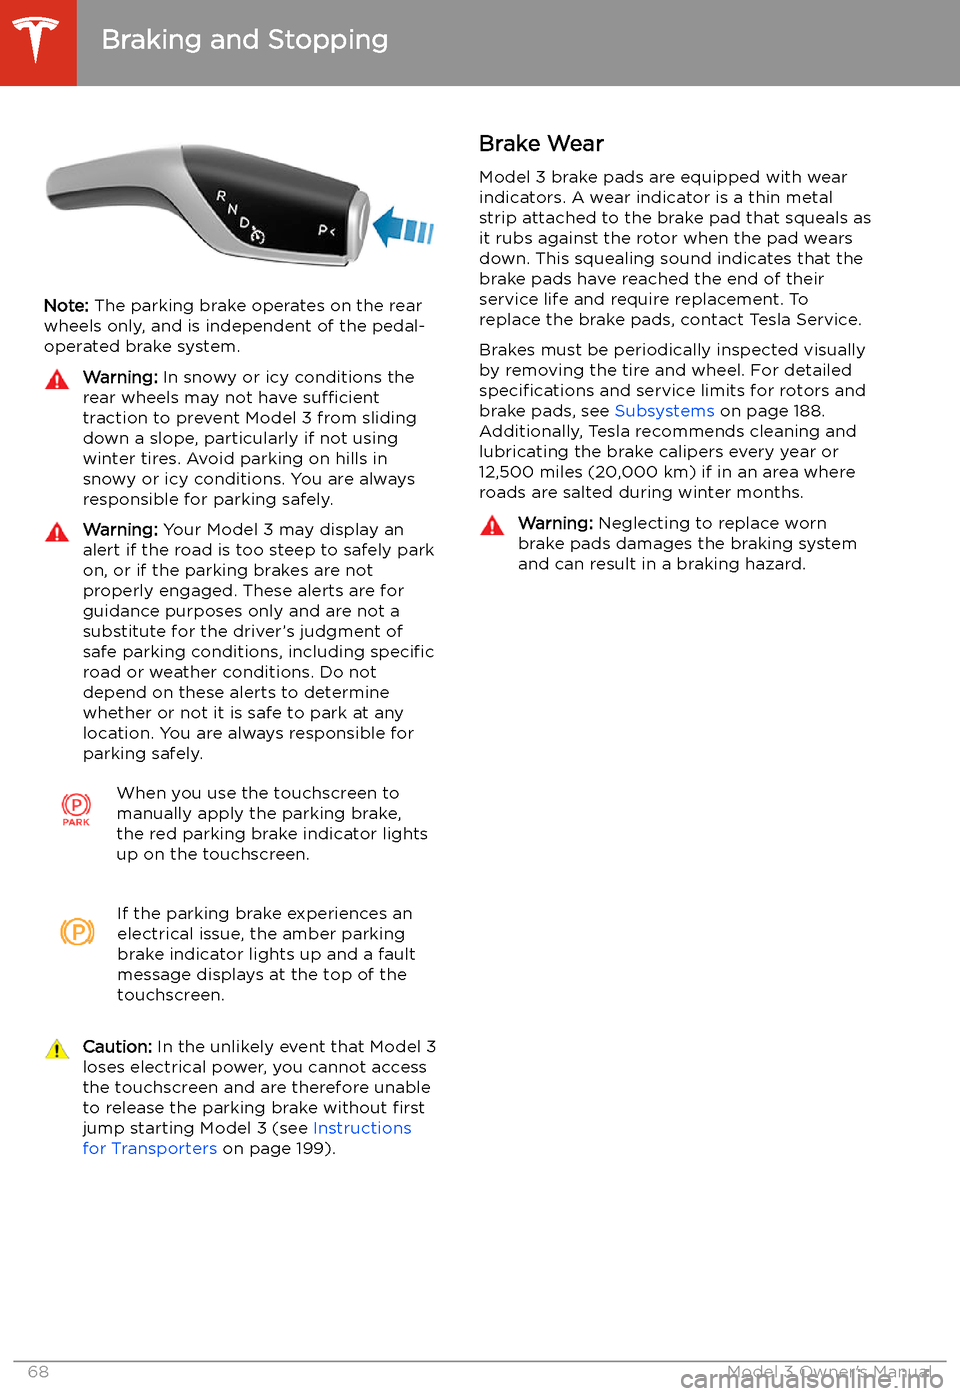
Note: The parking brake operates on the rear
wheels only, and is independent of the pedal-
operated brake system.
Warning: In snowy or icy conditions the
rear wheels may not have sufficient
traction to prevent Model 3 from sliding
down a slope, particularly if not using winter tires. Avoid parking on hills in
snowy or icy conditions. You are always responsible for parking safely.Warning: Your Model 3 may display an
alert if the road is too steep to safely park
on, or if the parking brakes are not
properly engaged. These alerts are for
guidance purposes only and are not a
substitute for the driver’s judgment of safe parking conditions, including specific
road or weather conditions. Do not
depend on these alerts to determine
whether or not it is safe to park at any location. You are always responsible for
parking safely.When you use the touchscreen to
manually apply the parking brake,
the red parking brake indicator lights
up on the touchscreen.If the parking brake experiences an
electrical issue, the amber parking brake indicator lights up and a fault
message displays at the top of the
touchscreen.Caution: In the unlikely event that Model 3
loses electrical power, you cannot access
the touchscreen and are therefore unable to release the parking brake without first
jump starting Model 3 (see Instructions
for Transporters on page 199).Brake Wear
Model 3 brake pads are equipped with wear indicators. A wear indicator is a thin metal
strip attached to the brake pad that squeals as
it rubs against the rotor when the pad wears
down. This squealing sound indicates that the
brake pads have reached the end of their service life and require replacement. To
replace the brake pads, contact Tesla Service.
Brakes must be periodically inspected visually by removing the tire and wheel. For detailed
specifications and service limits for rotors and
brake pads, see Subsystems on page 188.
Additionally, Tesla recommends cleaning and
lubricating the brake calipers every year or
12,500 miles (20,000 km) if in an area where
roads are salted during winter months.Warning: Neglecting to replace worn
brake pads damages the braking system
and can result in a braking hazard.
Braking and Stopping
68Model 3 Owner
Page 82 of 220

Regenerative Braking
Regenerative braking may be limited if the Battery is too cold. As you continue to drive,
the Battery warms up and regenerative power
increases (see Regenerative Braking on page
66).
Note: Limited regenerative braking can be
avoided if you allow enough time to precondition your vehicle or use scheduleddeparture before your drive, as mentioned
previously.
Note: Installing winter tires may result in
temporarily reduced regenerative braking
power but Model 3 will recalibrate itself to correct this after a short period of driving.
Blue Snow