Page 25 of 52
 or �")
Daytime Running Lights
The daytime running lights automatically turn on when the engine has started, the parking
brake is fully released, the light switch is in the Off, “AUTO” (if equipped) or “
”
position, and the select lever is not in the “P” position. Always turn on the headlights when
it’s dark outside by rotating the dial to the “
” or “AUTO” position.
TURN SIGNALS
Push slightly up for right lane change or fully
up for right turn signal. Push slightly down for
left lane change or fully down for left turn
signal.
WINDSHIELD WIPERS
To turn on the wipers, press the wiper control
lever down one position for intermittent, two
positions for low speed, or three positions for
high speed. To turn the wipers off, return the
lever to the “OFF” position. For a single wipe,
move the lever up one position.
When the lever is in the intermittent position,
rotate the dial to adjust the operating interval
of the wipers.
Pull the lever toward you to spray washer fluid.
The washer will spray until you release the lever, then wipe twice.
CONTROLS
23
Page 26 of 52

Press the wiper control lever down one
position. When the wiper control lever is in the
“AUTO” position, the wipers operate
automatically when the rain/")
Rain Sensing Windshield Wipers(if equipped)
Press the wiper control lever down one
position. When the wiper control lever is in the
“AUTO” position, the wipers operate
automatically when the rain/light sensor on the
windshield glass detects moisture on the
windshield. Rotate the dial to adjust the
sensitivity of the rain/light sensor. All other
functions of the wiper system work the same
as above.
NOTE: Make sure to turn off this function
before entering an automatic car wash.
REAR WINDOW WIPER
Rotate the end of the lever up one position for
intermittent, or two positions for continuous
wipe.
When the lever in is the intermittent position,
the wiper operates at intervals corresponding
with vehicle speed. When you move the select
lever to the “R” position, the wiper will switch
to continuous operation. It will return to
intermittent when you move the select lever
out of “R”.
Rotate the dial up from the continuous wipe position or down from the “OFF” position to
spray washer fluid. The washer will spray until you release the dial, then return to the
previous position and resume operation.
CONTROLS
24
Page 27 of 52
INSTRUMENT PANEL SWITCHES (LOWER LEFT)
1Power Rear Gate (if
equipped) (see page 36)
2One-touch Interior Lighting (if
equipped) (see following
section)
3Power Rear Gate Memory (if
equipped) (see page 37)
4Vehicle Dynamics Control
OFF
5Blind Spot Detection/Rear Cross Traffic Alert OFF (if equipped)
6Illumination Brightness (see page 22)
ONE-TOUCH INTERIOR LIGHTING(if equipped)
Press the switch to turn on the map lights and reading lights. Press
it again to turn the lights off. The lights will also turn off if you lock
your Subaru with the access key fob or transmitter, or using the
front door handle or rear gate lock.
CONTROLS
25
Page 28 of 52

Press and hold the button for
about two seconds")
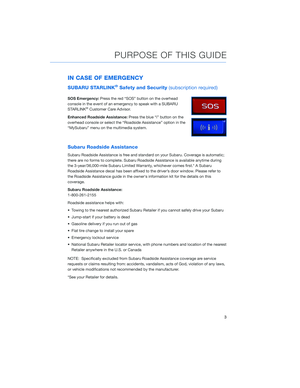
OVERHEAD PANEL
1SOS Emergency
Assistance:Press the
“SOS” button to connect
with a SUBARU STARLINK
®
Customer Care Advisor.
(Subscription required.)
Press and hold the button for
about two seconds to cancel
the call. Refer to the
SUBARU STARLINK
®Safety
and Security Owner’s
Manual or the SUBARU STARLINK
®Quick Guide.
2Enhanced Roadside Assistance:Press the “i” button to connect with a SUBARU
STARLINK
®Roadside Assistance Provider. (Subscription required.) Press and hold
the button for about two seconds to cancel the call. Refer to the SUBARU
STARLINK
®Quick Guide.
3Lane Departure Warning OFF switch:Press and hold this switch for two seconds to
turn off the Lane Departure Warning and the Lane Sway Warning function. Press and
hold the switch again for two seconds to turn the systems back on. Refer to the
EyeSight
®Owner’s Manual or Quick Guide.
4Pre-Collision Braking System OFF switch:Press and hold this switch for two
seconds to turn off the Pre-Collision Braking System and Pre-Collision Throttle
Management. Press and hold the switch again for two seconds to turn the systems
back on. Refer to the EyeSight
®Owner’s Manual or Quick Guide.
5Automatic Illumination:When the switch is in the “DOOR” position, the map lights
illuminate when any door is opened, the doors are unlocked using the remote keyless
entry system or keyless access function, or the ignition is turned from “ON” or “ACC”
to “LOCK”/“OFF”.
6Map Lights:Press a map light to turn it on or off.
CONTROLS
26
Page 29 of 52
GAUGES
1Tachometer
2Combination Meter Display (CMD)
3Speedometer
4Fuel gauge5Trip meter and odometer
6Select lever/gear position indicator
7Engine coolant temperature gauge
WARNING AND INDICATOR LIGHTS
Red lights indicate immediate attention is required. Some examples are:
Seatbelt
warningDoor
openBrake system
Yellow lights indicate caution. Some examples are:
Low fuelEngine oil
level warning
lightTire pressure
warning light
Green and blue lights are for information. Some examples are:
Headlight
indicator
lightAuto Vehicle
Hold ONHigh beam
indicator
light
GAUGES AND WARNING LIGHTS
27
Page 30 of 52
:Provides power to the radio and accessory power outlets.
ON:All ele")
IGNITION SWITCH
The ignition switch has four positions:
LOCK:You can only insert or remove the key in this position.
ACC (Accessory):Provides power to the radio and accessory power outlets.
ON:All electrical systems are available. The key returns to this position after starting the
engine.
START:Turn the key to this position to start the engine.
PUSH-BUTTON IGNITION SWITCH(if equipped)
Each time you press the ignition switch without
depressing the brake pedal, the ignition position will
change as follows: ACC, ON, OFF.
ACC (Accessory):Provides power to the radio and
accessory power outlets. Orange indicator illuminates.
ON:All electrical systems will be available. Orange
indicator illuminates.
OFF:Power off and indicator off.
STARTING THE ENGINE
Without Push-button Ignition
To start the engine:
1. Make sure the select lever is in the “P” position.
2. Using the key, turn the ignition switch to “START”.
NOTE: Do not depress the accelerator pedal. Release the key as soon as the engine
starts.
With Push-button Ignition
To start the engine:
1. Sit in the driver’s seat with the access key fob.
2. Make sure the select lever is in the “P” position.
3. Depress the brake pedal.
4. While depressing the brake pedal, look for the Engine START/ STOP button indicator to
turn Green and then briefly press and release the Engine “START/STOP” button.
OPERATING THE VEHICLE
28
Page 31 of 52
 is
electronically controlled and provides two different
driving modes: normal and manual.
Normal Mode")
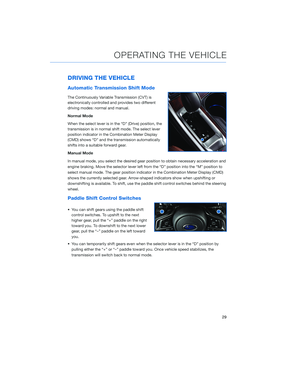
DRIVING THE VEHICLE
Automatic Transmission Shift Mode
The Continuously Variable Transmission (CVT) is
electronically controlled and provides two different
driving modes: normal and manual.
Normal Mode
When the select lever is in the “D” (Drive) position, the
transmission is in normal shift mode. The select lever
position indicator in the Combination Meter Display
(CMD) shows “D” and the transmission automatically
shifts into a suitable forward gear.
Manual Mode
In manual mode, you select the desired gear position to obtain necessary acceleration and
engine braking. Move the selector lever left from the “D” position into the “M” position to
select manual mode. The gear position indicator in the Combination Meter Display (CMD)
shows the currently selected gear. Arrow-shaped indicators show when upshifting or
downshifting is available. To shift, use the paddle shift control switches behind the steering
wheel.
Paddle Shift Control Switches
• You can shift gears using the paddle shift
control switches. To upshift to the next
higher gear, pull the “+” paddle on the right
toward you. To downshift to the next lower
gear, pull the “–” paddle on the left toward
you.
• You can temporarily shift gears even when the selector lever is in the “D” position by
pulling either the “+” or “–” paddle toward you. Once vehicle speed stabilizes, the
transmission will switch back to normal mode.
OPERATING THE VEHICLE
29
Page 32 of 52
 system and Vehicle
Dynamics Control (VDC) systems. It helps to maximize
traction in slippery conditions such as mu")
X-MODE®
X-MODE is the integrated control system of the
engine, All-Wheel Drive (AWD) system and Vehicle
Dynamics Control (VDC) systems. It helps to maximize
traction in slippery conditions such as mud or snow. In
certain situations, such as deep mud or snow, it may
help to turn VDC off to allow for more wheel spin.
X-MODE functions with the select lever in the “D” or
“R” position.
Press the X-MODE button with the vehicle speed less
than 12 mph to activate the system. When active, the
Multi-Function Display (MFD) shows the steering direction, vehicle angle and power
distribution. If the vehicle speed reaches 25 mph while X-MODE is active, the system is
cancelled and you will need to activate it again once you reach a lower speed.
Hill Descent Control (HDC)
This function helps maintain a constant vehicle speed when driving down steep hills or
declines. HDC is automatically engaged with X-MODE and functions with the select lever
in the “D” or “R” position.
OPERATING THE VEHICLE
30


1Power Rear Gate (if
equipped) (see page 36)
2One-touch Interior Lighting (if
equipped) (see following
section)
3Power Rear Gate Memory (if
equipped) (see page 3")

3Speedometer
4Fuel gauge5Trip meter and odometer
6Select lever/gear position indicator
7Engine coolant temperature gauge
WARNING AND INDICATOR LIGHT")