2020 Ram ProMaster City tire pressure
[x] Cancel search: tire pressurePage 232 of 350

IN CASE OF EMERGENCY 229
Insert the power plug into the vehicle power outlet socket.
Start the vehicle engine.
Push the Tire Service Kit power button to the “I” position.
The electric compressor will be turned on, sealant and air
will inflate the tire.
Minimum 26 psi (1.8 bar) of pressure should be reached
within 20 minutes. If the pressure has not been reached, turn
off and remove the Tire Service Kit, drive the vehicle 30 feet
(10 meters) back and forth, to better distribute the sealant
inside the tire.
Attach the clear flexible filling tube of the compressor
directly to the tire valve and repeat the inflation process.
When the correct pressure has been reached, start driving the
vehicle to uniformly distribute the sealant inside the tire.
After 10 minutes, stop and check the tire pressure. If the
pressure is below 19 psi (1.3 bar), do not drive the vehicle, as
the tire is too damaged, contact the nearest authorized
dealer.
• A loose Tire Service Kit thrown forward in a collision
or hard stop could endanger the occupants of the
vehicle. Always stow the Tire Service Kit in the place
provided. Failure to follow these warnings can result in
injuries that are serious or fatal to you, your passengers,
and others around you.
• Take care not to allow the contents of Tire Service Kit to come in contact with hair, eyes, or clothing. Tire
Service Kit sealant is harmful if inhaled, swallowed, or
absorbed through the skin. It causes skin, eye, and
respiratory irritation. Flush immediately with plenty of
water if there is any contact with eyes or skin. Change
clothing as soon as possible, if there is any contact with
clothing.
• Tire Service Kit Sealant solution contains latex. In case of an allergic reaction or rash, consult a physician
immediately. Keep Tire Service Kit out of reach of chil -
dren. If swallowed, rinse mouth immediately with
plenty of water and drink plenty of water. Do not
induce vomiting! Consult a physician immediately.WARNING! (Continued)
6
2020_RAM_PROMASTER_CITY_OM_USA=GUID-7B6A7FCA-79B0-423F-95C5-ED2A949C3D13=1=en=.book Page 229
Page 233 of 350

230 IN CASE OF EMERGENCY
If the pressure is at 19 psi (1.3 bar) or above repeat the infla-
tion process to reach the correct tire pressure and continue
driving.
Peel off the warning label from the bottle and place it on the
dashboard as a reminder to the driver that a tire has been
treated with Tire Service Kit.
NOTE:
Replace the sealant canister prior to the expiration date at an
authorized dealer. Tire Service Kit Sealant Canister
WARNING!
Tire Service Kit is not a permanent flat tire repair. Have
the tire inspected and repaired or replaced after using
Tire Service Kit. Do not exceed 50 mph (80 km/h) until
the tire is repaired or replaced. Failure to follow this
warning can result in injuries that are serious or fatal to
you, your passengers, and others around you. Have the
tire checked as soon as possible at an authorized dealer.
WARNING!
The metal end fitting from Power Plug may get hot after
use, so it should be handled carefully.
WARNING!
Store the sealant canister in its special compartment,
away from sources of heat. Failure to follow this
WARNING may result in sealant canister rupture and
serious injury or death.
2020_RAM_PROMASTER_CITY_OM_USA=GUID-7B6A7FCA-79B0-423F-95C5-ED2A949C3D13=1=en=.book Page 230
Page 244 of 350

241
SERVICING AND MAINTENANCE
SCHEDULED SERVICING
Your vehicle is equipped with an automatic oil change indicator
system. The oil change indicator system will remind you that it is
time to take your vehicle in for scheduled maintenance.
Based on engine operation conditions, the oil change indi-
cator message will illuminate. This means that service is
required for your vehicle. Operating conditions such as
frequent short-trips, trailer tow, extended engine idle time,
extremely hot or cold ambient temperatures will influence
when the “Oil Change Required” message is displayed.
Severe Operating Conditions can cause the change oil
message to illuminate as early as 3,500 miles (5,600 km) since
last reset. Have your vehicle serviced as soon as possible,
within the next 500 miles (805 km).
Your authorized dealer will reset the oil change indicator message
after completing the scheduled oil change. If a scheduled oil change
is performed by someone other than your authorized dealer, the
message can be reset by referring to the steps described under “Oil
Change Reset” in “Instrument Cluster Display” in “Getting To
Know Your Instrument Panel” for further information.
NOTE:
Under no circumstances should oil change intervals exceed
10,000 miles (16,000 km), 350 hours of engine run time or
12 months, whichever comes first. The 350 hours of engine run
or idle time is generally only a concern for fleet customers.
Severe Duty All Models
Change Engine Oil at 4,000 miles (6,500 km) or 350 hours of engine
run time if the vehicle is operated in a dusty and off road environ -
ment or is operated predominantly at idle, or only very low engine
RPM. This type of vehicle use is considered Severe Duty.
Once A Month Or Before A Long Trip:
• Check engine oil level.
• Check windshield washer fluid level.
• Check tire pressure and look for unusual wear or damage. Rotate tires at the first sign of irregular wear, even if it
occurs before the oil indicator system turns on.
• Check the fluid levels of the coolant reservoir and brake master cylinder, fill as needed.
• Check function of all interior and exterior lights.
7
2020_RAM_PROMASTER_CITY_OM_USA=GUID-7B6A7FCA-79B0-423F-95C5-ED2A949C3D13=1=en=.book Page 241
Page 258 of 350

SERVICING AND MAINTENANCE 255
(Continued)
To minimize the possibility of catalytic converter damage:
• Do not interrupt the ignition when the transmission is ingear and the vehicle is in motion.
• Do not try to start the vehicle by pushing or towing the vehicle.
• Do not idle the engine with any ignition components disconnected or removed, such as when diagnostic testing,
or for prolonged periods during very rough idle or
malfunctioning operating conditions.
Cooling System
Engine Coolant Checks
Check the engine coolant (antifreeze) protection every
12 months (before the onset of freezing weather, where
applicable). If the engine coolant (antifreeze) is dirty, the
system should be drained, flushed, and refilled with fresh
OAT coolant (conforming to MS.90032) by an authorized
dealer. Check the front of the A/C condenser for any accu-
mulation of bugs, leaves, etc. If dirty, clean by gently
spraying water from a garden hose vertically down the face
of the condenser.
Check the engine cooling system hoses for brittle rubber,
cracking, tears, cuts, and tightness of the connection at the
coolant recovery bottle and radiator. Inspect the entire
system for leaks. DO NOT REMOVE THE COOLANT PRES -
SURE CAP WHEN THE COOLING SYSTEM IS HOT.
WARNING!
• You or others can be badly burned by hot engine coolant (antifreeze) or steam from your radiator. If you
see or hear steam coming from under the hood, do not
open the hood until the radiator has had time to cool.
Never open a cooling system pressure cap when the
radiator or coolant bottle is hot.
• Keep hands, tools, clothing, and jewelry away from the radiator cooling fan when the hood is raised. The fan
starts automatically and may start at any time, whether
the engine is running or not.
• When working near the radiator cooling fan, discon -
nect the fan motor lead or turn the ignition to the OFF
mode. The fan is temperature controlled and can start at
any time the ignition is in the ON mode.
WARNING! (Continued)
7
2020_RAM_PROMASTER_CITY_OM_USA=GUID-7B6A7FCA-79B0-423F-95C5-ED2A949C3D13=1=en=.book Page 255
Page 269 of 350

266 SERVICING AND MAINTENANCE
RAISING THE VEHICLE
In the case where it is necessary to raise the vehicle, go to an
authorized dealer or service station.
TIRES
Tire Safety Information
Tire safety information will cover aspects of the following
information: Tire Markings, Tire Identification Numbers,
Tire Terminology and Definitions, Tire Pressures, and Tire
Loading.Tire Markings
Tire Markings
1 — US DOT Safety Standards Code (TIN)
2 — Size Designation
3 — Service Description
4 — Maximum Load
5 — Maximum Pressure
6 — Treadwear, Traction and Temperature Grades
2020_RAM_PROMASTER_CITY_OM_USA=GUID-7B6A7FCA-79B0-423F-95C5-ED2A949C3D13=1=en=.book Page 266
Page 270 of 350

SERVICING AND MAINTENANCE 267
NOTE:
• P (Passenger) — Metric tire sizing is based on US designstandards. P-Metric tires have the letter “P” molded into
the sidewall preceding the size designation. Example:
P215/65R15 95H.
• European — Metric tire sizing is based on European design standards. Tires designed to this standard have the
tire size molded into the sidewall beginning with the
section width. The letter "P" is absent from this tire size
designation. Example: 215/65R15 96H.
• LT (Light Truck) — Metric tire sizing is based on US design standards. The size designation for LT-Metric tires is the
same as for P-Metric tires except for the letters “LT” that
are molded into the sidewall preceding the size designa -
tion. Example: LT235/85R16. • Temporary spare tires are designed for temporary emer
-
gency use only. Temporary high pressure compact spare
tires have the letter “T” or “S” molded into the sidewall
preceding the size designation. Example: T145/80D18
103M.
• High flotation tire sizing is based on US design standards and it begins with the tire diameter molded into the side -
wall. Example: 31x10.5 R15 LT.
7
2020_RAM_PROMASTER_CITY_OM_USA=GUID-7B6A7FCA-79B0-423F-95C5-ED2A949C3D13=1=en=.book Page 267
Page 272 of 350
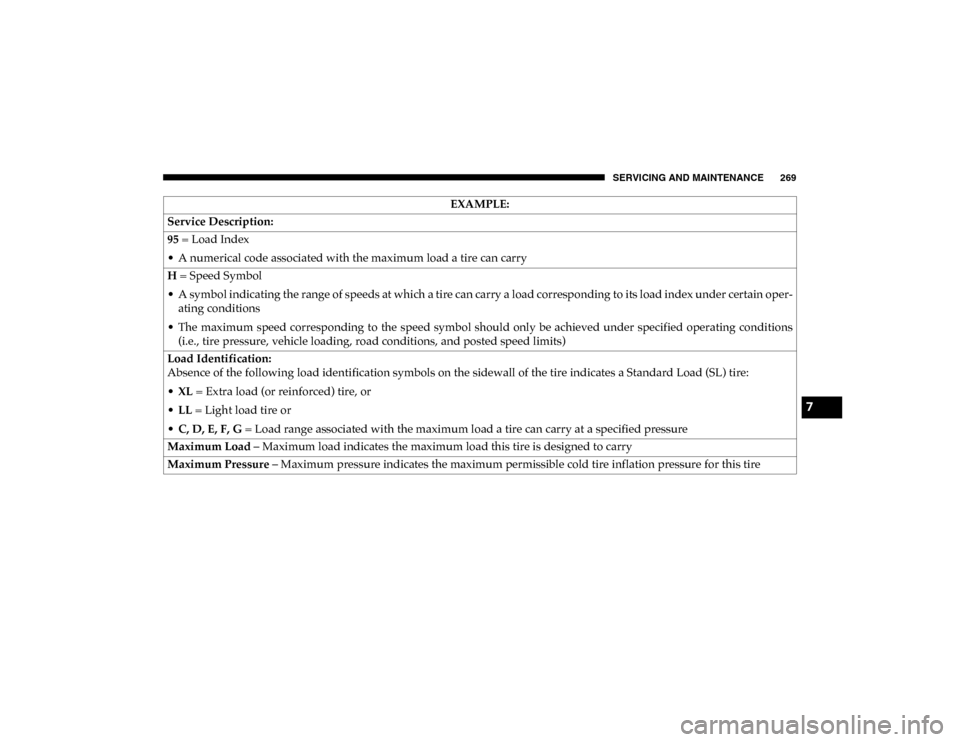
SERVICING AND MAINTENANCE 269
Service Description:
95 = Load Index
• A numerical code associated with the maximum load a tire can carry
H = Speed Symbol
• A symbol indicating the range of speeds at which a tire can carry a load corresponding to its load index under certain oper -
ating conditions
• The maximum speed corresponding to the speed symbol should only be achieved under specified operating conditions (i.e., tire pressure, vehicle loading, road conditions, and posted speed limits)
Load Identification:
Absence of the following load identification symbols on the sidewall of the tire indicates a Standard Load (SL) tire:
• XL = Extra load (or reinforced) tire, or
• LL = Light load tire or
• C, D, E, F, G = Load range associated with the maximum load a tire can carry at a specified pressure
Maximum Load – Maximum load indicates the maximum load this tire is designed to carry
Maximum Pressure – Maximum pressure indicates the maximum permissible cold tire inflation pressure for this tire EXAMPLE:
7
2020_RAM_PROMASTER_CITY_OM_USA=GUID-7B6A7FCA-79B0-423F-95C5-ED2A949C3D13=1=en=.book Page 269
Page 274 of 350

SERVICING AND MAINTENANCE 271
Tire Terminology And DefinitionsTerm Definition
B-Pillar The vehicle B-Pillar is the structural member of the body located behind
the front door.
Cold Tire Inflation Pressure Cold tire inflation pressure is defined as the tire pressure after the vehicle
has not been driven for at least three hours, or driven less than 1 mile
(1.6 km) after sitting for a minimum of three hours. Inflation pressure is
measured in units of PSI (pounds per square inch) or kPa (kilopascals).
Maximum Inflation Pressure The maximum inflation pressure is the maximum permissible cold tire
inflation pressure for this tire. The maximum inflation pressure is
molded into the sidewall.
Recommended Cold Tire Inflation Pressure Vehicle manufacturer's recommended cold tire inflation pressure as
shown on the tire placard.
Tire Placard A label permanently attached to the vehicle describing the vehicle’s
loading capacity, the original equipment tire sizes and the recommended
cold tire inflation pressures.
7
2020_RAM_PROMASTER_CITY_OM_USA=GUID-7B6A7FCA-79B0-423F-95C5-ED2A949C3D13=1=en=.book Page 271