2020 PEUGEOT PARTNER TEPEE tow
[x] Cancel search: towPage 5 of 216

3
.
.
Driving recommendations 103
Starting and stopping 1 04
Electronic engine immobiliser
1
05
Parking brake
1
05
Manual gearbox
1
05
6-speed electronic gearbox
1
06
Gear shift indicator
1
08
Stop & Start
1
08
Hill start assist
1
11
Tyre under-inflation detection
1
12
Tyre under-inflation detection with
reinitialisation
113
Speed limiter
1
15
Cruise control
1
17
Active City Brake
1
20
Parking sensors
1
22
Reversing camera
1
24Fuel 1
26
Fuel system cut-off 1 27
Compatibility of fuels
1
28
Snow chains
1
29
Removable snow shield
1
30
Changing a wiper blade
1
30
Towing device
1
31
Towbar with a swan neck towball
1
31
Roof bars
1
33
Zenith roof bars
1
33
Maximum weights on bars
1
34
Other accessories
1
34
Bonnet
13 5
Engines
1
36
Checking levels
1
36
Chec ks
13 8
AdBlue
® (BlueHDi engines) 1 40
Temporary puncture repair kit
1
43
Changing a wheel
1
43
Fitting the wheel trim on the rim
1
47
Changing a bulb
1
49
Changing a fuse
1
54
Battery
158
Economy mode
1
59
Towing your vehicle
1
59
Running out of fuel (Diesel)
1
60
Characteristics of engines and towed loads 1 61Petrol engines/weights 162
Diesel engines/weights 1 63
Dimensions
165
Identification markings
1
74
DrivingPractical information
In the event of a breakdown Technical data
Alphabetical index
Audio and Telematics
7-inch touch screen
Peugeot Connect Sound (RD5)
.
Contents
Page 7 of 216

5
As a passenger, if you avoid connecting your
multimedia devices (film, music, video game,
etc.), you will contribute towards limiting
the consumption of electrical energy and
therefore of fuel.
Disconnect your portable devices before
leaving the vehicle.
Eco- driving
Eco-driving is a range of everyday practices that allow the motorist to optimise their fuel consumption and CO2 emissions.
Optimise the use of your
gearbox
With a manual gearbox, move off gently and
change up without waiting. While accelerating,
change up early.
With an automatic gearbox, give preference
to automatic mode and avoid pressing the
accelerator pedal heavily or suddenly.
The gear shift indicator invites you to engage
the most suitable gear: as soon as the
indication is displayed in the instrument panel,
follow it straight away.
For vehicles fitted with an automatic gearbox,
this indicator appears only in manual mode.
Drive smoothly
Maintain a safe distance between vehicles,
use engine braking rather than the brake
pedal and press the accelerator gradually.
These practices contribute towards a
reduction in fuel consumption and CO
2
emissions and also help to reduce the
background traffic noise.
If your vehicle has cruise control, make use of
the system at speeds above 25
mph (40 km/h)
when the traffic is flowing well.
Control the use of your electrical
equipment
Before moving off, if the passenger
compartment is too warm, ventilate it by opening
the windows and air vents before using the air
conditioning.
Above 31
mph (50 km/h), close the windows and
open the air vents.
Consider using equipment that can help keep
the temperature in the passenger compartment
down (sunroof blind and window blinds, etc.).
Switch off the headlamps and foglamps when
there is sufficient visibility without them.
Avoid running the engine before moving off,
particularly in winter; your vehicle will warm up
much faster while driving.
Unless it has automatic regulation, switch off
the air conditioning as soon as the desired
temperature has been reached.
Switch off the demisting and defrosting controls,
if these are not automatically managed.
Switch off the heated seat as soon as possible.
.
.
Eco-drivingsommaire
Page 18 of 216

16
Warning/indicator lampStateIndicates Action/Observations
Dipped beam
headlamps/daytime
running lamps Fixed.
A manual selection or automatic
illumination. Rotate the lighting control stalk ring to the second
position.
Activation of the dipped beam
headlamps on switching on the
ignition: daytime running lamps
(depending on country of sale).
Blue warning/indicator lamps
Main beam
headlamps Fixed.
The lighting control stalk has
been pulled towards you. Pull the stalk to return to dipped beam headlamps.
Warning/indicator lamp in
the display screen State
Indicates Action/Observations
Cruise control Fixed. Cruise control is selected. Manual selection.
For more information on the Cruise control , refer to
the corresponding section.
Speed limiter Fixed. The limiter is selected. Manual selection.
For more information on the Speed limiter , refer to
the corresponding section.
Gear shift
indicator Fixed.
A recommendation which does
not take into account the road
configuration and the traffic
density. To reduce fuel consumption with a manual gearbox,
engage the appropriate gear. The driver remains
responsible for deciding whether or not to follow this
advice.
Instruments
Page 25 of 216

23
Each press of the button on the end of the
wiper control stalk allows you to scroll through
the various trip computer information displays,
depending on the screen.
The "vehicle" tab with the range, current fuel
consumption and remaining distance to travel.
The "1" tab (trip 1) with the average speed,
average fuel consumption and distance
travelled in trip 1 .
The "2" tab (trip 2) with the same information
for a 2
nd trip.
Zero reset
F When the desired trip is displayed, press the control for more than two seconds.
A few definitions
Range: displays the distance that can still be
travelled with the fuel detected in the tank on
the basis of the average consumption over the
last few miles (kilometres) travelled. If dashes instead of figures continue to
be displayed when driving, contact a
PEUGEOT dealer.
This displayed value can vary greatly
following a change in the vehicle's driving
conditions or the terrain. When the range falls below 19
miles (30 km),
dashes are displayed. After filling with at least
10 litres of fuel, the range is recalculated and is
displayed if it exceeds 62 miles (100 km).
Current fuel consumption: calculated
and displayed only when exceeding 19 mph
(30
km/h).
Average consumption: this is the average
fuel consumption since the last trip computer
zero reset.
Distance travelled: calculated from the last
trip computer zero reset.
Remaining distance: calculated according
to the final destination entered by the user. If
navigation is activated, the navigation system
calculates it instantaneously.
Average speed: this is the average speed
calculated since the last trip computer zero
reset (with the ignition on).
Date and time setting
Centre console without
screen
To adjust the time on the clock, use the left-
hand button on the instrument panel.
F
T
urn to the left: the minutes flash.
F
T
urn to the right to increase the minutes
(hold the button towards the right to scroll
through faster).
F
T
urn to the left: the hours flash.
F
T
urn to the right to increase the hours (hold
the button towards the right to scroll through
faster).
F
T
urn to the left: 24H or 12H is displayed.
F
T
urn to the right to select 24H or 12H.
F
T
urn to the left to finish setting the time.
The usual screen displays again when the
button has not been pressed for approximately
30
seconds.
1
Instruments
Page 30 of 216

28
Front doors
From outside
From inside
Sliding side door(s)From outside
F Pull the handle towards you, then backwards and open the side door, guiding
it as it slides backwards until it passes the
point of resistance and it stays open.
A mechanical system prevents the
left side door being opened when
the fuel filler flap is open.
From inside
F Unlock and open the side door using this handle, guiding it to the rear until it reaches
the point of resistance. Pass this point to
keep the door open.
Close the side door again using
the handle to start sliding and
pass the point of resistance. Then
use the shaped recess at the top
of the door pillar to guide the door
until it locks.
Do not use the grab handle to
slide the door.
F
U
se the remote control to lock /unlock the
vehicle.
F
I
f the remote control does not work, insert
the metal part of the key into the driver's
door lock.
F
U
se the door opening control to unlock and
open the respective door.
Access
Page 33 of 216

31
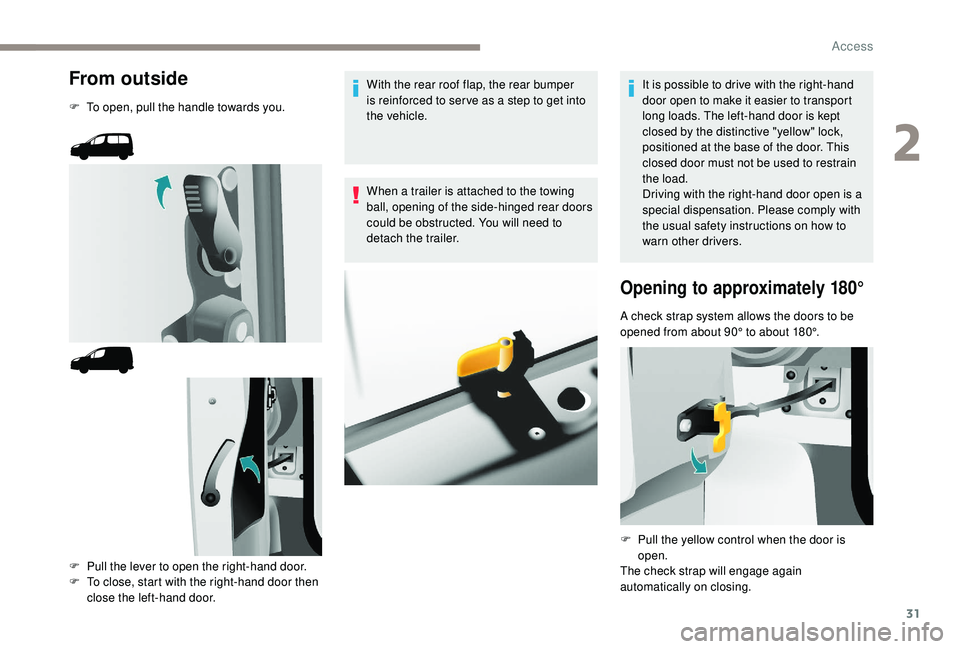
From outside
F To open, pull the handle towards you.F
P
ull the lever to open the right-hand door.
F
T
o close, start with the right-hand door then
close the left-hand door. With the rear roof flap, the rear bumper
is reinforced to ser ve as a step to get into
the vehicle.
When a trailer is attached to the towing
ball, opening of the side-hinged rear doors
could be obstructed. You will need to
detach the trailer.
It is possible to drive with the right-hand
door open to make it easier to transport
long loads. The left-hand door is kept
closed by the distinctive "yellow" lock,
positioned at the base of the door. This
closed door must not be used to restrain
the load.
Driving with the right-hand door open is a
special dispensation. Please comply with
the usual safety instructions on how to
warn other drivers.
Opening to approximately 180°
A check strap system allows the doors to be
opened from about 90° to about 180°.
F
P
ull the yellow control when the door is
open.
The check strap will engage again
automatically on closing.
2
Access
Page 34 of 216

32
When parked with the rear
doors open to 90°, the doors
conceal the rear lamps. To
signal your position to other
road users driving in the
same direction who may
not have seen your vehicle,
use a warning triangle or
other device required by the
legislation in your country.
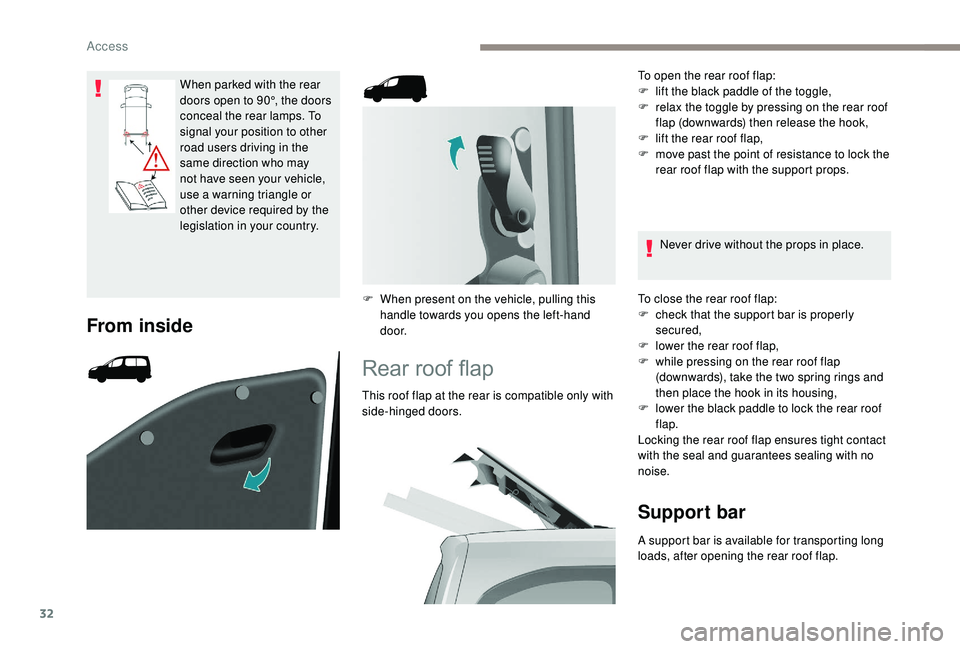
From inside
F When present on the vehicle, pulling this handle towards you opens the left-hand
d o o r.
Rear roof flap
This roof flap at the rear is compatible only with
side-hinged doors. To open the rear roof flap:
F
l
ift the black paddle of the toggle,
F
r
elax the toggle by pressing on the rear roof
flap (downwards) then release the hook,
F
l
ift the rear roof flap,
F
m
ove past the point of resistance to lock the
rear roof flap with the support props.
Never drive without the props in place.
To close the rear roof flap:
F
c
heck that the support bar is properly
secured,
F
l
ower the rear roof flap,
F
w
hile pressing on the rear roof flap
(downwards), take the two spring rings and
then place the hook in its housing,
F l ower the black paddle to lock the rear roof
flap.
Locking the rear roof flap ensures tight contact
with the seal and guarantees sealing with no
noise.
Support bar
A support bar is available for transporting long
loads, after opening the rear roof flap.
Access
Page 51 of 216

49
Ensure that the centre seat belt is stowed
correctly in its housing in the headlining.
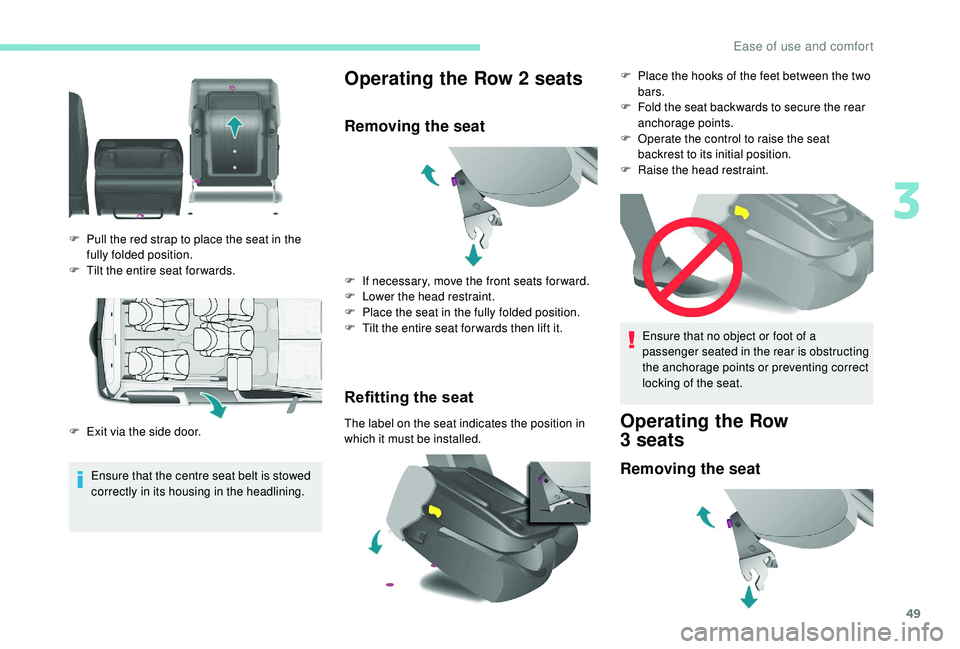
Operating the Row 2 seats
Removing the seat
Refitting the seat
The label on the seat indicates the position in
which it must be installed.
F
P
ull the red strap to place the seat in the
fully folded position.
F
T
ilt the entire seat for wards.
F
E
xit via the side door. F
I
f necessary, move the front seats for ward.
F
L
ower the head restraint.
F
P
lace the seat in the fully folded position.
F
T
ilt the entire seat for wards then lift it.
Ensure that no object or foot of a
passenger seated in the rear is obstructing
the anchorage points or preventing correct
locking of the seat.Operating the Row
3 seats
Removing the seat
F Place the hooks of the feet between the two
bars.
F
F
old the seat backwards to secure the rear
anchorage points.
F
O
perate the control to raise the seat
backrest to its initial position.
F
Ra
ise the head restraint.
3
Ease of use and comfort