2020 PEUGEOT PARTNER TEPEE belt
[x] Cancel search: beltPage 4 of 216

2
.
.
Instrument panel 7
W arning and indicator lamps 8
I
ndic ators
18
Lighting dimmer
2
2
Trip computer
2
2
Date and time setting
2
3
Instruments and controls
4
K
ey
25
Remote control
2
5
Front doors
2
8
Sliding side door(s)
2
8
Operation in the event of a battery failure
2
9
Tailgate
29
Side-hinged rear doors
3
0
Rear roof flap
3
2
Central locking
3
3
Alarm
34
Rear windows
3
5
Electric windows
3
5Steering wheel adjustment
3
7
Mirrors
37
Surveillance mirror
3
8
Front seats
3
8
Individual passenger seat
4
0
Multi-Flex bench seat
4
0
Rear bench seat
4
2
Rear seats (5 seats) 4 3
Rear seats (7 seats) 4 6
Crew cab
5
0
Seat modularity and configurations
5
2
Front fittings
5
4
Seating area fittings
5
5
Zenith
56
Fragrance diffuser
5
7
Courtesy lamps
5
9
Rear fittings (5 seats)
6
0
Rear fittings (7 seats)
6
1
Load space layout
6
4
Heating/Manual air conditioning
6
6
Dual-zone automatic air conditioning
6
7
Recommendations for ventilation
and air conditioning
6
9
Demisting and defrosting
7
0Lighting control stalk
7
1
Automatic illumination of headlamps
7
2
LED daytime running lamps
7
2
Guide-me-home lighting
7
2
Cornering lighting
7
3
Direction indicators
7
3
Headlamp beam
7
3
Wiper control stalk 7 3
General safety recommendations
7
6
Hazard warning lamps
7
7
Horn
77
Emergency or assistance call
7
7
Anti-lock braking system (ABS/EBFD)
7
9
Emergency braking assistance (EBA)
7
9
Anti-slip regulation (ASR) and electronic
stability control (ESC)
7
9
Grip control
8
0
Seat belts
8
2
Airbags
85
Child seats
8
9
Deactivating the passenger's front airbag
9
0
Reactivating the passenger's front airbag
9
1
Recommended child seats
9
4
Locations for child seats secured using
a seat belt
9
5
ISOFIX mountings and child seats
9
8
Instructions for child seats
1
01
Child lock
1
02
Over view
Instruments
Access Ease of use and comfort
Safety
Lighting and visibility
Eco-driving
Contents
Page 12 of 216

10
Warning/indicator lampStateCause Action/Observations
Seat belt not
fastened Fixed, then flashing.
The driver and/or front passenger
has not fastened their seat belt. Pull the strap then insert the tongue in the buckle.
Accompanied by an
audible signal, then
fixed. The vehicle is moving with the
driver's and/or front passenger’s
seat belt unfastened. Check that the seat belt is fastened correctly by pulling
the strap.
Power steering Fixed. The power steering has a fault. The vehicle retains conventional steering without
assistance.
Have it checked by a PEUGEOT dealer or a qualified
workshop.
Opening detection Fixed, accompanied
by a message in the
screen. One of the vehicle access
openings is not properly closed.
Check that all the vehicle access openings are
properly closed.
Parking brake Fixed. The parking brake is applied or
not properly released. Release the parking brake to switch off the warning
lamp, keeping your foot on the brake pedal.
Brake fluid level Fixed. The fluid level is too low. Top up with a fluid approved by PEUGEOT.
+ Electronic brake
force distribution
Fixed, even though
the level is correct,
associated with the
ABS
warning lamp. There is a fault with the system.
You must stop as soon as it is safe to do so.
Park and switch off the ignition.
Contact a PEUGEOT dealer or a qualified
workshop.
Instruments
Page 42 of 216
40
Individual passenger seat Multi-Flex bench seat
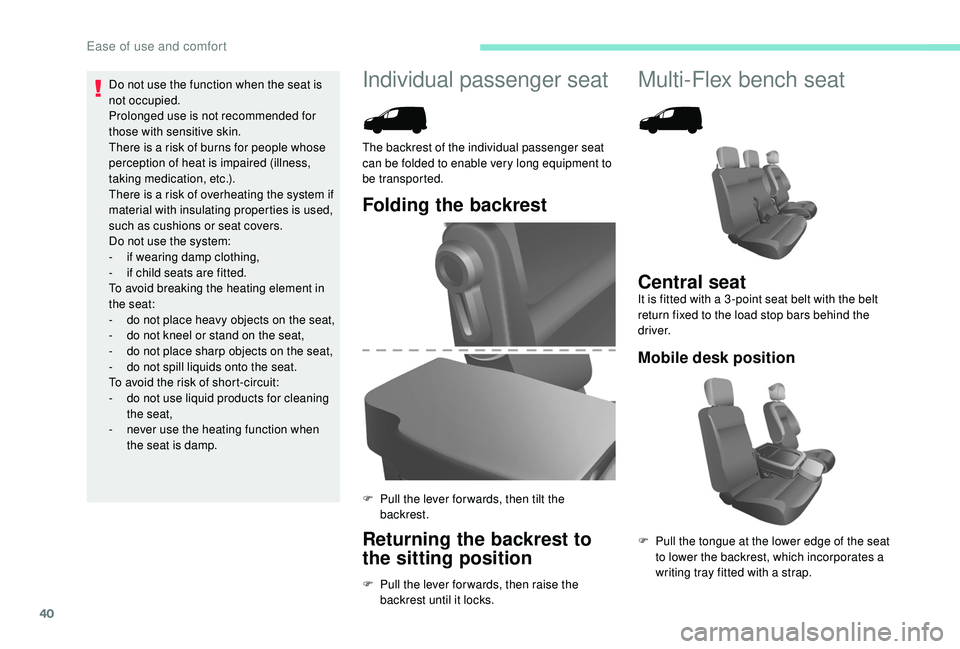
Folding the backrest
Returning the backrest to
the sitting position
F Pull the lever for wards, then raise the backrest until it locks.
The backrest of the individual passenger seat
can be folded to enable very long equipment to
be transported.
F
P
ull the lever for wards, then tilt the
backrest.
Central seatIt is fitted with a 3 -point seat belt with the belt
return fixed to the load stop bars behind the
driver.
Mobile desk position
F Pull the tongue at the lower edge of the seat to lower the backrest, which incorporates a
writing tray fitted with a strap.
Do not use the function when the seat is
not occupied.
Prolonged use is not recommended for
those with sensitive skin.
There is a risk of burns for people whose
perception of heat is impaired (illness,
taking medication, etc.).
There is a risk of overheating the system if
material with insulating properties is used,
such as cushions or seat covers.
Do not use the system:
-
i
f wearing damp clothing,
-
i
f child seats are fitted.
To avoid breaking the heating element in
the seat:
-
d
o not place heavy objects on the seat,
-
d
o not kneel or stand on the seat,
-
d
o not place sharp objects on the seat,
-
d
o not spill liquids onto the seat.
To avoid the risk of short-circuit:
-
d
o not use liquid products for cleaning
the seat,
-
n
ever use the heating function when
the seat is damp.
Ease of use and comfort
Page 43 of 216
41
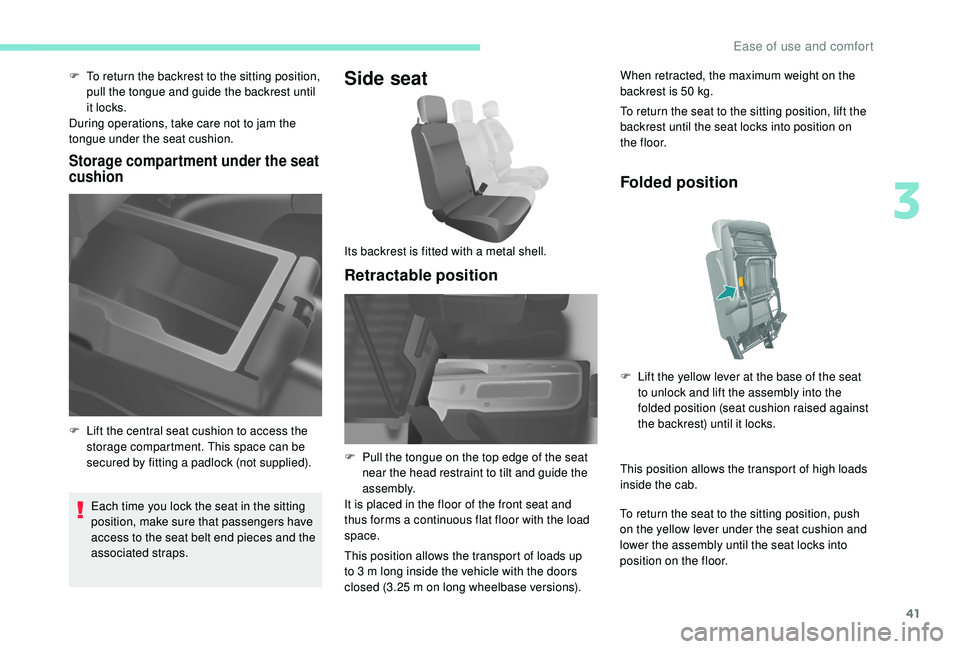
F To return the backrest to the sitting position, pull the tongue and guide the backrest until
it locks.
During operations, take care not to jam the
tongue under the seat cushion.
Storage compartment under the seat
cushion
Each time you lock the seat in the sitting
position, make sure that passengers have
access to the seat belt end pieces and the
associated straps.
Side seat
Retractable position
When retracted, the maximum weight on the
backrest is 50 kg.
To return the seat to the sitting position, lift the
backrest until the seat locks into position on
t h e f l o o r.
F
L
ift the central seat cushion to access the
storage compartment. This space can be
secured by fitting a padlock (not supplied). Its backrest is fitted with a metal shell.
F
P
ull the tongue on the top edge of the seat
near the head restraint to tilt and guide the
assembly.
It is placed in the floor of the front seat and
thus forms a continuous flat floor with the load
space.
This position allows the transport of loads up
to 3
m long inside the vehicle with the doors
closed (3.25
m on long wheelbase versions).
Folded position
This position allows the transport of high loads
inside the cab.
To return the seat to the sitting position, push
on the yellow lever under the seat cushion and
lower the assembly until the seat locks into
position on the floor. F
L
ift the yellow lever at the base of the seat
to unlock and lift the assembly into the
folded position (seat cushion raised against
the backrest) until it locks.
3
Ease of use and comfort
Page 47 of 216
45
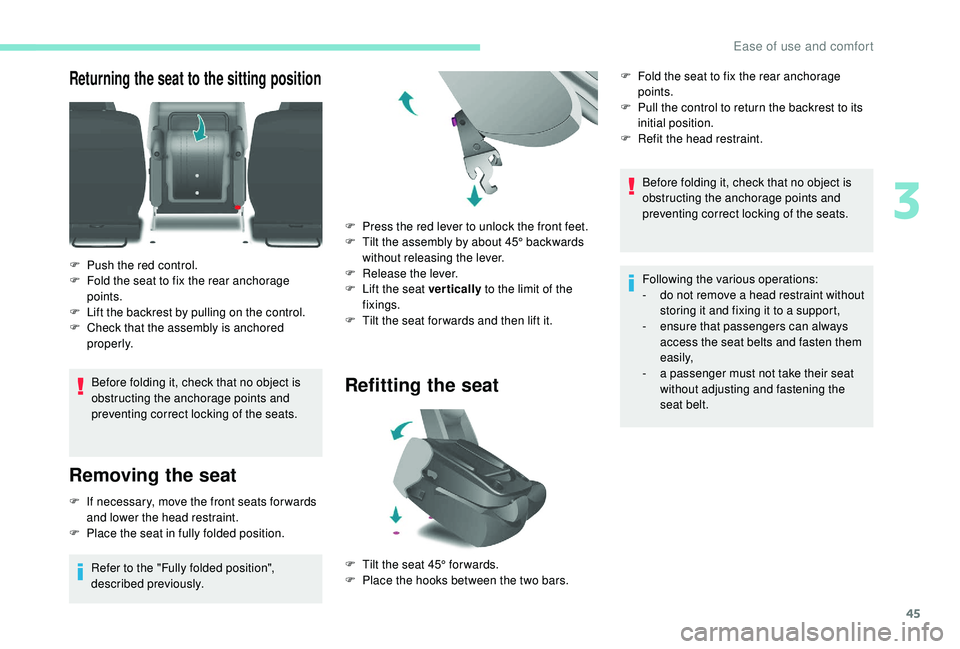
Returning the seat to the sitting position
Before folding it, check that no object is
obstructing the anchorage points and
preventing correct locking of the seats.
Removing the seat
F If necessary, move the front seats for wards and lower the head restraint.
F
P
lace the seat in fully folded position.
Refer to the "Fully folded position",
described previously. F
P
ress the red lever to unlock the front feet.
F
T
ilt the assembly by about 45° backwards
without releasing the lever.
F
R
elease the lever.
F
L
ift the seat vertically
to the limit of the
fixings.
F
T
ilt the seat for wards and then lift it.
Refitting the seat
F Push the red control.
F
F old the seat to fix the rear anchorage
points.
F
L
ift the backrest by pulling on the control.
F
C
heck that the assembly is anchored
properly.
F
T
ilt the seat 45° for wards.
F
P
lace the hooks between the two bars.Before folding it, check that no object is
obstructing the anchorage points and
preventing correct locking of the seats.
Following the various operations:
-
d
o not remove a head restraint without
storing it and fixing it to a support,
-
e
nsure that passengers can always
access the seat belts and fasten them
easily,
-
a p
assenger must not take their seat
without adjusting and fastening the
seat belt.
F
F
old the seat to fix the rear anchorage
points.
F
P
ull the control to return the backrest to its
initial position.
F
R
efit the head restraint.
3
Ease of use and comfort
Page 49 of 216
47
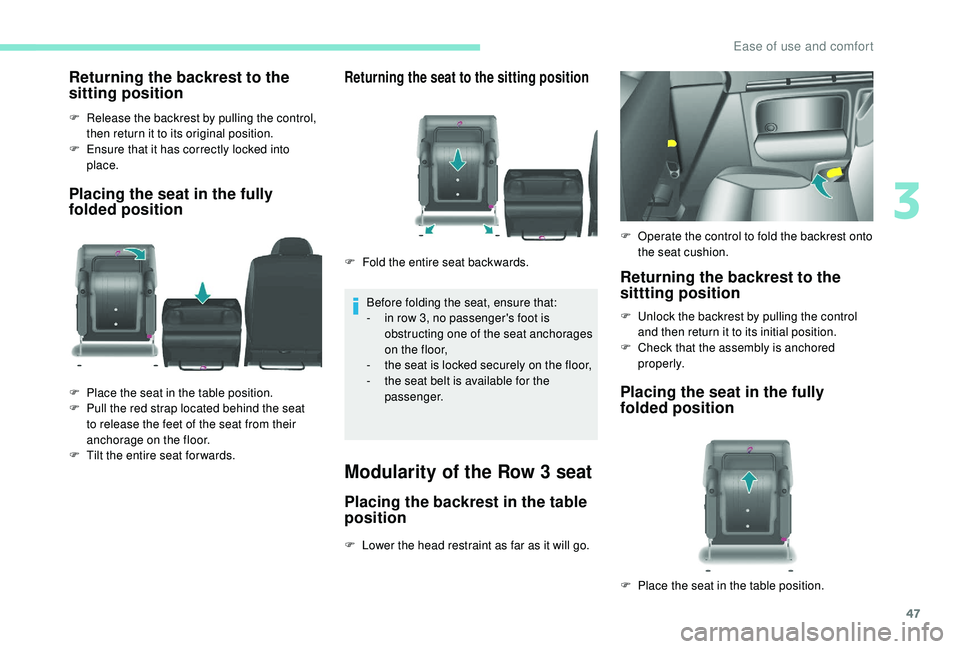
Returning the backrest to the
sitting position
F Release the backrest by pulling the control, then return it to its original position.
F
E
nsure that it has correctly locked into
place.
Placing the seat in the fully
folded position
Returning the seat to the sitting position
Before folding the seat, ensure that:
- i n row 3, no passenger's foot is
obstructing one of the seat anchorages
on the floor,
-
t
he seat is locked securely on the floor,
-
t
he seat belt is available for the
passenger.
Modularity of the Row 3 seat
Placing the backrest in the table
position
F Lower the head restraint as far as it will go.
F
P
lace the seat in the table position.
F
P
ull the red strap located behind the seat
to release the feet of the seat from their
anchorage on the floor.
F
T
ilt the entire seat for wards. F
F
old the entire seat backwards.
Returning the backrest to the
sittting position
F Unlock the backrest by pulling the control
and then return it to its initial position.
F
C
heck that the assembly is anchored
properly.
Placing the seat in the fully
folded position
F Operate the control to fold the backrest onto the seat cushion.
F
P
lace the seat in the table position.
3
Ease of use and comfort
Page 50 of 216
48
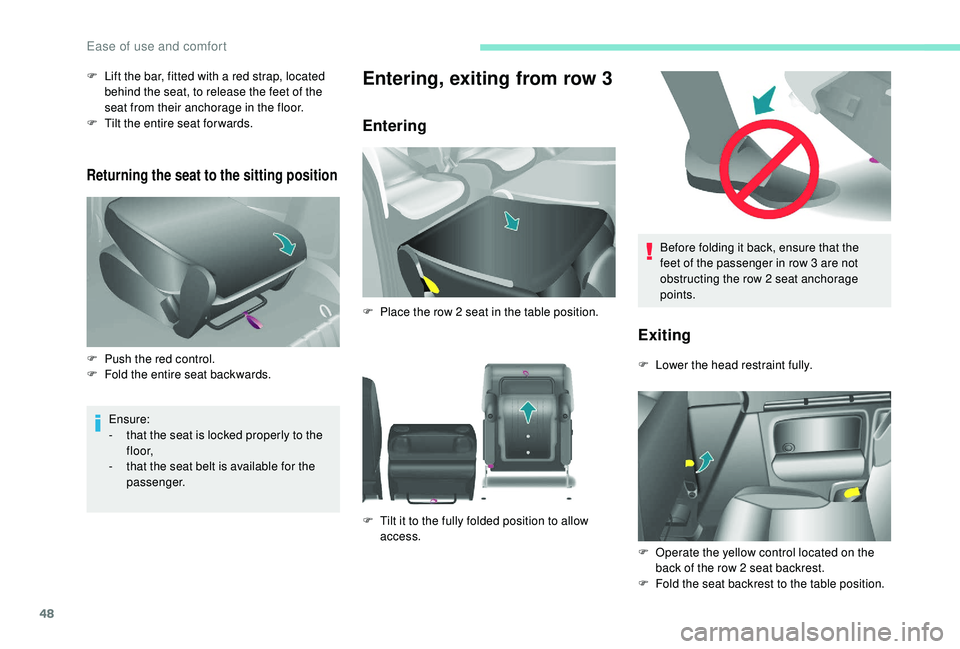
Before folding it back, ensure that the
feet of the passenger in row 3 are not
obstructing the row 2 seat anchorage
points.
Exiting
F Lower the head restraint fully.
F
O
perate the yellow control located on the
back of the row 2 seat backrest.
F
F
old the seat backrest to the table position.
Returning the seat to the sitting position
Ensure:
- t hat the seat is locked properly to the
f l o o r,
-
t
hat the seat belt is available for the
passenger.
Entering, exiting from row 3
Entering
F Lift the bar, fitted with a red strap, located behind the seat, to release the feet of the
seat from their anchorage in the floor.
F
T
ilt the entire seat for wards.
F
P
ush the red control.
F
F
old the entire seat backwards. F
P
lace the row 2 seat in the table position.
F
T
ilt it to the fully folded position to allow
access.
Ease of use and comfort
Page 51 of 216
49
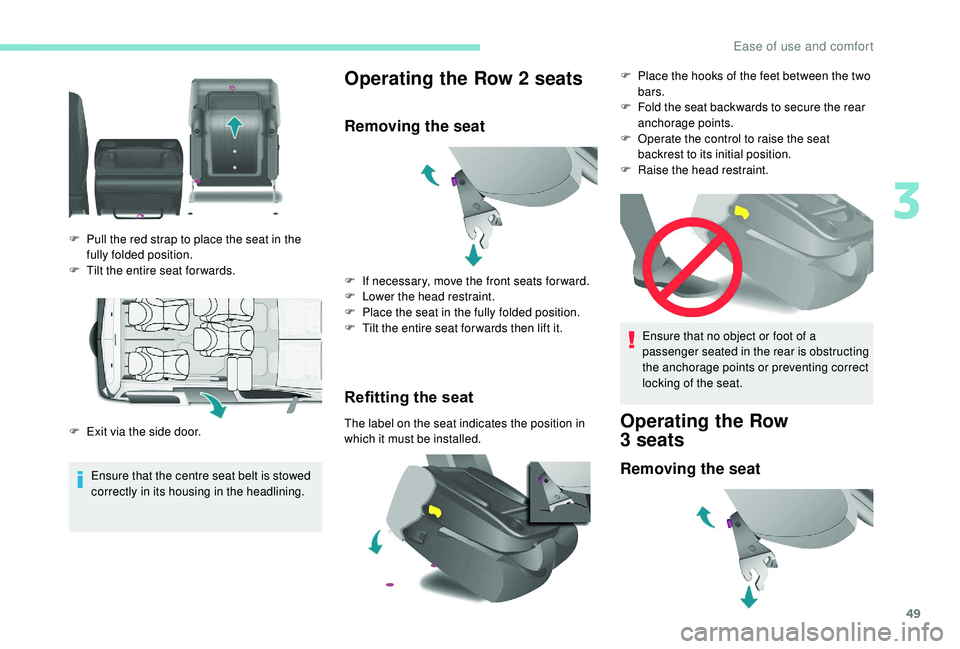
Ensure that the centre seat belt is stowed
correctly in its housing in the headlining.
Operating the Row 2 seats
Removing the seat
Refitting the seat
The label on the seat indicates the position in
which it must be installed.
F
P
ull the red strap to place the seat in the
fully folded position.
F
T
ilt the entire seat for wards.
F
E
xit via the side door. F
I
f necessary, move the front seats for ward.
F
L
ower the head restraint.
F
P
lace the seat in the fully folded position.
F
T
ilt the entire seat for wards then lift it.
Ensure that no object or foot of a
passenger seated in the rear is obstructing
the anchorage points or preventing correct
locking of the seat.Operating the Row
3 seats
Removing the seat
F Place the hooks of the feet between the two
bars.
F
F
old the seat backwards to secure the rear
anchorage points.
F
O
perate the control to raise the seat
backrest to its initial position.
F
Ra
ise the head restraint.
3
Ease of use and comfort