2020 PEUGEOT 5008 mirror
[x] Cancel search: mirrorPage 4 of 308
2
Contents
■
Overview
■
Eco-driving
1Instruments
Digital instrument panels 9
Warning and indicator lamps 11
Indicators 17
Manual test 20
Distance recorders 20
Lighting dimmer 21
Trip computer 22
Monochrome screen C 23
Touch screen 24
Remote features (Hybrid) 27
2Access
Remote control / Key 28
Keyless Entry and Starting 30
Central locking 32
Back-up procedures 32
Alarm 34
Doors 36
Boot 36
Hands-free tailgate 37
Electric windows 41
Panoramic sunroof 42
3Ease of use and comfort
Driving position 44
Front seats 45
Steering wheel adjustment 49
Mirrors 49
Rear bench seat 51
Rear seats 52
Seat modularity 57
Heating and Ventilation 58
Manual air conditioning 59
Semi-automatic mono-zone air conditioning 59
Dual-zone automatic air conditioning 61
Front demisting - defrosting 64
Heated windscreen 64
Rear screen demisting/defrosting 65
Thermal pre-conditioning (Hybrid) 65
Front fittings 66
Courtesy lamps 69
Interior ambience lighting 70
Rear fittings 70
Boot fittings 72
4Lighting and visibility
Exterior lighting control stalk 78
Direction indicators 79
Headlamp beam height adjustment 80
Automatic illumination of headlamps 80
Guide-me-home and welcome lighting 81
Automatic headlamp dipping 81
Cornering lighting 82
Wiper control stalk 83
Changing a wiper blade 85
Automatic wipers 85
5Safety
General safety recommendations 87
Hazard warning lamps 87
Horn 88
Pedestrian horn
(Hybrid) 88
Emergency or assistance call 88
Electronic stability control (ESC) 90
Advanced Grip Control 92
Hill Assist Descent Control 93
Seat belts 94
Airbags 97
Child seats 100
Deactivating the front passenger airbag 102
ISOFIX child seats 105
i-Size child seats 11 0
Child lock 11 2
6Driving
Driving recommendations 11 3
Starting / Switching off the engine
with the key
11 4
Starting / Switching off the engine
with Keyless Entry and Starting
11 6
Starting hybrid vehicles 11 6
Electric parking brake 11 8
6-speed manual gearbox 120
Automatic gearbox 121
Electric automatic gearbox (Hybrid) 124
Hill start assist 125
Dynamic pack 125
Driving modes 126
Gear efficiency indicator 127
Stop & Start 127
Under-inflation detection 129
Driving and manoeuvring aids -
General recommendations
130
Memorising speeds 132
Speed Limit Recognition and
Recommendation
132
Speed limiter 135
Cruise control 137
Drive Assist Plus 139
Adaptive Cruise Control 139
Page 6 of 308
4
Overview
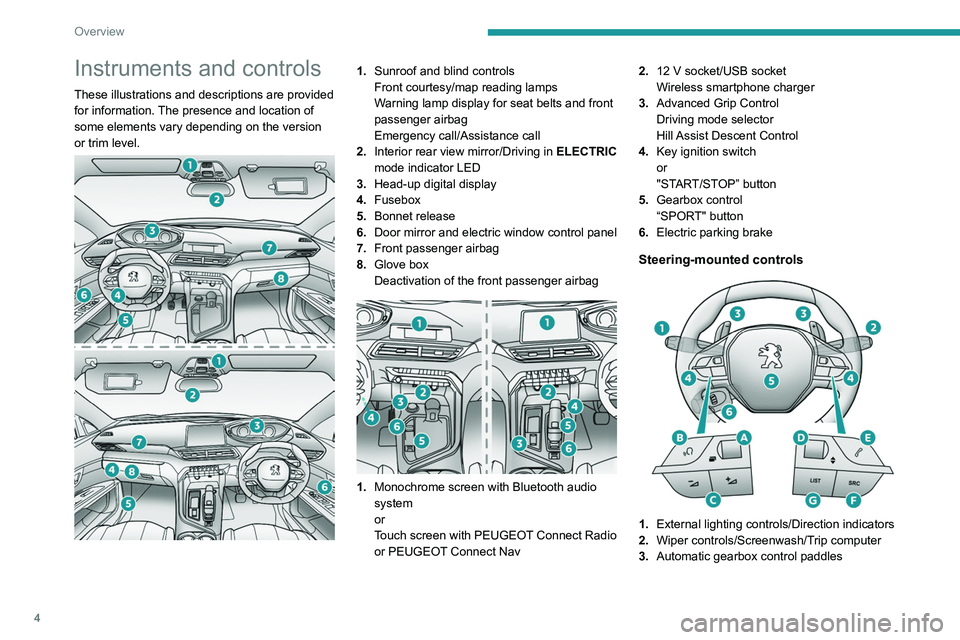
Instruments and controls
These illustrations and descriptions are provided
for information. The presence and location of
some elements vary depending on the version
or trim level.
1.Sunroof and blind controls
Front courtesy/map reading lamps
Warning lamp display for seat belts and front
passenger airbag
Emergency call/Assistance call
2. Interior rear view mirror/Driving in ELECTRIC
mode indicator LED
3. Head-up digital display
4. Fusebox
5. Bonnet release
6. Door mirror and electric window control panel
7. Front passenger airbag
8. Glove box
Deactivation of the front passenger airbag
1.Monochrome screen with Bluetooth audio
system
or
Touch screen with PEUGEOT Connect Radio
or PEUGEOT Connect Nav 2.
12 V socket/USB socket
Wireless smartphone charger
3. Advanced Grip Control
Driving mode selector
Hill Assist Descent Control
4. Key ignition switch
or
"START/STOP” button
5. Gearbox control
“SPORT" button
6. Electric parking brake
Steering-mounted controls
1.External lighting controls/Direction indicators
2. Wiper controls/Screenwash/Trip computer
3. Automatic gearbox control paddles
Page 30 of 308
28
Access
Remote control / Key
Remote control function
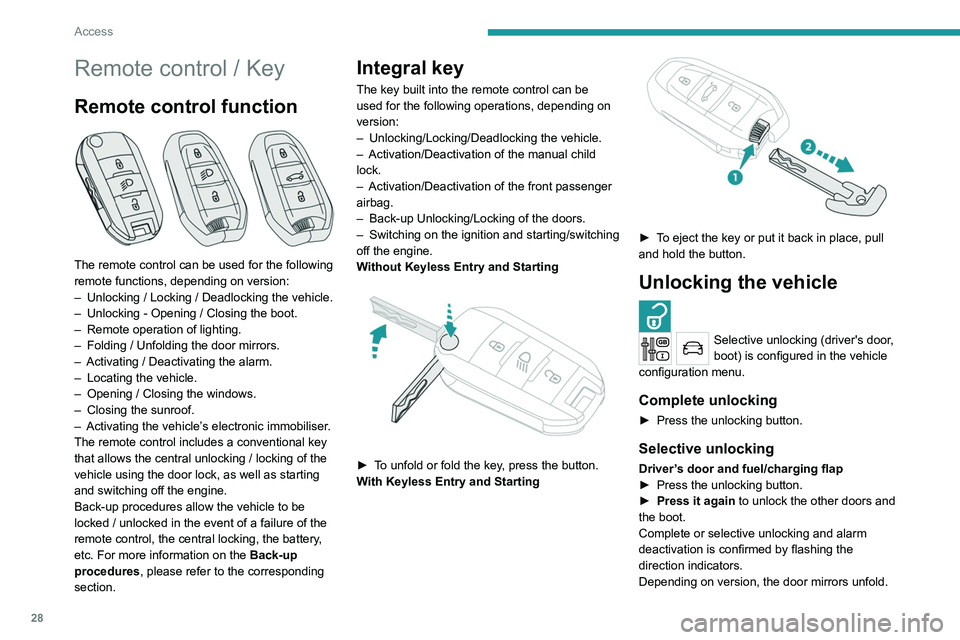
The remote control can be used for the following
remote functions, depending on version:
–
Unlocking / Locking / Deadlocking the vehicle.
–
Unlocking - Opening / Closing the boot.
–
Remote operation of lighting.
–
Folding / Unfolding the door mirrors.
–
Activating / Deactivating the alarm.
–
Locating the vehicle.
–
Opening / Closing the windows.
–
Closing the sunroof.
–
Activating the vehicle’
s electronic immobiliser.
The remote control includes a conventional key
that allows the central unlocking / locking of the
vehicle using the door lock, as well as starting
and switching off the engine.
Back-up procedures allow the vehicle to be
locked / unlocked in the event of a failure of the
remote control, the central locking, the battery,
etc. For more information on the Back-up
procedures, please refer to the corresponding
section.
Integral key
The key built into the remote control can be
used for the following operations, depending on
version:
–
Unlocking/Locking/Deadlocking the vehicle.
–
Activation/Deactivation of the manual child
lock.
–
Activation/Deactivation of the front passenger
airbag.
–
Back-up Unlocking/Locking of the doors.
–
Switching on the ignition and starting/switching
off the engine.
W
ithout Keyless Entry and Starting
► To unfold or fold the key, press the button.
With Keyless Entry and Starting
► To eject the key or put it back in place, pull
and hold the button.
Unlocking the vehicle
Selective unlocking (driver's door,
boot) is configured in the vehicle
configuration menu.
Complete unlocking
► Press the unlocking button.
Selective unlocking
Driver’s door and fuel/charging flap
► Press the unlocking button.
►
Press it again
to unlock the other doors and
the boot.
Complete or selective unlocking and alarm
deactivation is confirmed by flashing the
direction indicators.
Depending on version, the door mirrors unfold.
Selective unlocking and opening of
the tailgate
By default, selective unlocking of the tailgate
is deactivated and its motorised operation is
activated.
► Press and hold this button to unlock
the boot and trigger the motorised
opening of the tailgate.
The doors and fuel filler flap remain locked.
If selective unlocking of the tailgate is
deactivated, pressing the button unlocks
the whole vehicle.
If motorised operation of the tailgate is
deactivated, pressing the button releases
the tailgate.
To lock the vehicle, it is necessary to close
the tailgate again.
Locking the vehicle
Normal locking
► Press the locking button.
The locking, and the activation of the alarm
depending on version, is confirmed by the
lighting of the direction indicators.
Depending on version, the door mirrors fold.
Page 31 of 308
29
Access
2Selective unlocking and opening of
the tailgate
By default, selective unlocking of the tailgate
is deactivated and its motorised operation is
activated.
► Press and hold this button to unlock
the boot and trigger the motorised
opening of the tailgate.
The doors and fuel filler flap remain locked.
If selective unlocking of the tailgate is
deactivated, pressing the button unlocks
the whole vehicle.
If motorised operation of the tailgate is
deactivated, pressing the button releases
the tailgate.
To lock the vehicle, it is necessary to close
the tailgate again.
Locking the vehicle
Normal locking
► Press the locking button.
The locking, and the activation of the alarm
depending on version, is confirmed by the
lighting of the direction indicators.
Depending on version, the door mirrors fold.
An access (door or boot) that is not properly closed prevents locking of the
vehicle. However, if the vehicle has an alarm,
it will be activated after 45
seconds.
If the vehicle is unlocked and there is no
action at the doors or boot, the vehicle will
automatically lock itself again after about
30
seconds. If the vehicle has an alarm, it will
also be reactivated automatically.
Deadlocking
► Press the locking button again within
5 seconds to deadlock the vehicle (confirmed by
the temporary lighting of the direction indicators).
Deadlocking renders the interior door
controls inoperative. It also deactivates
the central locking button.
The horn remains operational.
Never leave anyone inside the vehicle
when it is deadlocked.
Closing the windows
Holding the locking button pressed for
more than 3 seconds closes the windows.
When closing the windows, ensure that
no person or object could prevent their
correct closure.
To leave the windows partly open on versions
with alarm, you must first deactivate the
interior volumetric alarm protection.
For more information on the Alarm, refer to
the corresponding section.
Locating the vehicle
This function helps you to spot your vehicle from
a distance, with the vehicle locked:
–
The direction indicators flash for approximately
10 seconds.
–
The door mirror spotlamps come on.
–
The courtesy lamps come on.
► Press this button.
Remote lighting of the
lamps
Availability of this function depends on version.► Press this button. The sidelamps,
dipped beam headlamps, number plate
lamps and door mirror spotlamps come on for 30
seconds.
Pressing again before the end of the timed
period switches off the lamps immediately.
Advice
Remote control
The remote control is a sensitive, high-
frequency device; avoid handling it in your
pocket, due to the risk of unintentionally
unlocking the vehicle.
Avoid pressing the remote control buttons
while out of range of the vehicle, due to
Page 32 of 308
30
Access
the risk of rendering the remote control
inoperative. It would then be necessary to
reset it.
The remote control does not work when the
key is in the ignition switch, even when the
ignition is switched off.
Anti-theft protection
Do not modify the electronic vehicle
immobiliser, as this might result in
malfunctions.
For vehicles with a key ignition switch,
remember to remove the key and turn the
steering wheel to engage the steering lock.
Locking the vehicle
Driving with the doors locked could make
it more difficult for the emergency services to
enter the vehicle in an emergency.
As a safety precaution, remove the key from
the ignition or take the electronic key with you
when leaving the vehicle, even for a short
time.
Purchasing a second-hand vehicle
Have the key codes memorised by a
PEUGEOT dealer, to ensure that the keys
in your possession are the only ones able to
start the vehicle.
Keyless Entry and
Starting
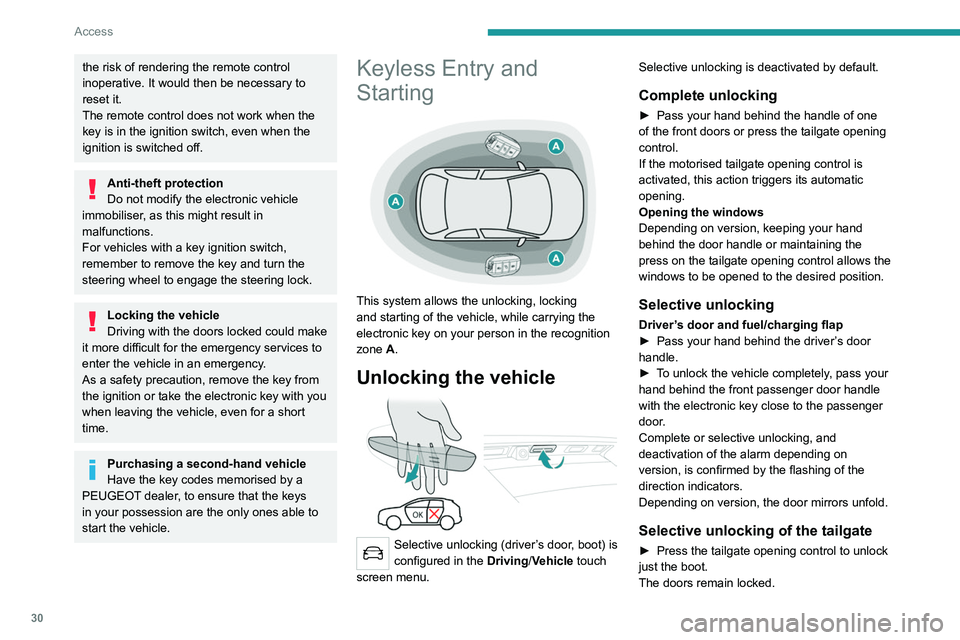
This system allows the unlocking, locking
and starting of the vehicle, while carrying the
electronic key on your person in the recognition
zone A.
Unlocking the vehicle
Selective unlocking (driver’s door, boot) is
configured in the Driving/Vehicle touch
screen menu. Selective unlocking is deactivated by default.
Complete unlocking
► Pass your hand behind the handle of one
of the front doors or press the tailgate opening
control.
If the motorised tailgate opening control is
activated, this action triggers its automatic
opening.
Opening the windows
Depending on version, keeping your hand
behind the door handle or maintaining the
press on the tailgate opening control allows the
windows to be opened to the desired position.
Selective unlocking
Driver’s door and fuel/charging flap
► Pass your hand behind the driver ’s door
handle.
►
T
o unlock the vehicle completely, pass your
hand behind the front passenger door handle
with the electronic key close to the passenger
door.
Complete or selective unlocking, and
deactivation of the alarm
depending on
version,
is confirmed by the flashing of the
direction indicators.
Depending on version, the door mirrors unfold.
Selective unlocking of the tailgate
► Press the tailgate opening control to unlock
just the boot.
The doors remain locked.
If selective unlocking of the tailgate is
deactivated, pressing this control also
unlocks the doors.
Locking the vehicle
Normal locking
► Press the handle on one of the front doors
(at the markings) or the locking control on the
tailgate.
It is not possible to lock the vehicle if one of the
electronic keys is left inside the vehicle.
Closing the windows and sunroof
Maintaining pressure on the door handle or
the tailgate control allows the windows and,
depending on version, the sunroof to be closed
to the desired position.
This operation also closes the sunroof blind.
Page 33 of 308
31
Access
2If selective unlocking of the tailgate is
deactivated, pressing this control also
unlocks the doors.
Locking the vehicle
Normal locking
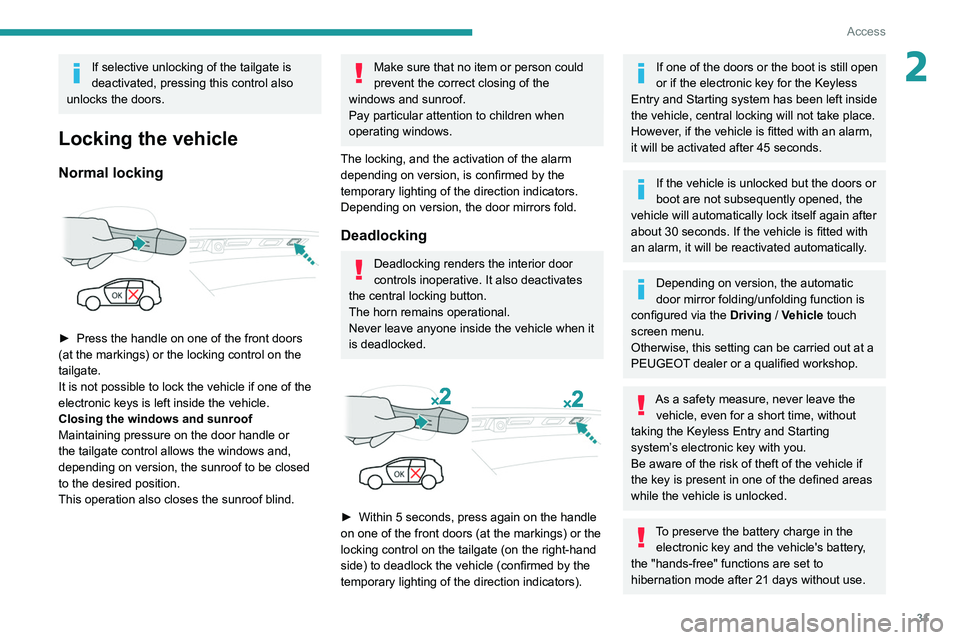
► Press the handle on one of the front doors
(at the markings) or the locking control on the
tailgate.
It is not possible to lock the vehicle if one of the
electronic keys is left inside the vehicle.
Closing the windows and sunroof
Maintaining pressure on the door handle or
the tailgate control allows the windows and,
depending on version, the sunroof to be closed
to the desired position.
This operation also closes the sunroof blind.
Make sure that no item or person could
prevent the correct closing of the
windows and sunroof.
Pay particular attention to children when
operating windows.
The locking, and the activation of the alarm
depending on version, is confirmed by the
temporary lighting of the direction indicators.
Depending on version, the door mirrors fold.
Deadlocking
Deadlocking renders the interior door
controls inoperative. It also deactivates
the central locking button.
The horn remains operational.
Never leave anyone inside the vehicle when it
is deadlocked.
► Within 5 seconds, press again on the handle
on one of the front doors (at the markings) or the
locking control on the tailgate (on the right-hand
side) to deadlock the vehicle (confirmed by the
temporary lighting of the direction indicators).
If one of the doors or the boot is still open
or if the electronic key for the Keyless
Entry and Starting
system has been left inside
the vehicle, central locking will not take place.
However
, if the vehicle is fitted with an alarm,
it will be activated after 45
seconds.
If the vehicle is unlocked but the doors or
boot are not subsequently opened, the
vehicle will automatically lock itself again after
about 30
seconds. If the vehicle is fitted with
an alarm, it will be reactivated automatically.
Depending on version, the automatic
door mirror folding/unfolding function is
configured via the Driving
/ Vehicle touch
screen menu.
Otherwise, this setting can be carried out at a
PEUGEOT dealer or a qualified workshop.
As a safety measure, never leave the vehicle, even for a short time, without
taking the Keyless Entry and Starting
system’s electronic key with you.
Be aware of the risk of theft of the vehicle if
the key is present in one of the defined areas
while the vehicle is unlocked.
To preserve the battery charge in the electronic key and the vehicle's battery,
the "hands-free" functions are set to
hibernation mode after 21 days without use.
Page 46 of 308

44
Ease of use and comfort
Driving position
Correct seating position
Adopting a good driving position helps improve
your comfort and protection.
It also optimises interior and exterior visibility as
well as access to controls.
Whether or not the vehicle has certain seat
adjustments described in this section depends
on the trim level and country of sale.
Driver’s side
Sit fully back in the seat with your pelvis, back
and shoulders in contact with the seat backrest.
Adjust the seat cushion height so that your eyes
are level with the centre of the windscreen.
The head room (from the roof) should be at least
10 cm.
Adjust the longitudinal position of the seat so
that you can fully depress the pedals with legs
slightly flexed.
The distance between your knees and the
dashboard should be at least 10 cm, for easy
access to the dashboard controls.
Adjust the backrest angle to as vertical a position
as possible; never tilt it more than 25°.
Adjust the head restraint so that its upper edge is
level with the top of your head.
Adjust the length of the seat cushion to support
your thighs.
Adjust the lumbar support so that it conforms to
the shape of your spine.
Adjust the steering wheel so that it is at least 25
cm from your sternum and you can hold it with
your arms slightly bent.
The steering wheel should not hide the
instrument panel.
As a safety precaution, adjust the seats only when the vehicle is stationary.
If your vehicle has electric seats, the
ignition must be on to adjust them.
Passenger’s side
Sit fully back in the seat with your pelvis, back
and shoulders in contact with the seat backrest.
Adjust the longitudinal position of the seat so that
you are at a distance of at least 25 cm from the
dashboard.
Adjust the head restraint so that its upper edge is
level with the top of your head.
Before moving off
Adjust the interior and exterior door mirrors to
reduce blind spots.
Fasten your seat belt: place the diagonal belt in
the middle of your shoulder and adjust the lap
belt so that it is tightened across your pelvis.
Ensure that all passengers have fastened their
seat belts correctly.
If your vehicle has electric door mirrors,
the ignition must be on to adjust them.
When driving
Maintain a good driving position and hold the
steering wheel with both hands at the 'quarter to
three' position, so that you can easily and quickly
reach the controls behind and near the steering
wheel.
Never adjust the seats or steering wheel
when driving.
Always keep your feet on the floor.
Front seats
Before moving the seat backwards,
ensure that there is no person or object
that might prevent the full travel of the seat.
There is a risk of trapping or pinching
passengers if present in the rear seats or of
jamming the seat if large objects are placed
on the floor behind the seat.
Page 49 of 308
47
Ease of use and comfort
3Refitting a head restraint
► Insert the head restraint rods into the guides
in the corresponding seat backrest.
►
Push the head restraint down as far as it will
go.
►
Press the lug
A to release the head restraint
and push it down.
►
Adjust the height of the head restraint.
Never drive with the head restraints
removed; they should be in place and
adjusted for the occupant of the seat.
Electrically-adjusted driver's
seat
To carry out these electric adjustments, switch on the ignition or start the engine
if the vehicle has gone into energy economy
mode.
These electric adjustments are accessible
about 1 minute after opening the driver's door.
They are deactivated about 1 minute after
switching the ignition off.
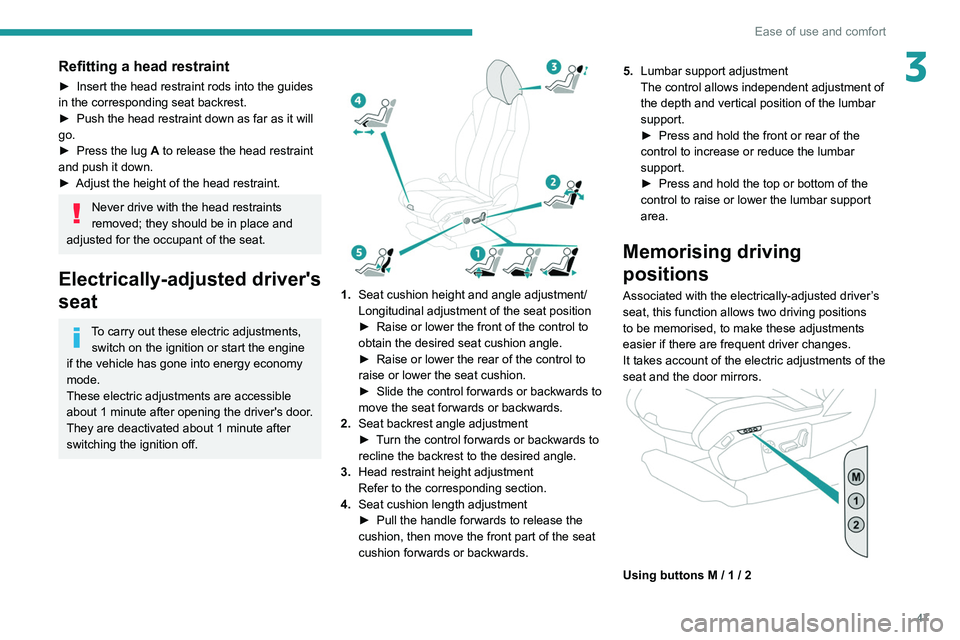
1. Seat cushion height and angle adjustment/
Longitudinal adjustment of the seat position
►
Raise or lower the front of the control to
obtain the desired seat cushion angle.
►
Raise or lower the rear of the control to
raise or lower the seat cushion.
►
Slide the control forwards or backwards to
move the seat forwards or backwards.
2. Seat backrest angle adjustment
►
T
urn the control forwards or backwards to
recline the backrest to the desired angle.
3. Head restraint height adjustment
Refer to the corresponding section.
4. Seat cushion length adjustment
►
Pull the handle forwards to release the
cushion, then move the front part of the seat
cushion forwards or backwards. 5.
Lumbar support adjustment
The control allows independent adjustment of
the depth and vertical position of the lumbar
support.
►
Press and hold the front or rear of the
control to increase or reduce the lumbar
support.
►
Press and hold the top or bottom of the
control to raise or lower the lumbar support
area.
Memorising driving
positions
Associated with the electrically-adjusted driver’s
seat, this function allows two driving positions
to be memorised, to make these adjustments
easier if there are frequent driver changes.
It takes account of the electric adjustments of the
seat and the door mirrors.
Using buttons M / 1 / 2