2020 PEUGEOT 5008 wheel size
[x] Cancel search: wheel sizePage 4 of 308
2
Contents
■
Overview
■
Eco-driving
1Instruments
Digital instrument panels 9
Warning and indicator lamps 11
Indicators 17
Manual test 20
Distance recorders 20
Lighting dimmer 21
Trip computer 22
Monochrome screen C 23
Touch screen 24
Remote features (Hybrid) 27
2Access
Remote control / Key 28
Keyless Entry and Starting 30
Central locking 32
Back-up procedures 32
Alarm 34
Doors 36
Boot 36
Hands-free tailgate 37
Electric windows 41
Panoramic sunroof 42
3Ease of use and comfort
Driving position 44
Front seats 45
Steering wheel adjustment 49
Mirrors 49
Rear bench seat 51
Rear seats 52
Seat modularity 57
Heating and Ventilation 58
Manual air conditioning 59
Semi-automatic mono-zone air conditioning 59
Dual-zone automatic air conditioning 61
Front demisting - defrosting 64
Heated windscreen 64
Rear screen demisting/defrosting 65
Thermal pre-conditioning (Hybrid) 65
Front fittings 66
Courtesy lamps 69
Interior ambience lighting 70
Rear fittings 70
Boot fittings 72
4Lighting and visibility
Exterior lighting control stalk 78
Direction indicators 79
Headlamp beam height adjustment 80
Automatic illumination of headlamps 80
Guide-me-home and welcome lighting 81
Automatic headlamp dipping 81
Cornering lighting 82
Wiper control stalk 83
Changing a wiper blade 85
Automatic wipers 85
5Safety
General safety recommendations 87
Hazard warning lamps 87
Horn 88
Pedestrian horn
(Hybrid) 88
Emergency or assistance call 88
Electronic stability control (ESC) 90
Advanced Grip Control 92
Hill Assist Descent Control 93
Seat belts 94
Airbags 97
Child seats 100
Deactivating the front passenger airbag 102
ISOFIX child seats 105
i-Size child seats 11 0
Child lock 11 2
6Driving
Driving recommendations 11 3
Starting / Switching off the engine
with the key
11 4
Starting / Switching off the engine
with Keyless Entry and Starting
11 6
Starting hybrid vehicles 11 6
Electric parking brake 11 8
6-speed manual gearbox 120
Automatic gearbox 121
Electric automatic gearbox (Hybrid) 124
Hill start assist 125
Dynamic pack 125
Driving modes 126
Gear efficiency indicator 127
Stop & Start 127
Under-inflation detection 129
Driving and manoeuvring aids -
General recommendations
130
Memorising speeds 132
Speed Limit Recognition and
Recommendation
132
Speed limiter 135
Cruise control 137
Drive Assist Plus 139
Adaptive Cruise Control 139
Page 164 of 308
162
Driving
When several successive spaces are
found, the vehicle will be directed
towards the last one.
► Move forwards slowly until a message
is displayed, accompanied by an audible
signal, asking you to engage reverse gear.
► Engage reverse gear, release the
steering wheel and move without
exceeding the speed of 5 mph (7 km/h).
The assisted parking manoeuvre is in progress.
7► Without exceeding 5 mph (7 km/h),
follow the instructions and the warnings
from the "Parking sensors" system, until the end
of the manoeuvre is indicated.
The end of the manoeuvre is confirmed by a message and an audible signal.
The system is deactivated: it is possible to retake
control.
During a "bay" parking manoeuvre, the
Park Assist system is automatically
deactivated once the rear of the vehicle is
within 50 cm of an obstacle.
Assistance with "parallel" parking exit manoeuvres
► To leave a "parallel" parking space, switch
the engine on.
becomes continuous when the obstacle is
less than 30 centimetres away.
If the Parking sensors function has
been deactivated, it will be automatically
reactivated during the assisted manoeuvring
phases.
During parking and exit from parking
manoeuvres, the Visiopark 1 - Visiopark
2 functions may come into operation. They
allow better monitoring of the surroundings of
the vehicle, by displaying additional
information in the touch screen.
For more information on the Visiopark
1 - Visiopark 2
functions, refer to the
corresponding section.
In some circumstances, the sensors may
not detect small obstacles located in their
blind spots.
Any object exceeding the size of the vehicle
(e.g.
roof ladder, towball) is not taken
into account by the Park Assist during a
manoeuvre.
Always check the surroundings of the vehicle before starting a manoeuvre.
If the lateral distance between the vehicle and
the space is too great, the system may not be
able to measure the space.
During manoeuvring phases, the steering
wheel performs rapid turns: do not hold
the steering wheel or put your hands between
the spokes of the steering wheel.
Beware of any object likely to block the
manoeuvre (e.g.
loose clothing, scarves, ties)
- risk of injury!
Assistance with "parallel" parking manoeuvres
► When parking, select " Park Assist " in
the Driving/Vehicle touch screen menu
to activate the function.
► Limit the vehicle speed to a maximum
of 12 mph (20 km/h) and select “ Enter
parallel parking space” on the touch screen.
To enter a parking space, the system does not identify spaces that are clearly
smaller or larger than the vehicle.
► Operate the direction indicator on the
parking side chosen to activate the
measurement function.
The vehicle should drive
at a distance of between 0.5
m and 1.5 m from
the row of parked vehicles.
20► Drive at a speed below 12 mph (20
km/h) following the instructions until the
system finds an available space.
► Move forwards slowly until a message
is displayed, accompanied by an audible
signal, asking you to engage reverse gear
.
► Engage reverse gear, release the
steering wheel and move without
exceeding the speed of 5 mph (7 km/h).
The assisted parking manoeuvre is in progress.
7► Without exceeding 5 mph (7 km/h),
move forwards and backwards, aided by
the warnings from the "Parking sensors" system,
until the end of the manoeuvre is indicated.
The end of the manoeuvre is confirmed by a message and an audible signal.
The system is deactivated: it is possible to retake
control.
Assistance with "bay" parking manoeuvres
► When parking, select “ Park Assist ” in
the Driving/Vehicle touch screen menu
to activate the function.
► Limit the vehicle speed to a maximum
of 12 mph (20 km/h) and select “ Enter
bay parking space” on the touch screen.
► Operate the direction indicator on the
parking side chosen to activate the
measurement function.
The vehicle should drive
at a distance of between 0.5
m and 1.5 m from
the row of parked vehicles.
20► Drive at a speed below 12 mph (20
km/h) following the instructions until the
system finds an available space.
Page 179 of 308
177
Practical information
7Fitting directly to the roof
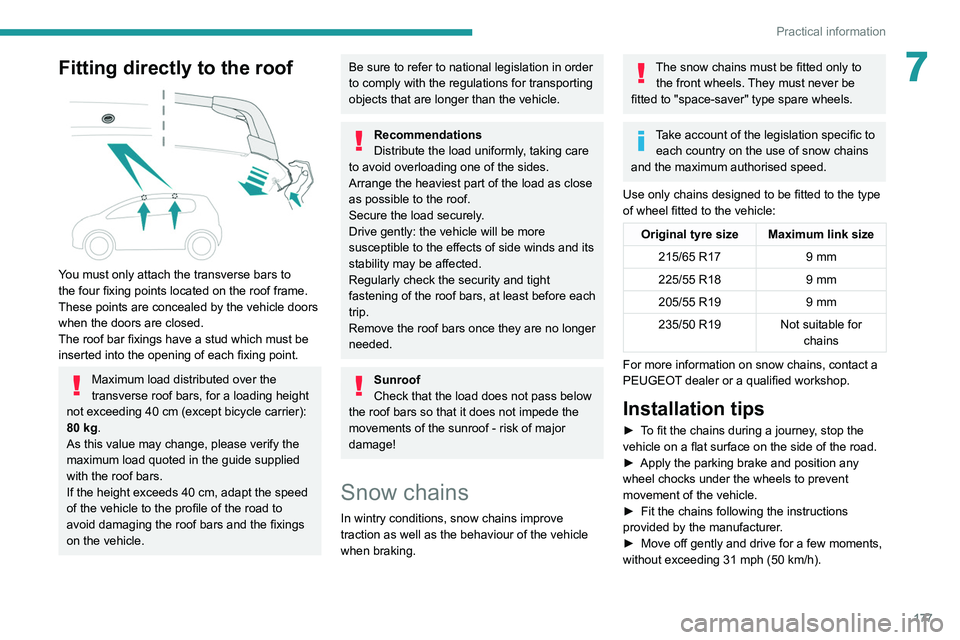
You must only attach the transverse bars to
the four fixing points located on the roof frame.
These points are concealed by the vehicle doors
when the doors are closed.
The roof bar fixings have a stud which must be
inserted into the opening of each fixing point.
Maximum load distributed over the
transverse roof bars, for a loading height
not exceeding 40 cm (except bicycle carrier):
80 kg.
As this value may change, please verify the
maximum load quoted in the guide supplied
with the roof bars.
If the height exceeds 40 cm, adapt the speed
of the vehicle to the profile of the road to
avoid damaging the roof bars and the fixings
on the vehicle.
Be sure to refer to national legislation in order
to comply with the regulations for transporting
objects that are longer than the vehicle.
Recommendations
Distribute the load uniformly, taking care
to avoid overloading one of the sides.
Arrange the heaviest part of the load as close
as possible to the roof.
Secure the load securely.
Drive gently: the vehicle will be more
susceptible to the effects of side winds and its
stability may be affected.
Regularly check the security and tight
fastening of the roof bars, at least before each
trip.
Remove the roof bars once they are no longer
needed.
Sunroof
Check that the load does not pass below
the roof bars so that it does not impede the
movements of the sunroof - risk of major
damage!
Snow chains
In wintry conditions, snow chains improve
traction as well as the behaviour of the vehicle
when braking.
The snow chains must be fitted only to the front wheels. They must never be
fitted to "space-saver" type spare wheels.
Take account of the legislation specific to each country on the use of snow chains
and the maximum authorised speed.
Use only chains designed to be fitted to the type
of wheel fitted to the vehicle:
Original tyre size Maximum link size 215/65 R17 9 mm
225/55 R18 9 mm
205/55 R19 9 mm
235/50 R19 Not suitable for
chains
For more information on snow chains, contact a
PEUGEOT dealer or a qualified workshop.
Installation tips
► To fit the chains during a journey, stop the
vehicle on a flat surface on the side of the road.
►
Apply the parking brake and position any
wheel chocks under the wheels to prevent
movement of the vehicle.
►
Fit the chains following the instructions
provided by the manufacturer
.
►
Move off gently and drive for a few moments,
without exceeding 31
mph (50 km/h).
Page 186 of 308
184
Practical information
AdBlue® (BlueHDi)
To respect the environment and ensure
compliance with the Euro 6 standard, without
adversely affecting the performance or fuel
consumption of its Diesel engines, PEUGEOT
has taken the decision to equip its vehicles
with a system that associates SCR (Selective
Catalytic Reduction) with a Diesel Particle Filter
(DPF) for the treatment of exhaust gases.
SCR system
Using a liquid called AdBlue® that contains urea,
a catalytic converter turns up to 85% of nitrogen
oxides (NOx) into nitrogen and water, which are
harmless to health and the environment.
The AdBlue® is contained in a special
tank holding about 17 litres.
Its capacity allows a driving range of
approximately 5,600 miles (9,000 km), highly
dependent on your driving style.
An alert system is triggered automatically once
the reserve level is reached: you can then drive
Manual gearbox
The gearbox does not require any maintenance (no oil change).
Automatic gearbox
The gearbox does not require any maintenance (no oil change).
Electric parking brake
This system does not require any routine servicing. However, in the event of a
problem, do not hesitate to have the system
checked by a PEUGEOT dealer or a qualified
workshop.
For more information on the Electric
parking brake, refer to the
corresponding section.
Brake pads
Brake wear depends on the style of
driving, particularly in the case of vehicles
used in town, over short distances. It may be
necessary to have the condition of the brakes
checked, even between vehicle services.
Unless there is a leak in the circuit, a drop in the
brake fluid level indicates that the brake pads
are worn.
After washing the vehicle, moisture, or in wintry conditions, ice can form on the
brake discs and pads: braking efficiency may
be reduced. Gently dab the brakes to dry and
defrost them.
Brake disc wear
For information on checking brake disc
wear, contact a PEUGEOT dealer or a
qualified workshop.
Wheels and tyres
The inflation pressure of all tyres, including the spare wheel, must be
checked on "cold” tyres.
The pressures indicated on the tyre pressure
label are valid for "cold" tyres. If you have driven
for more than 10 minutes or more than 6 miles
(10 kilometres) at over 31 mph (50
km/h), add
0.3 bar (30 kPa) to the values indicated on the
label.
Under-inflation increases fuel
consumption. Non-compliant tyre
pressure causes premature wear on tyres and
has an adverse effect on the vehicle's road
holding - risk of an accident!
Driving with worn or damaged tyres reduces the
braking and road holding performance of the
vehicle. It is recommended to regularly check the
condition of the tyres (tread and sidewalls) and
wheel rims as well as the presence of the valves.
When the wear indicators no longer appear set
back from the tread, the depth of the grooves is less than 1.6 mm; it is imperative to replace the
tyres.
Using different size wheels and tyres from those
specified can affect the lifetime of tyres, wheel
rotation, ground clearance, the speedometer
reading and have an adverse effect on road
holding.
Fitting different tyres on the front and rear axles
can cause the ESC to mistime.
Shock absorbers
It is not easy for drivers to detect when
shock absorbers are worn. Nevertheless,
the shock absorbers have a major impact on
road-holding and braking performance.
For your safety and driving comfort, it is
important to have them regularly checked by a
PEUGEOT dealer or a qualified workshop.
Timing and accessory kits
Timing and accessory kits are used from
the time the engine is started until it is
switched off. It is normal for them to wear over
time.
A
faulty timing or accessory kit can damage
the engine, rendering it unusable. Observe the
recommended replacement frequency, stated in
distance travelled or time elapsed, whichever is
reached first.
Page 198 of 308
196
In the event of a breakdown
► Check that the compressor switch is in
position " O
".
►
Fully uncoil the electric cable stowed under
the compressor
.
►
Connect the compressor's electric plug to the
vehicle's 12
V socket.
►
Switch the ignition on.
Only the 12 V sockets located at the
front of the vehicle and in the boot can
be used to power the compressor.
The 12V socket located at the back of the
centre console is not suitable for this purpose.
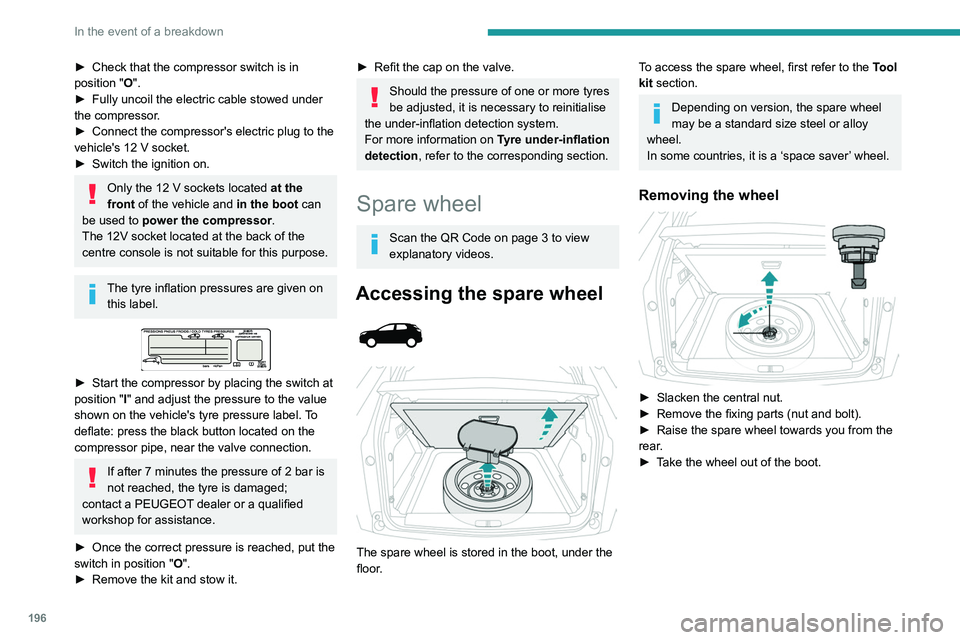
The tyre inflation pressures are given on this label.
► Start the compressor by placing the switch at
position " I
" and adjust the pressure to the value
shown on the vehicle's tyre pressure label. To
deflate: press the black button located on the
compressor pipe, near the valve connection.
If after 7 minutes the pressure of 2 bar is
not reached, the tyre is damaged;
contact a PEUGEOT dealer or a qualified
workshop for assistance.
►
Once the correct pressure is reached, put the
switch in position " O
".
►
Remove the kit and stow it.
► Refit the cap on the valve.
Should the pressure of one or more tyres
be adjusted, it is necessary to reinitialise
the under-inflation detection system.
For more information on Tyre under-inflation
detection, refer to the corresponding section.
Spare wheel
Scan the QR Code on page 3 to view
explanatory videos.
Accessing the spare wheel
The spare wheel is stored in the boot, under the
floor.
To access the spare wheel, first refer to the Tool
kit section.
Depending on version, the spare wheel
may be a standard size steel or alloy
wheel.
In some countries, it is a ‘space saver’ wheel.
Removing the wheel
► Slacken the central nut.
► Remove the fixing parts (nut and bolt).
►
Raise the spare wheel towards you from the
rear
.
►
T
ake the wheel out of the boot.
Putting the wheel back in place
► Put the wheel back in its housing.
► Slacken the nut on the bolt by a few turns.
► Position the fixing parts (nut and bolt) in the
middle of the wheel.
► Tighten fully until the central nut clicks, to
retain the wheel correctly.
► Return the tool box to the middle of the wheel
and clip it in place.
Page 282 of 308
280
Alphabetical index
CD, MP3 233, 246
Central locking
31–32
Changing a bulb
201–202, 204–205
Changing a fuse
205–206, 208–209
Changing a wheel
191–192, 196–198
Changing a wiper blade
84–85
Changing the remote control battery
33
Charge level indicator
20
Charger, induction
67
Charger, wireless
67
Charging cable
169–170, 172
Charging connector
168, 171–172
CHECK
20
Checking the engine oil level
17
Checking the levels
181–182
Checking tyre pressures (using the kit)
193, 195
Checks
180, 183–184
Checks, routine
183–184
Child lock
11 2
Children
97, 103, 105, 107, 110–111
Children (safety)
11 2
Child seats
97, 100–103, 107, 110–111
Child seats, conventional
102–103
Child seats, i-Size
11 0
Child seats, ISOFIX
105, 107, 110
Cleaning (advice)
168, 187–189
Closing the boot
31, 37
Closing the doors
31, 36
Collision Risk Alert
146–147
Configurations, seats
57
Configuration, vehicle
23–25, 27
Connected applications
266–267Connection, Bluetooth 235, 248–249,
267, 271–272
Connection, MirrorLink
247–248, 266
Connection, Wi-Fi network
267–268
Connectivity
265
Consumption figures
26
Container, AdBlue®
185–186
Control, emergency boot release
37
Control, emergency door
32–33
Control, heated seats
48
Controls, steering mounted
121–124
Control stalk, lighting
78–79
Control stalk, wipers
83–86
Control unit
169–170, 172
Courtesy lamps
69
Cover, load space
73
Cruise control
132, 134, 136–138
Cruise control, adaptive
139
Cruise control by speed limit recognition
134
Cruise control, dynamic with Stop function
134
Cup holder
66
D
DAB (Digital Audio Broadcasting) -
Digital radio
231–232, 245, 269
Date (setting)
23–24, 251, 275
Daytime running lamps
79, 202
Deactivating the passenger
airbag
98, 101–102
Deadlocking
29, 31
Deferred charging 27, 168, 171, 173
Defrosting
64
Defrosting, front
64
Demisting
64
Demisting, front
64
Demisting, rear
65
Demisting, rear screen
65
Dials and gauges
9
Digital instrument panel
9–10
Dimensions
226
Dipstick
17, 181
Direction indicators
79, 202–204
Domestic charging
170, 173
Door pockets
66
Doors
36
Drive Assist Plus
139
Driver’s attention warning
149
Driving
44–45, 113
Driving aids camera (warnings)
131
Driving aids (recommendations)
130
Driving economically
7
Driving positions (storing)
47–48
Dynamic pack
125–126
Dynamic stability control (DSC)
90–92
E
EBFD 90
Eco-driving (advice)
7
Economy mode
179
Electric automatic gearbox (Hybrid)
124