2020 PEUGEOT 5008 light
[x] Cancel search: lightPage 149 of 308
147
Driving
6
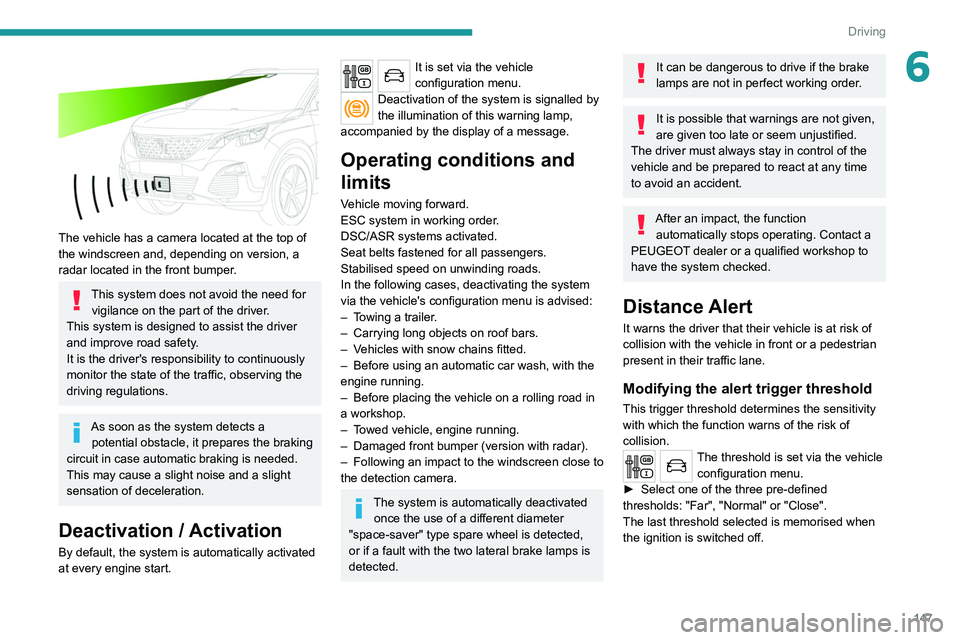
The vehicle has a camera located at the top of
the windscreen and, depending on version, a
radar located in the front bumper.
This system does not avoid the need for vigilance on the part of the driver.
This system is designed to assist the driver
and improve road safety.
It is the driver's responsibility to continuously
monitor the state of the traffic, observing the
driving regulations.
As soon as the system detects a potential obstacle, it prepares the braking
circuit in case automatic braking is needed.
This may cause a slight noise and a slight
sensation of deceleration.
Deactivation / Activation
By default, the system is automatically activated
at every engine start.
It is set via the vehicle
configuration menu.
Deactivation of the system is signalled by
the illumination of this warning lamp,
accompanied by the display of a message.
Operating conditions and
limits
Vehicle moving forward.
ESC system in working order.
DSC/ASR systems activated.
Seat belts fastened for all passengers.
Stabilised speed on unwinding roads.
In the following cases, deactivating the system
via the vehicle's configuration menu is advised:
–
T
owing a trailer.
–
Carrying long objects on roof bars.
–
V
ehicles with snow chains fitted.
–
Before using an automatic car wash, with the
engine running.
–
Before placing the vehicle on a rolling road in
a workshop.
–
T
owed vehicle, engine running.
–
Damaged front bumper (version with radar).
–
Following
an impact to the windscreen close to
the detection camera.
The system is automatically deactivated once the use of a different diameter
"space-saver" type spare wheel is detected,
or if a fault with the two lateral brake lamps is
detected.
It can be dangerous to drive if the brake
lamps are not in perfect working order.
It is possible that warnings are not given,
are given too late or seem unjustified.
The driver must always stay in control of the
vehicle and be prepared to react at any time
to avoid an accident.
After an impact, the function automatically stops operating. Contact a
PEUGEOT dealer or a qualified workshop to
have the system checked.
Distance Alert
It warns the driver that their vehicle is at risk of
collision with the vehicle in front or a pedestrian
present in their traffic lane.
Modifying the alert trigger threshold
This trigger threshold determines the sensitivity
with which the function warns of the risk of
collision.
The threshold is set via the vehicle configuration menu.
►
Select one of the three pre-defined
thresholds: "Far", "Normal" or "Close".
The last threshold selected is memorised when
the ignition is switched off.
Page 150 of 308
148
Driving
Malfunction
In the event of a fault with the system, you
are alerted by the fixed illumination of this
warning lamp, accompanied by the display of a
message and an audible signal.
Contact a PEUGEOT dealer or a qualified
workshop to have the system checked.
Distraction detection
Refer to the General recommendations on the
use of driving and manoeuvring aids .
Take a break in case of feeling tired or at least
every 2 hours.
Depending on version, the function comprises
either the "Driver Attention Alert" system alone
or combined with the "Driver Attention Alert by
camera" system.
These systems are in no way designed to keep the driver awake or to prevent
the driver from falling asleep at the wheel.
It is the driver’s responsibility to stop if feeling
tired.
Activation / Deactivation
It is set via the vehicle
configuration menu.
The state of the system stays in the memory
when the ignition is switched off.
Operation
Depending on the degree of risk of collision
detected by the system and the alert threshold
chosen by the driver, several different levels
of alert may be triggered and displayed in the
instrument panel.
They take account of the vehicle dynamics, the
speed of your vehicle and the one in front, the
environmental conditions and the operation of
the vehicle (cornering, actions on the pedals,
etc.) to trigger the alert at the best moment.
Level 1 (orange): visual alert only,
signalling that the vehicle in front is very
close.
The message "
Vehicle close" is displayed.
Level 2 (red): visual and audible alert,
signalling that a collision is imminent.
The message "
Brake!" is displayed.
Where the speed of your vehicle is too
high approaching another vehicle, the
first level of alert may not be displayed: the
level 2 alert may be displayed directly.
Important: the level
1 alert is never displayed
for a stationary obstacle or when the " Close"
trigger threshold has been selected.
Intelligent emergency
braking assistance
If the driver brakes, but not sufficiently to avoid a
collision, this system will supplement the braking,
within the limits of the laws of physics. This assistance will only be provided if the driver
presses the brake pedal.
Active Safety Brake
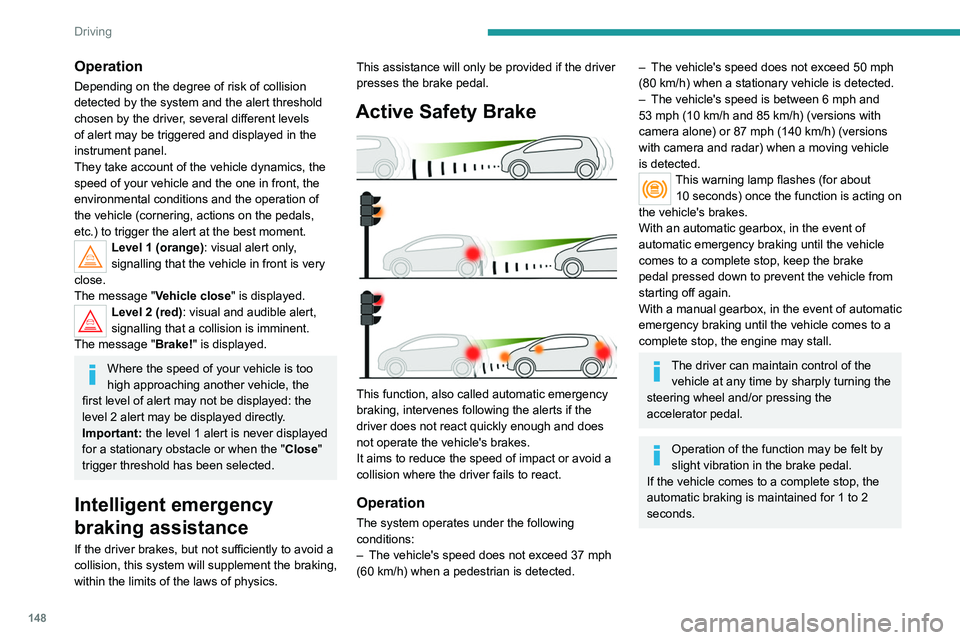
This function, also called automatic emergency
braking, intervenes following the alerts if the
driver does not react quickly enough and does
not operate the vehicle's brakes.
It aims to reduce the speed of impact or avoid a
collision where the driver fails to react.
Operation
The system operates under the following
conditions:
–
The vehicle's speed does not exceed 37 mph
(60 km/h) when a pedestrian is detected.
– The vehicle's speed does not exceed 50 mph
(80 km/h) when a stationary vehicle is detected.
–
The vehicle's speed is between 6 mph and
53 mph (10
km/h and 85 km/h) (versions with
camera alone) or 87 mph (140 km/h) (versions
with camera and radar) when a moving vehicle
is detected.
This warning lamp flashes (for about 10 seconds) once the function is acting on
the vehicle's brakes.
With an automatic gearbox, in the event of
automatic emergency braking until the vehicle
comes to a complete stop, keep the brake
pedal pressed down to prevent the vehicle from
starting off again.
With a manual gearbox, in the event of automatic
emergency braking until the vehicle comes to a
complete stop, the engine may stall.
The driver can maintain control of the vehicle at any time by sharply turning the
steering wheel and/or pressing the
accelerator pedal.
Operation of the function may be felt by
slight vibration in the brake pedal.
If the vehicle comes to a complete stop, the
automatic braking is maintained for 1 to 2
seconds.
Page 156 of 308
154
Driving
No alert is triggered in the following conditions:
– In the presence of non-moving objects (parked
vehicles, barriers, street lamps, road signs, etc.).
– Oncoming traffic.
– Driving on a winding road or a sharp corner.
– When overtaking or being overtaken by a very
long vehicle (lorry, bus, etc.) that is detected
in the rear blind spot but is also present in the
driver’s front field of vision.
– When overtaking quickly.
– In very heavy traffic: vehicles detected in
front and behind are confused with a lorry or a
stationary object.
– If the Park Assist function is activated.
Malfunction
In the event of a malfunction, this
warning lamp flashes for a few
moments in the instrument panel, accompanied
Malfunction
In the event of a system
malfunction, these warning lamps
come on on the instrument panel, accompanied
by an onscreen message and an audible signal.
Have the system checked by a PEUGEOT
dealer or a qualified workshop.
Blind Spot Monitoring
System
Refer to the General recommendations on the
use of driving and manoeuvring aids .
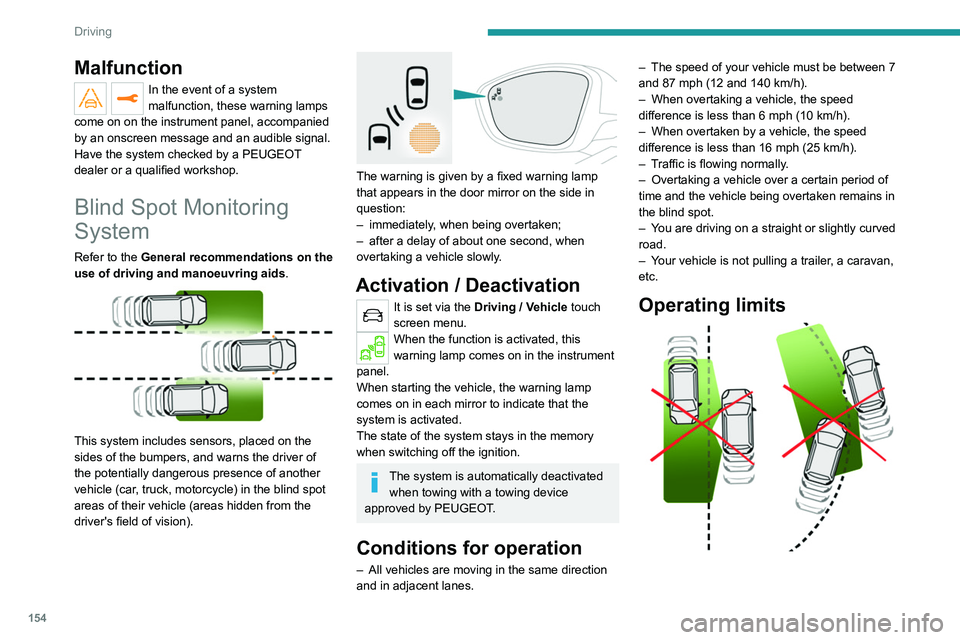
This system includes sensors, placed on the
sides of the bumpers, and warns the driver of
the potentially dangerous presence of another
vehicle (car, truck, motorcycle) in the blind spot
areas of their vehicle (areas hidden
from the
driver's field of vision).
The warning is given by a fixed warning lamp
that appears in the door mirror on the side in
question:
–
immediately
, when being overtaken;
–
after a delay of about one second, when
overtaking a vehicle slowly
.
Activation / Deactivation
It is set via the Driving / Vehicle touch
screen menu.
When the function is activated, this
warning lamp comes on in the instrument
panel.
When starting the vehicle, the warning lamp
comes on in each mirror to indicate that the
system is activated.
The state of the system stays in the memory
when switching off the ignition.
The system is automatically deactivated when towing with a towing device
approved by PEUGEOT.
Conditions for operation
– All vehicles are moving in the same direction
and in adjacent lanes. –
The speed of your vehicle must be between 7
and 87 mph (12 and 140
km/h).
–
When overtaking a vehicle, the speed
difference is less than 6
mph (10 km/h).
–
When overtaken by a vehicle, the speed
difference is less than 16
mph (25 km/h).
–
T
raffic is flowing normally.
–
Overtaking a vehicle over a certain period of
time and the vehicle being overtaken remains in
the blind spot.
–
Y
ou are driving on a straight or slightly curved
road.
–
Y
our vehicle is not pulling a trailer, a caravan,
etc.
Operating limits
Page 171 of 308
169
Practical information
7
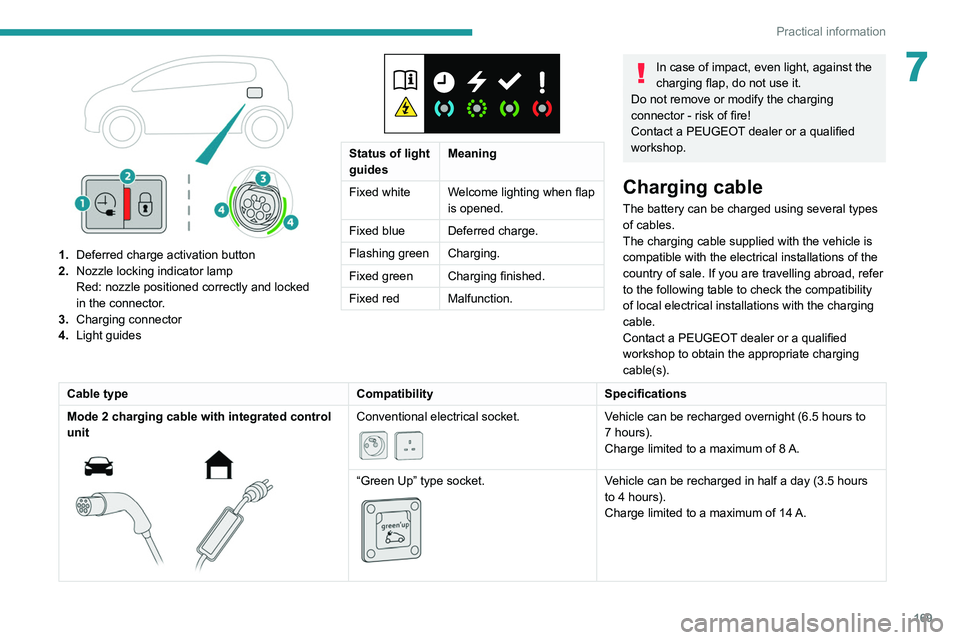
1.Deferred charge activation button
2. Nozzle locking indicator lamp
Red: nozzle positioned correctly and locked
in the connector.
3. Charging connector
4. Light guides
Status of light
guides Meaning
Fixed white Welcome lighting when flap
is opened.
Fixed blue Deferred charge.
Flashing green Charging.
Fixed green Charging finished.
Fixed red Malfunction.
In case of impact, even light, against the
charging flap, do not use it.
Do not remove or modify the charging
connector - risk of fire!
Contact a PEUGEOT dealer or a qualified
workshop.
Charging cable
The battery can be charged using several types
of cables.
The charging cable supplied with the vehicle is
compatible with the electrical installations of the
country of sale. If you are travelling abroad, refer
to the following table to check the compatibility
of local electrical installations with the charging
cable.
Contact a PEUGEOT dealer or a qualified
workshop to obtain the appropriate charging
cable(s).
Cable type CompatibilitySpecifications
Mode 2 charging cable with integrated control
unit
Conventional electrical socket.
Vehicle can be recharged overnight (6.5 hours to
7 hours).
Charge limited to a maximum of 8 A.
“Green Up” type socket.
Vehicle can be recharged in half a day (3.5 hours
to 4 hours).
Charge limited to a maximum of 14
A.
Page 174 of 308
172
Practical information
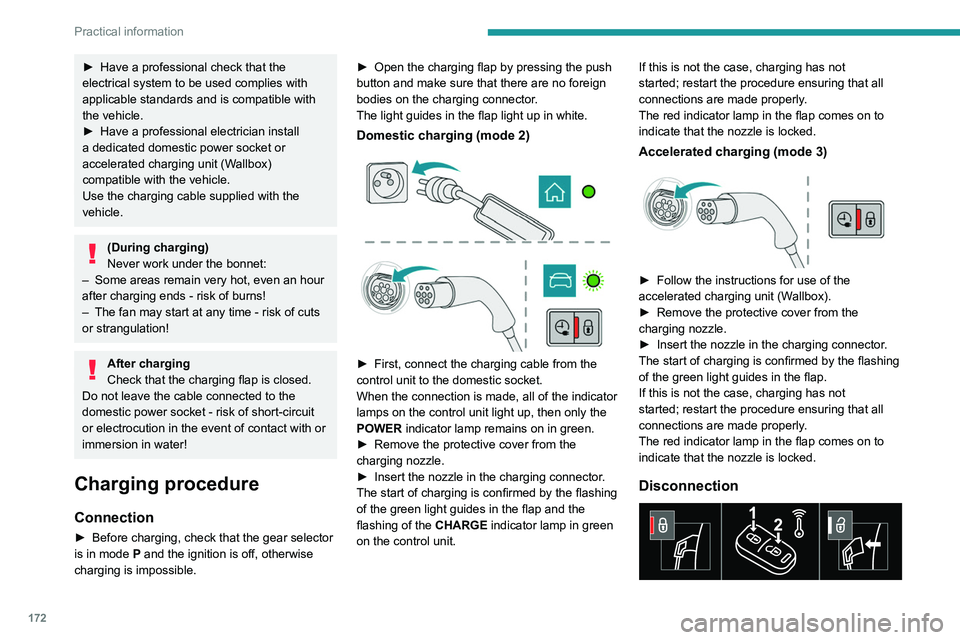
Before disconnecting the nozzle from the
charging connector:
► If the vehicle is unlocked, lock it and then
unlock it .
► If the vehicle is locked, unlock it.
The red indicator lamp in the flap goes out to
confirm that the charging nozzle is unlocked.
► Within 30 seconds, remove the charging
nozzle.
Domestic charging (mode 2)
The end of charging is confirmed by the fixed
lighting of the green CHARGE indicator lamp on
the control unit and by the fixed lighting of the
green light guides in the flap.
► After disconnection, remove the protective
cover from the nozzle and close the charging
flap.
► Disconnect the control unit's charging cable
from the domestic socket.
Accelerated charging (mode 3)
The end of charging is confirmed by the
accelerated charging unit (Wallbox) and by the
fixed lighting of the green light guides in the flap.
► After disconnection, replace the nozzle on the
charging unit and close the charging flap.
Deferred charging
By default, charging begins when the nozzle
is connected. Deferred charging can be
programmed.
► Have a professional check that the
electrical system to be used complies with
applicable standards and is compatible with
the vehicle.
►
Have a professional electrician install
a dedicated domestic power socket or
accelerated charging unit (W
allbox)
compatible with the vehicle.
Use the charging cable supplied with the
vehicle.
(During charging)
Never work under the bonnet:
–
Some areas remain very hot, even an hour
after charging ends - risk of burns!
–
The fan may start at any time - risk of cuts
or strangulation!
After charging
Check that the charging flap is closed.
Do not leave the cable connected to the
domestic power socket - risk of short-circuit
or electrocution in the event of contact with or
immersion in water!
Charging procedure
Connection
► Before charging, check that the gear selector
is in mode P and the ignition is off, otherwise
charging is impossible. ►
Open the charging flap by pressing the push
button and make sure that there are no foreign
bodies on the charging connector
.
The light guides in the flap light up in white.
Domestic charging (mode 2)
► First, connect the charging cable from the
control unit to the domestic socket.
When the connection is made, all of the indicator
lamps on the control unit light up, then only the
POWER
indicator lamp remains on in green.
►
Remove the protective cover from the
charging nozzle.
►
Insert the nozzle in the charging connector
.
The start of charging is confirmed by the flashing
of the green light guides in the flap and the
flashing of the
CHARGE indicator lamp in green
on the control unit. If this is not the case, charging has not
started; restart the procedure ensuring that all
connections are made properly.
The red indicator lamp in the flap comes on to
indicate that the nozzle is locked.
Accelerated charging (mode 3)
► Follow the instructions for use of the
accelerated charging unit (W allbox).
►
Remove the protective cover from the
charging nozzle.
►
Insert the nozzle in the charging connector
.
The start of charging is confirmed by the flashing
of the green light guides in the flap.
If this is not the case, charging has not
started; restart the procedure ensuring that all
connections are made properly.
The red indicator lamp in the flap comes on to
indicate that the nozzle is locked.
Disconnection
Page 175 of 308

173
Practical information
7Before disconnecting the nozzle from the
charging connector:
►
If the vehicle is unlocked, lock it and then
unlock it .
►
If the vehicle is locked, unlock it.
The red indicator lamp in the flap goes out to
confirm that the charging nozzle is unlocked.
►
Within
30 seconds, remove the charging
nozzle.
Domestic charging (mode 2)
The end of charging is confirmed by the fixed
lighting of the green CHARGE indicator lamp on
the control unit and by the fixed lighting of the
green light guides in the flap.
►
After disconnection, remove the protective
cover from the nozzle and close the charging
flap.
►
Disconnect the control unit's charging cable
from the domestic socket.
Accelerated charging (mode 3)
The end of charging is confirmed by the
accelerated charging unit (Wallbox) and by the
fixed lighting of the green light guides in the flap.
►
After disconnection, replace the nozzle on the
charging unit and close the charging flap.
Deferred charging
By default, charging begins when the nozzle
is connected. Deferred charging can be
programmed.
Settings
► In the Hybrid touch screen menu,
select the Charge tab.
►
Set the charging start time.
►
Press
OK.
The setting is saved in the system.
You can also programme the deferred charging function using a smartphone, via
the MyPeugeot
application.
For more information on Remotely operable
features , refer to the corresponding section.
Activation
► Connect the vehicle to the desired charging
equipment.
► Press this button in the flap within one
minute to activate the system (confirmed
by the light guides coming on in blue).
Towing device
Distribution of loads
► Distribute the load in the trailer so that the
heaviest items are as close as possible to the
axle, and the nose weight approaches the
maximum permitted without exceeding it.
Air density decreases with altitude, thus reducing
engine performance.
The maximum load which
can be towed must be reduced by 10% per
1,000
metres of altitude.
Use towing devices and their genuine
wiring harnesses approved by
PEUGEOT. It is recommended that the
installation be performed by a PEUGEOT
dealer or a qualified workshop.
If not fitted by a PEUGEOT dealer, it must
still be fitted in accordance with the vehicle
manufacturer's instructions.
Important: with a motorised tailgate and its
"Hands-Free Tailgate Access" function, if a
towing device is fitted outside the PEUGEOT
dealer network, it is essential to visit a
PEUGEOT dealer or a qualified workshop
to recalibrate the detection system - risk of
"Hands-Free Tailgate Access" function failure.
Certain driving or manoeuvring aid functions
are automatically deactivated if an approved
towing system is used.
Observe the maximum authorised
towable weight, indicated on the vehicle's
registration certificate, the manufacturer's
label as well as in the Technical data section
of this guide.
Complying with the maximum authorised
nose weight (towball) also includes the
use of accessories (bicycle carriers, tow
boxes, etc.).
Observe the legislation in force in the
country in which you are driving.
Page 176 of 308
174
Practical information
After use
When travelling without a trailer or
load carrier, remove the towball and fit the
protective plug into the carrier, to provide
clear visibility of the number plate and/or its
lighting.
Fitting the towball
► Below the rear bumper, remove the protective
plug 2 from the carrier 1.
► Insert the end of the towball 5 into the carrier
1 and push it upwards; it will lock into position
automatically.
Vehicle equipped with motorised
tailgate with "Hands-Free Tailgate
Access" function
To avoid unwanted opening of the tailgate
when using the towing device:
–
deactivate this function in advance in your
vehicle's configuration menu,
–
or move the electronic key away from the
recognition zone, with the tailgate closed.
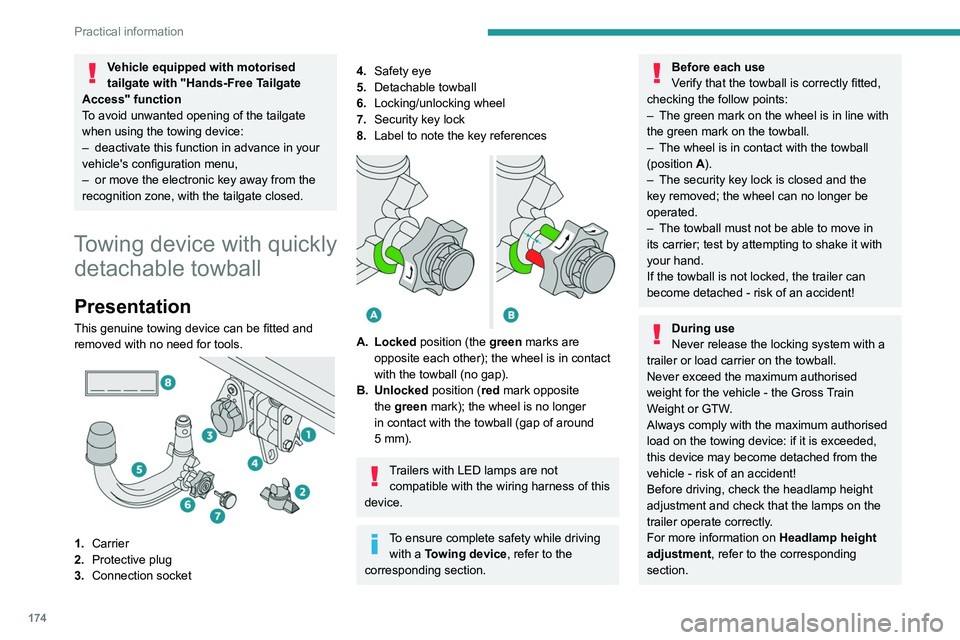
Towing device with quickly detachable towball
Presentation
This genuine towing device can be fitted and
removed with no need for tools.
1. Carrier
2. Protective plug
3. Connection socket
4.Safety eye
5. Detachable towball
6. Locking/unlocking wheel
7. Security key lock
8. Label to note the key references
A. Locked position (the green marks are
opposite each other); the wheel is in contact
with the towball (no gap).
B. Unlocked position (red mark opposite the green mark); the wheel is no longer
in contact with the towball (gap of around
5
mm).
Trailers with LED lamps are not compatible with the wiring harness of this
device.
To ensure complete safety while driving with a Towing device , refer to the
corresponding section.
Before each use
Verify that the towball is correctly fitted,
checking the follow points:
–
The green mark on the wheel is in line with
the green mark on the towball.
–
The wheel is in contact with the towball
(position A
).
–
The security key lock is closed and the
key removed; the wheel can no longer be
operated.
–
The towball must not be able to move in
its carrier; test by attempting to shake it with
your hand.
If the towball is not locked, the trailer can
become detached - risk of an accident!
During use
Never release the locking system with a
trailer or load carrier on the towball.
Never exceed the maximum authorised
weight for the vehicle - the Gross Train
Weight or GTW.
Always comply with the maximum authorised
load on the towing device: if it is exceeded,
this device may become detached from the
vehicle - risk of an accident!
Before driving, check the headlamp height
adjustment and check that the lamps on the
trailer operate correctly.
For more information on Headlamp height
adjustment, refer to the corresponding
section.
Page 177 of 308
175
Practical information
7After use
When travelling without a trailer or
load carrier, remove the towball and fit the
protective plug into the carrier, to provide
clear visibility of the number plate and/or its
lighting.
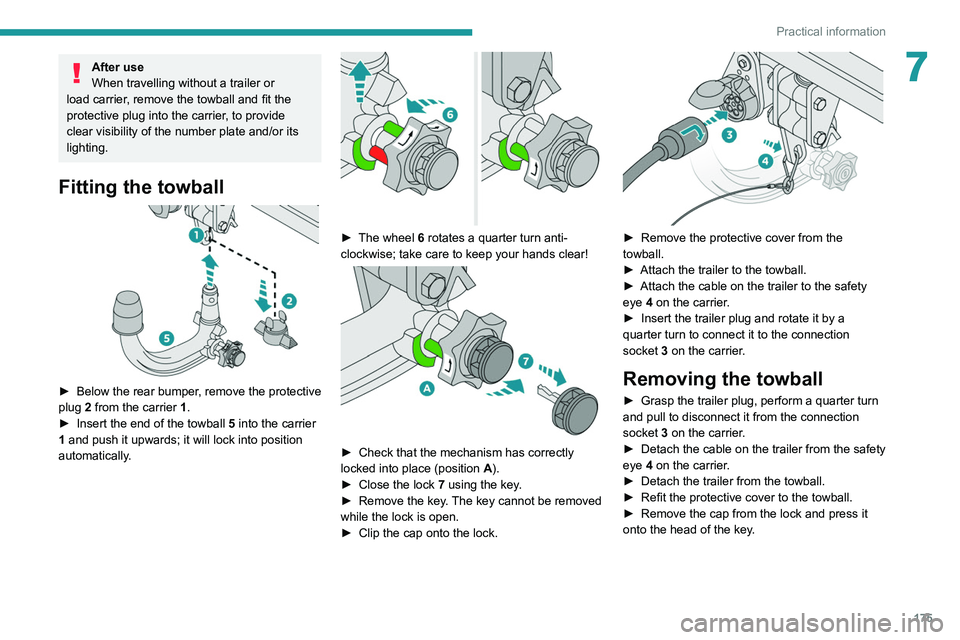
Fitting the towball
► Below the rear bumper , remove the protective
plug 2 from the carrier 1.
►
Insert the end of the towball
5 into the carrier
1 and push it upwards; it will lock into position
automatically.
► The wheel 6 rotates a quarter turn anti-
clockwise; take care to keep your hands clear!
► Check that the mechanism has correctly
locked into place (position A
).
►
Close the lock 7
using the key.
►
Remove the key
. The key cannot be removed
while the lock is open.
►
Clip the cap onto the lock.
► Remove the protective cover from the
towball.
►
Attach the trailer to the towball.
►
Attach the cable on the trailer to the safety
eye
4 on the carrier.
►
Insert the trailer plug and rotate it by a
quarter turn to connect it to the connection
socket
3 on the carrier.
Removing the towball
► Grasp the trailer plug, perform a quarter turn
and pull to disconnect it from the connection
socket
3 on the carrier.
►
Detach the cable on the trailer from the safety
eye
4 on the carrier.
►
Detach the trailer from the towball.
►
Refit the protective cover to the towball.
►
Remove the cap from the lock and press it
onto the head of the key
.