2020 PEUGEOT 5008 tow bar
[x] Cancel search: tow barPage 178 of 308
176
Practical information
Fitting directly to the roof
You must only attach the transverse bars to
the four fixing points located on the roof frame.
These points are concealed by the vehicle doors
when the doors are closed.
The roof bar fixings have a stud which must be
inserted into the opening of each fixing point.
Maximum load distributed over the
transverse roof bars, for a loading height
not exceeding 40 cm (except bicycle carrier):
80 kg.
As this value may change, please verify the
maximum load quoted in the guide supplied
with the roof bars.
If the height exceeds 40 cm, adapt the speed
of the vehicle to the profile of the road to
avoid damaging the roof bars and the fixings
on the vehicle.
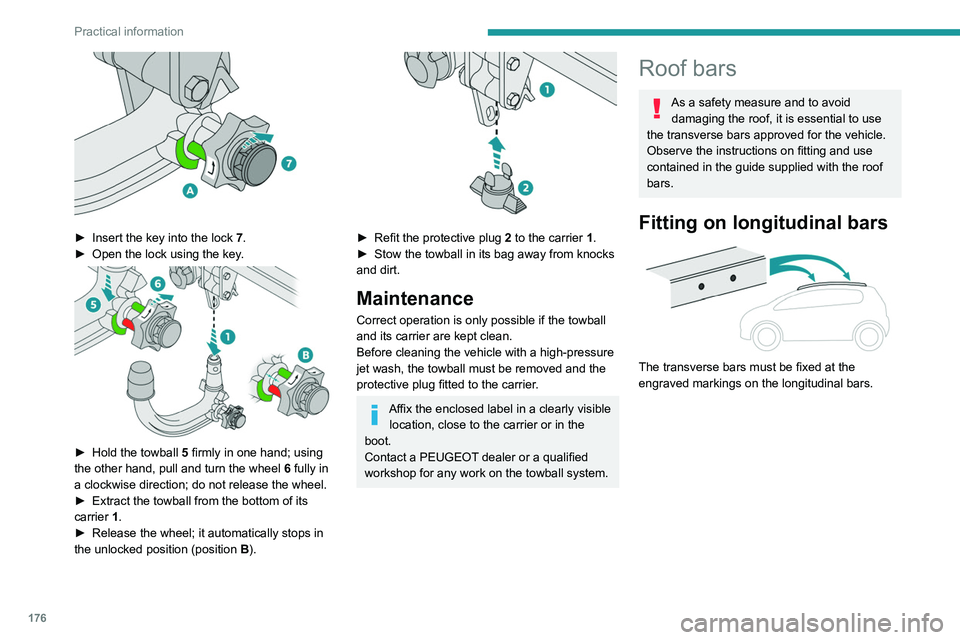
► Insert the key into the lock 7.
► Open the lock using the key .
► Hold the towball 5 firmly in one hand; using
the other hand, pull and turn the wheel 6 fully in
a clockwise direction; do not release the wheel.
►
Extract the towball from the bottom of its
carrier
1.
►
Release the wheel; it automatically stops in
the unlocked position (position B
).
► Refit the protective plug 2 to the carrier 1.
► Stow the towball in its bag away from knocks
and dirt.
Maintenance
Correct operation is only possible if the towball
and its carrier are kept clean.
Before cleaning the vehicle with a high-pressure
jet wash, the towball must be removed and the
protective plug fitted to the carrier.
Affix the enclosed label in a clearly visible location, close to the carrier or in the
boot.
Contact a PEUGEOT dealer or a qualified
workshop for any work on the towball system.
Roof bars
As a safety measure and to avoid damaging the roof, it is essential to use
the transverse bars approved for the vehicle.
Observe the instructions on fitting and use
contained in the guide supplied with the roof
bars.
Fitting on longitudinal bars
The transverse bars must be fixed at the
engraved markings on the longitudinal bars.
Page 186 of 308
184
Practical information
AdBlue® (BlueHDi)
To respect the environment and ensure
compliance with the Euro 6 standard, without
adversely affecting the performance or fuel
consumption of its Diesel engines, PEUGEOT
has taken the decision to equip its vehicles
with a system that associates SCR (Selective
Catalytic Reduction) with a Diesel Particle Filter
(DPF) for the treatment of exhaust gases.
SCR system
Using a liquid called AdBlue® that contains urea,
a catalytic converter turns up to 85% of nitrogen
oxides (NOx) into nitrogen and water, which are
harmless to health and the environment.
The AdBlue® is contained in a special
tank holding about 17 litres.
Its capacity allows a driving range of
approximately 5,600 miles (9,000 km), highly
dependent on your driving style.
An alert system is triggered automatically once
the reserve level is reached: you can then drive
Manual gearbox
The gearbox does not require any maintenance (no oil change).
Automatic gearbox
The gearbox does not require any maintenance (no oil change).
Electric parking brake
This system does not require any routine servicing. However, in the event of a
problem, do not hesitate to have the system
checked by a PEUGEOT dealer or a qualified
workshop.
For more information on the Electric
parking brake, refer to the
corresponding section.
Brake pads
Brake wear depends on the style of
driving, particularly in the case of vehicles
used in town, over short distances. It may be
necessary to have the condition of the brakes
checked, even between vehicle services.
Unless there is a leak in the circuit, a drop in the
brake fluid level indicates that the brake pads
are worn.
After washing the vehicle, moisture, or in wintry conditions, ice can form on the
brake discs and pads: braking efficiency may
be reduced. Gently dab the brakes to dry and
defrost them.
Brake disc wear
For information on checking brake disc
wear, contact a PEUGEOT dealer or a
qualified workshop.
Wheels and tyres
The inflation pressure of all tyres, including the spare wheel, must be
checked on "cold” tyres.
The pressures indicated on the tyre pressure
label are valid for "cold" tyres. If you have driven
for more than 10 minutes or more than 6 miles
(10 kilometres) at over 31 mph (50
km/h), add
0.3 bar (30 kPa) to the values indicated on the
label.
Under-inflation increases fuel
consumption. Non-compliant tyre
pressure causes premature wear on tyres and
has an adverse effect on the vehicle's road
holding - risk of an accident!
Driving with worn or damaged tyres reduces the
braking and road holding performance of the
vehicle. It is recommended to regularly check the
condition of the tyres (tread and sidewalls) and
wheel rims as well as the presence of the valves.
When the wear indicators no longer appear set
back from the tread, the depth of the grooves is less than 1.6 mm; it is imperative to replace the
tyres.
Using different size wheels and tyres from those
specified can affect the lifetime of tyres, wheel
rotation, ground clearance, the speedometer
reading and have an adverse effect on road
holding.
Fitting different tyres on the front and rear axles
can cause the ESC to mistime.
Shock absorbers
It is not easy for drivers to detect when
shock absorbers are worn. Nevertheless,
the shock absorbers have a major impact on
road-holding and braking performance.
For your safety and driving comfort, it is
important to have them regularly checked by a
PEUGEOT dealer or a qualified workshop.
Timing and accessory kits
Timing and accessory kits are used from
the time the engine is started until it is
switched off. It is normal for them to wear over
time.
A
faulty timing or accessory kit can damage
the engine, rendering it unusable. Observe the
recommended replacement frequency, stated in
distance travelled or time elapsed, whichever is
reached first.
Page 197 of 308
195
In the event of a breakdown
8Only the 12 V sockets located at the
front of the vehicle and in the boot can
be used to power the compressor.
The 12
V socket located at the back of the
centre console is not suitable for this purpose.
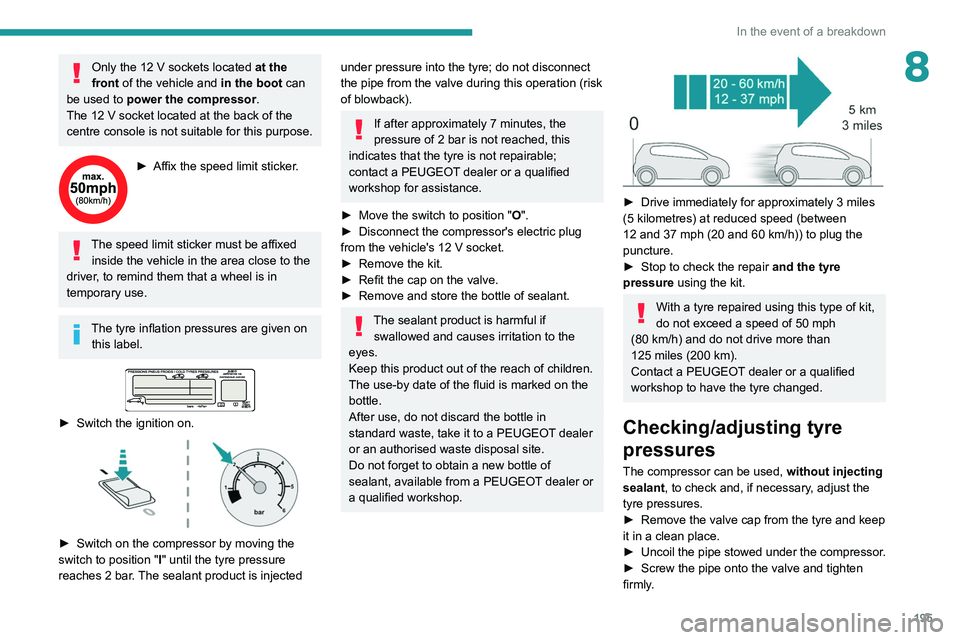
► Affix the speed limit sticker .
The speed limit sticker must be affixed
inside the vehicle in the area close to the
driver, to remind them that a wheel is in
temporary use.
The tyre inflation pressures are given on this label.
► Switch the ignition on.
► Switch on the compressor by moving the
switch to position " I
" until the tyre pressure
reaches 2 bar. The sealant product is injected
under pressure into the tyre; do not disconnect
the pipe from the valve during this operation (risk
of blowback).
If after approximately 7 minutes, the
pressure of 2 bar is not reached, this
indicates that the tyre is not repairable;
contact a PEUGEOT dealer or a qualified
workshop for assistance.
►
Move the switch to position " O
".
►
Disconnect the compressor's electric plug
from the vehicle's 12
V socket.
►
Remove the kit.
►
Refit the cap on the valve.
►
Remove and store the bottle of sealant.
The sealant product is harmful if swallowed and causes irritation to the
eyes.
Keep this product out of the reach of children.
The use-by date of the fluid is marked on the
bottle.
After use, do not discard the bottle in
standard waste, take it to a PEUGEOT dealer
or an authorised waste disposal site.
Do not forget to obtain a new bottle of
sealant, available from a PEUGEOT dealer or
a qualified workshop.
► Drive immediately for approximately 3 miles
(5 kilometres) at reduced speed (between
12 and 37 mph (20 and 60
km/h)) to plug the
puncture.
►
Stop to check the repair
and the tyre
pressure using the kit.
With a tyre repaired using this type of kit,
do not exceed a speed of 50
mph
(80
km/h) and do not drive more than
125
miles (200 km).
Contact a PEUGEOT dealer or a qualified
workshop to have the tyre changed.
Checking/adjusting tyre
pressures
The compressor can be used, without injecting
sealant, to check and, if necessary, adjust the
tyre pressures.
►
Remove the valve cap from the tyre and keep
it in a clean place.
►
Uncoil
the pipe stowed under the compressor.
►
Screw the pipe onto the valve and tighten
firmly
.
Page 198 of 308
196
In the event of a breakdown
► Check that the compressor switch is in
position " O
".
►
Fully uncoil the electric cable stowed under
the compressor
.
►
Connect the compressor's electric plug to the
vehicle's 12
V socket.
►
Switch the ignition on.
Only the 12 V sockets located at the
front of the vehicle and in the boot can
be used to power the compressor.
The 12V socket located at the back of the
centre console is not suitable for this purpose.
The tyre inflation pressures are given on this label.
► Start the compressor by placing the switch at
position " I
" and adjust the pressure to the value
shown on the vehicle's tyre pressure label. To
deflate: press the black button located on the
compressor pipe, near the valve connection.
If after 7 minutes the pressure of 2 bar is
not reached, the tyre is damaged;
contact a PEUGEOT dealer or a qualified
workshop for assistance.
►
Once the correct pressure is reached, put the
switch in position " O
".
►
Remove the kit and stow it.
► Refit the cap on the valve.
Should the pressure of one or more tyres
be adjusted, it is necessary to reinitialise
the under-inflation detection system.
For more information on Tyre under-inflation
detection, refer to the corresponding section.
Spare wheel
Scan the QR Code on page 3 to view
explanatory videos.
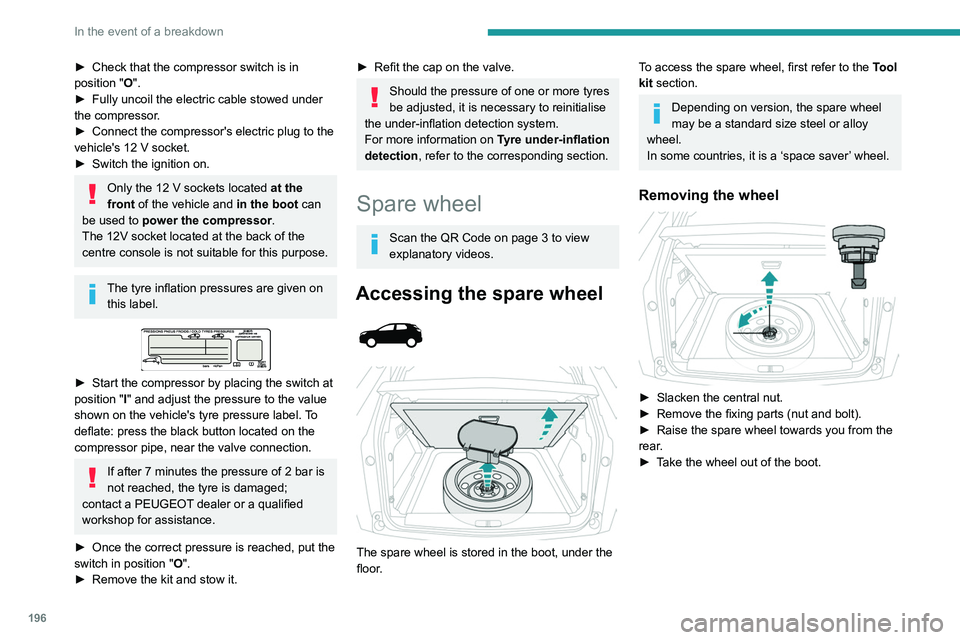
Accessing the spare wheel
The spare wheel is stored in the boot, under the
floor.
To access the spare wheel, first refer to the Tool
kit section.
Depending on version, the spare wheel
may be a standard size steel or alloy
wheel.
In some countries, it is a ‘space saver’ wheel.
Removing the wheel
► Slacken the central nut.
► Remove the fixing parts (nut and bolt).
►
Raise the spare wheel towards you from the
rear
.
►
T
ake the wheel out of the boot.
Putting the wheel back in place
► Put the wheel back in its housing.
► Slacken the nut on the bolt by a few turns.
► Position the fixing parts (nut and bolt) in the
middle of the wheel.
► Tighten fully until the central nut clicks, to
retain the wheel correctly.
► Return the tool box to the middle of the wheel
and clip it in place.
Page 217 of 308
215
In the event of a breakdown
8
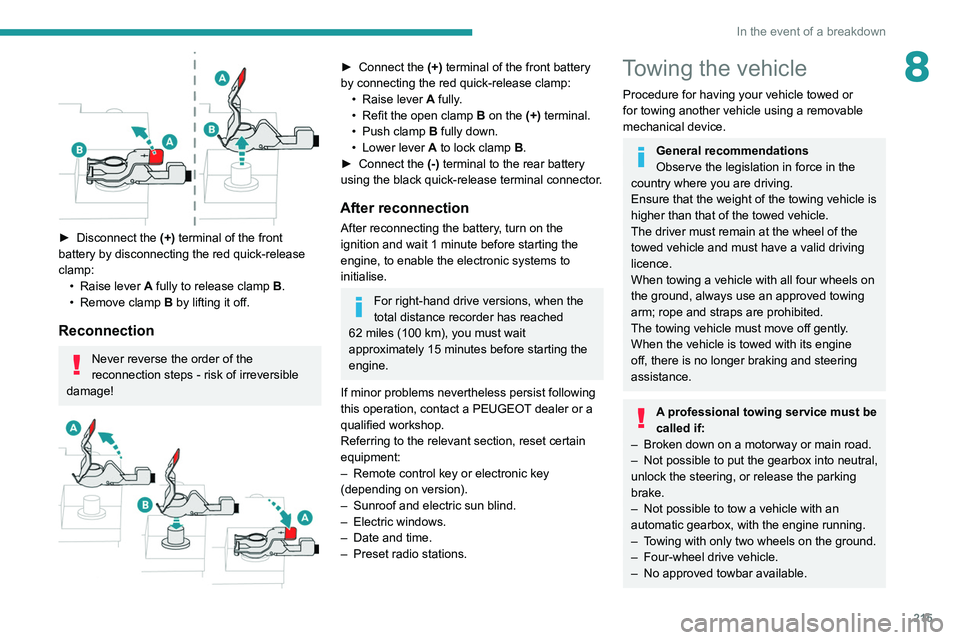
► Disconnect the (+) terminal of the front
battery by disconnecting the red quick-release
clamp: •
Raise lever
A
fully to release clamp
B
.
•
Remove clamp
B
by lifting it off.
Reconnection
Never reverse the order of the
reconnection steps - risk of irreversible
damage!
► Connect the (+) terminal of the front battery
by connecting the red quick-release clamp: •
Raise lever
A
fully.
•
Refit the open clamp
B
on the (+) terminal.
•
Push clamp
B fully down.
•
Lower lever
A
to lock clamp B.
►
Connect the
(-) terminal to the rear battery
using the black quick-release terminal connector.
After reconnection
After reconnecting the battery, turn on the
ignition and wait 1 minute before starting the
engine, to enable the electronic systems to
initialise.
For right-hand drive versions, when the
total distance recorder has reached
62
miles (100 km), you must wait
approximately 15
minutes before starting the
engine.
If minor problems nevertheless persist following
this operation, contact a PEUGEOT dealer or a
qualified workshop.
Referring to the relevant section, reset certain
equipment:
–
Remote control key or electronic key
(depending on version).
–
Sunroof and electric sun blind.
–
Electric windows.
–
Date and time.
–
Preset radio stations.
Towing the vehicle
Procedure for having your vehicle towed or
for towing another vehicle using a removable
mechanical device.
General recommendations
Observe the legislation in force in the
country where you are driving.
Ensure that the weight of the towing vehicle is
higher than that of the towed vehicle.
The driver must remain at the wheel of the
towed vehicle and must have a valid driving
licence.
When towing a vehicle with all four wheels on
the ground, always use an approved towing
arm; rope and straps are prohibited.
The towing vehicle must move off gently.
When the vehicle is towed with its engine
off, there is no longer braking and steering
assistance.
A professional towing service must be
called if:
–
Broken down on a motorway or main road.
–
Not possible to put
the gearbox into neutral,
unlock the steering, or release the parking
brake.
–
Not possible to tow a vehicle with an
automatic gearbox, with the engine running.
–
T
owing with only two wheels on the ground.
–
Four-wheel drive vehicle.
–
No approved towbar available.
Page 218 of 308
216
In the event of a breakdown
Hybrid vehicles
Before any intervention, with the ignition on, depress the brake pedal and select mode N, then switch off the hybrid system (READY indicator lamp
off).
Always call on professionals for recovery of the vehicle on a flatbed lorry or trailer .
Use the towing eye only
to free the vehicle where it is stuck, or to secure it for recovery on a flatbed lorry or trailer .
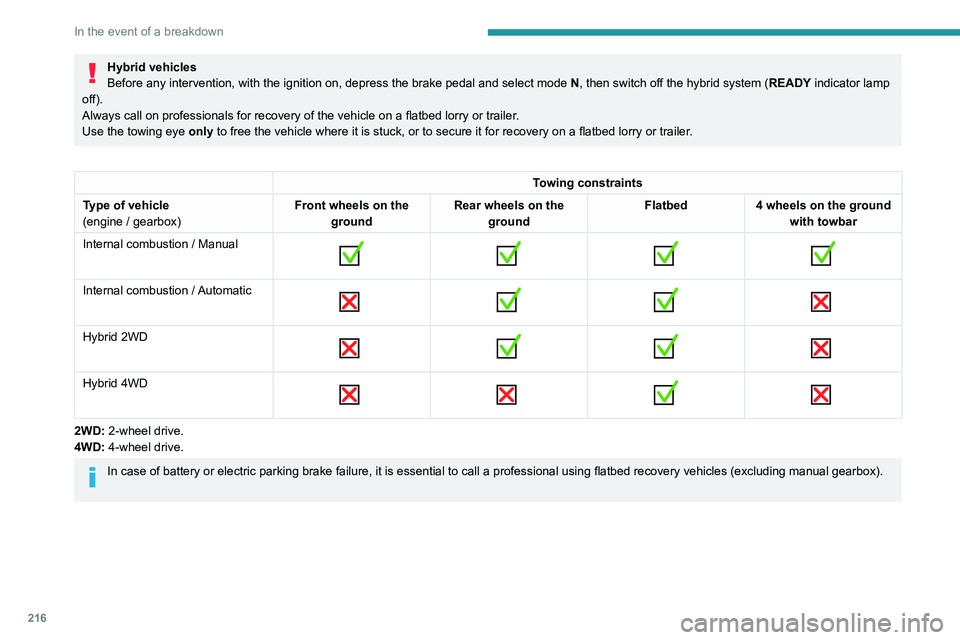
Towing constraints
Type of vehicle
(engine / gearbox) Front wheels on the
ground Rear wheels on the
ground Flatbed
4 wheels on the ground
with towbar
Internal combustion / Manual
Internal combustion / Automatic
Hybrid 2WD
Hybrid 4WD
2WD: 2-wheel drive.
4WD: 4-wheel drive.
In case of battery or electric parking brake failure, it is essential to call a p
rofessional using flatbed recovery vehicles (excluding manual gearbox).
Accessing the tools
Page 219 of 308
217
In the event of a breakdown
8Accessing the tools
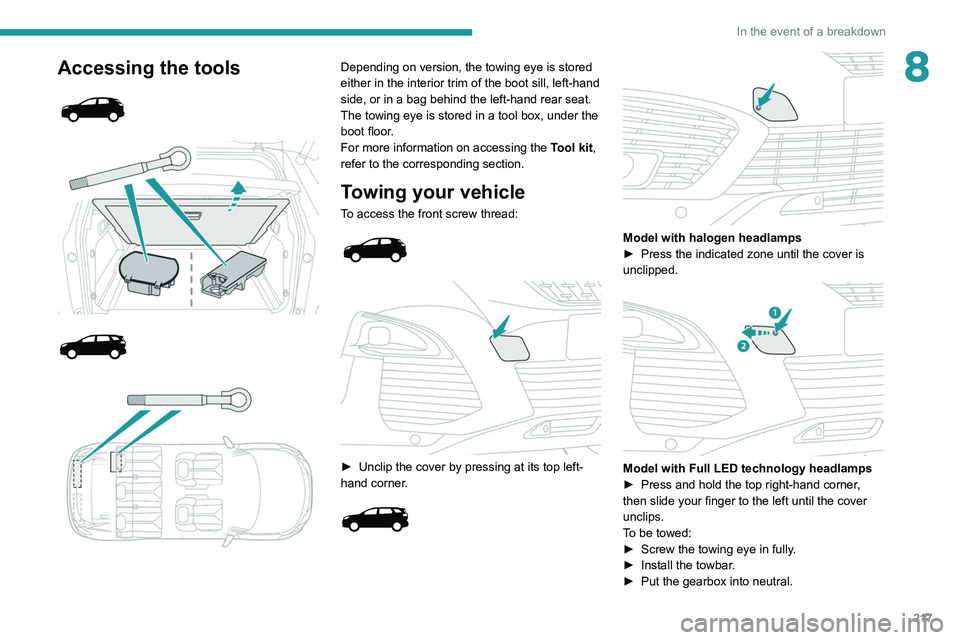
Depending on version, the towing eye is stored
either in the interior trim of the boot sill, left-hand
side, or in a bag behind the left-hand rear seat.
The towing eye is stored in a tool box, under the
boot floor.
For more information on accessing the Tool kit,
refer to the corresponding section.
Towing your vehicle
To access the front screw thread:
► Unclip the cover by pressing at its top left-
hand corner .
Model with halogen headlamps
► Press the indicated zone until the cover is
unclipped.
Model with Full LED technology headlamps
► Press and hold the top right-hand corner ,
then slide your finger to the left until the cover
unclips.
To be towed:
►
Screw the towing eye in fully
.
►
Install the towbar
.
►
Put the gearbox into neutral.
Page 220 of 308
218
In the event of a breakdown
Failure to observe this instruction could
result in damage to certain components
(braking, transmission, etc.) and to the
absence of braking assistance the next time
the engine is started.
Automatic gearbox: never tow the vehicle with the driving wheels on the ground
and the engine off.
►
Unlock the steering and release the parking
brake.
►
Switch on the hazard warning lamps on both
vehicles.
►
Move off gently
, drive slowly and only for a
short distance.
Towing another vehicle
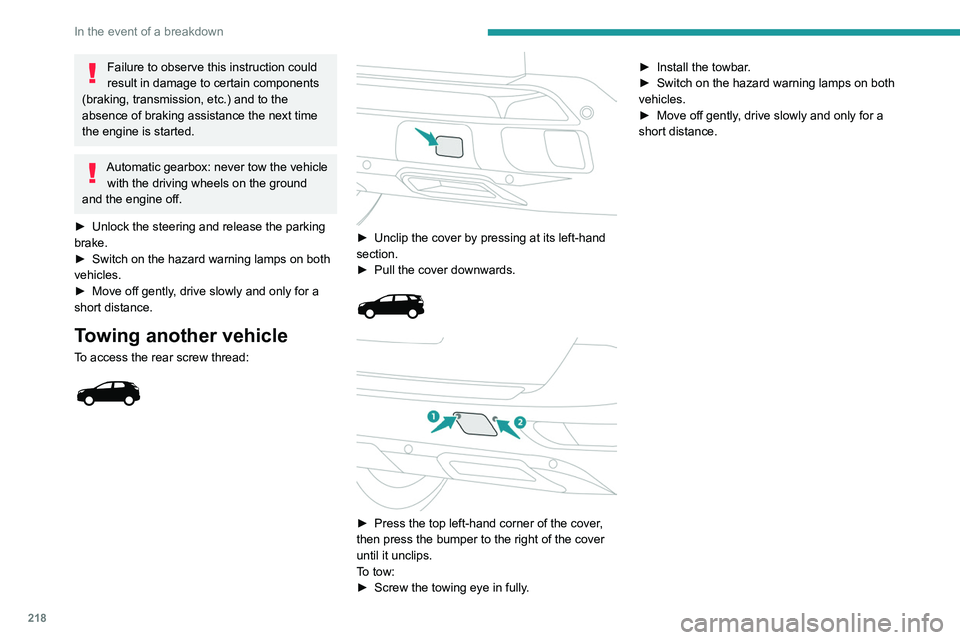
To access the rear screw thread:
► Unclip the cover by pressing at its left-hand
section.
►
Pull the cover downwards.
► Press the top left-hand corner of the cover ,
then press the bumper to the right of the cover
until it unclips.
To tow:
►
Screw the towing eye in fully
.►
Install the towbar
.
►
Switch on the hazard warning lamps on both
vehicles.
►
Move off gently
, drive slowly and only for a
short distance.