2020 PEUGEOT 5008 roof rack
[x] Cancel search: roof rackPage 9 of 308

7
Eco-driving
Eco-driving
Eco-driving refers to a range of everyday
practices that allow the motorist to optimise their
fuel consumption and CO
2emissions.
Optimise your use of the gearbox
With a manual gearbox, move off gently and
change up promptly. While accelerating, change
up early.
With an automatic gearbox, favour automatic
mode and avoid pressing the accelerator pedal
heavily or suddenly.
The gear efficiency indicator prompts you to
engage the most suitable gear: whenever this
indication is displayed on the instrument panel,
follow it straight away.
With an automatic gearbox, this indicator
appears only in manual mode.
Drive smoothly
Maintain a safe distance between vehicles, use
engine braking rather than the brake pedal and
press the accelerator gradually. These attitudes
help to save fuel, reduce CO
2 emissions and
decrease general traffic noise.
If the vehicle has the steering-mounted
"CRUISE" control, use cruise control at speeds
above 25 mph (40
km/h) when the traffic is
flowing well.
Use electrical equipment wisely
Before moving off, if the passenger compartment
is too warm, ventilate it by opening the windows
and air vents before using the air conditioning.
At speeds above 31
mph (50 km/h), close the
windows and leave the air vents open.
Consider using equipment that can help keep
the temperature in the passenger compartment
down (sunroof blind and window blinds, etc.).
Unless automatically regulated, switch off the air
conditioning as soon as the desired temperature
has been reached.
Switch off the demisting and defrosting functions,
if they are not managed automatically.
Switch off the heated seat as soon as possible.
Switch off the headlamps and foglamps when
the visibility conditions do not require their use.
Avoid running the engine before moving off,
particularly in winter; your vehicle will warm up
much faster while driving.
As a passenger, avoid connecting your
multimedia devices (film, music, video game,
etc.) to help reduce consumption of electrical
energy, and hence fuel.
Disconnect all portable devices before leaving
the vehicle.
Limit the causes of excess consumption
Spread loads throughout the vehicle; place the
heaviest items in the boot, as close as possible
to the rear seats.
Limit the loads carried in the vehicle and
minimise wind resistance (roof bars, roof rack, bicycle carrier, trailer, etc.). Preferably, use a
roof box.
Remove roof bars and roof racks after use.
At the end of winter, remove snow tyres and refit
summer tyres.
Avoid using the Dynamic Pack for too long, in
order to limit your fuel consumption.
Comply with servicing instructions
Check tyre pressures regularly, with the tyres
cold, referring to the label in the door aperture on
the driver's side.
Carry out this check in particular:
–
before a long journey
.
–
at each change of season.
–
after a long period out of use.
Do not overlook the spare wheel and, where
applicable, the tyres on your trailer or caravan.
Have your vehicle serviced regularly (engine oil,
oil filter
, air filter, passenger compartment filter,
etc.) and observe the schedule of operations in
the manufacturer's service schedule.
With a BlueHDi Diesel engine, if the SCR system
is faulty, your vehicle will emit pollution. Visit
a PEUGEOT dealer or a qualified workshop
as soon as possible to restore your vehicle’s
nitrogen oxide emissions to regulatory
compliance.
When filling the fuel tank, do not continue after
the third nozzle cut-out, to avoid overflow.
You will only see the fuel consumption of your
new vehicle settle down to a consistent average
after the first 1,900 miles (3,000 kilometres).
Page 76 of 308

74
Ease of use and comfort
Removal
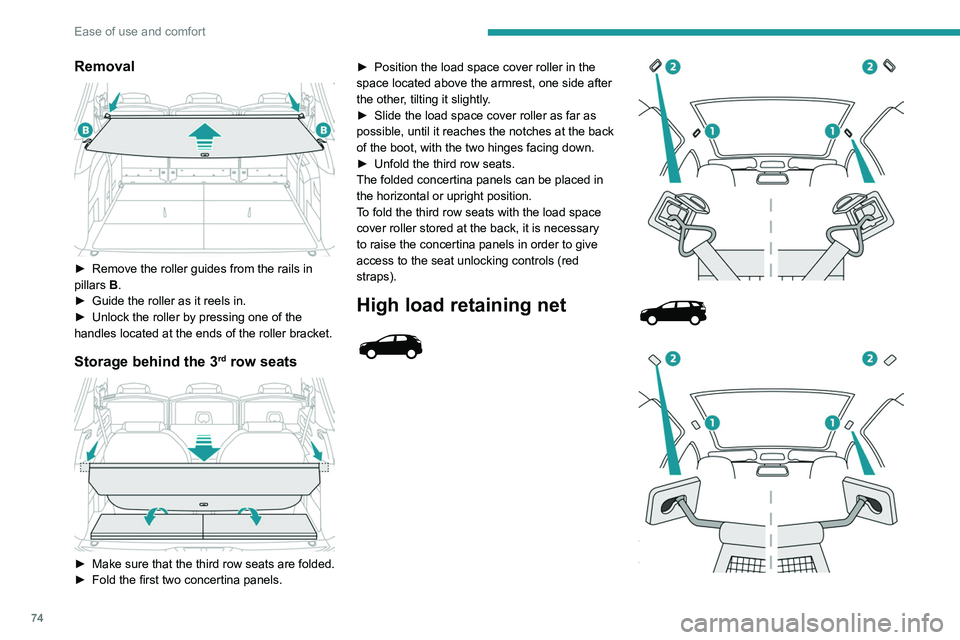
► Remove the roller guides from the rails in
pillars B
.
►
Guide the roller as it reels in.
►
Unlock the roller by pressing one of the
handles located at the ends of the roller bracket.
Storage behind the 3rd row seats
► Make sure that the third row seats are folded.
► Fold the first two concertina panels. ►
Position the load space cover roller in the
space located above the armrest, one side after
the other
, tilting it slightly.
►
Slide the load space cover roller as far as
possible, until it reaches the notches at the back
of the boot, with the two hinges facing down.
►
Unfold the third row seats.
The folded concertina panels can be placed in
the horizontal or upright position.
T
o fold the third row seats with the load space
cover roller stored at the back, it is necessary
to raise the concertina panels in order to give
access to the seat unlocking controls (red
straps).
High load retaining net
This removable net allows the entire loading
volume up to the roof to be used:
– behind the front seats (1
st row) when the rear
seats are folded down.
– behind the rear seats (2
nd row) when the load
space cover is removed.
It protects the occupants in case of
sudden braking.
Behind the front seats
(Depending on version)
► Fold down the rear seats.
► Remove the trim covers on each side,
located in the upper section in the roof.
► Position the net's upper hooks in the roof.
Page 214 of 308

212
In the event of a breakdown
► At the end of the charging operation, switch
off charger B
before disconnecting the cables
from battery A.
24v 12v
If this label is present, use only a 12 V
charger to avoid causing irreversible
damage to the electrical components related
to the Stop & Start system.
Never try to charge a frozen battery - risk
of explosion!
If the battery has frozen, have it checked by a
PEUGEOT dealer or by a qualified workshop
who will verify that the internal components
have not been damaged and that the case
has not cracked, which would mean a risk of
toxic and corrosive acid leaking.
Some functions, including Stop & Start,
are not available if the battery is not
sufficiently charged.
Disconnecting the battery
In order to maintain an adequate state of charge
for starting the engine, it is recommended that
the battery be disconnected if the vehicle is
taken out of service for a long period. Before disconnecting the battery:
►
Close all openings (doors, boot, windows,
roof).
►
Switch off all electrical consumers (audio
system, wipers, lighting, etc.).
►
Switch off the ignition and wait for 4
minutes.
At the battery, it is only necessary to disconnect
the (+) terminal.
Quick-release terminal clamp
Disconnecting the (+) terminal
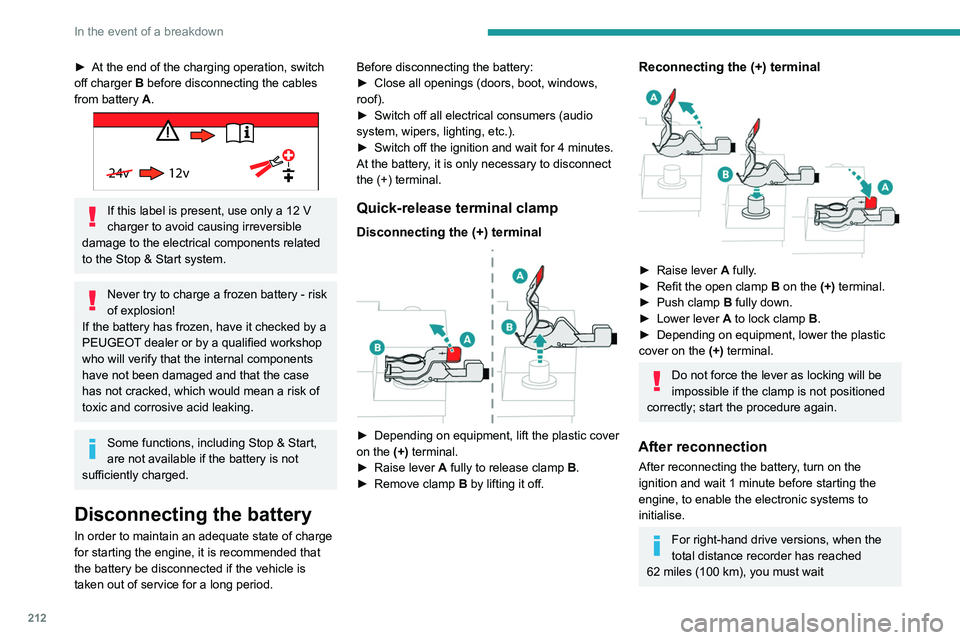
► Depending on equipment, lift the plastic cover
on the (+) terminal.
►
Raise lever
A
fully to release clamp
B
.
►
Remove clamp
B
by lifting it off.
Reconnecting the (+) terminal
► Raise lever A fully.
► Refit the open clamp B on the (+) terminal.
►
Push clamp
B fully down.
►
Lower lever
A
to lock clamp B.
►
Depending on equipment, lower the plastic
cover on the
(+) terminal.
Do not force the lever as locking will be
impossible if the clamp is not positioned
correctly; start the procedure again.
After reconnection
After reconnecting the battery, turn on the
ignition and wait 1 minute before starting the
engine, to enable the electronic systems to
initialise.
For right-hand drive versions, when the
total distance recorder has reached
62
miles (100 km), you must wait
approximately 15 minutes before starting the
engine.
If minor problems nevertheless persist following
this operation, contact a PEUGEOT dealer or a
qualified workshop.
Referring to the relevant section, reset certain
equipment:
– Remote control key or electronic key
(depending on version).
– Sunroof and electric sun blind.
– Electric windows.
– Date and time.
– Preset radio stations.
After reconnection of the battery, the
“Collision risk detection system fault”
message is displayed on the instrument panel
when the ignition is switched on. This
operation is perfectly normal. The message
will disappear while driving.
The Stop & Start system may not be operational during the trip following the
first engine start.
In this case, the system will only be available
again after a continuous period with the
vehicle immobilised, the duration of which
depends on the exterior temperature and the
state of charge of the battery (up to about 8
hours).
Page 216 of 308

214
In the event of a breakdown
(+) Positive terminal, protected by a red plastic
cover.
(-) Negative terminal with a black quick-release
connector.
Charging the front battery
using a battery charger
For optimum service life of the front battery, it
is essential to maintain an adequate state of
charge.
In some circumstances, it may be necessary to
charge the front battery:
–
using the vehicle mainly for short journeys;
–
if the vehicle is to be taken off the road for
several weeks.
Contact a PEUGEOT
dealer or a qualified
workshop.
To charge the vehicle's front battery yourself, use only a charger compatible
with lead-acid batteries with a nominal voltage
of 12
V.
Follow the instructions provided by the
manufacturer of the charger.
Never reverse polarities.
It is not necessary to disconnect the
battery.
►
Switch off the ignition.
►
Switch off all electrical consumers (audio
system, lighting, wipers, etc.).
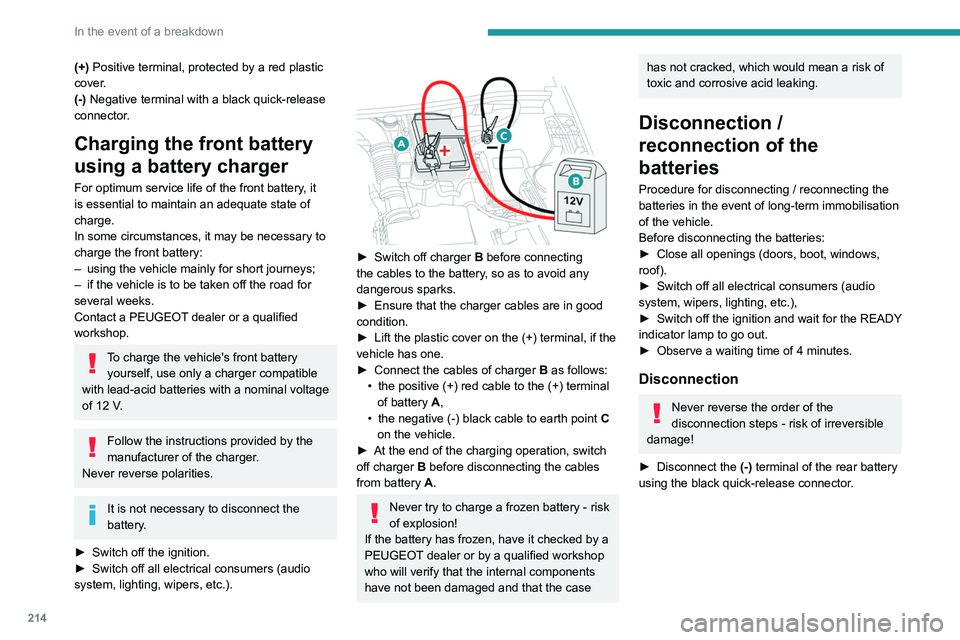
► Switch off charger B before connecting
the cables to the battery, so as to avoid any
dangerous sparks.
►
Ensure that the charger cables are in good
condition.
►
Lift the plastic cover on the (+) terminal, if the
vehicle has one.
►
Connect the cables of charger B
as follows:
•
the positive (+) red cable to the (+) terminal
of battery
A,
•
the negative (-) black cable to earth point C
on the vehicle.
►
At the end of the charging operation, switch
off charger B
before disconnecting the cables
from battery A.
Never try to charge a frozen battery - risk
of explosion!
If the battery has frozen, have it checked by a
PEUGEOT dealer or by a qualified workshop
who will verify that the internal components
have not been damaged and that the case
has not cracked, which would mean a risk of
toxic and corrosive acid leaking.
Disconnection /
reconnection of the
batteries
Procedure for disconnecting / reconnecting the
batteries in the event of long-term immobilisation
of the vehicle.
Before disconnecting the batteries:
►
Close all openings (doors, boot, windows,
roof).
►
Switch off all electrical consumers (audio
system, wipers, lighting, etc.),
►
Switch
off the ignition and wait for the READY
indicator lamp to go out.
►
Observe a waiting time of 4 minutes.
Disconnection
Never reverse the order of the
disconnection steps - risk of irreversible
damage!
►
Disconnect the (-)
terminal of the rear battery
using the black quick-release connector.
► Disconnect the (+) terminal of the front
battery by disconnecting the red quick-release
clamp: • Raise lever A fully to release clamp B.
• Remove clamp B by lifting it off.
Reconnection
Never reverse the order of the
reconnection steps - risk of irreversible
damage!