2020 NISSAN 370Z ESP
[x] Cancel search: ESPPage 301 of 455
THREE-WAY CATALYST
The three-way catalyst is an emission
control device installed in the exhaust
system. Exhaust gases in the three-way
catalyst are burned at high temperatures
to help reduce pollutants.
WARNING
.The exhaust gas and the exhaust
system are very hot. Keep people,
animals or flammable materials
away from the exhaust system
components.
. Do not stop or park the vehicle
over flammable materials such as
dry grass, waste paper or rags.
They may ignite and cause a fire.
CAUTION
.Do not use leaded gasoline. De-
posits from leaded gasoline ser-
iously reduce the three-way
catalyst’s ability to help reduce
exhaust pollutants.
. Keep your engine tuned up. Mal-
functions in the ignition, fuel in-
jection, or electrical systems can cause overrich fuel flow into the
three-way catalyst, causing it to
overheat. Do not keep driving if
the engine misfires, or if notice-
able loss of performance or other
unusual operating conditions are
detected. Have the vehicle in-
spected. It is recommended you
visit a NISSAN dealer for this
service.
. Avoid driving with an extremely
low fuel level. Running out of fuel
could cause the engine to misfire,
damaging the three-way catalyst.
. Do not race the engine while
warming it up.
. Do not push or tow your vehicle
to start the engine.
TIRE PRESSURE MONITORING SYS-
TEM (TPMS)
Each tire, including the spare (if provided),
should be checked monthly when cold
and inflated to the inflation pressure
recommended by the vehicle manufac-
turer on the vehicle placard or tire infla-
tion pressure label. (If your vehicle has
tires of a different size than the size
indicated on the vehicle placard or tire
inflation pressure label, you should deter-
mine the proper tire inflation pressure for those tires.)
As an added safety feature, your vehicle
has been equipped with a Tire Pressure
Monitoring System (TPMS) that illumi-
nates a low tire pressure telltale when
one or more of your tires is significantly
under-inflated. Accordingly, when the low
tire pressure telltale illuminates, you
should stop and check your tires as soon
as possible, and inflate them to the
proper pressure. Driving on a significantly
under-inflated tire causes the tire to
overheat and can lead to tire failure.
Under-inflation also reduces fuel effi-
ciency and tire tread life, and may affect
the vehicle’s handling and stopping abil-
ity.
Please note that the TPMS is not a
substitute for proper tire maintenance,
and it is the driver’s responsibility to
maintain correct tire pressure, even if
under-inflation has not reached the level
to trigger illumination of the TPMS low
tire pressure telltale.
Your vehicle has also been equipped with
a TPMS malfunction indicator to indicate
when the system is not operating prop-
erly. The TPMS malfunction indicator is
combined with the low tire pressure tell-
tale. When the system detects a malfunc-
tion, the telltale will flash for
approximately one minute and then re-
Starting and driving5-3
Page 303 of 455

the light still illuminates while
driving after adjusting the tire
pressure, a tire may be flat or
the TPMS may be malfunctioning.
If you have a flat tire, replace it
with a spare tire (if so equipped)
or repair it with the tire puncture
repair kit (if so equipped) as soon
as possible. If no tire is flat and all
tires are properly inflated, it is
recommended you consult a
NISSAN dealer.
. Since the spare tire is not
equipped with the TPMS, when a
spare tire is mounted or a wheel
is replaced, the TPMS will not
function and the low tire pressure
warning light will flash for ap-
proximately 1 minute. The light
will remain on after 1 minute.
Have your tires replaced and/or
TPMS system reset as soon as
possible. It is recommended you
visit a NISSAN dealer for these
services.
. Replacing tires with those not
originally specified by NISSAN
could affect the proper operation
of the TPMS.
. NISSAN recommends using only
Genuine NISSAN Emergency Tire
Sealant provided with your vehi- cle. Other tire sealants may da-
mage the valve stem seal which
can cause the tire to lose air
pressure. It is recommended you
visit a NISSAN dealer as soon as
possible after using tire repair
sealant (for models equipped
with the emergency tire puncture
repair kit).
CAUTION
.
The TPMS may not function prop-
erly when the wheels are
equipped with tire chains or the
wheels are buried in snow.
. Do not place metalized film or
any metal parts (antenna, etc.) on
the windows. This may cause
poor reception of the signals
from the tire pressure sensors,
and the TPMS will not function
properly.
Some devices and transmitters may tem-
porarily interfere with the operation of
the TPMS and cause the low tire pressure
warning light to illuminate. Some exam-
ples are: .
Facilities or electric devices using
similar radio frequencies are near the
vehicle.
. If a transmitter set to similar frequen-
cies is being used in or near the
vehicle.
. If a computer (or similar equipment) or
a DC/AC converter is being used in or
near the vehicle.
Low tire pressure warning light may
illuminate in the following cases.
. If the vehicle is equipped with a wheel
and tire without TPMS.
. If the TPMS has been replaced and the
ID has not been registered.
. If the wheel is not originally specified
by NISSAN.
FCC Notice:
For USA:
This device complies with Part 15 of the
FCC Rules. Operation is subject to the
following two conditions: (1) This device
may not cause harmful interference,
and (2) this device must accept any
interference received, including inter-
ference that may cause undesired op-
eration.
NOTE:
Changes or modifications not expressly
approved by the party responsible for
compliance could void the user’s
Starting and driving5-5
Page 304 of 455
5-6Starting and driving
authority to operate the equipment.
For Canada:
This device complies with Industry Ca-
nada licence-exempt RSS standard(s).
Operation is subject to the following
two conditions: (1) this device may not
cause interference, and (2) this device
must accept any interference, including
interference that may cause undesired
operation of the device.
AVOIDING COLLISION AND ROLL-
OVER
WARNING
Failure to operate this vehicle in a
safe and prudent manner may result
in loss of control or an accident.
Be alert and drive defensively at all times.
Obey all traffic regulations. Avoid exces-
sive speed, high speed cornering, or
sudden steering maneuvers, because
these driving practices could cause you
to lose control of your vehicle. As with
any vehicle, a loss of control could
result in a collision with other vehicles
or objects, or cause the vehicle to roll-
over, particularly if the loss of control
causes the vehicle to slide sideways. Be
attentive at all times, and avoid driving when tired. Never drive when under the
influence of alcohol or drugs (including
prescription or over-the-counter drugs
which may cause drowsiness). Always
wear your seat belt as outlined in the
“Seat belts” (P.1-10) of this manual, and
also instruct your passengers to do so.
Seat belts help reduce the risk of injury in
collisions and rollovers.
In a rollover
crash, an unbelted or improperly belted
person is significantly more likely to be
injured or killed than a person properly
wearing a seat belt.
OFF-ROAD RECOVERY
While driving, the right side or left side
wheels may unintentionally leave the
road surface. If this occurs, maintain
control of the vehicle by following the
procedure below. Please note that this
procedure is only a general guide. The
vehicle must be driven as appropriate
based on the conditions of the vehicle,
road and traffic.
1. Remain calm and do not overreact.
2. Do not apply the brakes.
3. Maintain a firm grip on the steering wheel with both hands and try to hold
a straight course.
4. When appropriate, slowly release the accelerator pedal to gradually slow
the vehicle. 5. If there is nothing in the way, steer the
vehicle to follow the road while the
vehicle speed is reduced. Do not
attempt to drive the vehicle back onto
the road surface until vehicle speed is
reduced.
6. When it is safe to do so, gradually turn the steering wheel until both tires
return to the road surface. When all
tires are on the road surface, steer the
vehicle to stay in the appropriate
driving lane.
.If you decide that it is not safe toreturn the vehicle to the road sur-
face based on vehicle, road or
traffic conditions, gradually slow
the vehicle to a stop in a safe place
off the road.
RAPID AIR PRESSURE LOSS
Rapid air pressure loss or a “blow-out” can
occur if the tire is punctured or is
damaged due to hitting a curb or pothole.
Rapid air pressure loss can also be caused
by driving on under-inflated tires.
Rapid air pressure loss can affect the
handling and stability of the vehicle,
especially at highway speeds.
Help prevent rapid air pressure loss by
maintaining the correct air pressure and
visually inspect the tires for wear and
damage. See “Wheels and tires” (P.8-26) of
Page 310 of 455
5-12Starting and driving
4.Warm-up
Allow the engine to idle for at least 30
seconds after starting. Do not race the
engine while warming it up. Drive at
moderate speed for a short distance
first, especially in cold weather. In cold
weather, keep the engine running for
a minimum of 2 - 3 minutes before
shutting it off. Starting and stopping
the engine over a short period of time
may make the vehicle more difficult to
start.
When racing the engine up to 4,500
rpm or more under no load condition,
the engine will enter the fuel cut
mode.
5. To stop the engine, shift the shift lever to the P (Park) position (AT model) or
move the shift lever to the N (Neutral)
position (MT model), and push the
ignition switch to the OFF position.
NOTE:
Care should be taken to avoid situations
that can lead to potential battery dis-
charge and potential no-start condi-
tions such as:
1. Installation or extended use of elec-
tronic accessories that consume
battery power when the engine is
not running (Phone chargers, GPS,
DVD players, etc.) 2.
Vehicle is not driven regularly and/
or only driven short distances.
In these cases, the battery may need to
be charged to maintain battery health.AUTOMATIC TRANSMISSION
7 speed automatic transmission
The automatic transmission in your vehi-
cle is electronically controlled by a trans-
mission control module to produce
maximum efficiency and smooth opera-
tion.
Shown on the following pages are the
recommended operating procedures for
this transmission. Follow these proce-
dures for maximum vehicle performance
and driving enjoyment.
Starting the vehicle
After starting the engine, fully depress the
foot brake pedal and push the shift lever
button before shifting the shift lever to
the R (Reverse), N (Neutral), D (Drive) or
Manual shift mode position. Be sure the
vehicle is fully stopped before attempting
to shift the shift lever.
This automatic transmission model is
designed so that the foot brake pedal
must be depressed before shifting from
P (Park) to any drive position while the
ignition switch position is ON.
The shift lever cannot be moved out of
the P (Park) position and into any of the
other gear positions if the ignition
switch is pushed to the LOCK, OFF or
ACC position.
DRIVING THE VEHICLE
Page 316 of 455
5-18Starting and driving
SSD0536
Shifting
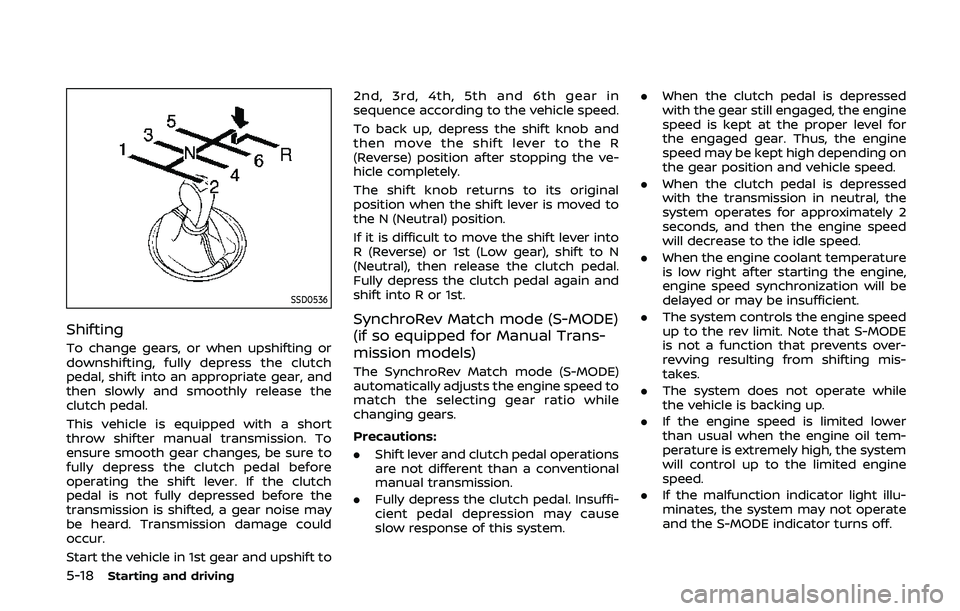
To change gears, or when upshifting or
downshifting, fully depress the clutch
pedal, shift into an appropriate gear, and
then slowly and smoothly release the
clutch pedal.
This vehicle is equipped with a short
throw shifter manual transmission. To
ensure smooth gear changes, be sure to
fully depress the clutch pedal before
operating the shift lever. If the clutch
pedal is not fully depressed before the
transmission is shifted, a gear noise may
be heard. Transmission damage could
occur.
Start the vehicle in 1st gear and upshift to2nd, 3rd, 4th, 5th and 6th gear in
sequence according to the vehicle speed.
To back up, depress the shift knob and
then move the shift lever to the R
(Reverse) position after stopping the ve-
hicle completely.
The shift knob returns to its original
position when the shift lever is moved to
the N (Neutral) position.
If it is difficult to move the shift lever into
R (Reverse) or 1st (Low gear), shift to N
(Neutral), then release the clutch pedal.
Fully depress the clutch pedal again and
shift into R or 1st.
SynchroRev Match mode (S-MODE)
(if so equipped for Manual Trans-
mission models)
The SynchroRev Match mode (S-MODE)
automatically adjusts the engine speed to
match the selecting gear ratio while
changing gears.
Precautions:
.
Shift lever and clutch pedal operations
are not different than a conventional
manual transmission.
. Fully depress the clutch pedal. Insuffi-
cient pedal depression may cause
slow response of this system. .
When the clutch pedal is depressed
with the gear still engaged, the engine
speed is kept at the proper level for
the engaged gear. Thus, the engine
speed may be kept high depending on
the gear position and vehicle speed.
. When the clutch pedal is depressed
with the transmission in neutral, the
system operates for approximately 2
seconds, and then the engine speed
will decrease to the idle speed.
. When the engine coolant temperature
is low right after starting the engine,
engine speed synchronization will be
delayed or may be insufficient.
. The system controls the engine speed
up to the rev limit. Note that S-MODE
is not a function that prevents over-
revving resulting from shifting mis-
takes.
. The system does not operate while
the vehicle is backing up.
. If the engine speed is limited lower
than usual when the engine oil tem-
perature is extremely high, the system
will control up to the limited engine
speed.
. If the malfunction indicator light illu-
minates, the system may not operate
and the S-MODE indicator turns off.
Page 325 of 455
.HEADED UPHILL WITH CURB:
Turn the wheels away from the
curb and move the vehicle back
until the curb side wheel gently
touches the curb.
.HEADED UPHILL OR DOWNHILL, NOCURB:
Turn the wheels toward the side of
the road so the vehicle will move
away from the center of the road if
it moves.
4. Push the ignition switch to the OFF position.
WARNING
If the engine is not running or is
turned off while driving, the power
assist for the steering will not work.
Steering will be harder to operate.
The power assisted steering uses a hy-
draulic pump, driven by the engine, to
assist steering.
If the engine stops or the drive belt
breaks, you will still have control of the
vehicle. However, much greater steering
effort is needed, especially in sharp turns
and at low speeds.
BRAKING PRECAUTIONS
The brake system has two separate
hydraulic circuits. If one circuit malfunc-
tions, you will still have braking at two
wheels.
Vacuum assisted brakes
The brake booster aids braking by using
engine vacuum. If the engine stops, you
can stop the vehicle by depressing the
brake pedal. However, greater foot pres-
sure on the brake pedal will be required to
stop the vehicle and the stopping dis-
tance will be longer.
Wet brakes
When the vehicle is washed or driven
through water, the brakes may get wet.
As a result, your braking distance will be
longer and the vehicle may pull to one
side during braking.
To dry brakes, drive the vehicle at a safe
speed while lightly tapping the brake
pedal to heat-up the brakes. Do this until
the brakes return to normal. Avoid driving
the vehicle at high speeds until the brakes
function correctly.
Starting and driving5-27
POWER STEERING BRAKE SYSTEM
Page 326 of 455
5-28Starting and driving
PARKING BRAKE BREAK-IN
Break in the parking brake shoes when-
ever the stopping effect of the parking
brake is weakened or whenever the
parking brake shoes and/or drums/ro-
tors are replaced, in order to assure the
best braking performance.
This procedure is described in the vehicle
service manual. It is recommended you
visit a NISSAN dealer for this service.
Using the brakes
Avoid resting your foot on the brake
pedal while driving. This will cause over-
heating of the brakes, wearing out the
brake and pads faster and reduce gas
mileage.
To help save the brakes and to prevent
the brakes from overheating, reduce
speed and downshift to a lower gear
before going down a slope or long grade.
Overheated brakes may reduce braking
performance and could result in loss of
vehicle control.
WARNING
.While driving on a slippery sur-
face, be careful when braking,
accelerating or downshifting.
Abrupt braking or accelerating could cause the wheels to skid
and result in an accident.
. If the engine is not running or is
turned off while driving, the
power assist for the brakes will
not work. Braking will be harder.
BRAKE ASSIST
When the force applied to the brake pedal
exceeds a certain level, the Brake Assist is
activated generating greater braking
force than a conventional brake booster
even with light pedal force.
WARNING
The Brake Assist is only an aid to
assist braking operation and is not a
collision warning or avoidance de-
vice. It is the driver’s responsibility to
stay alert, drive safely and be in
control of the vehicle at all times.
ANTI-LOCK BRAKING SYSTEM (ABS)
WARNING
.The Anti-lock Braking System
(ABS) is a sophisticated device,
but it cannot prevent accidents
resulting from careless or dan-
gerous driving techniques. It can
help maintain vehicle control dur-
ing braking on slippery surfaces.
Remember that stopping dis-
tances on slippery surfaces will
be longer than on normal sur-
BRAKE ASSIST
Page 327 of 455

faces even with ABS. Stopping
distances may also be longer on
rough, gravel or snow covered
roads, or if you are using tire
chains. Always maintain a safe
distance from the vehicle in front
of you. Ultimately, the driver is
responsible for safety.
. Tire type and condition may also
affect braking effectiveness.
— When replacing tires, install
the specified size of tires on
all four wheels.
— When installing a spare tire, make sure that it is the proper
size and type as specified on
the Tire and Loading Informa-
tion label. See “Tire and Load-
ing Information label” (P.10-
14) of this manual.
— For detailed information, see “Wheels and tires” (P.8-26) of
this manual.
The Anti-lock Braking System (ABS) con-
trols the brakes so the wheels do not lock
during hard braking or when braking on
slippery surfaces. The system detects the
rotation speed at each wheel and varies
the brake fluid pressure to prevent each
wheel from locking and sliding. By pre- venting each wheel from locking, the
system helps the driver maintain steering
control and helps to minimize swerving
and spinning on slippery surfaces.
Using the system
Depress the brake pedal and hold it down.
Depress the brake pedal with firm steady
pressure, but do not pump the brakes.
The ABS will operate to prevent the
wheels from locking up. Steer the vehicle
to avoid obstacles.
WARNING
Do not pump the brake pedal. Doing
so may result in increased stopping
distances.
Self-test feature
The ABS includes electronic sensors, elec-
tric pumps, hydraulic solenoids and a
computer. The computer has a built-in
diagnostic feature that tests the system
each time you start the engine and move
the vehicle at a low speed in forward or
reverse. When the self-test occurs, you
may hear a “clunk” noise and/or feel a
pulsation in the brake pedal. This is
normal and does not indicate a malfunc-
tion. If the computer senses a malfunc-
tion, it switches the ABS off and
illuminates the ABS warning light on the
instrument panel. The brake system then
operates normally, but without anti-lock
assistance.
If the ABS warning light illuminates during
the self-test or while driving, have the
vehicle checked. It is recommended you
visit a NISSAN dealer for this service.
Normal operation
The ABS operates at speeds above 3 to 6
MPH (5 to 10 km/h).
When the ABS senses that one or more
wheels are close to locking up, the
actuator rapidly applies and releases
hydraulic pressure. This action is similar
to pumping the brakes very quickly. You
may feel a pulsation in the brake pedal
and hear a noise from under the hood or
feel a vibration from the actuator when it
is operating. This is normal and indicates
that the ABS is operating properly. How-
ever, the pulsation may indicate that road
conditions are hazardous and extra care
is required while driving.
Starting and driving5-29