2020 MERCEDES-BENZ GLS SUV ad blue
[x] Cancel search: ad bluePage 30 of 549
Wire
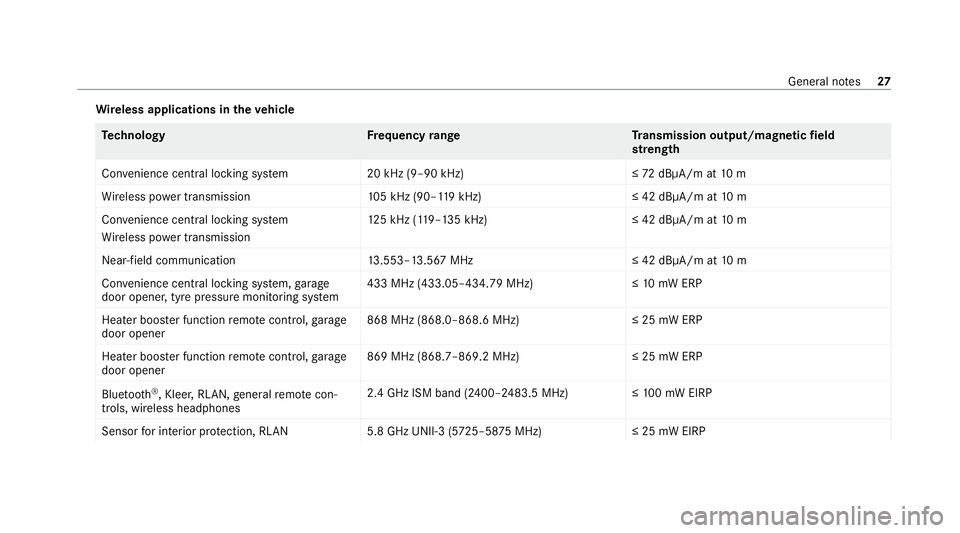
less applications in theve hicle Te
ch nology Frequency rang eT ransmission output/magnetic field
st re ngth
Con venience central lo cking sy stem 20 kHz (9–90 kHz)≤ 72dBμA/m at 10 m
Wi reless po wer transmission 105 kHz (90–1 19kHz) ≤ 42 dBμA/m at10 m
Con venience central lo cking sy stem
Wi reless po wer transmission 12
5 kHz (1 19–135 kHz)≤ 42 dBμA/m at10 m
Near-field communication 13.553–13.567 MHz ≤ 42 dBμA/m at10 m
Con venience central lo cking sy stem, garage
door opener, tyre pressure monitoring sy stem 433 MHz (433.05–434.79 MHz)≤
10mW ERP
Heater boos ter function remo tecontrol, garage
door opener 868 MHz (868.0–868.6 MHz
)≤25 mW ERP
Heater boos ter function remo tecontrol, garage
door opener 869 MHz (868.7–869.2 MHz
)≤25 mW ERP
Blue tooth ®
, Kleer, RLAN, general remo tecon‐
trols, wi reless headphones 2.4 GHz ISM band (2400–2483.5 MHz
)≤100 mW EIRP
Sensor for interior pr otection, RLAN 5.8 GHz UNII-3 (5725–58 75MHz) ≤ 25 mW EIRP General no
tes27
Page 32 of 549
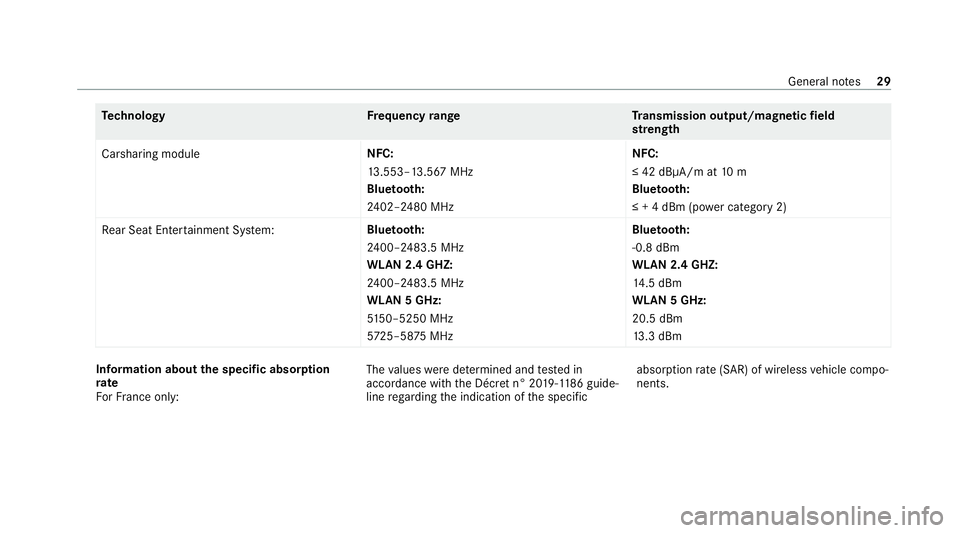
Te
ch nology Frequency rang eT ransmission output/magnetic field
st re ngth
Carsharing module NFC:
13
.553–13.567 MHz
Blue tooth:
24 02–2480 MHz NFC:
≤ 42 dBμA/m at
10 m
Blue tooth:
≤ + 4 dBm (po wer category 2)
Re ar Seat En tertainment Sy stem: Blue
tooth:
24 00–2483.5 MHz
WLAN 2.4 GHZ:
24 00–2483.5 MHz
WLAN 5 GHz:
51 50–5250 MHz
572 5–58 75MHz Blue
tooth:
-0.8 dBm
WLAN 2.4 GHZ:
14 .5 dBm
WLAN 5 GHz:
20.5 dBm
13 .3 dBm In
fo rm ation about the specific absor ption
rate
Fo rFr ance on ly: The
values weredeterm ined and tested in
accordance with the Décre t n° 2019-118 6guide‐
line rega rding the indication of the specific absor
ption rate (SAR) of wireless vehicle compo‐
nents. General no
tes29
Page 150 of 549
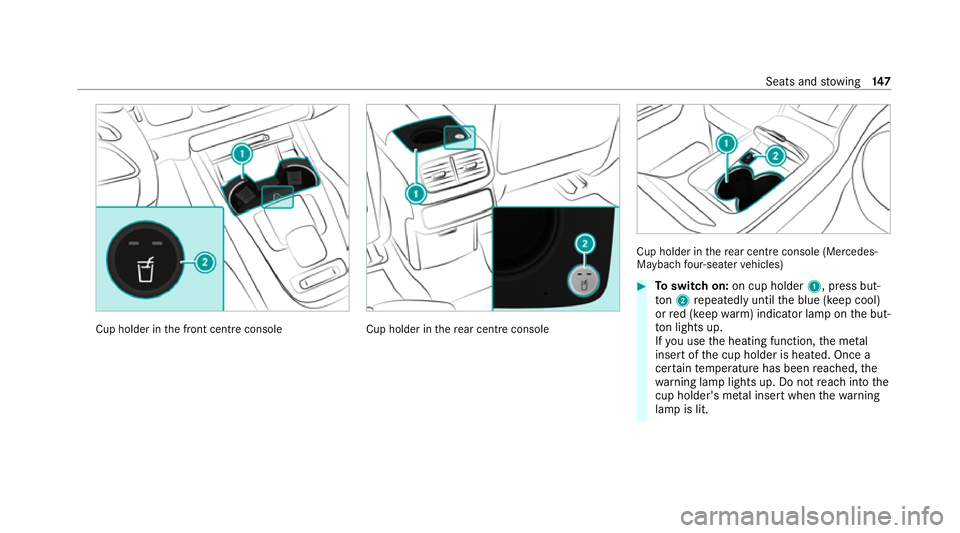
Cup holder in
the front cent reconsole Cup holder in
there ar centre console Cup holder in
there ar centre console (Mercedes-
Maybach four-seater vehicles) #
Toswitch on: on cup holder 1, press but‐
to n2 repeatedly until the blue (keep cool)
or red (keep warm) indicator lamp on the but‐
to n lights up.
If yo u use the heating function, the me tal
inse rtof the cup holder is heated. Once a
cer tain temp erature has been reached, the
wa rning lamp lights up. Do not reach into the
cup holder's me tal inse rtwhen thewa rning
lamp is lit. Seats and
stowing 147
Page 183 of 549
St
ationary heater/ventilation St
ationary heater/ventilation function
R The air inside theve hicle is heated or ventila‐
te dto the set temp erature.
R The air inside theve hicle cannot be cooled
down to temperatures below the outside
te mp erature.
R Ifth e outside temp erature changes, ventila‐
tion mode au tomatical lyswitches toheating
mode or heating mode automatically
switches toventilation mode.
The stationary heater and theex haust gas outlet
are situated behind theright-hand front wheel.
Switching thest ationary heater/ventilation
on/off via the operating unit &
DANG ER Risk of fata l injury due topoi‐
sonous exhaust gases
If th eta ilpipe is bloc ked or suf ficient ventila‐
tion is not possible, poisonous exhaust gases
such as carbon monoxide may enter theve hi‐
cle. This is the case in enclosed spaces or if
th eve hicle gets stuck in sn ow,fo rex ample. #
Alw ays switch thest ationary heater off
in enclosed spaces without an air
ex traction sy stems, e.g. in garage s. #
Keep theta ilpipe and the area around
th eve hicle free from snow when the
engine or thest ationary heater are run‐
ning. #
Open a window on the windward side of
th eve hicle toensure an adequate sup‐
ply of fresh air. &
WARNING Risk offire due tohot station‐
ary heater components and exhaust
ga ses
Flammable materials such as lea ves, grass or
twigs may ignite. #
When thest ationary heater is swit ched
on, make sure that:
R hot vehicle parts do not come into
contact with flammable materials.
R theex haust gas can flow out of the
st ationary heater exhaust pipe
unhindered. R
theex haust gas does not come into
contact with flammable materials. *
NO
TEBattery discharge caused bysta‐
tionary heater or stationary ventilation
operation Ope
rating thest ationary heater or stationary
ve ntilation drains the batter y. #
After heating or ventilating theve hicle
twice, drive for a longer period of time. Re
quirements:
R The fuel tank is su fficiently full.
% Please no tethat if theta nk fill le vel is too
lo w, it can result in function restrictions dur‐
ing auxilia ryheating operation. #
Set the desired temp erature using thew
button. #
Press the& button.
The red or blue indicator lamp on the&
button will light up or go out. 18 0
Climate cont rol
Page 184 of 549
Indicator lamp colours:
R Blue: stationary ventilation is switched on.
R Red:thest ationary heater is swit ched on.
R Yello w: the departure time has been prese‐
lected.
The stationary heater/ ventilation will switch off
au tomatically af ter 50 minutes.
Operation using the app: thest ationary
heater/ ventilation can also be operated via the
Mercedes me connect app. You can find fur ther
information in the separate Owner's Manual at
https://moba.i.daimler.com/mar kets/ece-r ow/
baix/cars/connectme/en_GB/#emotions/
St artseite.html.
Setting thest ationary heater/stationary ven‐
tilation via the multimedia sy stem #
Call up the air conditioning menu
(/ page 175). #
Select Auxiliary heating.
Selecting the departure time #
Select the time TIME A: XX, TIME B: XXor
TIME C: XX. Setting
the departu retime #
Select the time TIME A: XX, TIME B: XXor
TIME C: XX. #
Select the pen beside the time. #
Set a time.
Setting thest ationary heater/ventilation via
re mo tecont rol
Re quirements:
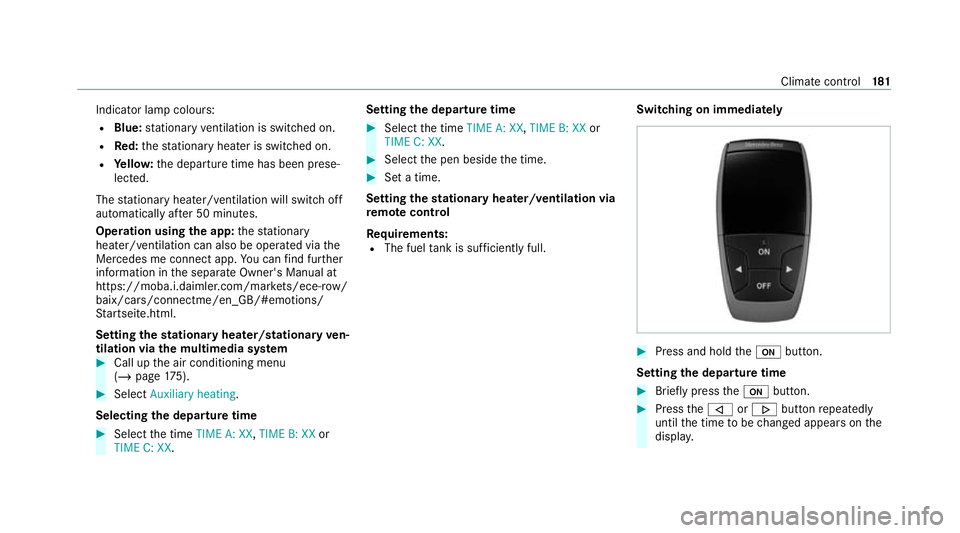
R The fuel tank is su fficiently full. Switching on immedia
tely #
Press and hold theu button.
Setting the departu retime #
Brie fly press theu button. #
Press the, or. button repeatedly
until the time tobe changed appears on the
displa y. Climate cont
rol181
Page 198 of 549
#
Alw ays drive on inclines in the line of
fa ll (straight up or down) and do not
turn. &
WARNING Risk offire due toflammable
materials on hot parts of theex haust
sy stem
Flammable material such as lea ves, grass or
twigs may ignite if they come into contact
wi th hot parts of theex haust sy stem. #
When driving on unpa vedro ads or off-
ro ad, regular lych eck theve hicle under‐
side. #
Remo vetrapped plants or other flam‐
mable material, in particular. #
Ifth ere is damage, consult a qualified
specialist workshop immediately. When driving off-road, sand, mud and
water or
wate r mixed with oil may getinto the brakes.
This may lead toare duction in braking ef fect or
tot al brake failure as a result of increased wear.
The braking characteristics will vary depending
on the material that has entered the sy stem. Clean
the brakes af ter driving off-road. If you
th en notice reduced braking ef fect or hear
scraping noises, ha vethe brake sy stem checked
at a qualified specialist workshop. Adapt your
driving style to thech anged braking characteris‐
tics.
* NO
TEDama gecaused bydriving over
obs tacles The
vehicle can be damaged by:
R driving up onto high kerbs or unpa ved
ro ads.
R quickly driving over obs tacles su chas
ke rbs, speed bumps or po tholes.
R heavy objects hitting the underbody or
ch assis components. #
Do not drive over obs tacles that could
damage theve hicle. #
Check theve hicle regular lyfor dama ge
during off-road driving. #
Adjust theve hicle speed tosuit the
ro ad sur face conditions. #
Ifth ere is damage, consult a qualified
specialist workshop immediately. +
ENVIRONMENTAL
NOTEEnvironmental
dama gedue tonon-obser vance of pro‐
hibition signs Environmental pr
otection has priority. Treat
nature with respect. #
Be sure toobser veprohibition signs. Checklist before driving off-road
Check
thefo llowing points before driving off-
ro ad:
R Fuel le vel
R Vehicles with a diesel engine: AdBlue ®
le vel
R Engine oil le vel:fill engine oil tothe maxi‐
mum le velto ensure full gradeability
(/ page 360).
R Tyre-change tool kit and spare wheel
R Tyres and wheels Driving and parking
19 5
Page 217 of 549
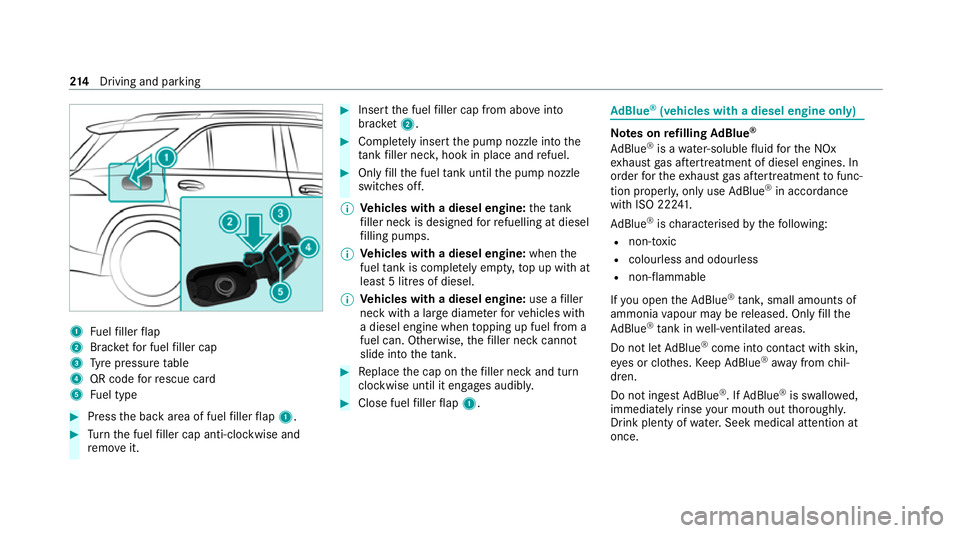
1
Fuelfiller flap
2 Brac ketfo r fuel filler cap
3 Tyre pressure table
4 QR code forre scue card
5 Fuel type #
Press the back area of fuel filler flap 1. #
Turn the fuel filler cap anti-clockwise and
re mo veit. #
Insert the fuel filler cap from abo veinto
brac ket2. #
Comp lete ly inse rtthe pump nozzle into the
ta nk filler nec k,hook in place and refuel. #
Only fill th e fuel tank until the pump nozzle
switches off.
% Vehicles with a diesel engine: theta nk
fi ller neck is designed forre fuelling at diesel
fi lling pumps.
% Vehicles with a diesel engine: whenthe
fuel tank is compl etely em pty, top up with at
least 5 litres of diesel.
% Vehicles with a diesel engine: use afiller
neck with a lar gediame terfo rve hicles with
a diesel engine when topping up fuel from a
fuel can. Otherwise, thefiller neck cannot
slide into theta nk. #
Replace the cap on thefiller neck and turn
clockwise until it engages audibl y. #
Close fuel filler flap 1. Ad
Blue ®
(vehicles with a diesel engine on ly) Note
s onrefilling AdBlue ®
Ad Blue ®
is a wate r-soluble fluid forth e NOx
ex haust gas af tertre atment of diesel engines. In
order forth eex haust gas af tertre atment tofunc‐
tion proper ly, only use AdBlue ®
in acco rdance
with ISO 22 241.
Ad Blue ®
is ch aracterised bythefo llowing:
R non-t oxic
R colourless and odourless
R non-flammable
If yo u open theAd Blue ®
tank, small amounts of
ammonia vapour may be released. Only fill the
Ad Blue ®
tank in well-ventilated areas.
Do not let AdBlue ®
come into contact wi thskin,
ey es or clo thes. Keep AdBlue ®
aw ay from chil‐
dren.
Do not ingest AdBlue ®
. If AdBlue ®
is swallo wed,
immediately rinse your mouth out thoroughly.
Drink plenty of water.Seek medical attention at
once. 214
Driving and pa rking
Page 218 of 549
Obser
vethe no tes on operating fluids
(/ page 417).
Ad Blue ®
is available here:
R AdBlue ®
can be topped up byfast service at
a qu alified specialist workshop, e.g. a
Mercedes-Benz Service Centre.
R AdBlue ®
is available at many filling stations
from AdBlue ®
filling pumps.
R Alternativel y,Ad Blue ®
is available at qualified
specialist workshops, e.g. Mercedes-Benz
Service Centres, and at many filling stations
in Ad Blue ®
re fill canis ters or AdBlue ®
re fill
bottles.
% Ensure the connection between there fill
con tainer and vehicle filler neck does not
drip. To
pping up AdBlue ®
* NOTEEngine dama gedue toAd Blue ®
being in the fuel #
AdBlue ®
must not be used tofill the
fuel tank. #
Only use AdBlue ®
to fill th eAd Blue ®
ta nk. #
Do not overfill theAd Blue ®
tank. *
NO
TEContamination of theve hicle inte‐
ri or due toAd Blue ®
lea kage #
Afterto pping up, carefully close the
Ad Blue ®
re fill con tainer. #
Avoid car rying AdBlue ®
re fill con tainers
permanently in theve hicle. Re
quirements:
R The vehicle is unloc ked. The
following messages appear in order in the
multifunction display when theAd Blue ®
tank
requ irestopping up:
R Refill AdBlue See Owner’s Manual The
Ad Blue ®
leve l has fallen below there ser ve
ra nge. Top up AdBlue ®
immediately.
R Top up AdBlue Emergency op. in XXX miles
See Owner's ManualThe low AdBlue ®
level
will lead tolimited per form ance af terthe
re maining dis tance displ ayed has been
driven. Top up AdBlue ®
immediately.
R XX,X l Top up AdBlue Emer. op.: max. XXX
km/h Start not poss. in XXX kmThe low
AdBlue ®
leve l will lead tolimited per form‐
ance from the speed displa yed. Af terthe
re maining dis tance displ ayed has been cov‐
ered, it will no longer be possible tostart the
engine. Top up with at least the amount of
Ad Blue ®
displ ayed.
R XX,X l Top up AdBlue Switch on ignition, wait
60 sec. or eng. start not poss. TheAdBlue ®
ta nk is em pty. Yo u can no lon gerst art the
engine. Top up with at least the amount of Driving and parking
215