2020 MERCEDES-BENZ GLE COUPE tire pressure
[x] Cancel search: tire pressurePage 541 of 757
Note
s on MOExtended tyres (run-flat tyres) &
WARNING Risk of accident when driving
in eme rgency mode
When driving in emer gency mode, the han‐
dling characteristics are impaired. e.g. when
cornering, when accelerating stronglyand
when braking. #
Do not exceed the permissible maxi‐
mum speed. #
Avoid any abrupt steering and driving
maneuvers as well as driving over
obs tacles (curbs, pot holes, off-road).
This applies, in pa rticular, toa loaded
ve hicle. #
Stop driving in the emer gency mode if
yo u notice:
R banging noise
R vehicle vibration
R smoke which smells like rubber
R continuous ESP ®
inter vention
R crac ksin tire side walls #
After driving in emergency mode ha ve
th erims checkedby aqu alified special‐
ist workshop with rega rd totheir fur ther
use. #
The defective tire must be replaced in
eve rycase. Wi
th MOExtended tyres (run-flat tyres), you can
continue todrive your vehicle even if there is a
tot al loss of pressure in one or more tyres. How‐
eve r,th e tyre af fected must not show any clearly
visible damage.
Yo u can recognise MOExtended tyres bythe
MOExtended marking which appears on the side
wa ll of the tyre.
Ve hicles with tyre pressure monitoring sys‐
te m: MOExtended tyres may only be used in
conjunction wi than activated tyre pressure mon‐
itoring sy stem.
If a pressure loss warning message appears in
th e multifunction displa y,proceed as follo ws:
R Check the tyre for dama ge.
R If driving on, obser vethefo llowing no tes. Driving distance possible in emer
gency
mode af ter the pressure loss warning: Load condition Driving distance pos‐
sible in emergency
mode
Pa rtially laden 80 km
Fu lly laden 30 km The driving dis
tance possible in emergency
mode may vary depending on the driving style.
Obser vethe maximum permissible speed of
80 km/h.
If a tyre has gone flat and cannot be replaced
with an MOEx tended tyre, you can use a stand‐
ard tyre as a temp orary measure. TIREFIT kit
storage location Plug-in
hybrid: be sure toobser vethe no tes in
th e Supplement. Otherwise, you may failto rec‐
ognise dangers.
The TIREFIT kit is loca ted under the load com‐
partment floor. 538
Breakdown assis tance
Page 542 of 757
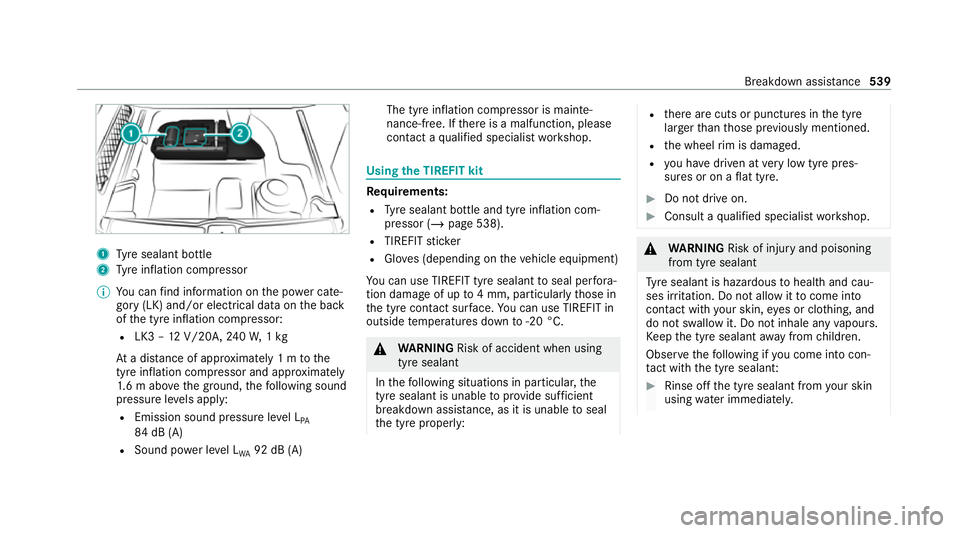
1
Tyre sealant bottle
2 Tyre inflation compressor
% You can find information on the po wer cate‐
gory (LK) and/or electrical data on the back
of the tyre inflation compressor:
R LK3 – 12V/20A, 240W, 1kg
At a dis tance of appr oximately 1 m tothe
tyre inflation compressor and appr oximately
1. 6 m abo vethe ground, thefo llowing sound
pressure le vels apply:
R Emission sound pressure le vel L
PA
84 dB (A)
R Sound po wer le vel L
WA 92 dB (A) The tyre inflation compressor is mainte‐
nance-free. If
there is a malfunction, please
conta ct aqualified specialist workshop. Using
the TIREFIT kit Re
quirements:
R Tyre sealant bottle and tyre inflation com‐
pressor (/ page 538).
R TIREFIT sticker
R Gloves (depending on theve hicle equipment)
Yo u can use TIREFIT tyre sealant toseal per fora‐
tion dama geof up to4 mm, particularly those in
th e tyre conta ct surface. You can use TIREFIT in
outside temp eratures down to-20 °C. &
WARNING Risk of accident when using
tyre sealant
In thefo llowing situations in particular, the
tyre sealant is unable toprov ide suf ficient
breakdown assis tance, as it is unable toseal
th e tyre proper ly: R
there are cuts or punctures in the tyre
larger than those pr eviously mentioned.
R the wheel rim is dama ged.
R you ha vedriven at very low tyre pres‐
sures or on a flat tyre. #
Do not drive on. #
Consult a qualified specialist workshop. &
WARNING Risk of inju ryand poisoning
from tyre sealant
Ty re sealant is hazardous tohealth and cau‐
ses ir rita tion. Do not allow it tocome into
contact wi thyour skin, eyes or clo thing, and
do not swallow it. Do not inhale any vapours.
Ke ep the tyre sealant away from children.
Obser vethefo llowing if you come into con‐
ta ct wi th the tyre sealant: #
Rinse off the tyre sealant from your skin
using water immediatel y. Breakdown assis
tance 539
Page 545 of 757
#
Unscr ew thefilling hose from theva lve of the
defective tyre. &
WARNING Risk of accident from driving
wi th sealed tyres
A tyre temp orarily sealed with tyre sealant
impairs driving characteristics and is not
suitable for higher speeds. #
Adapt your driving style according lyand
drive carefull y. #
Do not exceed the maximum speed
limit with a tyre that has been repaired
using tyre sealant. #
Obser vethe maximum permissible speed for
a tyre sealed with tyre sealant 80 km/h. #
Affix th e upper section of the TIREFIT sticker
to the instrument clus ter in a location where
it will be easi lyseen bythe driver.
* NO
TEStaining from leaking tyre sealant Af
ter use, excess tyre sealant may leak out
from thefilling hose. #
Therefore, place thefilling hose in the
plastic bag that con tained the TIREFIT
kit. +
ENVIRONMEN
TALNO TEEnvironmental
pollution caused byenvironmen tally ir re‐
sponsible disposal Ty
re sealant contains polluta nts. #
Have the tyre sealant bottle disposed of
professionall y,e.g. at a Mercedes-Benz
Service Centre. #
Stow th e tyre sealant bottle, the tyre inflation
compressor and thewa rning triangle. #
Pull away immediatel y. #
Stop driving af ter appro ximately ten minu tes
and check the tyre pressure using the tyre
inflation compressor.
The tyre pressure must now be at least
13 0 kPa (1.3 bar/19 psi). &
WARNING Risk of accident due tothe
specified tyre pressure not being ach‐
ie ved
If th e specified tyre pressure is not achie ved
af te r a brief drive, the tyre is too badly dam‐
aged. The tyre sealant cannot repair the tyre
in this ins tance.
Dama ged tyres and a tyre pressure that is
to o low can significantly impair braking and
handling characteristics. #
Do not drive on. #
Consult a qualified specialist workshop. Countries
that ha veMercedes-Benz
Service24h: you will find a sticke r with thete le‐
phone number, e.g. on the B‑pillar on the driver's
side. #
Toincrease the ty repressure: switch on
th e tyre inflation compressor. 542
Breakdown assis tance
Page 559 of 757
Note
s on noise or unusual handling charac‐
te rist ics
While driving, pay attention tovibrations, noises
and unusual handling characteristics, e.g. pulling
to one side. This may indicate that the wheels or
tyres are damaged. If you suspect that a tyre is
defective, reduce your speed immediatel y.Stop
th eve hicle as soon as possible tocheck the
wheels and tyres for dama ge. Hidden tyre dam‐
age could also be causing the unusual handling
ch aracteristics. If youfind no signs of damage,
ha ve the tyres and wheels checked at a qualified
specialist workshop. Note
s onregular lyinspecting wheels and
tyres &
WARNING Risk of accident from dam‐
aged tyres
Dama ged tyres can cause tyre pressure loss.
As a result, you could lose cont rol of your
ve hicle. #
Check the tyres regularly for signs of
dama geand replace any damaged tyres
immediatel y. &
WARNING Risk of aquaplaning due to
insuf ficient tyre tread
Insu fficient tyre tread will result in reduced
tyre grip. The tyre tread is no longer able to
dissipate water.
This means that in heavy rain or slush the
ri sk of aquaplaning is increased, in particular
where speed is not adap tedto suit the condi‐
tions.
If th e tyre pressure is too high or too lo w,
tyres may exhibit dif fere nt le vels of wear at
dif fere nt locations on the tyre tread. #
Thus, you should regularly check the
tread de pth and the condition of the
tread across the entire width of all
tyres. Minimum tread dep
thfor:
R Summer tyres: 3 mm
R M+S tyres: 4 mm #
For saf etyre asons, replace the tyres
before the legally prescribed limit for
th e minimum tread dep thisreached. Car
ryout thefo llowing checks on all wheels reg‐
ularly, at least once a month or as requ ired, e.g.
prior toa long journey or driving off- road:
R Check the tyre pressure (/ page 557).
R Visually inspect wheels and tyres for dam‐
age.
R Check theva lve caps.
The valves must be pr otected against mois‐
ture and dirt bytheva lve caps appr oved
especially foryo ur vehicle byMercedes-Benz.
R Visual check of the tyre tread dep thand the
tyre contact su rface across the entire width.
The minimum tread dep thfor summer tyres
is 3 mm and for winter tyres 4 mm. 556
Wheels and tyres
Page 570 of 757
th
erisk of skidding or hydroplaning on wet
ro ads is inc reased.
In addition, the tyre grip is greatly reduced at
a low outside temp erature and tyre running
te mp erature. #
Switch on the ESP ®
and adapt your
driving style accordingly. #
Use M+S tyres at outside temp eratures
of less than 50 °F. Obse
rveth efo llowing when selecting, fitting and
re placing tyres:
R Countr y-specific requirements for tyre
appro valth at define a specific tyre type for
yo ur vehicle.
Fu rthermore, the use of cer tain tyre types in
cer tain regions and areas of operation can
be highly beneficial.
R Only use tyres and wheels of the same type
(summer tyres, winter tyres, MOEx tended
tyres) and the same make.
R Only fit wheels of the same size on one axle
(left and right). It is only permissible
tofit a di fferent wheel
size in theeve nt of a flat tyre in order to
drive tothe specialist workshop.
R Only fit tyres of the cor rect size onto the
wheels.
R Do not make any modifications tothe brake
sy stem, the wheels or the tyres.
The use of shims or brake dust shields is not
permitted and may in validate theve hicle's
ge neral operating pe rmit.
R Vehicles with a tyre pressure monitoring
sy stem: allfitted wheels mu stbe equipped
with functioning sensors forth e tyre pres‐
sure monitoring sy stem.
R Attemp eratures below 7 °C, use winter tyres
or all-season tyres mar ked M+S for all
wheels.
Wi nter tyres bearing the004D snowflake
symbol in addition tothe M+S marking pro‐
vide the best possible grip in wintry road
conditions.
R For M+S tyres, only use tyres with the same
tread. R
Obser vethe maximum permissible speed for
th e M+S tyres fitted.
If th e tyre's maximum speed is below that of
th eve hicle, this must be indicated byan
appropriate label in the driver's field of
vision.
R Run in new tyres at moderate speeds forthe
fi rs t10 0 km.
R Replace the tyres af ter six years at the latest,
re ga rdless of wear.
R When replacing with tyres that do not
fe ature run-flat characteristics: vehicles
with MOExtended tyres are not equipped
with a TIREFIT kit at thefa ctor y.Equip the
ve hicle with a TIREFIT kit af terre placing with
tyres that do not feature run-flat characteris‐
tics, e.g. winter tyres.
% You can permanently limit the maximum
ve hicle speed for driving with winter tyres
(/ page 229).
Fo r more information on wheels and tyres, con‐
ta ct a qualified specialist workshop. Wheels and tyres
567
Page 750 of 757
Tu
rn signal lights .....................................1 42
Switching on/off ................................. 14 2
TV ............................................................. 326
Ac tivating ............................................ 497
Ad justing the brightness ..................... 503
Calling up the menu (CI+ module) .......5 04
Information .......................................... 496
Overview ............................................. 498
Picture settings ................................... 503
Setting subtitles .................................. 502
Setting the audio language .................. 502
Showing telete xt .................................. 502
Showing/hiding full screen ................. 499
Te lete xt overview ................................. 502
Vo ice commands (LINGU ATRO NIC) .....3 26
TV channel
Ac tivating/deactivating channel fix ..... 500
Channel fix .......................................... 500
Channel li stove rview .......................... .501
Countr y-specific character set ............ 500
EPG (electronic programme guide) ...... 500
Overview of favo urites ........................ .501
Selecting from thech annel list ............ 499
Selecting from the control menu ......... 499
Selecting from thefa vo urites .............. 499 Selecting in
the bac kground ................ 500
St oring .................................................5 01
Tw o-w ayradios
Fr equencies ......................................... 581
No tes on ins tallation .......................... .580
Tr ansmission output (maximum) .......... 581
Ty re inflation compressor
see TIREFIT kit
Ty re pressure ........................................... 558
Checking (ty repressure monitoring
sy stem) ............................................... 559
No tes ................................................... 557
Re starting the tyre pressure monitor‐
ing sy stem ...........................................5 60
TIREFIT kit .......................................... .539
Ty re pressure monitoring sy stem
(function) ............................................. 559
Ty re pressure table .............................. 558
Ty re pressure moni tor............................. 561
Fu nction .............................................. 559
Ty re pressure moni toring sy stem
Checking the tyre pressure ................. 559
Checking the tyre temp erature ............ 559
Re starting ............................................ 560 Ty
re pressure table ................................. 558
Ty re temp erature
Checking (tyre pressure monitoring
sy stem) ............................................... 559
Ty re pressure monitoring sy stem
(function) ............................................. 559
Ty re tread ................................................. 556
Ty re-change tool kit
Overview ............................................ .568
Ty res
Changing hub caps .............................. 570
Checking ............................................ .556
Che cking the tyre pressure (tyre
pressure monitoring sy stem) ............... 559
Fitting .................................................. 572
Flat tyre ............................................... 537
Inter changing ...................................... 568
MOExtended tyres .............................. .538
Noise ................................................... 556
No tes on fitting ................................... 564
Re moving ............................................. 572
Re placing .................................... 564, 569
Re starting the tyre pressure monitor‐
ing sy stem ...........................................5 60 Index
747
Page 751 of 757
Selection ............................................. 564
Snow chains ........................................ 557
St oring ................................................ 568
TIREFIT kit ...........................................5 39
Ty re pressure (N otes) .......................... 557
Ty re pressure monitoring sy stem
(function) ............................................. 559
Ty re pressure table .............................. 558
Un usual handling characteristics ........ 556 U
Un its of measurement
Setting ................................................ .377
Un locking setting ...................................... 80
Up dates
Impor tant sy stem updates .................. 380
Pe rforming .......................................... 379
Software upda tes ................................ 379
USB port ...................................................1 36
User profile see Profile V
Ve hicle ...................................................... 176
Ac tivating/deactivating standby
mode .................................................... 211
Ad ditional door lock .............................. 82
Collision de tection (pa rking) ................ 210
Cor rect use ........................................... 32
Data acquisition .................................... 33
Data storage .......................................... 33
Diagnostics connection .........................31
Equipment ............................................. 24
Implied warranty .................................. .33
Locking (auto matically) ......................... 85
Locking (digital vehicle keyst icke r) ....... 83
Locking (from the inside) ....................... 83
Locking (KEYLESS-GO) .......................... 84
Locking (mobile phone) ......................... 83
Locking/unlocking (emergency key) .... .86
Lo we ring .............................................. 573
Medical aids .......................................... 32
Pa rking up ............................................ 211
QR code rescue card ............................. 33
Qualifi ed specialist workshop ................31
Ra ising ................................................ .570
REA CHregulation ..................................32 Re
gistration ...........................................32
St andby mode function ........................ 211
St arting (Digital Vehicle Keyst icke r) .... 175
St arting (eme rgency operation
mode) .................................................. 176
St arting (mobile phone) ...................... .175
St arting (Remo teOnline) ..................... 17 7
St arting (s tart/s top button) .................1 74
Switching off (s tart/s top button) ........ 203
To wing ................................................ .299
Un locking (digital vehicle keyst icke r) .... 83
Un locking (from the inside) ...................83
Un locking (KEYLESS-GO) ...................... .84
Un locking (mobile phone) ...................... 83
Ve ntilating (co nvenience opening) ......... 94
Vo ice commands (LINGU ATRO NIC) .....3 31
Ve hicle data
Angle of app roach/departure ............ .628
Displ aying (DYNAMIC SELECT) ............ .191
Fo rding dep th...................................... 628
Maximum gradient climbing ability ...... 628
Maximum speeds ................................ 627
Ro of load ............................................. 627
Tr ans ferring toAndroid Auto ............... 459
Tr ans ferring toApple CarPl ay®
............ 459 74 8
Index
Page 754 of 757
St
oring ................................................ 568
TIREFIT kit ...........................................5 39
Ty re pressure (N otes) .......................... 557
Ty re pressure monitoring sy stem
(function) ............................................. 559
Ty re pressure table .............................. 558
Un usual handling characteristics ........ 556
Wi -Fi .......................................................... 373
Overview ............................................. 373
Setting ................................................. 373
Setting up a hotspot ............................ 375
Setting up an Internet connection ....... 475
Wi ndow airbag ...........................................42
Wi ndo ws
see Side windo ws
Wi ndo ws(Care) ...................................... .531
Wi ndscreen ...................................... 153, 15 9
Defrosting ............................................ 15 9
Infrared reflective ................................ 15 8
Ra dio wav es ......................................... 157
Re placing wiper blades (MAGIC
VISION CONTROL) ............................... 15 3
Wi ndscreen
see Windsc reen see
Windshield
Wi ndscreen heating ................................ 16 5
Wi ndscreen heating
see Windsc reen heating
Wi ndscreen washer fluid ........................ 625
No tes .................................................. 625
Wi ndscreen washer sy stem
To pping up ...........................................5 23
Wi ndscreen wipers
Changing the wiper blades ...................1 51
Re placing wiper blades (MAGIC
VISION CONTROL) ............................... 15 3
Switching on/off ................................. 15 0
Wi ndshield ................................................ 151
Changing the wiper blades ...................1 51
Wi nter operation
Snow chains ........................................ 557
Wi nter tyres
Setting the permanent speed limita‐
tion ...................................................... 229
Wi per blades
Ca re ..................................................... 531
Re placing .............................................1 51Re
placing (MAGIC VISION CONTROL)
.............................................................1 53
Wire lesscharging
Fu nction/no tes ................................... 13 6
Mobile phone ....................................... 13 8
Wire lessvehicle comp onents
Declaration of con form ity ...................... 26
Wo rkout prog ram
Overview ..............................................1 10
Wo rkshop
see Qualified specialist workshop Index
751