2020 MERCEDES-BENZ GLE COUPE battery
[x] Cancel search: batteryPage 6 of 757
Mir
rors ........................................................ 154
Operating the sun visors ............................. 157
Area pe rmeable toradio wav es on the
windscreen ................................................ .157
Infrared-reflective windscreen function ...... 15 8Climate control
........................................ 15 9
Overview of climate contro l systems ..........1 59
Operating the climate control sy stem ......... 161 Driving and pa
rking .................................. 17 3
Driving ........................................................ 173
DY NA MIC SELECT switch ........................... 189
Au tomatic transmission .............................. 19 2
Fu nction of the 4MATIC .............................. 197
Re fuelling .................................................... 197
Pa rking ...................................................... .203
Driving and driving saf ety sy stems .............. 212
Tr ailer hit ch................................................ 292
Bicycle rack function .................................. 297
Ve hicle towing instructions ........................ .299 Instrument Display and on-board
comp
uter.................................................. 300
Instrument display overview ...................... .300
Overview of the buttons on thesteering
wheel ..........................................................3 01
Operating the on-board computer .............. 301
Ad justing the design of the instrument
display ........................................................ 303
Showing display conte nt onthe instru‐
ment clus ter ............................................... 304
Overview of what is shown on the multi‐
function display .......................................... 305
Ad justing the instrument lighting ............... 306
Menus and submenus ................................ 306
Head-up Display .......................................... 313 LINGU
ATRO NIC ......................................... 315
No tes on operating saf ety .......................... .315
Operation ....................................................3 15
Using LINGU ATRO NIC ef fectively ................ 318
Essential voice commands .......................... 319 MBUX multimedia sy
stem ...................... 335
Overview and operation .............................. 335 Sy
stem settings .......................................... 370
Fit & Healt hy............................................... 381
Na vigation .................................................. 387
Te lephone .................................................. .432
Online and Internet functions ..................... .474
Media ......................................................... 484
Ra dio .......................................................... 493
TV ............................................................... 496
Sound ......................................................... 504
MBUX Rear En tertainment Sy stem .............5 08 Maintenance and care
..............................517
ASS YST PLUS service inter val display ........ .517
Engine compartment ................................... 51 8
Cleaning and care ...................................... .524 Breakdown assistance
............................535
Emergency .................................................. 535
Flat tyre ...................................................... 537
Battery (vehicle) ......................................... 543
To w- starting or towing away ....................... 549
Electrical fuses ........................................... 553 Contents
3
Page 25 of 757
Pr
otection of the environment
Plug-in hybrid: obser vethe no tes in the Supple‐
ment. Otherwise, you may failto recognise dan‐
ge rs.
+ ENVIRONMENTAL
NOTEEnvironmental
dama gedue tooperating conditions and
personal driving style The pollutant emission of
theve hicle is
directly related tothewa yyo u operate the
ve hicle.
Operate your vehicle in an environmentally
re sponsible manner tohelp pr otect the envi‐
ro nment. Please obser vethefo llowing rec‐
ommendations on ope rating conditions and
pe rsonal driving style.
Operating conditions: #
Make sure that the tyre pressure is cor‐
re ct. #
Do not car ryany unnecessary weight
(e.g. roof luggage rack s once you no
lon ger need them). #
Adhere tothe service inter vals.
A regularly serviced vehicle will contri b‐
ute toenvironmen tal pr otection. #
Alw ays ha vemaintenance workcar ried
out at a qualified specialist workshop.
Pe rsonal driving style: #
Do not depress the accelera tor pedal
when starting the engine. #
Do not warm upthe engine while the
ve hicle is stationar y. #
Drive carefully and maintain a suitable
di st ance from theve hicle in front. #
Avoid frequent, sudden acceleration
and braking. #
Change gear in good time and use each
ge ar on lyup to00C3 of its maximum
engine speed. #
Switch off the engine in stationary traf‐
fi c, e.g. byusing the ECO start/ stop
function. #
Drive fuel-ef ficiently. Obser vethe ECO
display for a fuel-ef ficient driving style. +
ENVIRONMEN
TALNO TEEnvironmental
pollution caused byirre sponsible dis‐
posal of the high-voltage battery A high-voltage battery conta
ins materials
which are harmful tothe environment. #
Dispose of faulty high-voltage bat teries
at a qualified specialist workshop. Ta
ke -back of end-of-life vehicles
EU countries onl y:
Mercedes-Benz will take back your end-of-life
ve hicle for environment-friendly disposal in
accordance with the European Union(EU) End-
of-Life Vehicles Directive.
A network of vehicle take -ba ckpoints and dis‐
mantlers has been es tablished foryo uto return
yo ur vehicle. You can lea veit at any of these
points free of charge . This makes an impor tant
contribution toclosing there cycling circle and
conse rving resources.
Fo r fur ther information about there cycling and
disposal of end-of-li fevehicles, and theta ke- 22
General no tes
Page 34 of 757
Diagnostics connection
The diagnostics connection is on ly intended for
th e connection of diagnostic devices at a quali‐
fi ed specialist workshop. &
WARNING Risk of accident due tocon‐
necting devices tothe diagnostics con‐
nection
If yo u connect equipment toa diagnostics
connection in theve hicle, it may af fect the
operation of vehicle sy stems.
As a result, the operating saf ety of theve hi‐
cle could be af fected. #
Only connect theve hicle diagnostics
connection todevices which ha vebeen
te sted with rega rd totheir use and are
considered safe. &
WARNING Risk of accident due to
objects in the driver's foot we ll
Objects in the driver's foot we ll may impede
pedal tr avel or block a depressed pedal. This jeopardises
the operating and road
saf ety of theve hicle. #
Stow all objects in theve hicle securely
so that they cannot getinto the driver's
fo ot we ll. #
Alw aysfit th efloor mats securely and
as prescribed in order toensure that
th ere is alw ays suf ficient room forthe
pedals. #
Do not use loose floor mats and do not
place floor mats on top of one ano ther. *
NO
TEBattery discharging from using
devices connected tothe diagnostics
connection Using devices at
the diagnostics connection
drains the batter y. #
Check thech arge leve l of the batter y. #
Ifth ech arge leve l is lo w,charge the
batter y,e.g. bydriving a considerable
dis tance. Connecting equipment
tothe diagnostics con‐
nection can lead toemissions monitoring infor‐
mation being reset, forex ample. This may lead
to theve hicle failing tomeet therequ irements of
th e next emissions inspection during the main
inspection. Qualified specialist
workshop
Plug-in hybrid: obser vethe no tes in the Supple‐
ment. Otherwise, you may failto recognise dan‐
ge rs.
A qu alified specialist workshop has the neces‐
sary special skills, tools and qualifications to
cor rectly car ryout any necessary workon your
ve hicle. This particularly applies tosaf ety-re le‐
va nt wo rks.
Alw ays ha vethefo llowing workcar ried out on
yo ur vehicle at a qualified specialist workshop:
R safety-re leva nt wo rks
R service and maintenance work
R repair work
R modifications as well as ins tallations and
con versions General no
tes31
Page 36 of 757
Fo
rth is reason, thefo llowing can occur in isola‐
te d cases, depending on the aids used:
R Aids malfunctioning
R Adverse health ef fects
Obser vethe no tes and warnings of the manufac‐
turer of the aids; if in doubt, conta ctthe device
manufacturer and your doc tor.Mercedes-
Benz AGrecommends using only few electrical
ve hicle sy stems if there is continuing uncer tainty
concerning the possibility of aids malfunction‐
ing.
Ha ve repairs and maintenance workinthe area
of vehicle components car rying live voltage and
transmission aerials car ried out byaqu alified
specialist workshop. Implied
warra nty
* NO
TEDama getotheve hicle arising
from violation of these operating instruc‐
tions. Damage
totheve hicle can arise from viola‐
tion of these operating instructions. This damage is not co
vered either bythe
Mercedes-Benz implied warranty or bythe
New‑ or Used- Vehicle Warrant y. #
Follow the instructions in these operat‐
ing instructions on proper operation of
yo ur vehicle as well as on possible vehi‐
cle damage. QR code
forre scue card
The QR code is secured in the fuel filler flap and
on the opposite side on the B-pillar. In theeve nt
of an accident, rescue services can use the QR
code toquickly find the appropriate rescue card
fo ryo ur vehicle. The cur rent rescue card con‐
ta ins the most impor tant information about your
ve hicle in a compact form , e.g. thero uting of the
electric lines.
Fu rther information can be obtained at https://
www.mercedes-benz.de/qr-code. Data
storage Electronic control units
Elect
ronic control units are fitted in your vehicle.
Some of these are necessary forth e safe opera‐
tion of your vehicle, while some assist you when
driving (driver assis tance sy stems). In addition,
yo ur vehicle pr ovides com fort and enter tainment
functions, which are also made possible byelec‐
tronic control units.
Elect ronic control units contain da tamemories
which cantemp orarily or permanently store
te ch nical information about theve hicle's operat‐
ing state, component loads, main tenance
re qu irements and tech nical events or faults.
In general, this information documents thest ate
of a component part, a module, a sy stem or the
sur roundings such as:
R operating status of sy stem components (e.g.
fi ll le vels, battery status, tyre pressure)
R status messages concerning theve hicle or
its individual components (e.g. number of
wheel revo lutions/speed, longitudinal accel‐ General no
tes33
Page 84 of 757
Re
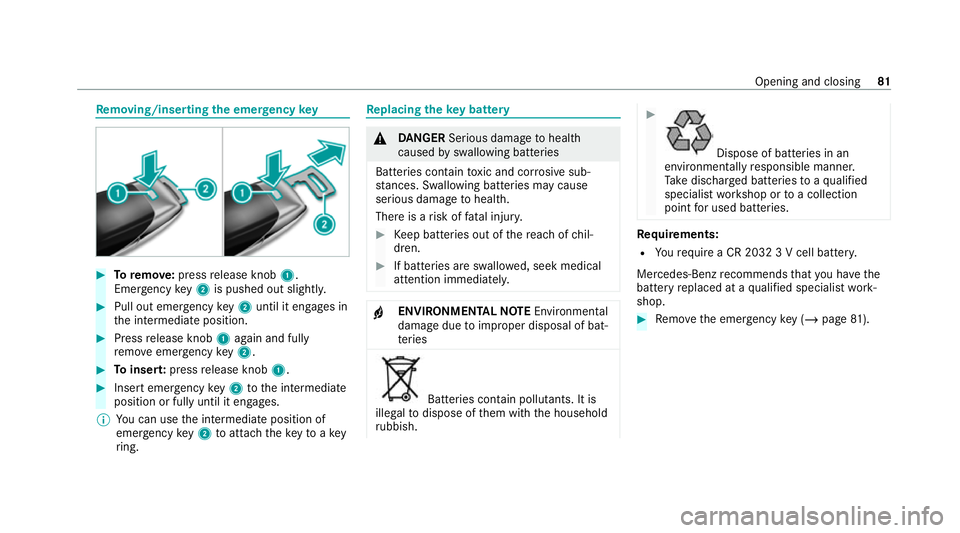
moving/inserting the eme rgency key #
Toremo ve:press release knob 1.
Emer gency key2 is pushed out slight ly.#
Pull out emer gency key2 until it en gage s in
th e intermediate position. #
Press release knob 1again and fully
re mo veemer gency key2. #
Toinser t:press release knob 1. #
Insert emer gency key2 tothe intermediate
position or fully until it engages.
% You can use the intermediate position of
emer gency key2 toattach theke yto akey
ri ng. Re
placing the key battery &
DANG ER Serious damage tohealth
caused byswallowing batteries
Batteries contain toxic and cor rosive sub‐
st ances. Swallowing bat teries may cause
serious damage tohealth.
There is a risk of fata l injur y. #
Keep batteries out of there ach of chil‐
dren. #
If batteries are swallo wed, seek medical
attention immediately. +
ENVIRONMEN
TALNO TEEnvironmental
dama gedue toimproper disposal of bat‐
te ries Batteries conta
in pollutants. It is
illegal todispose of them with the household
ru bbish. #
Dispose of batteries in an
environmen tally responsible manner.
Ta ke dischar ged batteries toaqu alified
specialist workshop or toa collection
point for used batteries. Re
quirements:
R Yourequ ire a CR 2032 3 V cell batter y.
Mercedes-Benz recommends that you ha vethe
battery replaced at a qualified specialist work‐
shop. #
Remo vethe emer gency key ( / page 81). Opening
and closing 81
Page 85 of 757
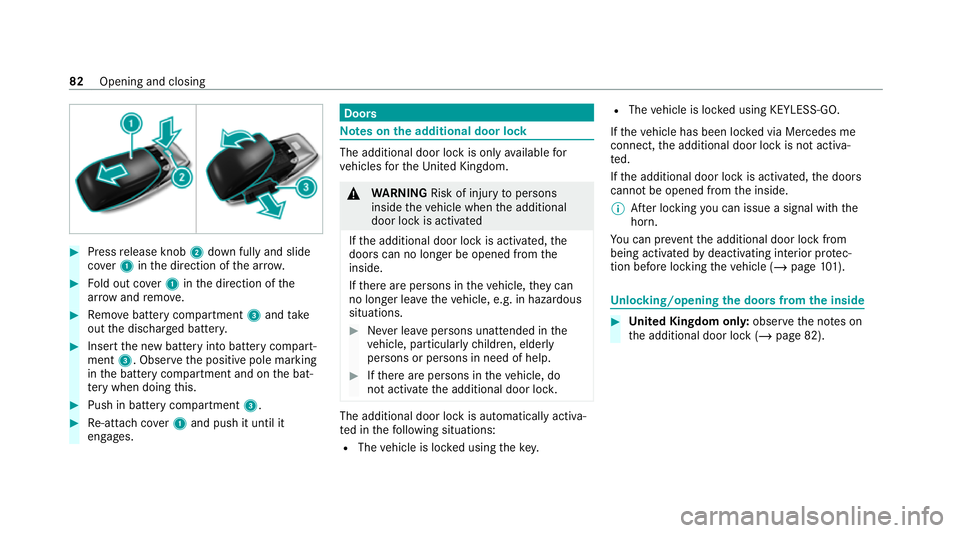
#
Press release knob 2down fully and slide
co ver1 inthe direction of the ar row. #
Fold out co ver1 inthe direction of the
ar row and remo ve. #
Remo vebattery compartment 3and take
out the dischar ged batter y. #
Insert the new battery into battery compart‐
ment 3. Obser vethe positive pole marking
in the battery compartment and on the bat‐
te ry when doing this. #
Push in battery compartment 3.#
Re-attach co ver1 and push it until it
engages. Doors
Note
s onthe additional door lock The additional door lock is only
available for
ve hicles forth eUni ted Kingdom. &
WARNING Risk of inju ryto persons
inside theve hicle when the additional
door lock is activated
If th e additional door lock is activated, the
doors can no longer be opened from the
inside.
If th ere are persons in theve hicle, they can
no longer le aveth eve hicle, e.g. in hazardous
situations. #
Never lea vepersons unattended in the
ve hicle, particularly children, elderly
persons or persons in need of help. #
Ifth ere are persons in theve hicle, do
not activate the additional door loc k. The additional door lock is automatically activa‐
te d in thefo llowing situations:
R The vehicle is loc ked using thekey. R
The vehicle is loc ked using KEYLESS-GO.
If th eve hicle has been loc ked via Mercedes me
connect, the additional door lock is not activa‐
te d.
If th e additional door lock is activated, the doors
cann otbe opened from the inside.
% After locking you can issue a signal with the
horn.
Yo u can pr eventthe additional door lock from
being activated bydeactivating interior pr otec‐
tion before locking theve hicle (/ page101). Un
locking/opening the doors from the inside #
United Kingdom onl y:obser vethe no tes on
th e additional door lock (/ page 82).82
Opening and closing
Page 88 of 757
If
yo u open theta ilgate from outside, it is auto‐
matically unloc ked. Problems with KEYLESS-GO
Problem
Possible causes/consequences and 0050
0050Solutions
Yo u can no lon ger lock or unlock the
ve hicle using KEYLESS-GO. Po
ssible causes:
R The key functions ha vebeen deactivated (/ page 80).
R The key bat tery iswe ak or dischar ged.
R There is inter fere nce from a po werful radio signal source.
R The key is faulty. #
Activate theke y functions (/ page 80). #
Check the battery using the indicator lamp and replace if necessary (/ page81). #
Use the emer gency keyto unlo ckor lock theve hicle (/ page81). #
Have theve hicle and keych ecked at a qualified specialist workshop. Ac
tivating/deactivating the automatic lo ck‐
ing feature The
vehicle is loc ked automatically when the
ignition is switched on and the wheels are turn‐
ing fast erthan walking pace. Opening and closing
85
Page 144 of 757
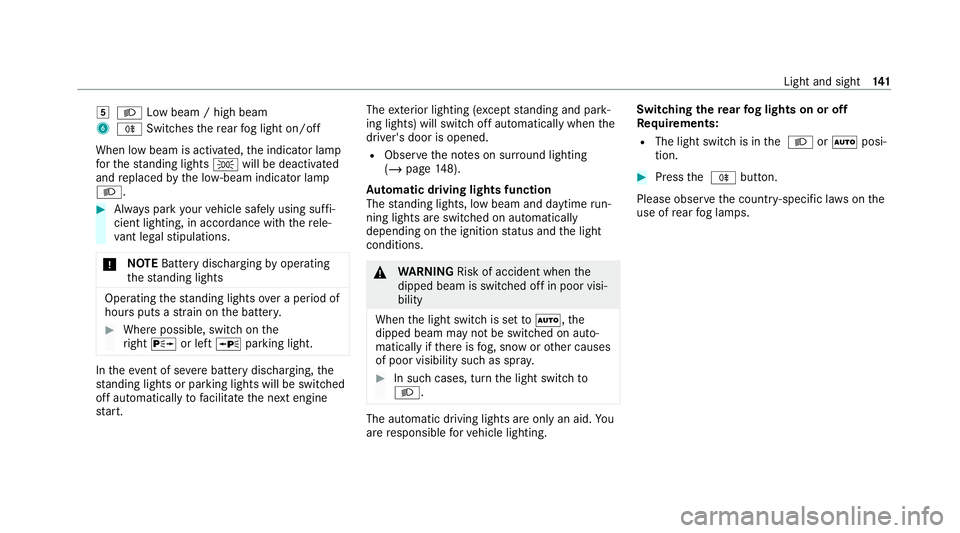
004B
0058 Low beam / high beam
6 005E Switches there ar fog light on/off
When low beam is activated, the indicator lamp
fo rth est anding lights 0060will be deactivated
and replaced bythe lo w-beam indicator lamp
0058. #
Alw ays park your vehicle safely using suf fi‐
cient lighting, in acco rdance with there le‐
va nt le galst ipulations.
* NO
TEBattery discharging byoperating
th est anding lights Operating
thest anding lights over a period of
hours puts a stra in on the batter y. #
Where possible, switch on the
ri ght 0064 or left 0063parking light. In
theeve nt of se vere battery discharging, the
st anding lights or parking lights will be swit ched
off automatically tofacilitate the next engine
st art. The
exterior lighting (e xcept standing and park‐
ing lights) will swit choff automatically when the
driver's door is opened.
R Obser vethe no tes on sur round lighting
(/ page 148).
Au tomatic driving lights function
The standing lights, low beam and daytime run‐
ning lights are switched on au tomatically
depending on the ignition status and the light
conditions. &
WARNING Risk of accident when the
dipped beam is switched off in poor visi‐
bility
When the light switch is set to0058 ,the
dipped beam may not be switched on auto‐
matically if there is fog, snow or other causes
of poor visibility such as spr ay. #
In such cases, turn the light switch to
0058 . The automatic driving lights are only an aid.
Yo u
are responsible forve hicle lighting. Switching
there ar fog lights on or off
Re quirements:
R The light switch is in the 0058 or0058 posi‐
tion. #
Press the 005E button.
Please obser vethe count ry-specific la wsonthe
use of rear fog lamps. Light and sight
141