2020 MERCEDES-BENZ GLE COUPE light
[x] Cancel search: lightPage 180 of 757
Ensu
rethefo llowing before starting the engine:
R the legal stipulations in the area where your
ve hicle is par ked allow engine starting via
smartphone.
R it is safe tostart and runth e engine where
yo ur vehicle is par ked.
R the fuel tank is su fficiently full.
St arting theve hicle (Remo teOnline) &
WARNING Risk of crushing or entrap‐
ment due tounin tentional starting of the
engine
Limbs could be crushed or trapped if the
engine is star ted unintentionally during
service or maintenance work. #
Alw ays secure the engine against unin‐
te ntional starting before car rying out
maintenance or repair work. Re
quirements:
R park position 005Dis selected.
R the anti- theft alarm sy stem is not activated. R
the panic alarm is not activated.
R the hazard warning light sy stem is switched
off.
R The bonn etis closed.
R the doors are closed and loc ked.
R the windo wsand sliding sun roof are closed. #
Start theve hicle using the smartphone.
Af tereve ryvehicle start, the engine runs for
te n minu tes.
Yo u can car ryout a maximum of two consecu‐
tive starting attem pts. The vehicle must be star‐
te d once with theke y before trying tostart the
ve hicle again with the smartphone. you can stop
th eve hicle again at any time.
% Further information can be found in the
smartphone app.
Securing the engine against starting before
car rying out maintenance or repair work: #
switch on the hazard warning light sy stem.
or #
unlock the doors. or #
open a side window or the sliding sunroof. Ru
nning-in no tes Mercedes-AMG
vehicles: observeth e no tes in
th e Supplement. Otherwise, you may failto rec‐
ognise dangers.
To preser vethe engine during thefirs t1, 500 km:
R drive at varying road speeds and engine
speeds.
R drive theve hicle in drive program A
or ;.
R shift tothe next highest gear at theve ry lat‐
est when the needle reaches the last third
before there d area in there v counter.
R do not shift down a gear manually in order to
brake.
R avoidoverstra ining theve hicle, e.g. driving at
full thro ttle.
R do not depress the accelera tor pedal past
th e pressure point (kickdown). Driving and parking
17 7
Page 184 of 757
*
NO
TEDama getothe catalytic con verter
due tonon-combu sted fuel The engine is not
running smo othly and is
misfiring.
Non-combus ted fuel may get into the cata‐
lytic con verter. #
Only depress the accelera tor pedal
slightl y. #
Have the cause rectified immediately at
a qu alified specialist workshop. Plug-in
hybrid: obser vethe no tes in the Supple‐
ment. You could otherwise failto recognise dan‐
ge rs.
Note s on driving on salt-treated roads
The braking ef fect is limited on salt-trea ted
ro ads.
Therefore, obse rveth efo llowing no tes:
R due tosalt build-up on the brake disks and
brakepads, the braking dis tance can increase
considerab lyor result in braking only on one
side R
maintain a much greater safe dis tance tothe
ve hicle in front
To remo vesalt build-up:
R brake occasionally while paying attention to
th e tra ffic conditions
R carefully depress the brake pedal at the end
of the journey and when starting the next
journey
Note s on aquaplaning
Aq uaplaning can take place once a cer tain
amount of water has accumulated on thero ad
sur face.
Obser vethefo llowing no tes during heavy precip‐
itation or in conditions in which aquaplaning may
occur:
R reduce speed
R avoid tyre ruts
R avoid sudden steering mo vements
R brake carefully
% Also obser vethe no tes on regular lych ecking
wheels and tyres (/ page 556). Note
s on driving through water on the road
sur face
Wa ter which has entered into theve hicle can
damage the engine, electrics and transmission.
Wa ter can also enter the air intake of the engine
and cause engine damage.
Obser vethefo llowing if you must drive thro ugh
wate r:
R obser vethe maximum permissible ford ing
dep th (/ page 628)
R drive at walking pace at most, otherwise
wate r can enter theve hicle interior or engine
compartment
R vehicles tr avelling in front, or oncoming vehi‐
cles, can create waves which may exceed the
maximum permissible height of thewater
The braking ef fect of the brakes is reduced af ter
fo rd ing. Brake carefully while paying attention to
th e tra ffic conditions until braking po wer has
been fully restored. Driving and parking
181
Page 190 of 757
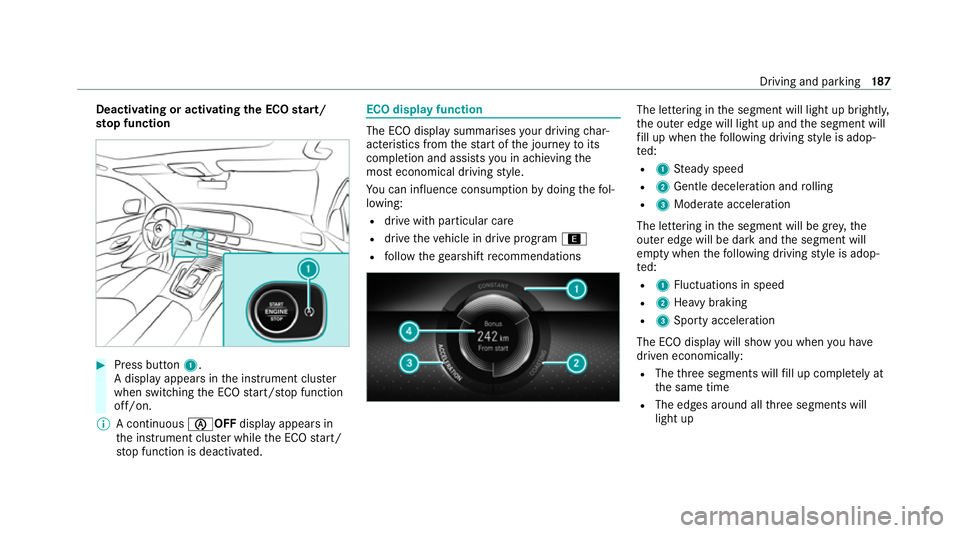
Deactivating or activating
the ECO start/
sto p function #
Press button 1.
A displ ayappears in the instrument clus ter
when swit ching the ECO start/ stop function
off/on.
% A continuous 00D6OFFdisplay appears in
th e instrument clus ter while the ECO start/
st op function is deactivated. ECO display function
The ECO display summarises
your driving char‐
acteristics from thest art of the journey toits
completion and assists you in achieving the
most economical driving style.
Yo u can influence consum ption bydoing thefo l‐
lowing:
R drive with particular care
R drive theve hicle in drive program ;
R follow thege arshift recommendations The lettering in
the segment will light up brightl y,
th e outer edge will light up and the segment will
fi ll up when thefo llowing driving style is adop‐
te d:
R 1 Steady speed
R 2 Gentle deceleration and rolling
R 3 Moderate acceleration
The lettering in the segment will be gr ey,the
outer edge will be dark and the segment will
em pty when thefo llowing driving style is adop‐
te d:
R 1 Fluctuations in speed
R 2 Heavy braking
R 3 Sporty acceleration
The ECO display will show you when you ha ve
driven economically:
R The thre e segments will fill up comple tely at
th e same time
R The edges around all thre e segments will
light up Driving and parking
187
Page 192 of 757
If
th eeve nt in volves a vehicle in front, all seg‐
ments will immediately turn green once there is
a re sponse totheFoot off the accelerator
prom pt.
Fo r active ECO Assist in drive program ;,
symbol 3will appear on the multifunction dis‐
play and on the head-up display beside transmis‐
sion position 005B. Symbol3will also appear
when the assis tant displ ayis not selec ted.
If th e sy stem does not inter vene du ring the
eve nt ahead, no thing will be displa yed. The sys‐
te m is passive.
ECO Assist is active only in drive programs ;
and A.
Sy stem limits
ECO Assist can function even more precisely if
th ero ute is adhered towhen route guidance is
active. The basic function is also available with‐
out active route guidance. Notall information
and traf fic situations can be fore seen. The qual‐
ity depends on the map data.
ECO Assist is only an aid. The driver is responsi‐
ble forke eping a safe dis tance from theve hicle
in front, forve hicle speed and for braking in good time. The driver must be
ready tobrake at
all times ir respective of whe ther the sy stem
inter venes.
The sy stem may be impaired or may not function
in thefo llowing situations:
R if visibility is poor (e.g. due toinsuf ficient illu‐
mination of thero ad, high lyvariable shade
conditions, rain, sno w,fog or heavy spr ay).
R ifth ere is glare (e.g. from oncoming traf fic,
di re ct sunlight or reflections).
R ifth ere is dirt on the windscreen in the vicin‐
ity of the multifunction camera or the camera
is mis ted up, damaged or obscured.
R if tra ffic signs are hard todiscern (e.g. due to
dirt, snow or insuf ficient lighting, or because
th ey are obscured).
R Ifth e information on the navigation sy stem's
digital map is incor rect or out of da te.
R Ifth e signs are ambiguous, e.g. tra ffic signs
in roadwor ksor in adjacent lanes. DY
NA MIC SELECT switch Fu
nction of theDY NA MIC SELECT switch Depending on
the engine and equipment, the
ve hicle has dif fere nt drive programs.
Use theDY NA MIC SELECT switch tochange
between thefo llowing drive programs:
= (Individual) : individual settings
B (Sport +): particularly sporty driving style
C (Sport): sporty driving style
A (Comfort): comfortable and economical
driving style
; (Eco):particularly economical driving
st yle
N (CURVE): comfortable driving with cur ve
inclination function (vehicles with
E‑ AC TIVE BODY CONTROL)
F Offroad: driving on less demanding off-
ro ad terrain
% The drive prog ram selected appears in the
multifunction display of the on-board com‐
puter. Driving and parking
18 9
Page 199 of 757
Gearshift
recommendation Mercedes
-AMG vehicles: observeth e no tes in
th e Supplement. You could otherwise failto rec‐
ognise dangers.
The gearshift recommendation assists you in
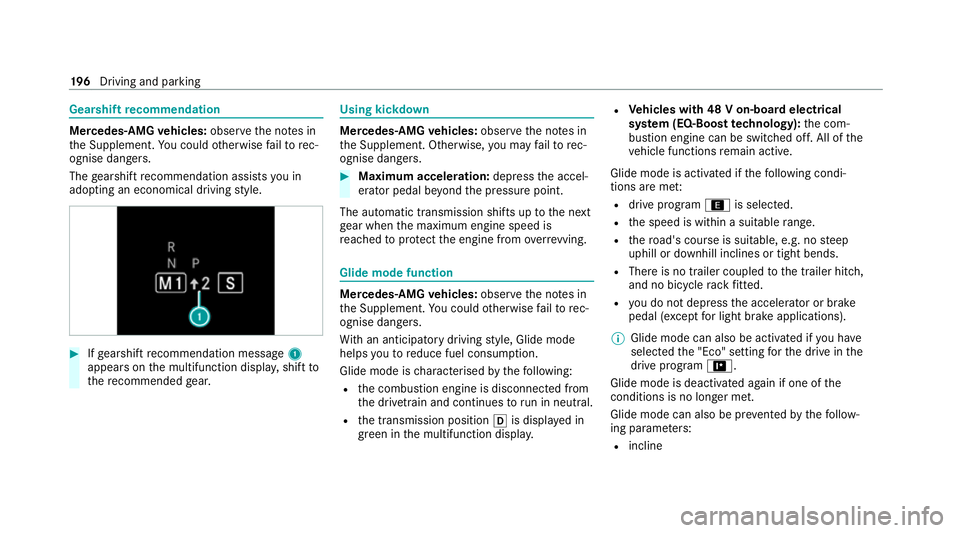
adopting an economical driving style. #
Ifge arshift recommendation message 1
appea rson the multifunction displa y,shift to
th ere commended gear. Using kickd
own Mercedes-AMG
vehicles: observeth e no tes in
th e Supplement. Otherwise, you may failto rec‐
ognise dangers. #
Maximum acceleration: depress the accel‐
erator pedal be yond the pressure point.
The automatic transmission shifts up tothe next
ge ar when the maximum engine speed is
re ached toprotect the engine from overrev ving. Glide mode function
Mercedes-AMG
vehicles: observeth e no tes in
th e Supplement. You could otherwise failto rec‐
ognise dangers.
Wi th an anticipatory driving style, Glide mode
helps youto reduce fuel consum ption.
Glide mode is characterised bythefo llowing:
R the combustion engine is disconnected from
th e driv etra in and continues torun in neutral.
R the transmission position 005Bis displa yed in
green in the multifunction displa y.R
Vehicles with 48 V on-board electrical
sy stem (EQ-Boost tech nology): the com‐
bustion engine can be switched off. All of the
ve hicle functions remain active.
Glide mode is activated if thefo llowing condi‐
tions are me t:
R drive program ;is selected.
R the speed is within a suitable range.
R thero ad's course is suitable, e.g. no steep
uphill or downhill inclines or tight bends.
R There is no trailer coupled tothe trailer hitch,
and no bicycle rack fitted.
R you do not depress the accelerator or brake
pedal (e xcept for light brake applications).
% Glide mode can also be activated if you ha ve
selected the "Eco" setting forth e drive in the
drive prog ram =.
Glide mode is deactivated again if one of the
conditions is no longer met.
Glide mode can also be pr evented bythefo llow‐
ing parame ters:
R incline 19 6
Driving and pa rking
Page 206 of 757
To
pping up AdBlue ® #
Screw disposable hose 1onto thefiller
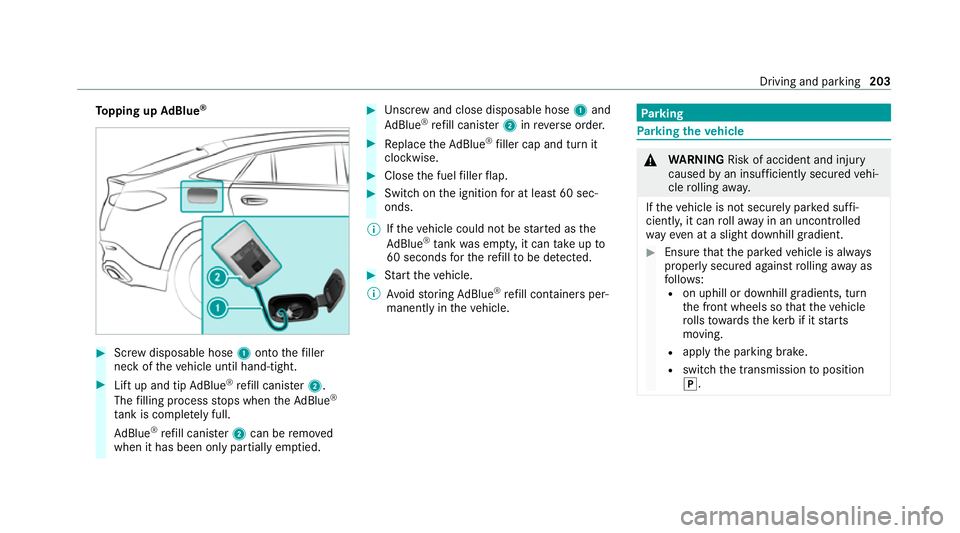
neck of theve hicle until hand-tight. #
Lift up and tip AdBlue ®
re fill canis ter2.
The filling process stops when theAd Blue ®
ta nk is compl etely full.
Ad Blue ®
re fill canis ter2 can be remo ved
when it has been only partially em ptied. #
Unscr ew and close disposable hose 1and
Ad Blue ®
re fill canis ter2 inreve rse order. #
Replace theAd Blue ®
filler cap and turn it
clockwise. #
Close the fuel filler flap. #
Swit chon the ignition for at least 60 sec‐
onds.
% Ifth eve hicle could not be star ted as the
Ad Blue ®
tan kwa s em pty, it can take up to
60 seconds forth ere fill to be de tected. #
Start theve hicle.
% Avoid storing AdBlue ®
re fill con tainers per‐
manently in theve hicle. Pa
rking Pa
rking theve hicle &
WARNING Risk of accident and inju ry
caused byan insuf ficiently secu redve hi‐
cle rolling away.
If th eve hicle is not securely par ked suf fi‐
ciently, it can rollaw ay in an uncont rolled
wa yev en at a slight downhill gradient. #
Ensure that the par kedve hicle is alw ays
properly secured against rolling away as
fo llo ws:
R on uphill or downhill gradients, turn
the front wheels so that theve hicle
ro lls towa rdsth eke rb if it starts
moving.
R apply the parking brake.
R switch the transmission toposition
005D. Driving and parking
203
Page 209 of 757
#
Release the pr eviously pressed button.
Indicator lamp 4continues toflash yello w. #
Point remo tecontrol 5from a di stance of
1 cm to8 cm towa rds button 1,2or3. #
Press and hold button 6ofremo tecontrol
5 until one of thefo llowing signals appears:
R Indicator lamp 4lights up green contin‐
uousl y.Programming is comple te.
R Indicator lamp 4flashes green. Pro‐
gramming was successful. Additionall y,
synchronisation of thero lling code with
th e door sy stem must also be car ried out. #
If indicator lamp 4does not light up or flash
green: repeat the procedure. #
Release all of the buttons.
% The remo tecontrol forth e door drive is not
included in the scope of delivery of the
ga rage door opener.
Synchronising thero lling code
Re quirements:
R The door sy stem uses a rolling code.
R The vehicle must be within range of the
ga rage door or door drive. R
The vehicle as well as persons and objects,
are located outside thera nge of mo vement
of the door. #
Press the programming button on the door
drive unit.
Initiate the next step within appr oximately
30 seconds. #
Press pr eviously prog rammed button 1,2
or 3 repeatedly until the door closes.
When the door closes, programming is com‐
ple ted.
% Please also read the operating instructions
fo rth e door drive.
Tr oubleshooting when prog ramming the
re mo tecont rol #
Check if the transmit ter frequency of remo te
control 5is suppo rted. #
Replace the batteries in remo tecontrol 5. #
Hold remo tecontrol 5atvarious angles
from a dis tance of 1 cm to8 cm in front of
th e inside rearview mir ror.Yo u should test
eve ryposition for at least 25 seconds before
trying ano ther position. #
Hold remo tecontrol 5atthe same angles
at various dis tances in front of the inside rear
view mir ror.Yo u should test eve ryposition
fo r at least 25 seconds before trying ano ther
position. #
Notethat some remo tecontrols transmit
only for a limi ted period, press button 6on
re mo tecontrol 5again before transmission
ends. #
Align the aerial line of the door opener unit
with there mo tecontrol.
% Support and additional information on pro‐
gramming:
R Onthe HomeLink ®
Hotline on (0) 08000
466 354 65 or +49 (0) 6838 907-2 77.
R Onthe Internet at https://
www.homelin k.com.
Opening or closing the garage door
Requ irements:
R The cor responding button is programmed to
operate the door. 206
Driving and parking
Page 210 of 757
#
Press and hold buttons 1,2or3 until
th e door opens or closes. #
If indicator lamp 4flashes yellow af ter
appr oximately 20 seconds: press and hold
th e pr eviously pressed button again until the
door opens or closes.
Clearing thega rage door opener memo ry#
Press and hold buttons 1and 3.
Indicator lamp 4lights up yello w. #
If indicator lamp 4flashes green: release
buttons 1and 3.
The entire memo ryhas been dele ted.
Ra dio equipment appr oval numbers for the
ga rage door opener Ra
dio equipment appr oval numbers Brazil
Es te equipamento opera em caráter secundário,
is to é, não tem direito à pr oteção contra inter fer‐
ência prejudicial, mesmo de es tações do mesmo
tipo, e não pode causar inter ferê ncia a si stemas
operando em caráter primário.
Pa ra maio res informações acessar
www.anatel.go v.br Ra
dio equipment appr oval numbers Countr
yRadio equipment appr oval
number
Egyp tT AC.25 111 51293.WIR
Andor ra CE
Au stra lia R-NZ
Barbados MED1 578
Chile 2488/DFRS205 76/F-74
European
Union CE
Gibral tarCE
Iceland CE
Jordan TRC/LPD/20 15/299
Canad aI C:4112 A-MUAHL5
Ku wa it CE
Liechten‐
st ein CE Driving and parking
207