2020 MERCEDES-BENZ GLA change wheel
[x] Cancel search: change wheelPage 27 of 346
Protecting
theenvironment General
notes H
Environmental
note
Daimler's declaredpolicyisone ofcompre-
hensive environm entalprotect ion.
The object ivesareforthe natural resources
that form thebasis ofour existen ceon this
planet tobe used sparingly andinamanner
that takes therequirements ofboth nature
and humanity intoaccount.
You toocan help toprotect theenvironm ent
by operating yourvehicle inan environm en-
tally responsible manner.
Fuel consumpt ionand therate ofengine,
transm ission,brakeandtirewear areaffec-
ted bythese factors:
R operating conditionsof your vehicle
R your personal drivingstyle
You caninfluence bothfactors. Youshould
bear thefollowing inmind:
Operating conditions:
R avoid shorttripsasthese increase fuel
consumpt ion.
R alwa ysmake surethatthetire pressures
are correct .
R do not carry anyunnecessary weight.
R remove roofracks onceyounolonger
need them.
R aregularly servicedvehiclewillcont ribute
to environm entalprotect ion.You should
therefore adheretothe service intervals.
R alwa yshave service workcarried outata
quali fiedspecialist workshop.
Personal drivingstyle:
R do not depress theaccelerator pedal
when startin gthe engine.
R do not warm upthe engine whenthevehi-
cle isstationary.
R drive carefully andmaintain asafe dis-
tance fromthevehicle infront .
R avoid frequent, suddenacceleration and
braking. R
change gearingood timeanduseeach
gear onlyupto00C3 ofits maximum engine
speed.
R switch offthe engine instationary traffic.
R keep aneye onthe vehicle's fuelcon-
sumption. Environmental
concerns andrecom-
mendat ions
Wherever theOperator's Manualrequires you
to dispose ofmaterials, firsttrytoregenerate
or re-use them.Observe therelevant environ-
ment alrules andregulations whendisposing
of materials. Inthis way youwillhelp topro-
tect theenvironm ent. Genuine
Mercedes-Benz parts H
Environmental
note
Daimler AGalso supplie srecondit ioned
major assemblies andparts which areofthe
same qualityas new parts. Theyarecovered
by the same Limited Warranty entitlements
as new parts.
! Air
bags andEmergen cyTensioning Devi-
ces, aswell ascont rolunits andsensors for
these restraint systems, maybeinstalled in
the following areasofyour vehicle:
R doors
R door pillars
R door sills
R seats
R cock pit
R instrumen tcluster
R cent erconsole
Do not install accessories suchasaudio sys-
tems inthese areas. Donot carry out
repairs orwelding. Youcould impair the
operating efficiency ofthe restraint sys-
tems.
Have aftermark etaccessories installedata
quali fiedspecialist workshop.
You could jeopardize theoperating safetyof
your vehicle ifyou useparts, tiresandwheels
as well asaccessories relevanttosafety which Genuine
Mercedes-Benz parts
25Introdu ction Z
Page 28 of 346
have
notbeen approved byMercedes-Ben z.
This could leadtomalfunctions insafety-rele-
vant systems, e.g.thebrake system. Useonly
genuine Mercedes-Ben zparts orparts ofequal
qual ity.Only usetires, wheels andaccessories
that have been specifically approvedforyour
vehicle.
Genuine Mercedes-Ben zparts aresubject to
strict qualitycont rol.Every parthasbeen spe-
cifically developed, manufactured orselected
for and adapted toMercedes-Ben zvehicles.
Therefore, onlygenuine Mercedes-Ben zparts
should beused.
More than300,000 differentgenuine
Mercedes-Ben zparts areavaila blefor
Mercedes-Ben zmodels.
All authorized Mercedes-Ben zCenters main-
tain asupply ofgenuine Mercedes-Ben zparts
for necessary serviceandrepair work.Inaddi-
tion, strategically locatedpartsdelivery cen-
ters provide quickandreliabl eparts service.
Always specify thevehicle identification num-
ber (VIN) when ordering genuineMercedes-
Benz parts (Ypage 334). Operat
or'sManual Vehicle
equipment
i This
Operator's Manualdescribes allmod-
els and allstandard andoptional equipment
of your vehicle availableatthe time ofthis
Operator's Manualgoingtoprint. Country-
specific differences arepossible. Bearin
mind thatyour vehicle maynotfeature all
funct ionsdescribed here.Thisalso appli es
to safety-relevant systemsandfunct ions.
The equipment inyour vehicle maytherefore
differ fromthatshown inthe descriptions
and illustrations.
The original purchase agreement listsallsys-
tems installed inyour vehicle.
Should youhave anyquestions concerning
equipment andoperation, pleaseconsult an
authorized Mercedes-Ben zCenter.
The Operator's ManualandMaintenanc e
Booklet areimportant documents andshould
be kept inthe vehicle. Service
andvehicle operation Maintenance
Always bringtheMaintenanc eBooklet with
you when taking thevehicle toan authorized
Mercedes-Ben zCenter. Yourcustomer service
advisor willenter every service intoyour Main-
tenanc eBooklet onyour behalf. Roadside
Assistance
The Mercedes-Ben zRoadsi deAssistanc ePro-
gram offers technicalhelp inthe event ofa
breakdown. Callsto the toll-free Roadside
Assistanc eHotline areanswered byour agents
24 hours aday, 365days ayear.
<00140010001B0013001300100029003200350010003000280035002600480047
00480056> (1-800-367-6372)
(USA)
1-800-387-0100 (Canada)
For additional information, refertothe
Mercedes-Ben zRoadsi deAssistanc eProgram
brochure (USA)orthe "Roa dside Assistanc e"
section inthe Service andWarranty Booklet
(Canada ).You willfind both inthe vehicle
document wallet. Change
ofadd ress orchange ofown-
ership
In the event ofachange ofaddress, please
send usthe "Notification ofAddress Change"
in the Service andWarranty Bookletorsimply
call theMercedes-Ben zCustomer Assistance
Center (USA)atthe hotline number
1-80 0-FOR- MERCedes (1-800-367-6372)or
Customer ServiceCenter(Canada )at
1-80 0-387-0100.This willassist usincont act-
ing you inatimely manner shouldtheneed
arise.
If you sellyour Mercedes, pleaseleaveallliter-
ature inthe vehicle sothat itis availa bletothe
next owner.
If you have purchased aused car,please send
us the "Notification ofUsed CarPurchase" in
the Service andWarranty Bookletorsimply
call theMercedes-Ben zCustomer Assistance
Center (USA)atthe hotline number
1-80 0-FOR- MERCedes (1-800-367-6372)or
Customer Service(Canada )at
1-80 0-387-0100. 26
Service
andvehicl eoperat ionIntroduct ion
Page 35 of 346
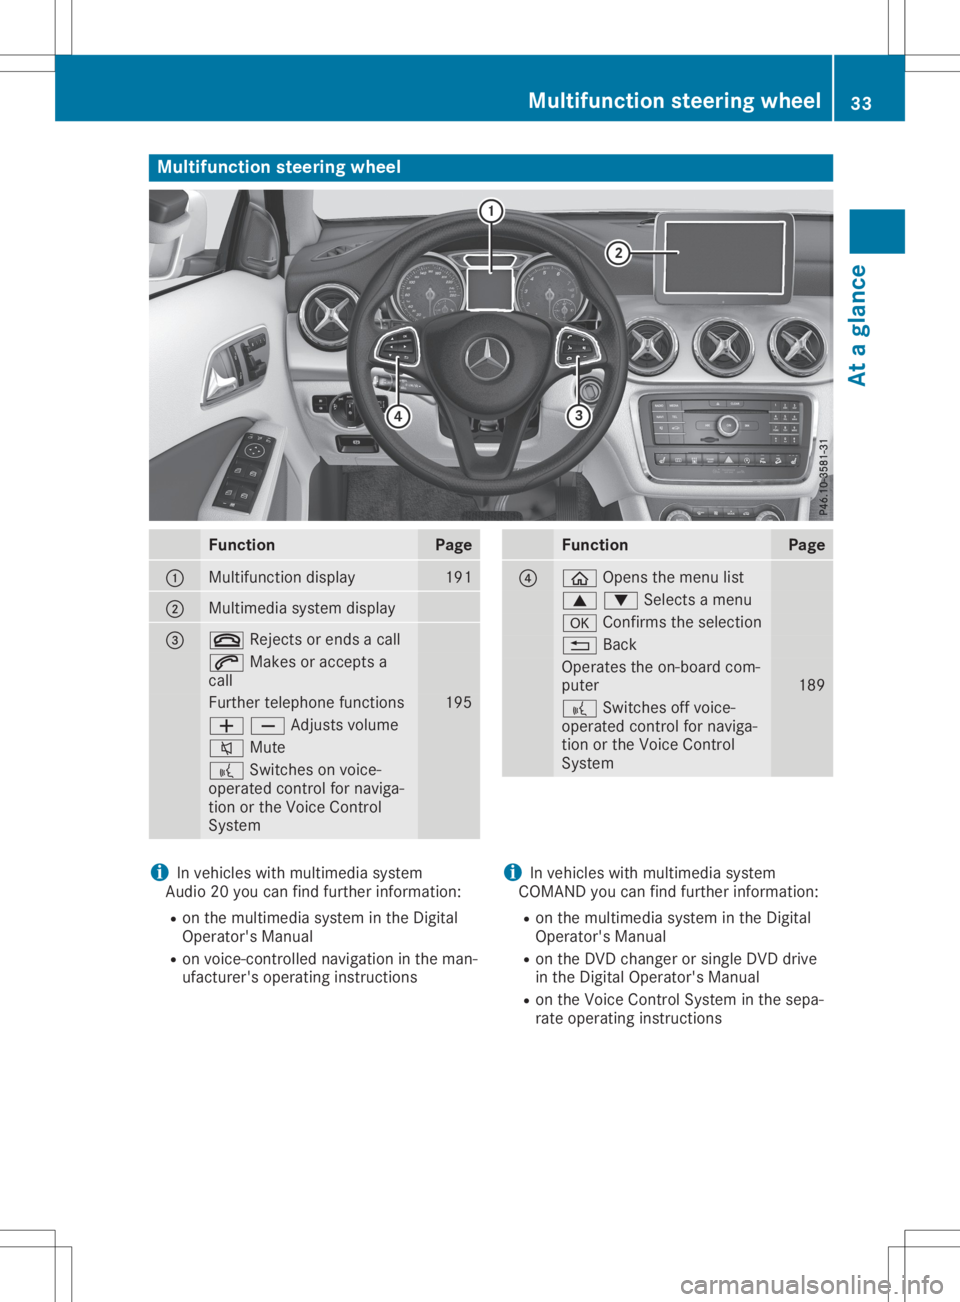
Multifunc
tionsteering wheel Func
tion Page
0043
Mul
tifunction display 191
0044
Mul
timedi asystem display 0087
0076
Rejects orends acall 0061
Makes oraccepts a
call Further
telephone functions 195
00810082Adju
stsvolum e 0063
Mute 0059
Switche son voice-
op era ted contro lfor nav iga-
tio nor the VoiceControl
Sys tem Fun
ction Pag
e 0085
00E2
Opensthe menu list 00630064Sel
ectsamenu 0076
Confirm sthe selectio n 0038
Back Ope
ratesthe on-bo ardcom-
pu ter 189
0059
Switches offvoice-
ope rate dcontrol fornavi ga-
tion orthe VoiceControl
Sys tem i
Inveh icles with mul time diasy stem
Aud io20 youcan find further informa tion:
R on the multime diasy stem inthe Digi tal
Ope rator'sManua l
R on voice-contro lled navi gation inthe man-
ufa cture r'sope ratinginstru ctions i
Inveh icles with mul time diasy stem
CO MAND youcan find further informa tion:
R on the multime diasy stem inthe Digi tal
Ope rator'sManua l
R on the DVD changer orsing leDVD drive
in the Digi talOpe rator'sManua l
R on the VoiceControl System inthe sepa-
rate operatinginstru ctions Multi
functionste ering wheel
33Atagl anc e
Page 95 of 346
G
WARNING
If the drive r'sseat isnot engag ed,itcoul d
move forwardsasfar asthe next catch dur-
ing movement suchasbraki ngorabru pt
changes ofdire ction. Asaresu lt,you would
be pus hed against yourseat beltby the
unsecu reddrive r'sseat.
This couldcaus eyou tolose control ofthe
vehicl e.The seat beltcannot protect as
intended andcouldresu ltin add itiona l
injury .
There isarisk ofan accide ntand injury .
Before everyjourney ,make surethatthe
drive r'sseat isfull yengag ed.
Observe thesafety noteson"Air bags"
(Y pag e44) and "Children inthe vehicl e"
(Y pag e53). G
WARNING
If the drive r'sseat isnot engag ed,itcoul d
move unexpe ctedlywhilethe vehicl eis in
motion. Thiscouldcaus eyou tolose control
of the vehicl e.There isarisk ofan accide nt.
Alwa ysmake surethatthedrive r'sseat is
engag edbefore starting thevehicl e. G
WARNING
You couldlose control ofyou rvehicl eif you
do the followi ngwhi ledrivi ng:
R adju stthe drive r'sseat, headrestrai nt,
steering wheelor mirrors
R fasten theseat belt
There isarisk ofan accide nt.
Adjust thedrive r'sseat, headrestrai nt,
steering wheeland mirror andfasten your
seat beltbefore starting theengine. G
WARNING
If you adju stthe seat heightcarel essly,you
or other vehicleoccupa ntscoul dbe trappe d
and thereby injured.Chi ldre nin particu lar
coul daccide ntallypress theelectrica lseat
adju stment buttons andbecome trapped.
There isarisk ofinjury . Whil
emoving theseats, makesurethatyour
hands orother bodyparts donot getunder
the leve rasse mbly ofthe seat adjustment
system.
! To
prevent damagetothe seats andthe
seat heati ng,obser vethe followi ngnotes:
R Do not spillliq uid sonto theseats. Drythe
seats assoon aspossi bleifliq uid does
get spilled onthe seats.
R Ifthe seat covers aredamp orwet, donot
swi tch onthe seat heati ng.Also, donot
use theseat heati ngtodry the seats.
R Cle anthe seat covers asrecommende d;
see the"Interio rcare" section.
R Do not transport heavyloa dson the
seats. Donot placepointed objectson
the seat cushi onssuch asknives, nailsor
tools. Where possible,use theseats only
for carryi ngpass engers.
R When operatingtheseat heati ng,donot
cover theseats withinsulating materia ls,
e.g. blankets, coats,bags,protective cov-
ers, child seats orbooster seats.
R When theseat heati ngisswi tched on,the
seat surfa cecan bedama gedasaresu lt
of objects being placed onthe seats, for
exampl e,seat cushi ons,child seats and
protective coversnotapproved by
Mercede s-Benz.
! Make
surethatthere arenoobjects inthe
footwel lunder orbehi ndthe seats when
moving theseats back. There isarisk that
the seats and/or theobjects couldbe dam-
age d.
i Further related subjects:
R Ca rgo compartment enlargement (folding
dow nthe rear seats) (Ypag e254) Seats
93Seats,steering wheeland mirrors Z
Page 99 of 346
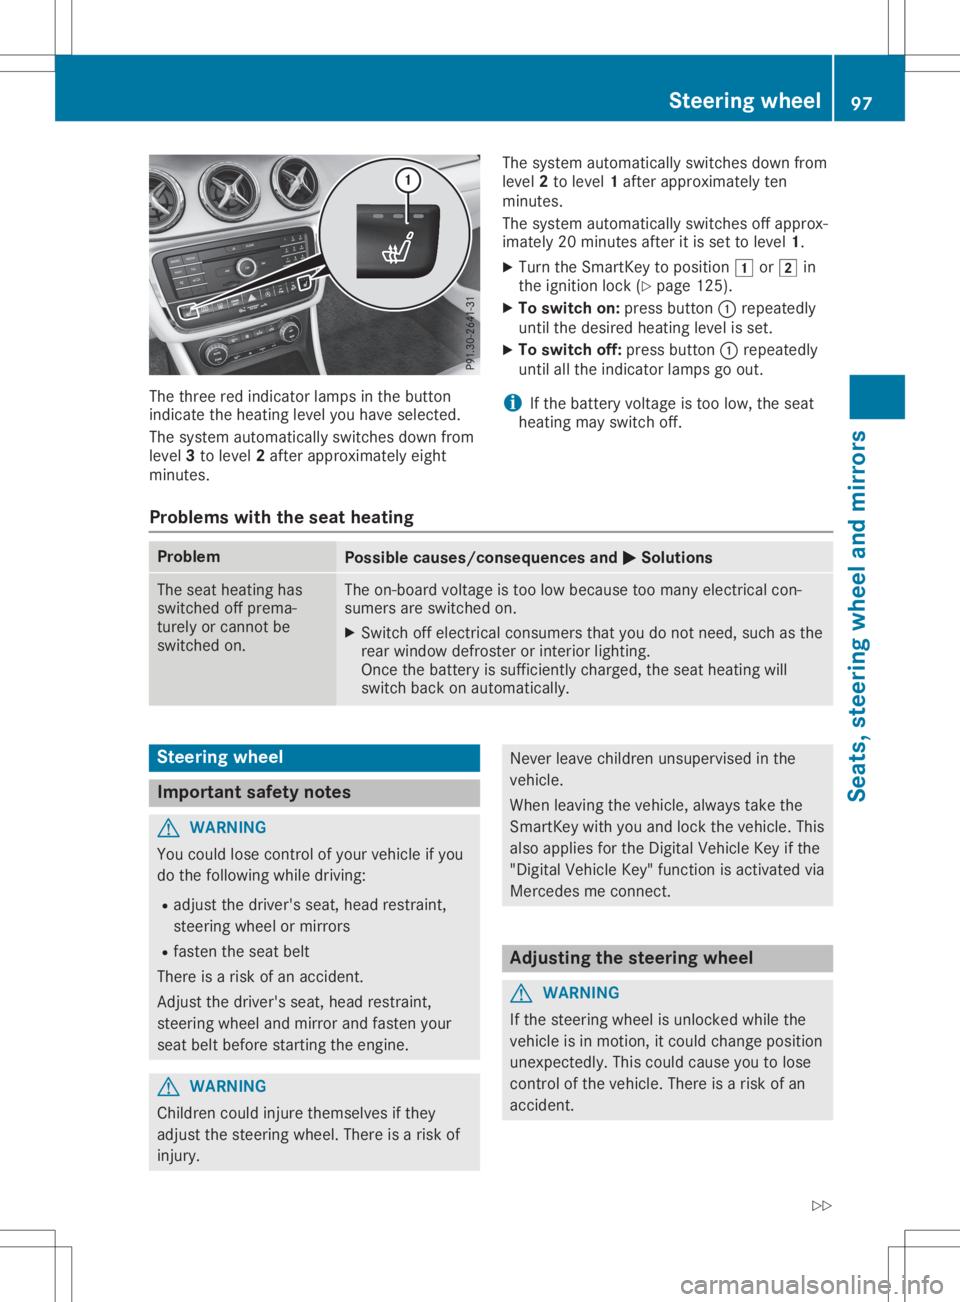
The
three redindicator lampsinthe button
indicate theheating levelyouhave selected.
The system automatically switchesdownfrom
level 3to level 2after approximately eight
minutes. The
system automatically switchesdownfrom
level 2to level 1after approximately ten
minutes.
The system automatically switchesoffapprox-
imately 20minutes afteritis set tolevel 1.
X Turn theSmart Keytoposition 0047or0048 in
the ignition lock(Ypage 125).
X To switch on:press button 0043repeatedly
until thedesired heating levelisset.
X To switch off:press button 0043repeatedly
until allthe indicator lampsgoout.
i If
the battery voltage istoo low, theseat
heating mayswitch off.
Problems withtheseat heating Problem
Possible
causes/conse quencesand0050 0050
Solutions The
seat heating has
switched offprema-
turely orcann otbe
switched on. The
on-board voltageistoo low because toomany electric alcon-
sumers areswitched on.
X Switch offelectric alconsumer sthat youdonot need, suchasthe
rear window defrosteror inter iorlighting.
Once thebattery issufficient lycharged, theseat heating will
switch backonautomatically. Steering
wheel Import
antsafety notes G
WARNIN
G
You could losecontrolofyour vehicle ifyou
do the following whiledriving:
R adjust thedriver's seat,head restraint,
steerin gwheel ormirrors
R fasten theseat belt
There isarisk ofan accident .
Adjust thedriver's seat,head restraint,
steerin gwheel andmirror andfasten your
seat beltbefore startingthe engine. G
WARNIN
G
Children couldinjure themselves ifthey
adjust thesteerin gwheel. Thereisarisk of
injury. Never
leavechildren unsupervised inthe
vehicle.
When leaving thevehicle, alwaystake the
Smart Keywith youand lock thevehicle. This
also applies forthe Digital Vehicle Keyifthe
"Digital Vehicle Key"functionisactivated via
Mercedes meconn ect. Adjust
ingthe steering wheel G
WARNIN
G
If the steerin gwheel isunlocked whilethe
vehicle isin motion ,it could change position
unexpect edly.Thiscould cause youtolose
cont rolofthe vehicle. Thereisarisk ofan
accident . Steering
wheel
97Seats,steering wheelandmirrors
Z
Page 102 of 346
If
you come intocontact withtheelectro-
lyte, observe thefollow ing:
R Rinse offthe electroly tefrom yourskin
immedi atelywithwater.
R Immedia telyrinse theelectroly teout of
you reyes thoroughl ywith clean water.
R Ifthe electroly teisswal lowe d,immedi -
ately rinse yourmouth outthoroughl y.Do
not induce vomiting.
R Ifelectroly tecomes intocontact withyour
skin orhair orisswal lowe d,seek medica l
attention immediately.
R Immedia telychange outofclothing which
has come intocontact withelectroly te.
R Ifan allergic reaction occurs,seekmedi-
cal attention immediately.
The "Automatic anti-glaremirrors"function is
only availableifthe vehicle isequi pped with
the "Mirro rspackage ".
The rear-view mirrorandtheexterior mirroron
the driver's sideautoma ticallygointo anti-
glare mode if:
R the ignition isswitched onand
R incident lightfrom headlampsstrikes the
sensor inthe rear-view mirror
The mirrors donot gointo anti-glare modeif
reverse gearisengaged orifthe interior light-
ing isswitched on. Parking
positionfor the exterio rmir-
ror onthe front-passenge rside
Setting andstoring theparking posi-
tion You
cansetthe front-passenger sideexterior
mirror suchthatyoucan seetherear wheel on
that side assoon asyou engage reverse gear.
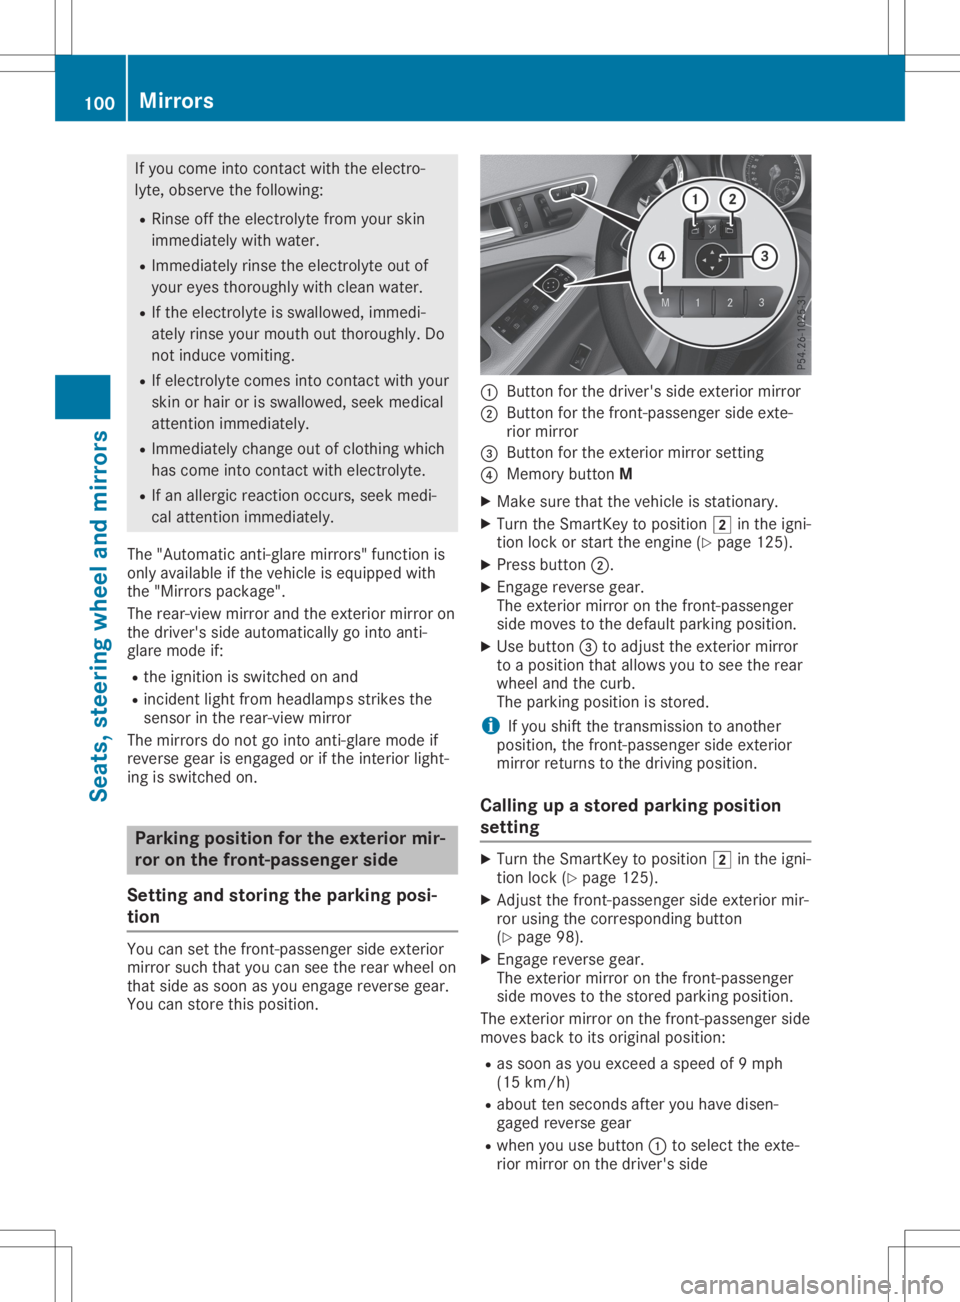
You canstore thispositio n. 0043
Button forthe driver's sideexterior mirror
0044 Button forthe front-passenger sideexte-
rior mirror
0087 Button forthe exterior mirrorsetting
0085 Memory buttonM
X Make surethatthevehicle isstationary .
X Turn theSmartKey topositio n0048 inthe igni-
tion lock orstart theengine (Ypage 125).
X Press button 0044.
X Engage reverse gear.
The exterior mirroronthe front-passenger
side moves tothe defau ltparking position.
X Use button 0087toadjust theexterior mirror
to apositio nthat allows youtosee therear
wheel andthecurb.
The parking positionis stored.
i If
you shift thetransmission toanother
positio n,the front-passenger sideexterior
mirror returns tothe driving position.
Call ingupastored parking position
setting X
Turn theSmartKey topositio n0048 inthe igni-
tion lock (Ypage 125).
X Adjust thefront-passenger sideexterior mir-
ror using thecorresponding button
(Y page 98).
X Engage reverse gear.
The exterior mirroronthe front-passenger
side moves tothe stored parking position.
The exterior mirroronthe front-passenger side
moves backtoits origina lpositio n:
R as soon asyou exceed aspeed of9mph
(15 km/h )
R abou tten seconds afteryouhave disen-
gage dreverse gear
R when youusebutton 0043toselect theexte-
rior mirror onthe driver's side 100
MirrorsSeats,
steerin gwhe eland mirrors
Page 109 of 346
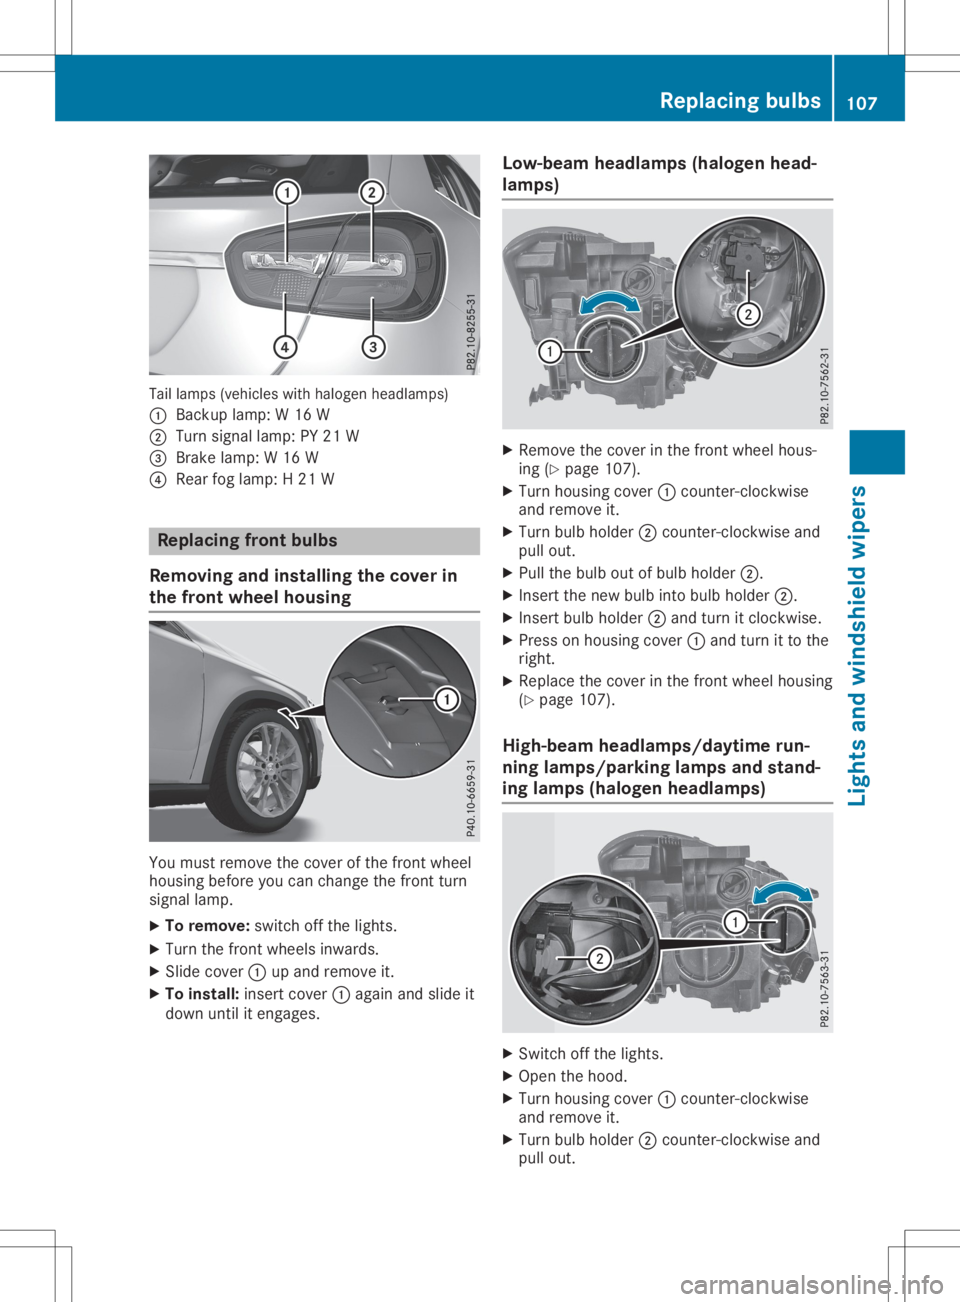
Tail
lamps (vehicles withhalogen headlamps)
0043 Backup lamp:W16 W
0044 Turn signal lamp:PY21 W
0087 Brake lamp:W16 W
0085 Rear foglamp: H21 W Replacing
frontbulbs
Removing andinstalling thecover in
the front wheel housing You
must remove thecover ofthe front wheel
housing beforeyoucan change thefront turn
signal lamp.
X To remove: switchoffthe lights.
X Turn thefront wheels inwards.
X Slide cover 0043upand remove it.
X To install: insertcover0043again andslide it
down untilitengages. Low-beam
headlamps(halogen head-
lamp s) X
Remove thecover inthe front wheel hous-
ing (Ypage 107).
X Turn housing cover0043count er-clockwise
and remove it.
X Turn bulbholder 0044count er-clockwise and
pull out.
X Pull thebulb outofbulb holder 0044.
X Insert thenew bulb intobulb holder 0044.
X Insert bulbholder 0044and turn itclock wise.
X Press onhousing cover0043and turn itto the
right.
X Replace thecover inthe front wheel housing
(Y page 107).
High-beam headlamps/daytimerun-
ning lamp s/park inglamp sand stand -
ing lamp s(halogen headlamps) X
Switch offthe lights.
X Open thehood.
X Turn housing cover0043count er-clockwise
and remove it.
X Turn bulbholder 0044count er-clockwise and
pull out. Replacing
bulbs
107Lightsandwindshield wipers Z
Page 152 of 346
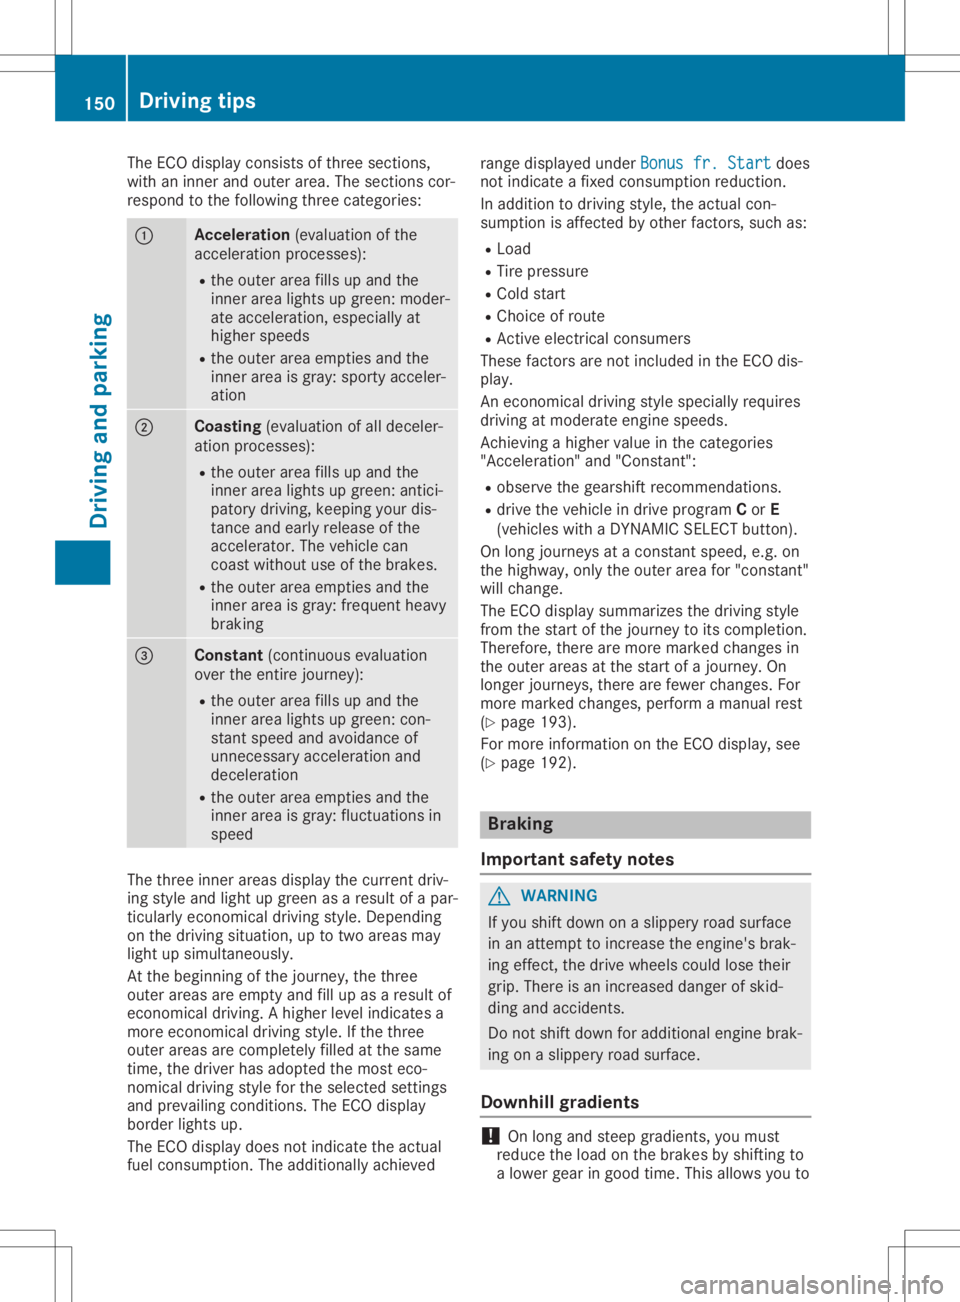
The
ECO display consistsof three section s,
with aninner andouter area.Thesection scor-
respond tothe following threecategories: 0043
Acce
leration (evaluation ofthe
acceleration processes):
R the outer areafillsupand the
inner arealights upgreen: moder-
ate acceleration ,especially at
higher speeds
R the outer areaempties andthe
inner areaisgray: sporty acceler-
ation 0044
Coasting
(evaluation ofall deceler-
ation processes):
R the outer areafillsupand the
inner arealights upgreen: antici-
patory driving, keeping yourdis-
tanc eand early release ofthe
accelerator. Thevehicle can
coast without useofthe brakes.
R the outer areaempties andthe
inner areaisgray: frequent heavy
braking 0087
Constant
(continuous evaluation
over theentir ejourney):
R the outer areafillsupand the
inner arealights upgreen: con-
stant speed andavoidance of
unnec essary acceleration and
deceleration
R the outer areaempties andthe
inner areaisgray: fluctuations in
speed The
three innerareas display thecurrent driv-
ing style andlight upgreen asaresult ofapar-
ticularly economicaldriving style.Dependin g
on the driving situation, uptotwo areas may
light upsimultaneously.
At the beginning ofthe journey, thethree
outer areas areempty andfillup asaresult of
econom icaldriving. Ahigher levelindicates a
more econom icaldriving style.Ifthe three
outer areas arecompletely filledatthe same
time, thedriver hasadopted themost eco-
nomical drivingstyleforthe selected settings
and prevailing conditions.TheECO display
border lightsup.
The ECO display doesnotindicate theactual
fuel consumpt ion.Theadditionally achieved range
display edunder Bonus fr.Start Bonus
fr.Start does
not indicate afixed consumpt ionreduction .
In addition todriving style,theactual con-
sumption isaffect edbyother factors,such as:
R Load
R Tire pressure
R Cold start
R Choice ofroute
R Act ive electric alconsumer s
These factorsare not included inthe ECO dis-
play.
An econom icaldriving stylespecially requires
driving atmoderate enginespeeds.
Achievin gahigher valueinthe categories
"Accelerat ion"and"Constant ":
R observe thegearshift recommendations .
R drive thevehicle indrive program Cor E
(vehicles withaDYNA MICSELECT button ).
On long journeys ataconst antspeed, e.g.on
the highway, onlytheouter areafor"const ant"
will change.
The ECO display summarizes thedriving style
from thestart ofthe journey toits completion .
Therefore, therearemore marked changes in
the outer areas atthe start ofajourney. On
longer journeys, therearefewer changes. For
more marked changes, performamanual rest
(Y page 193).
For more inform ationonthe ECO display ,see
(Y page 192). Br
aking
Import antsafety notes G
WARNIN
G
If you shift down onaslippery roadsurface
in an attempt toincrease theengine's brak-
ing effect ,the drive wheels couldlosetheir
grip. There isan increased dangerofskid-
ding andaccident s.
Do not shift down foradditional enginebrak-
ing onaslippery roadsurface.
Dow nhill gradients !
On
long andsteep gradients, youmust
reduce theload onthe brakes byshiftin gto
a lower gearingood time. Thisallows youto 150
Driving
tipsDriving andparking