2020 MERCEDES-BENZ GLA wiper blades
[x] Cancel search: wiper bladesPage 25 of 346

Wheel
chock...... ................................327
Wheel s
Cha nging awhe el...... ....................326
Che cking ........................................ 305
Cl eani ng...... ...... ............................. 282
Emergency sparewhe el...... ........... 331
Important safetynotes .................. 305
Informatio non drivi ng...... ..............305
<002C00510057004800550046004B00440051004A004C0051004A00120046004B
0044[ nging................ 326
Mou nting anew whee l...... .............329
Rem oving awhe el....... ................... 329
Storing ...........................................327
Tig htening torque....... .................... 330
Whee lsize/tire size.......................330
Whee lsand tires
Cha nging awhe el....... ................... 327
Windo wcurtain airbag
Displ aymessa ge....... ..................... 212
Opera tion......................................... 47
Windo ws
see Side windows
Windsh ield
Defrosting ......................................120
Windsh ieldwashe rsyste m
Addi ngwasher fluid....... ................277
Importa ntsafe tynotes .................. 339
Windsh ieldwi pers
Displ aymessa ge....... ..................... 229
Prob lem(malfunction) ................... 112
Rea rwi ndow wiper ....... .................110
Rep lacing thewiper blades ....... ..... 110
Switchi ngon/off ........................... 109
Winte rdrivin g
Slip pery road surfaces....... ............ 153
Snow chains....... ........................... 308
Winte roperatio n
Gene ralnotes ................................ 307
Winte rtires
M+S tires.......................................307
Wiper blades
Cl eani ng....... .................................. 283
Importa ntsafe tynotes .................. 110
Rep lacing (rearwi ndow) ................112
Woo dentrim (clean inginstruc-
tion s)....... ...........................................285
Worksho p
see Qualified speci alist worksh op Z
ZONE function
Switchi ngon/off ........................... 120 In
dex
23
Page 111 of 346

Tail
lamps
X Loosen screws0087using ascrewdriver.
X Remove thebulb holder fromthetaillamp. Bulb
holder
0085 Turn signals
0083 Brake lamp
X Tur nsignal: pressthebulb gently intothe
bulb holder, turnitcount er-clockwise and
remove itfrom thebulb holder.
X Insert thenew bulb intothebulb holder and
turn itclock wise.
X Bra kelamp :remove thecorrespon ding
bulb from thebulb holder.
X Insert thenew bulb intothebulb holder.
X Insert thebulb holder intothetaillamp and
screw itfirmly intoplace usingscrews 0087.
X Insert thetaillamp intothevehicle.
X Tighten fendernut0043and re-est ablish con-
tact with conn ector 0044.
X Close theside trimpanel (Ypage 108). Windshield
wipers Switching
thewindshield wipers
on/off
! Do
not operate thewindshield wipers
when thewindshield isdry, asthis could
damage thewiper blades. Moreover, dust
that hascollected onthe windshield can
scratc hthe glass ifwiping takesplacewhen
the windshield isdry.
If it is necessary toswitch onthe windshield
wipers indry weather conditions,alway suse
washer fluidwhen operating thewindshield
wipers.
! If
the windshield wipersleavesmears on
the windshield afterthevehicle hasbeen
washed inan automatic carwash, waxor
other residues maybethe reason forthis.
Clean thewindshield usingwasher fluid
after washing thevehicle inan automatic
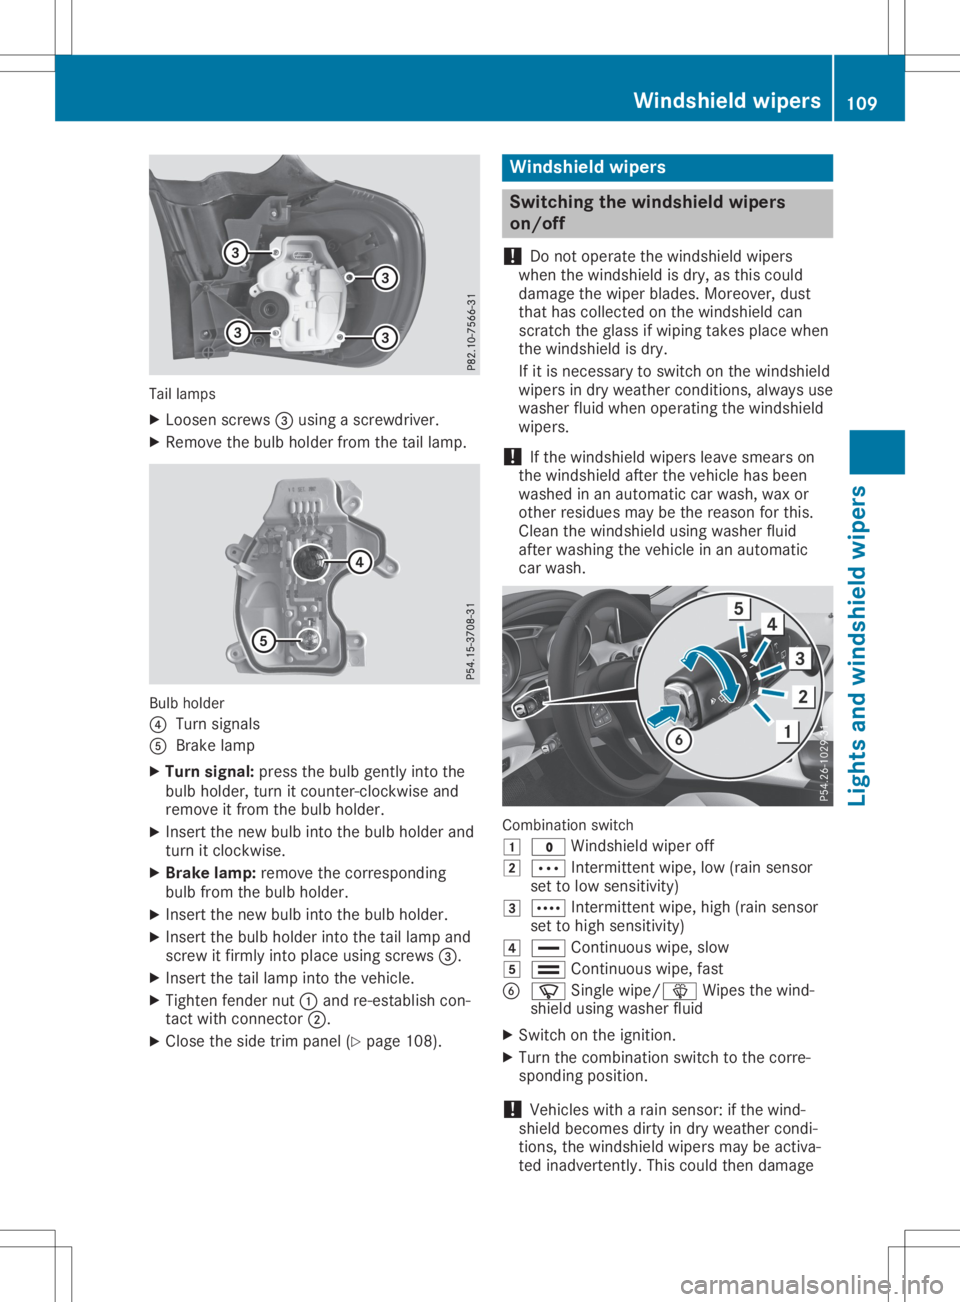
car wash. Combination
switch
0047 003F Windshield wiperoff
0048 0062 Intermitt entwipe, low(rain sensor
set tolow sensitivit y)
0049 0063 Intermitt entwipe, high(rain sensor
set tohigh sensitivit y)
004A 00AA Continuous wipe,slow
004B 00A9 Continuous wipe,fast
0084 00D3 Single wipe/00D4 Wipesthewind-
shield usingwasher fluid
X Switch onthe ignition.
X Turn thecombinat ionswitch tothe corre-
sponding position.
! Vehicles
witharain sensor: ifthe wind-
shield becomes dirtyindry weather condi-
tions, thewindshield wipersmaybeactiva-
ted inadverten tly.This could thendamage Windshield
wipers
109Lightsandwindshield wipers Z
Page 113 of 346

X
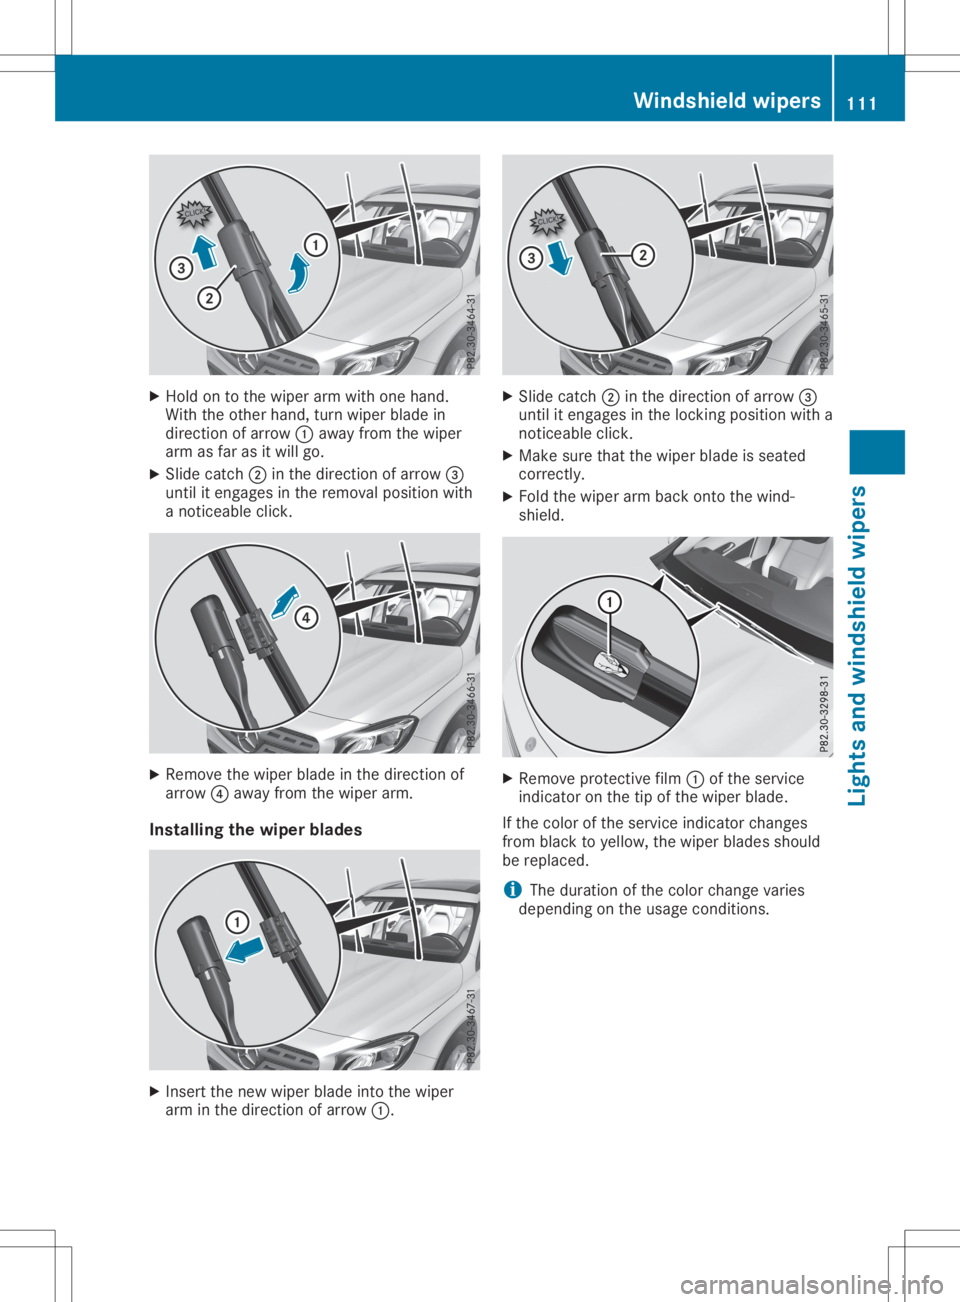
Hold ontothe wiper arm with one hand .
With theother hand,turn wiper blade in
dir ectio nof arro w0043 away from thewiper
arm asfar asitwi llgo.
X Slid ecatch 0044inthe directio nof arro w0087
until itenga gesinthe remov alpos itionwi th
a noticea bleclick. X
Re move thewiper blade inthe directio nof
arro w0085 away from thewiper arm.
In stall ingthe wiper blade s X
Insert thenew wiper blade into thewiper
arm inthe directio nof arro w0043. X
Slid ecatch 0044inthe directio nof arro w0087
until itenga gesinthe locki ngpos itionwi th a
noticea bleclick.
X Make surethat thewiper blade issea ted
correctl y.
X Fold thewiper arm back onto thewind-
shi eld . X
Re move protective film 0043 ofthe servi ce
indi cator onthe tipofthe wiper blade.
If the colo rof the servi ceindi cator chang es
from blacktoyellow, thewiper blades shou ld
be repl aced .
i The
durati onofthe colo rchang evari es
dep endi ngon the usagecondi tions. Win
dshie ldwipers
111Lights andwindshi eld wi pers Z
Page 284 of 346

These
notesalso apply tolight alloy wheels
with aclear mattefinish.
Use only insect remover andcarshampoo
from therange ofcare products approved by
Mercedes- Benz.
Cleaning thedecorative film !
The
following mayhave aneffect onthe
service lifeand color ofdecorative film:
R sunlight
R temperat ure,e.g.hot-airfan
R weather conditions
R ston eimpacts anddirt
R chemical cleaningagents
R greasy substances
! Do
not use anytypes ofpolish onmatt
decorative film.Polishing surfacescovered
with filmgives itashiny finish.
! Do
not treat mattorstruct ureddecorative
film with wax. Thismay lead tomarks that
cann otbe removed.
Observe thenotesinthe section onthe care
and treatm entofmatte paintwork
(Y page 281), these notesalso apply tomatte
decorative film.
To clean, useplenty ofwater andamild clean-
ing agent without additional orabrasive prod-
ucts, e.g.useacar shampoo approved for
Mercedes- Benz.
X Dry vehicles coveredwithfilmusing asoft,
absorbent clothafterevery wash.
Water marks couldotherwise form.
Scr atches, corrosiv edeposits, areasaffected
by corrosion anddamage causedbyinade-
quate carecannotalway sbe completely
repaired. Insuch cases, visitaqualified spe-
cialist workshop.
X Remove dirtimmediately, wherepossible,
while avoiding rubbingtoohard.
The decorative filmmay beirreparably dam-
aged.
X Soak insect remains withinsect remover
and rinse offthe treated areasafterwards.
X Soak birddroppings withwater andrinse off
the treated areasafterwards.
The Paint Cleaner cleaning product, whichhas
been approved andrecomm endedby
Mercedes- Benz,should beused when dirthas penetr
atedthedecorative filmsurface orthe
decorative filmhasbecome dull.
The manufact urercanprovide youwith infor-
mation onspecial careandcleaning products.
Laminated surfacesmayexhibit optical differ-
ences tosurfaces whichwerenotprotec tedby
a decorative filmwhen thedecorative filmis
removed.
i Have
workorrepairs ondecorative film
carried outataqualified specialist work-
shop. Mercedes- Benzrecomm endsthatyou
use anauthorized Mercedes-BenzCenter for
this purpose. Cleaning
thevehicle parts
Cleaning thewheels G
WARNIN
G
The water jetfrom acircular jetnozz le(dirt
blasters) cancause invisible exteriordam-
age tothe tires orchassis compon ents.
Component sdamaged inthis way may fail
unexpect edly.There isarisk ofan accident .
Do not use power washers withcircular jet
noz zles toclean thevehicle. Havedamaged
tires orchassis compon entsreplaced imme-
diately.
! Do
not use acidic wheel cleaning products
to remove brakedust.Thiscould damage
wheel boltsandbrake compon ents.
! Do
not park yourvehicle foralong period
of time directly aftercleaning, particularly
after cleaning thewheel rimwith wheel
cleaner. Wheelcleaner canlead tothe
increased corrosionofthe brake discsand
pads. Therefore, driveforafew minutes
after cleaning. Byheating upthe brakes, the
brake discsandpads dry.Thevehicle can
then beparked foralong period oftime.
Cleaning thewindows G
WARNIN
G
You could become trappedbythe wind-
shield wipers ifthey start moving while
cleaning thewindshield orwiper blades.
There isarisk ofinjury. 282
CareMaintenance
andcare