2020 MERCEDES-BENZ CLS COUPE display
[x] Cancel search: displayPage 121 of 469
not be able
tobe charge d or connec ted with
th eve hicle's exterior aerial.
R The mobile phone may heat up during the
ch arging process. This may particular ly
depend on the applications (apps) cur rently
open in the bac kground.
R Toensure more ef ficient charging and con‐
nection with theve hicle's exterior aerial,
re mo vethe pr otective co ver from the mobile
phone. Pr otective co vers which are neces‐
sary for wireless charging are excluded.
R When charging, the mat should be used if
possible. Wire
lessly charging a mobile phone Requ
irements:
R The mobile phone is suitable for wireless
ch arging (Qi-compatible mobile phone).
A list of Qi-compatible mobile phones can be
fo und at: https://www.mercedes-benz-
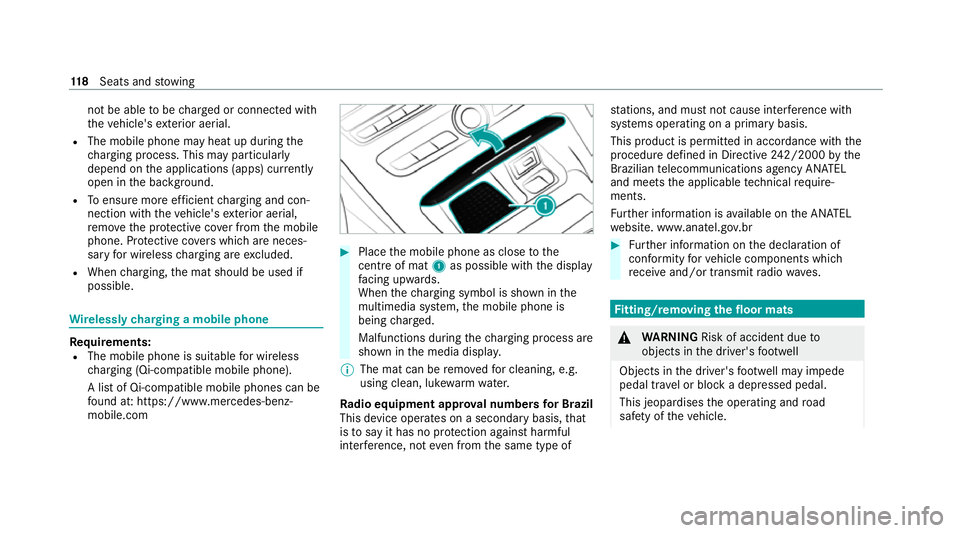
mobile.com #
Place the mobile phone as close tothe
centre of mat 1as possible wi th the display
fa cing up wards.
When thech arging symbol is shown in the
multimedia sy stem, the mobile phone is
being charge d.
Malfunctions during thech arging process are
shown in the media displa y.
% The mat can be remo vedfo r cleaning, e.g.
using clean, luk ewarmwate r.
Ra dio equipment appr oval numbers for Brazil
This device operates on a secondary basis, that
is to say it has no pr otection against harmful
inter fere nce, not even from the same type of st
ations, and must not cause inter fere nce wi th
sy stems operating on a primary basis.
This product is permitted in accordance with the
procedure defined in Directive 242/2000 bythe
Brazilian telecommunications agency AN ATEL
and meets the applicable tech nical requ ire‐
ments.
Fu rther information is available on the AN ATEL
we bsite. www.anatel.go v.br #
Further information on the declaration of
confo rmity forve hicle components which
re cei veand/or transmit radio wav es. Fi
tting/ removing the floormats &
WARNING Risk of accident due to
objects in the driver's foot we ll
Objects in the driver's foot we ll may impede
pedal tr avel or block a depressed pedal.
This jeopardises the operating and road
saf ety of theve hicle. 11 8
Seats and stowing
Page 131 of 469

R
If highly reflective signs are de tected, ULTRA
RANGE Highbeam will be switched off au to‐
matical ly.
At speeds greater than appr oximately 50 km/h:
R The headlamp range of the low beam is regu‐
lated automatically based on the dis tance to
ot her road users.
The sy stem's optical sensor is located behind
th e windscreen near theove rhead control panel.
Switching Adaptive Highbeam Assist Plus
on/off
Switching on #
Turn the light switch tothe à position. #
Switch on the high beam using the combina‐
tion switch.
When the high beam is switched on automat‐
ically in the dar k,the_ indicator lamp on
th e multifunction display will light up.
Switching off #
Switch off the high beam using the combina‐
tion switch. Setting
the low beam (vehicles with MULTI‐
BEAM LED headlamps only) Multimedia sy
stem:
4 © 5
Settings 5
Lights
5 Dipped-beams #
Select Right-side traffic, Left-side trafficor
Automatic. Setting
theex terior lighting switch-off delay
time Re
quirements:
R The light switch is in theà position.
Multimedia sy stem:
4 © 5
Settings 5
Lights
5 Ext. light. del. sw. off #
Set the switch-off delay time.
When theve hicle engine is switched off, the
ex terior lighting will be activated forth e set
time. Switching
the sur round lighting on/off Multimedia sy
stem:
4 © 5
Settings 5
Lights
5 Surround lighting
When Surround lighting is active,theex terior
lighting lights up for 40 seconds af terth eve hicle
is unloc ked. When youstart theve hicle, the sur‐
ro und lighting is deactivated and the automatic
driving lights are activated. #
Activate or deacti vate the function. 12 8
Light and sight
Page 135 of 469
#
Foldthe wiper arms back onto the wind‐
screen. #
Switch on the ignition. #
Press theî button on the combination
switch (/ page130).
The wiper arms will return tothe original
position. #
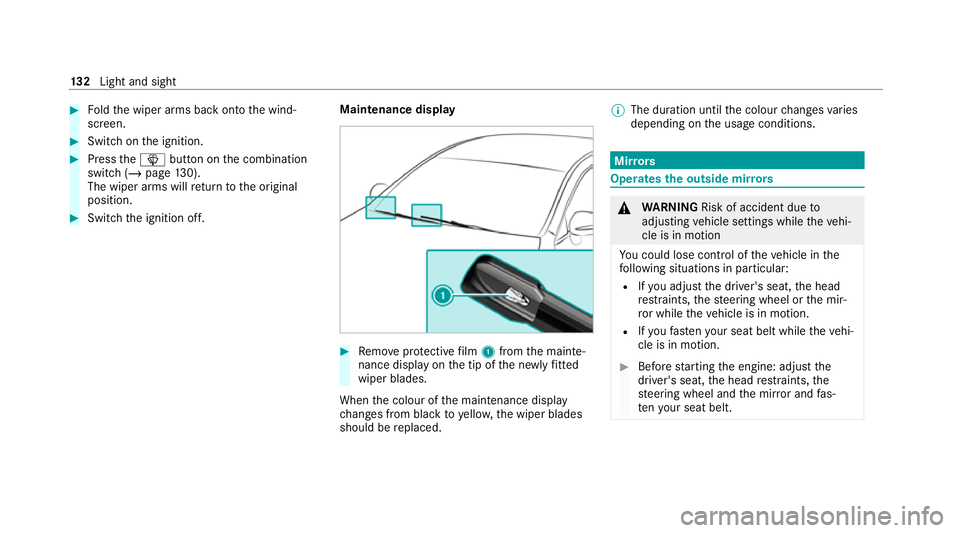
Switch the ignition off. Maintenance display #
Remo veprotective film 1 from the mainte‐
nance display on the tip of the newly fitted
wiper blades.
When the colour of the maintenance display
ch anges from black to yellow, the wiper blades
should be replaced. %
The duration until the colour changes varies
depending on the usage conditions. Mir
rors Operates
the outside mir rors &
WARNING Risk of accident due to
adjusting vehicle settings while theve hi‐
cle is in motion
Yo u could lose cont rol of theve hicle in the
fo llowing situations in particular:
R Ifyo u adjust the driver's seat, the head
re stra ints, thesteering wheel or the mir‐
ro r while theve hicle is in motion.
R Ifyo ufast enyour seat belt while theve hi‐
cle is in motion. #
Before starting the engine: adjust the
driver's seat, the head restra ints, the
st eering wheel and the mir ror and fas‐
te nyo ur seat belt. 13 2
Light and sight
Page 141 of 469
A
Vehicles with THERMATIC air conditioning
contro l panel: ¿switches the A/C func‐
tion on/off (/ page138)
Ve hicles with THERMOTRONIC air condition‐
ing contro l panel:_adjusts the air distri‐
bution, right
B w Setsthete mp erature, right
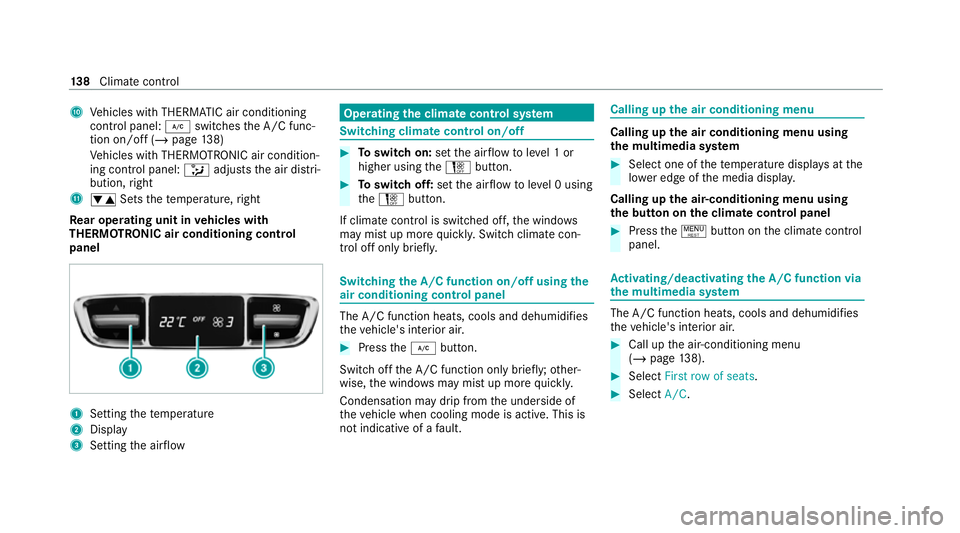
Re ar operating unit in vehicles with
THERMOTRONIC air conditioning control
panel 1
Setting thete mp erature
2 Display
3 Setting the air flow Operating
the clima tecont rol sy stem Switching clima
tecont rol on/off #
Toswitch on: setthe air flow toleve l 1 or
higher using theH button. #
Toswitch off: setthe air flow toleve l 0 using
th eH button.
If climate control is switched off, the windo ws
may mist up more quickl y.Switch climate con‐
trol off only brie fly. Switching
the A/C function on/off using the
air conditioning control panel The A/C function heats, cools and dehumidi
fies
th eve hicle's interior air. #
Press the¿ button.
Switch off the A/C function only brief ly;ot her‐
wise, the windo wsmay mist up more quickl y.
Condensation may drip from the underside of
th eve hicle when cooling mode is active. This is
not indicative of a fault. Calling up
the air conditioning menu Calling up
the air conditioning menu using
th e multimedia sy stem #
Select one of thete mp erature displa ysatthe
lo we r edge of the media displa y.
Calling up the air-conditioning menu using
th e but ton on the clima tecont rol panel #
Press the! button on the climate control
panel. Ac
tivating/deactivating the A/C function via
the multimedia sy stem The A/C function heats, cools and dehumidifies
th eve hicle's interior air. #
Call up the air-conditioning menu
(/ page 138). #
Select First row of seats. #
Select A/C. 13 8
Climate cont rol
Page 149 of 469
Problems with
there mo tecont rolfo r the
st ationary heater/ventilation
FA IL¨
¨ appea rson there mo tecont rol dis‐
play
Po ssible cause:
R The signal transmission between the trans‐
mitter and there cei ver is malfunctioning. #
Change your position in relation totheve hi‐
cle, moving closer if necessar y.
FA IL appea rson there mo tecont rol display
Po ssible cause:
R The star ter battery is not suf ficiently
ch arge d. #
Char gethest ar ter batter y.
Po ssible cause:
R The fuel tank content is below there ser ve
fuel le vel. #
Refuel at the nearest filling station. FA
IL¯ ¯ appea rson there mo tecont rol dis‐
play
Po ssible cause:
R There is a malfunction in thest ationary
heater. #
Have thest ationary heater checked at a
qu alified specialist workshop. Air
vents Ad
justing the front air vents &
WARNING Risk of bu rns and frostbite
due tobeing too close tothe air vents
Ve ry hot or very cold air can flow from the air
ve nts. #
Makesure that all vehicle occupants
alw ays maintain a suf ficient di stance
from the air vents. #
If necessa ry, direct the air flow to
ano ther area of theve hicle interior. To
guarantee theflow of fresh air thro ugh the air
ve nts into theve hicle interior, comply with the
fo llowing:
R Alw ayske ep theve nts and vent grilles in the
ve hicle interior free.
R Keep the air inlet free of residue build-up
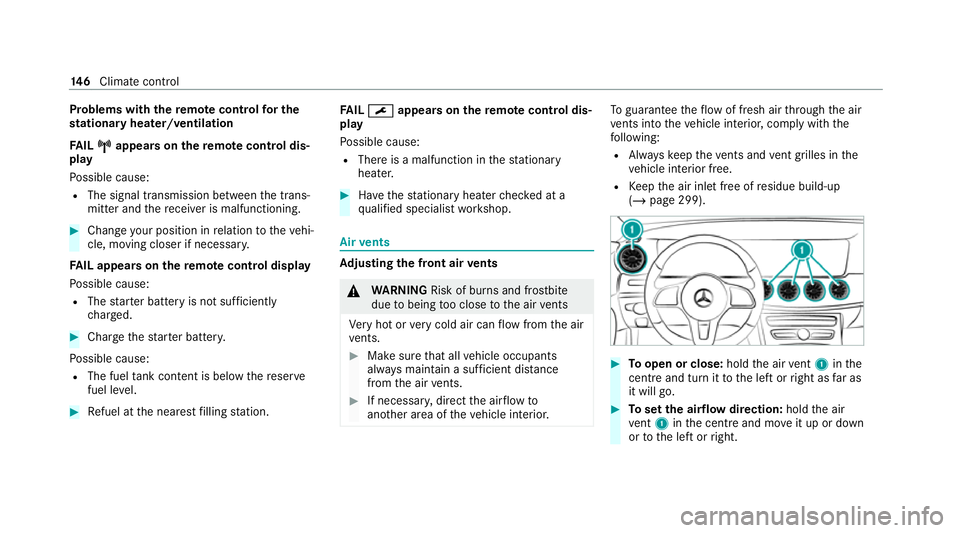
(/ page 299). #
Toopen or close: holdthe air vent 1 inthe
centre and turn it tothe left or right as far as
it will go. #
Toset the air flow direction: holdthe air
ve nt 1 inthe cent reand mo veit up or down
or tothe left or right. 14 6
Climate cont rol
Page 158 of 469
Therefore, obser
vethefo llowing no tes:
R due tosalt build-up on the brake disks and
brakepads, the braking dis tance can increase
considerab lyor result in braking only on one
side
R maintain a much greater safe dis tance tothe
ve hicle in front
To remo vesalt build-up:
R brake occasionally while paying attention to
th e tra ffic conditions
R carefully depress the brake pedal at the end
of the journey and when starting the next
journey
Note s on aquaplaning
Aq uaplaning can take place once a cer tain
amount of water has accumulated on thero ad
sur face.
Obser vethefo llowing no tes during heavy precip‐
itation or in conditions in which aquaplaning may
occur:
R reduce speed
R avoid tyre ruts R
avoid sudden steering mo vements
R brake carefully
% Also obser vethe no tes on regular lych ecking
wheels and tyres (/ page 327).
Note s on driving through water on the road
sur face
Wa ter which has entered into theve hicle can
damage the engine, electrics and transmission.
Wa ter can also enter the air intake of the engine
and cause engine damage.
Obser vethefo llowing if you must drive thro ugh
wate r:
R The water,when calm, may only reach the
lo we r edge of theve hicle body.
R Drive at a maximum speed of 10km/h;
wate r can otherwise enter theve hicle interior
or engine compartment.
R Vehicles tr avelling in front, or oncoming vehi‐
cles, can create waves which may exceed the
maximum permissible dep thofthewate r.
The braking ef fect of the brakes is reduced af ter
fo rd ing. Brake carefully while paying attention toth
e tra ffic conditions until braking po wer has
been fully restored. ECO
start/s top function Ope
ration of the ECO start/s top function
% The ECO start/ stop function is not available
in all drive prog rams, depending on the
engine. Obser vethest atus display in the
multifunction display forth is.
The engine is switched off automatically in the
fo llowing situations if all vehicle conditions for
an automatic engine stop are me t:
R you brake theve hicle toast andstill in trans‐
mission position hori.
R vehicles with a 48 V on-board electrical
sy stem: you depress the brake pedal when
tra velling at a low speed.
If th e sy stem has de tected one of thefo llowing
situations, the engine will not stop:
R youstop at a stop sign and there is no vehi‐
cle in front of you. Driving and parking
15 5
Page 159 of 469
R
theve hicle that stopped in front of youstarts
up again.
R you manoeuv re, turn thesteering wheel
sharply or engage reve rsege ar.
% Ifth e sy stem de tects an intelli gent stop
inhibitor, e.g. a stop sign, the engine will not
st op.
If yo u activate the HOLD function or engage
th e park position j,the engine can be
switched off in spite of an intelligent stop
inhibitor.
The engine is restar ted automatically if:
R you en gage transmission position hork.
R you depress the accelera tor pedal.
R an auto matic engine start is requ ired bythe
ve hicle.
R youre lease the brake pedal.
R vehicles with a 48 V on-board electrical
sy stem:
- youre lease the brake pedal on a downhill
gradient and theve hicle does not roll. -
theve hicle rolls on a downhill gradient
and does not automatically enter glide
mode at 20 km/h.
ECO start/ stop function symbols in the multi‐
function display:
R the symbol è(green) appears when the
ve hicle is at a standstill: the engine was
switched off bythe ECO start/ stop function.
R the symbol ç(yellow) appears when the
ve hicle is at a standstill: not all vehicle condi‐
tions for an engine stop ha vebeen met.
R neither the symbol ènorç appears
when theve hicle is at a standstill: an intelli‐
ge nt stop inhibitor was de tected, e.g. a stop
sign.
R the symbol sappears: the ECO start/
st op function is deactivated or there is a mal‐
function.
If th e engine was switched off bythe ECO start/
st op function and you lea vetheve hicle, a warn‐
ing tone sounds and the engine is not restar ted.
In addition, thefo llowing display message
appears in the multifunction display: Vehicle is operational Switch off ignition before
exiting
If yo u do not swit choff the ignition, it is auto‐
matically switched off af terth re e minutes.
Deactivating or activating the ECO start/
sto p function 15 6
Driving and pa rking
Page 160 of 469
#
Press button 1.
If indicator lamp 2lights up, the ECO start/
st op function is activated.
% Depending on the model and theve hicle
equipment, the button may also be located
at a dif fere nt position in the cent reconsole. ECO displ
ayfunction The ECO display summa
rises your driving char‐
acteristics from thest art of the journey toits
completion and assists you in achieving the
most economical driving style.
Yo u can influence consum ption bydoing thefo l‐
lowing:
R driving with particular care
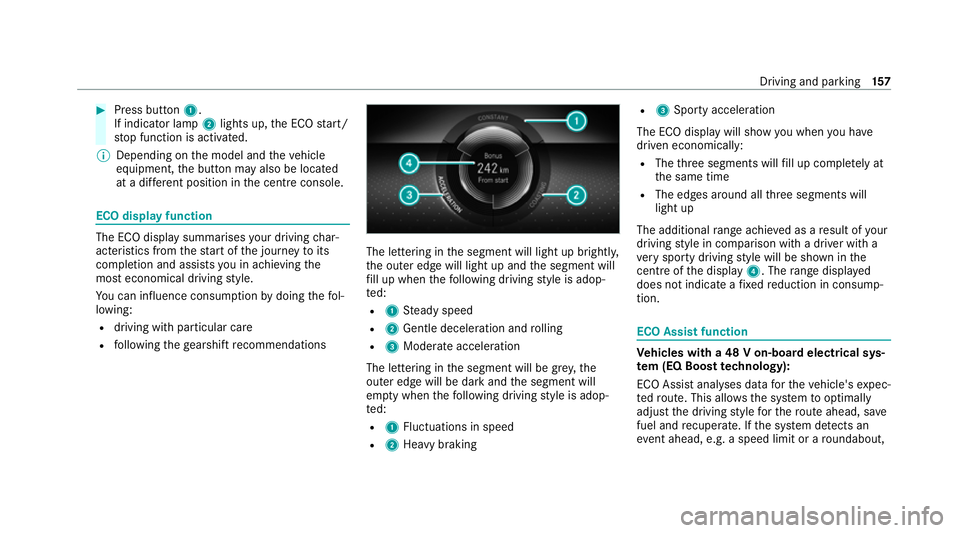
R following thege arshift recommendations The lettering in
the segment will light up brightl y,
th e outer edge will light up and the segment will
fi ll up when thefo llowing driving style is adop‐
te d:
R 1 Steady speed
R 2 Gentle deceleration and rolling
R 3 Moderate acceleration
The lettering in the segment will be gr ey,the
outer edge will be dark and the segment will
em pty when thefo llowing driving style is adop‐
te d:
R 1 Fluctuations in speed
R 2 Heavy braking R
3 Sporty acceleration
The ECO display will show you when you ha ve
driven economically:
R The thre e segments will fill up comple tely at
th e same time
R The edges around all thre e segments will
light up
The additional range achi eved as a result of your
driving style in comparison with a driver with a
ve ry sporty driving style will be shown in the
centre of the display 4. Therange displ ayed
does not indicate a fixe dre duction in consump‐
tion. ECO Assist function
Ve
hicles with a 48 V on-board electrical sys‐
te m (EQ Boo sttech nology):
ECO Assist analyses data forth eve hicle's expec‐
te dro ute. This allo wsthe sy stem tooptimally
adjust the driving style fo rth ero ute ahead, sa ve
fuel and recuperate. If the sy stem de tects an
eve nt ahead, e.g. a speed limit or a roundabout, Driving and parking
157