2020 MERCEDES-BENZ CLS COUPE display
[x] Cancel search: displayPage 45 of 469
When
the ignition is switched on, there ar seat
belt status display informs youfo r a cer tain
amount of time which rear seat belt is not fas‐
te ned.
Yo u can immediately dismiss there ar seat belt
st atus display using the back button on the left-
hand side of thesteering wheel (/ page245).
If a vehicle occupant unfas tens a seat belt in the
re ar while theve hicle is motion, there ar seat
belt status display appears again.
In addition, a warning tone may sound. In this
case, there ar seat belt status display cannot be
hidden using the back button on the left-hand
side of thesteering wheel. Airbags
Overview of airbags
1
Knee airbag
2 Driver's airbag
3 Front passenger airbag
4 Window airbag
5 Side airbag
The ins tallation location of an airbag is identified
by the AIRB AGsymbol.
When enabled, an airbag can pr ovide additional
pr otection forth ere spective vehicle occupant. Pot
ential pr otection pr ovided byeach airbag:
R Knee airbag: thigh, knee and lo wer leg
R Driver's airbag, front passenger airbag: head
and ribcage
R Window airbag: head
R Side airbag: ribcage, also pelvis for front seat
occupants &
WARNING Risk of inju ryor death if the
co-driver airbag is enabled
If th e co-driver airbag is enabled, a child on
th e co-driver seat may be stru ck bythe co-
driver airbag during an accident.
NEVER use a rear wa rd-facing child restra int
sy stem on a seat with an ENABLED FRONT
AIRB AG; DEAT H or SERIOUS INJU RYtothe
CH ILD can occur. When
fitting a child restra int sy stem tothe front
passenger seat, obser vetheve hicle-specific
information (/ page 66). Also, alw ays obser ve
th e no tes on rear wa rd-facing or forw ard-facing
ch ild restra int sy stems on the front passenger
seat. 42
Occupant saf ety
Page 50 of 469
Fu
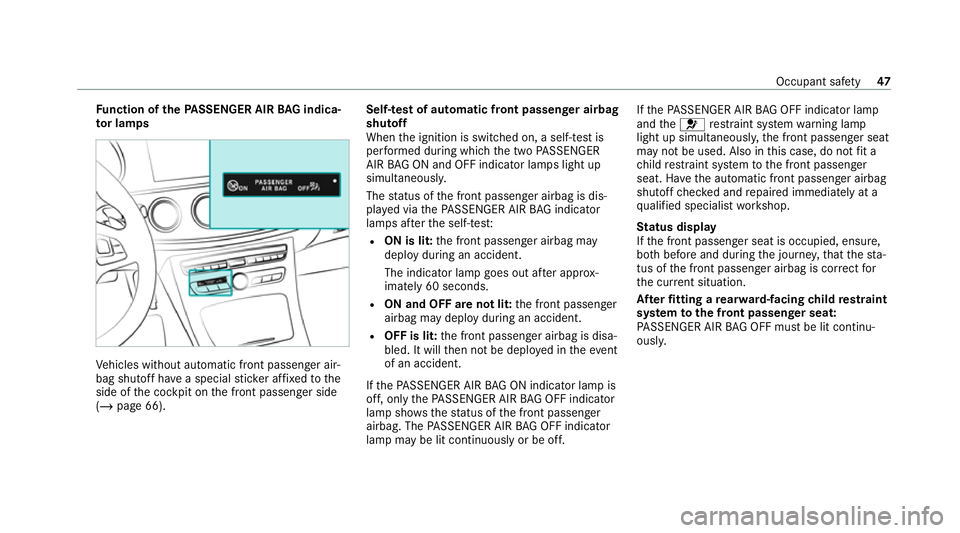
nction of thePA SSENGER AIR BAG indica‐
to r lamps Ve
hicles without automatic front passenger air‐
bag shutoff ha vea special sticke r af fixe dto the
side of the cockpit on the front passenger side
(/ page 66). Self-test of automatic front passenger airbag
shutoff
When
the ignition is switched on, a self-test is
per form ed during which the two PASSENGER
AIR BAG ON and OFF indicator lamps light up
simul taneously.
The status of the front passenger airbag is dis‐
pla yed via thePA SSENGER AIR BAG indicator
lamps af terth e self-tes t:
R ON is lit: the front passenger airbag may
deploy during an accident.
The indicator lamp goes out af ter appro x‐
ima tely 60 seconds.
R ON and OFF are not lit: the front passenger
airbag may deploy during an accident.
R OFF is lit: the front passenger airbag is disa‐
bled. It will then not be deplo yed in theev ent
of an accident.
If th ePA SSENGER AIR BAG ON indicator lamp is
off, on lythePA SSENGER AIR BAG OFF indicator
lamp sho wsthest atus of the front passenger
airbag. The PASSENGER AIR BAG OFF indicator
lamp may be lit continuously or be off. If
th ePA SSENGER AIR BAG OFF indicator lamp
and the6 restra int sy stem warning lamp
light up simultaneousl y,the front passenger seat
may not be used. Also in this case, do not fit a
ch ild restra int sy stem tothe front passenger
seat. Ha vethe automatic front passenger airbag
shutoff checked and repaired immediately at a
qu alified specialist workshop.
St atus display
If th e front passenger seat is occupied, ensure,
bo th before and during the journe y,that thest a‐
tus of the front passenger airbag is cor rect for
th e cur rent situation.
Af terfitting a rear wa rd-facing child restra int
sy stem tothe front passenger seat:
PA SSENGER AIR BAG OFF must be lit continu‐
ousl y. Occupant saf
ety47
Page 54 of 469
th
e dis tance between the door and theve hicle
occupant.
If PRE-SAFE ®
Impulse Side has been deplo yed or
is faulty, thePRE-SAFE impulse side inoperative
See Owner's Manual display message appears
(/ page 361). Safely transporting
children in theve hicle Alw
ays obser vewhen children are tr avelling
in theve hicle %
Also strictly obser vethe saf ety no tesfo rthe
specific situation. In this wa yyo u can recog‐
nise po tential risks and avoid dangers if chil‐
dren are tr avelling in theve hicle
(/ page 52).
Be diligent
Bear in mind that negligence when securing a
ch ild in thech ild restra int sy stem may ha veseri‐
ous consequences. Alw ays be diligent in secur‐
ing a child carefully before everyjou rney. To
impr oveprotection forch ildren younger than
12 years old or under 1.50 m in height,
Mercedes-Benz recommends you obse rvethe
fo llowing information:
R Alw ays secure thech ild in a child restra int
sy stem suitable forth is Mercedes-Benz vehi‐
cle.
R The child restra int sy stem must be appropri‐
ate tothe age, weight and size of thech ild.
R The vehicle seat must be suitable forfitting a
ch ild restra int sy stem (/ page 55).
Ac cident statistics show that children secured
on there ar seats are general lysafer than chil‐
dren secured on the front seats. Forth is reason,
Mercedes-Benz strongly advises that youfit a
ch ild restra int sy stem toare ar seat.
The generic termchild restra int sy stem
The generic term child restra int sy stem is used
in this Owner's Manual. A child restra int sy stem
is, forex ample:
R a baby car seat
R are ar wa rd-f acing child seat R
afo rw ard-facing child seat
R ach ild boos ter seat with a backrest and seat
belt guide
Mercedes-Benz recommends using a child
boos ter seat with a backrest.
The child restra int sy stem must be appropriate
to the age, weight and size of thech ild.
Obser velaws and legal requ irements
Alw ays obser vethe legal requ irements when
using a child restra int sy stem in theve hicle.
Make sure that thech ild restra int sy stem is
appr oved in accordance with theva lid test speci‐
fi cations and guidelines. Further information can
be obtained at a qualified specialist workshop.
Mercedes-Benz recommends that you use a
Mercedes-Benz Service Centre forth is purpose.
Only use appr ovedch ild restra int sy stems
On lych ild restra int sy stems that meet thefo l‐
lowing UNECE standards are permit tedfo r use in
th eve hicle:
R UN-R44
R UN-R129 (i-Size child restra int sy stems) Occupant saf
ety51
Page 63 of 469
on
the multifunction display on the instrument
clus ter.
If th e cent reseat backrest is not engaged and
loc ked in place, there d lock verification indica‐
to r will be visible. &
WARNING Risk of inju ryor death if the
permissible gross mass of thech ild and
ch ild restra int sy stem toget her is excee‐
ded.
To o much load may be placed on the ISOFIX
or i‑Size child restra int sy stems and thech ild
may not be restra ined cor rectly in theeve nt
of an accident, forex ample. #
Ifth ech ild and thech ild restra int sys‐
te m toget her weigh more than 33 kg,
only use an ISOFIX or i‑Size child
re stra int sy stem with which thech ild is
secured with theve hicle seat belt. #
Also secure thech ild restra int sy stem
with theTo pTe ther belt, if available. Alw
ays comply with the information about the
mass of thech ild restra int sy stem:
R inthe manufacturer's ins tallation and operat‐
ing instructions forth ech ild restra int sy stem
used
R on a label on thech ild restra int sy stem, if
present
Re gular lych eck that the permissible gross mass
of thech ild and child restra int sy stem is still
complied with.
When fitting a child restra int sy stem, obser ve
th efo llowing:
O Alw
ays obser vethe cor rect use of the seats
and consider their suitability for attaching a
ch ild restra int sy stem.
ISOFIX child seat securing sy stem
(/ page 58)
or
i‑Size child seat securing sy stem
(/ page 59) O
Alw
ays comply with the manufacturer's
ins tallation and operating instructions for
th ech ild restra int sy stem used.
O Make sure
that thech ild's feet do not touch
th e front seat. If necessar y,mo vethe front
seat slightly forw ards.
®When fitting an ISOFIX child restra int sys‐
te m, also obser vethefo llowing:
O When using a baby car seat in
weight
gr oup 0/0+ and a rear wa rd-facing child
re stra int sy stem in weight group I on a
re ar seat: adjustthe front seat so that the
seat does not touch thech ild restra int sys‐
te m.
O When using a
forw ard-facing child
re stra int sy stem of weight group I: the
backrest of thech ild restra int sy stem must
lie as flat as possible against the backrest of
th eve hicle seat.
O If
th e head restra int of thech ild seat cannot
be fully extended when it is ins talled in the
ve hicle, this will result in restrictions on the
maximum size setting forch ild restra int sys‐
te ms in weight group 2 or 3. 60
Occupant sa fety
Page 65 of 469
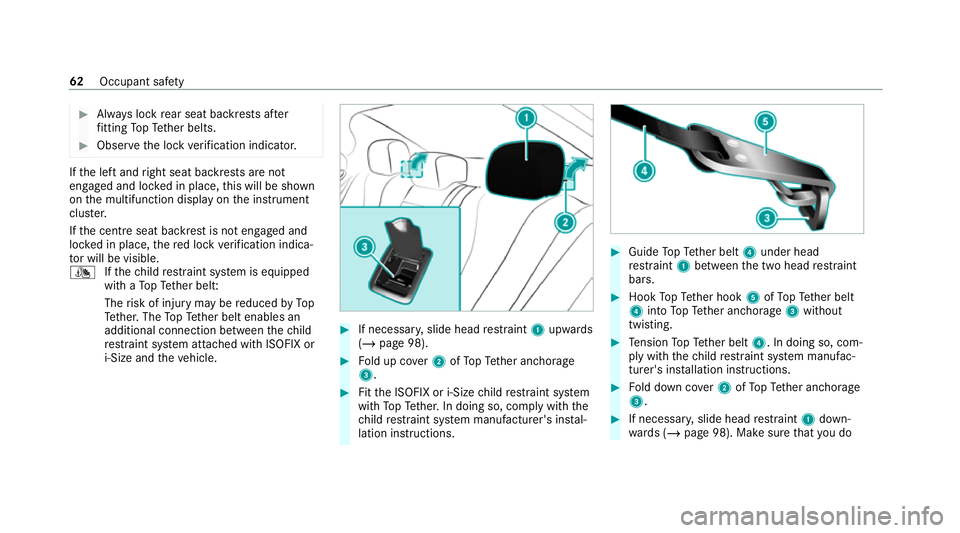
#
Alw ays lock rear seat backrests af ter
fi tting TopTe ther belts. #
Obser vethe lock verification indicator. If
th e left and right seat backrests are not
engaged and loc ked in place, this will be shown
on the multifunction display on the instrument
clus ter.
If th e cent reseat backrest is not engaged and
loc ked in place, there d lock verification indica‐
to r will be visible.
¯ Ifth ech ild restra int sy stem is equipped
with a TopTe ther belt:
The risk of injury may be reduced byTo p
Te ther. The TopTe ther belt enables an
additional connection between thech ild
re stra int sy stem attached with ISOFIX or
i‑Size and theve hicle. #
If necessar y,slide head restra int 1 upwards
(/ page 98). #
Fold up co ver2 ofTopTe ther anchorage
3. #
Fitthe ISOFIX or i‑Size child restra int sy stem
with TopTe ther. In doing so, comply with the
ch ild restra int sy stem manufacturer's ins tal‐
lation instructions. #
Guide TopTe ther belt 4under head
re stra int 1 between the two head restra int
bars. #
Hook TopTe ther hook 5ofTopTe ther belt
4 into TopTe ther anchorage 3without
twisting. #
Tension TopTe ther belt 4. In doing so, com‐
ply with thech ild restra int sy stem manufac‐
turer's ins tallation instructions. #
Fold down co ver2 ofTopTe ther anchorage
3. #
If necessar y,slide head restra int 1 down‐
wa rds (/ page 98). Make sure that you do 62
Occupant saf ety
Page 68 of 469

on
the multifunction display on the instrument
clus ter.
If th e cent reseat backrest is not engaged and
loc ked in place, there d lock verification indica‐
to r will be visible.
When fitting a belt-secured child restra int
sy stem, obser vethefo llowing:
O Alw
ays comply with the manufacturer's
ins tallation and operating instructions for
th ech ild restra int sy stem used.
O Fo
r a child restra int sy stem in the "Univer‐
sal" or "Semi-Universal" categor y,make
sure that the sy stem has been appr oved for
th eve hicle seat.
Obser vethe no tes under "Suitability of
seats for attaching belt-secu redch ild
re stra int sy stems" (/ page 63).
O When using a
weight category 0/0+
baby car seat and a weight category I
re ar wa rd-facing child restra int sy stem
on a rear seat: adjustthe front seat so that
th e seat does not touch thech ild restra int
sy stem. O
The backrest of
thefo rw ard-facing child
re stra int sy stem must, as far as possible, be
re sting on the seat backrest of there ar
seat.
O If
th e head restra int of thech ild seat cannot
be fully extended when it is ins talled in the
ve hicle, this will result in restrictions on the
maximum size setting forch ild restra int sys‐
te ms in weight category II or III.
Contact with thero of when the head
re stra int is fully extended and lo cked in
place will not result in any restrictions on
use.
O The
child restra int sy stem must not be put
under stra in between thero of and the seat
cushion and/or be fitted facing the wrong
direction. Where possible, adjust the seat
cushion inclination accordingly.
O The
child restra int sy stem must not be put
under stra in by the head restra int. Adjust
th e head restra ints as appropriate.
O Make sure
that thech ild's feet do not touch
th e front seat. If necessar y,mo vethe front
seat slightly forw ards. #
Install thech ild restra int sy stem.
The entire base of thech ild restra int sy stem
must alw aysre st on the sitting sur face of the
re ar seat. #
Alw ays make sure that the shoulder belt
st ra p is cor rectly routed from the seat belt
outlet of theve hicle tothe shoulder belt
guide on thech ild restra int sy stem.
The shoulder belt stra p must be routed for‐
wa rds and down wards from the seat belt out‐
let. Occupant saf
ety65
Page 109 of 469
Yo
u can use the memory function when the igni‐
tion is switched off.
Seat adjustments for up tothre e people can be
st ored and called up using the memory function.
Yo u can sa vesettings forth efo llowing sy stems:
R Seat, backrest and head restra int
R Steering wheel
R Outside mir rors
R Head-up display Operating
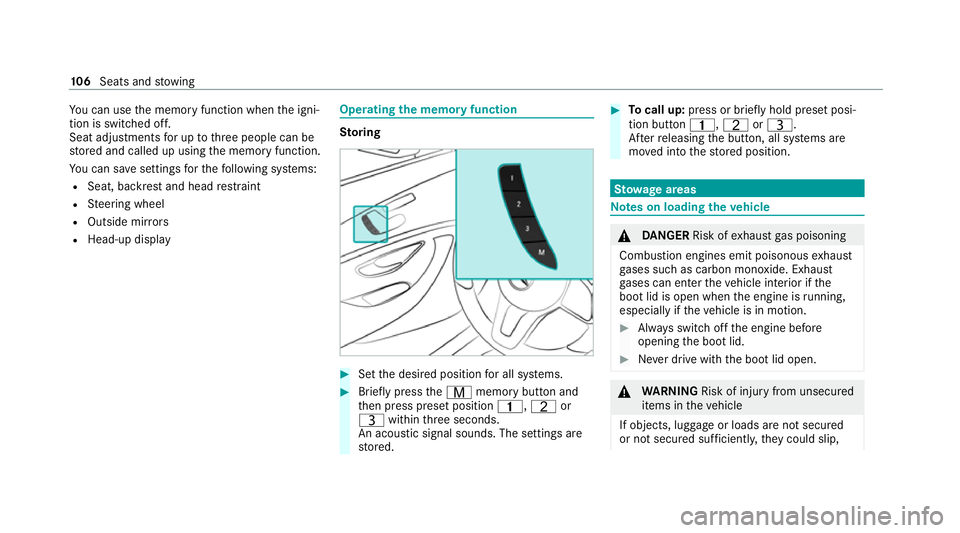
the memory function St
oring #
Set the desired position for all sy stems. #
Brief lypress theV memory button and
th en press preset position 4,Tor
U within thre e seconds.
An acoustic signal sounds. The settings are
st ored. #
Tocall up: press or brief lyhold preset posi‐
tion button 4,TorU.
Af terre leasing the button, all sy stems are
mo ved into thestored position. St
ow age areas Note
s on loading theve hicle &
DANG ER Risk of exhaust gas poisoning
Combustion engines emit poisonous exhaust
ga ses such as carbon monoxide. Exhaust
ga ses can enter theve hicle interior if the
boot lid is open when the engine is running,
especially if theve hicle is in motion. #
Alw ays switch off the engine before
opening the boot lid. #
Never drive with the boot lid open. &
WARNING Risk of inju ryfrom unsecu red
items in theve hicle
If objects, luggage or loads are not secured
or not secured suf ficientl y,they could slip, 106
Seats and stowing
Page 112 of 469
St
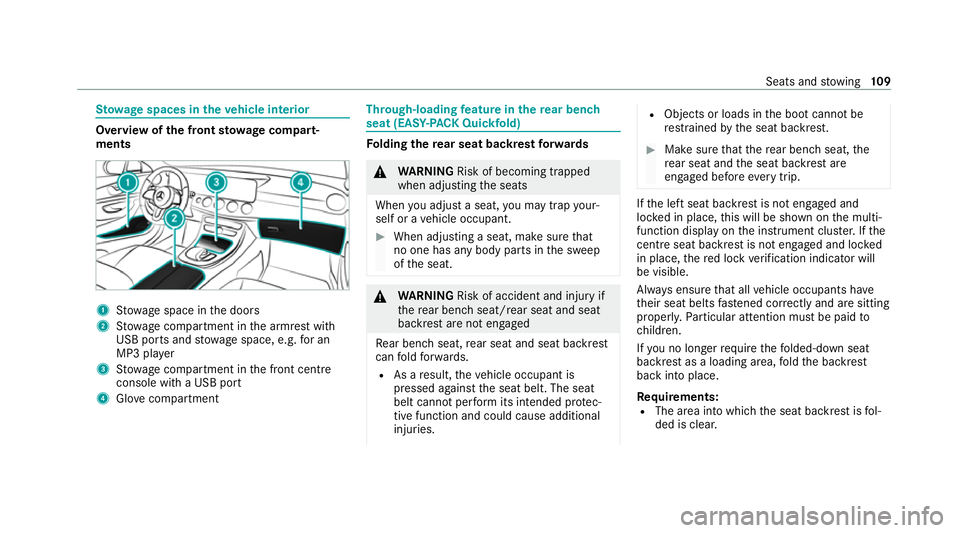
ow age spaces in theve hicle interior Overview of
the front stowage compa rt‐
ments 1
Stow age space in the doors
2 Stow age compartment in the armrest with
USB ports and stowage space, e.g. for an
MP3 pla yer
3 Stow age compartment in the front cent re
console wi tha USB port
4 Glovecompa rtment Through-loading
feature in there ar ben ch
seat (EAS Y-PA CK Quickfold) Fo
lding there ar seat backrest forw ards &
WARNING Risk of becoming trapped
when adjusting the seats
When you adjust a seat, you may trap your‐
self or a vehicle occupant. #
When adjusting a seat, make sure that
no one has any body parts in the sweep
of the seat. &
WARNING Risk of accident and inju ryif
th ere ar ben chseat/rear seat and seat
backrest are not engaged
Re ar ben chseat, rear seat and seat backrest
can fold forw ards.
R As a result, theve hicle occupant is
pressed against the seat belt. The seat
belt cann otper form its intended pr otec‐
tive function and could cause additional
injuries. R
Objects or loads in the boot cann otbe
re stra ined bythe seat backrest. #
Make sure that there ar ben chseat, the
re ar seat and the seat backrest are
engaged before everytrip. If
th e left seat backrest is not engaged and
loc ked in place, this will be shown on the multi‐
function display on the instrument clus ter.If the
centre seat ba ckrest is not engaged and loc ked
in place, there d lock verification indicator will
be visible.
Alw ays ensure that all vehicle occupants ha ve
th eir seat belts fastened cor rectly and are sitting
prope rly. Pa rticular attention must be paid to
ch ildren.
If yo u no lon gerre qu ire thefo lded-d own seat
ba ckrest as a loading area, fold the backrest
back into place.
Re quirements:
R The area into which the seat backrest is fol‐
ded is clear. Seats and
stowing 109