2020 MERCEDES-BENZ AMG GT R-ROADSTER fuel pressure
[x] Cancel search: fuel pressurePage 6 of 441
Driving and pa
rking ................................. 104
Driving ........................................................ 104
Ra cetrack opera tion .................................... 11 3
DY NA MIC SELECT switch ............................1 17
Au tomatic transmission .............................. 11 9
Re fuelling .................................................... 12 3
Pa rking ...................................................... .125
Driving and driving saf ety sy stems .............. 131
Ve hicle towing instructions ........................ .161 Instrument display and on-board
compu
ter.................................................. 16 2
No tes on the instrument display and on-
board computer .......................................... 16 2
Instrument display overview ...................... .163
Overview of the buttons on thesteering
wheel ..........................................................1 64
Operating the on-board computer .............. 16 4
Overview of what is shown on the multi‐
function display .......................................... 16 5
Ad justing the instrument lighting ................1 65LING
UATRONIC ......................................... 16 6
No tes on operating saf ety ...........................1 66Operation ...................................................
16 6
Using LINGU ATRO NIC ef fectively ................ 16 8
Essential voice commands .......................... 16 8 Multimedia sy
stem .................................. 18 0
Overview and operation .............................. 180
Sy stem settings .......................................... 189
AMG TR ACKPA CE ...................................... .199
Na vigation .................................................. 204
Te lephone .................................................. .230
Online and Internet functions ..................... 257
Media ........................................................ .264
Ra dio .......................................................... 276
TV ............................................................... 279
Sound ......................................................... 286 Main
tenance and care ............................. 289
ASS YST PLUS service inter val display ........ 289
Engine compartment .................................. 290
Cleaning and care ...................................... .296 Breakdown assi
stance ............................ 302
Emergency ................................................. .302 Flat tyre ...................................................... 304
Battery (vehicle) ..........................................
310
To w- starting or towing away ....................... 315
Electrical fuses ............................................ 319 Wheels and tyres
..................................... 321
No tes on noise or unusual handling char‐
acteristics .................................................. .321
No tes on regular lyinspecting wheels and
tyres .......................................................... .321
No tes on snow chains ................................ .321
Ty re pressure .............................................. 322
Wheel change ............................................ .325
Emer gency spa rewheel .............................. 335 Te
ch nical data .......................................... 338
No tes on tech nical da ta.............................. 338
On-board electronics .................................. 338
Ra dio equipment appr ovals forth eve hi‐
cle components .......................................... 338
Ve hicle identification plate, VIN and
engine number overview ............................ 338
Operating fluids .......................................... 340
Ve hicle data ................................................ 345 Contents
3
Page 12 of 441
1
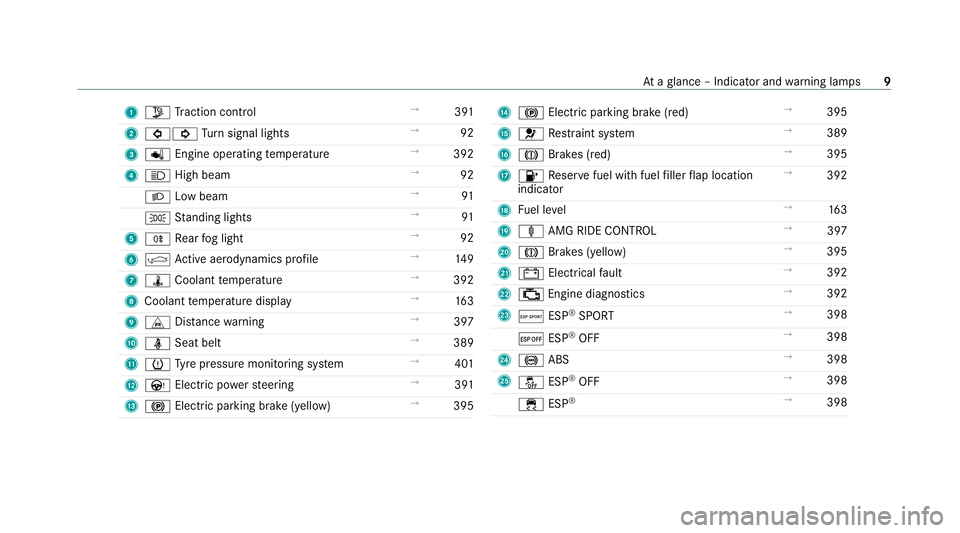
Õ Traction control →
391
2 #! Turn signal lights →
92
3 p Engine operating temp erature →
392
4 K High beam →
92
L Low beam →
91
T Standing lights →
91
5 R Rear fog light →
92
6 | Active ae rodynamics profile →
14 9
7 ÿ Coolant temp erature →
392
8 Coolant temp erature display →
16 3
9 L Distance warning →
397
A ü Seat belt →
389
B h Tyre pressure monitoring sy stem →
401
C Ù Electric po werst eering →
391
D ! Electric pa rking brake (yellow) →
395 E
! Electric parking brake (red) →
395
F 6 Restra int sy stem →
389
G J Brakes (red) →
395
H 8 Reser vefuel with fuel filler flap location
indicator →
392
I Fuel le vel →
16 3
J ä AMG RIDE CONTROL →
397
K J Brakes (yellow) →
395
L # Electrical fault →
392
M ; Engine diagnostics →
392
N Æ ESP®
SPORT →
398
¤ ESP®
OFF →
398
O ! ABS →
398
P å ESP®
OFF →
398
÷ ESP®
→
398 At
aglance – Indicator and warning lamps 9
Page 20 of 441
Pr
otection of the environment
+ ENVIRONMENTAL
NOTEEnvironmental
dama gedue tooperating conditions and
personal driving style The pollutant emission of
theve hicle is
directly related tothewa yyo u operate the
ve hicle.
Operate your vehicle in an environmentally
re sponsible manner tohelp pr otect the envi‐
ro nment. Please obser vethefo llowing rec‐
ommendations on ope rating conditions and
pe rsonal driving style.
Operating conditions: #
Make sure that the tyre pressure is cor‐
re ct. #
Do not car ryany unnecessary weight
(e.g. roof luggage rack s once you no
lon ger need them). #
Adhere tothe service inter vals.
A regularly serviced vehicle will contri b‐
ute toenvironmen tal pr otection. #
Alw ays ha vemaintenance workcar ried
out at a qualified specialist workshop.
Pe rsonal driving style: #
Do not depress the accelera tor pedal
when starting the engine. #
Do not warm upthe engine while the
ve hicle is stationar y. #
Drive carefully and maintain a suitable
dist ance from theve hicle in front. #
Avoid frequent, sudden acceleration
and braking. #
Change gear in good time and use each
ge ar on lyup toÔ of its maximum
engine speed. #
Switch off the engine in stationary traf‐
fi c, e.g. byusing the ECO start/ stop
function. #
Drive fuel-ef ficiently. Obser vethe ECO
display for a fuel-ef ficient driving style. Ta
ke -back of end-of-life vehicles
EU countries onl y:
Mercedes-Benz will take back your end-of-life
ve hicle for environment-friendly disposal in
accordance with the European Union(EU) End-
of-Life Vehicles Directive.
A network of vehicle take -ba ckpoints and dis‐
mantlers has been es tablished foryo uto return
yo ur vehicle. You can lea veit at any of these
points free of charge . This makes an impor tant
contribution toclosing there cycling circle and
conse rving resources.
Fo r fur ther information about there cycling and
disposal of end-of-life vehicles, and theta ke-
back conditions, please visit the national
Mercedes-Benz website foryo ur count ry. Gene
ral no tes 17
Page 110 of 441
R
allow the engine toreach a maximum engine
speed of 4,500 rpm on lybrief ly.
R drive theve hicle in drive program A.
R change gear before there v counter needle is
Ô ofthewa yto there d area of there v coun‐
te r.
R do not shift down a gear manually in order to
brake.
R avoidoverstra ining theve hicle, e.g. driving at
full thro ttle.
R do not depress the accelera tor pedal past
th e pressure point (kickdown).
R only increase the engine speed gradually and
accelera tetheve hicle tofull speed af ter
1, 500 km.
This also applies when the engine or parts of the
driv etra in ha vebeen replaced.
Please also obser vethefo llowing running-in
no tes:
R in cer tain driving and driving saf ety sy stems,
th e sensors adjust automatically while a cer‐
ta in dis tance is being driven af terth eve hicle
has been delivered or af terre pairs. Full sys‐ te
m ef fectiveness is not reached until the
end of this teach-in process.
R brakepads, brake discs and tyres that are
either new or ha vebeen replaced only ach‐
ie ve optimum braking ef fect and grip af ter
se veral hundred kilom etre s of driving. Com‐
pensate forth ere duced braking ef fect by
applying greaterfo rc eto the brake pedal. Note
s on engine output and engine torq ue %
The actual (maximum) values that can be
achie vedfo r engine output and engine tor‐
qu e may deviate from the certified values
within the count ry-specific guidelines for
permissible tolerances (basis: UN-ECE No.
85 or country -specific guidelines).
Fa ctors that can influence this are, forex am‐
ple:
R sea le vel
R fuel grade
R outside temp erature
R operating temp erature of the engine Unti
lth e engine has reached its operating tem‐
perature, thefo llowing engine operating temp er‐
ature warning lamp is lit: Engine output and engine
torque ha vebeen
re duced. Take this into account foryo ur driving
st yle.
When the engine operating temp erature warning
lamp goes out, full engine output and engine tor‐
qu e are available. Note
s on driving &
WARNING Risk of accident due to
objects in the driver's foot we ll
Objects in the driver's foot we ll may impede
pedal tr avel or block a depressed pedal.
This jeopardises the operating and road
saf ety of theve hicle. Driving and parking
107
Page 125 of 441
%
Topermanently shift thege ars manually in
drive prog ram = using thesteering wheel
ge arshift paddles, select theM (Manual) set‐
ting forth e transmission.
* NO
TEDama getothe engine due toshift‐
ing up too late The automatic transmission does not shift up
in manual mode
even when the engine's lim‐
iting speed is reached.
The fuel supply is inter rupte d in order topre‐
ve nt the engine from overrev ving. #
Shift up before the engine speed rea‐
ch es there d area in there v counter. #
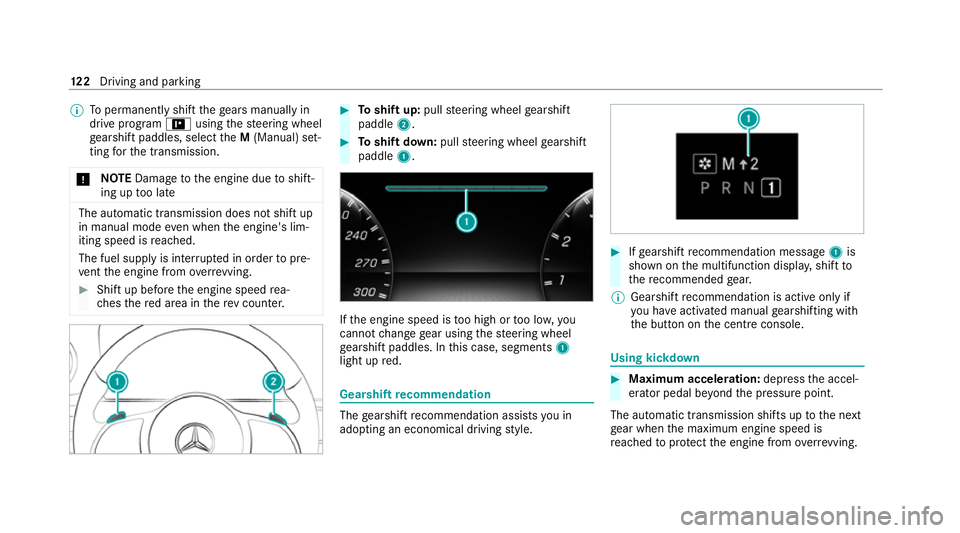
Toshift up: pullsteering wheel gearshift
paddle 2. #
Toshift down: pullsteering wheel gearshift
paddle 1. If
th e engine speed is too high or too lo w,you
cannot change gear using thesteering wheel
ge arshift paddles. In this case, segments 1
light up red. Gearshift
recommendation The
gearshift recommendation assists you in
adopting an economical driving style. #
Ifge arshift recommendation message 1is
shown on the multifunction displa y,shift to
th ere commended gear.
% Gearshift recommendation is acti veonly if
yo u ha veactivated manual gearshifting with
th e button on the cent reconsole. Using kickdown
#
Maximum acceleration: depress the accel‐
erator pedal be yond the pressure point.
The automatic transmission shifts up tothe next
ge ar when the maximum engine speed is
re ached toprotect the engine from overrev ving. 12 2
Driving and pa rking
Page 128 of 441
Obser
vethe no tes on operating fluids and fuel.
The recommended octane number foryo ur vehi‐
cle can be found on the information label in the
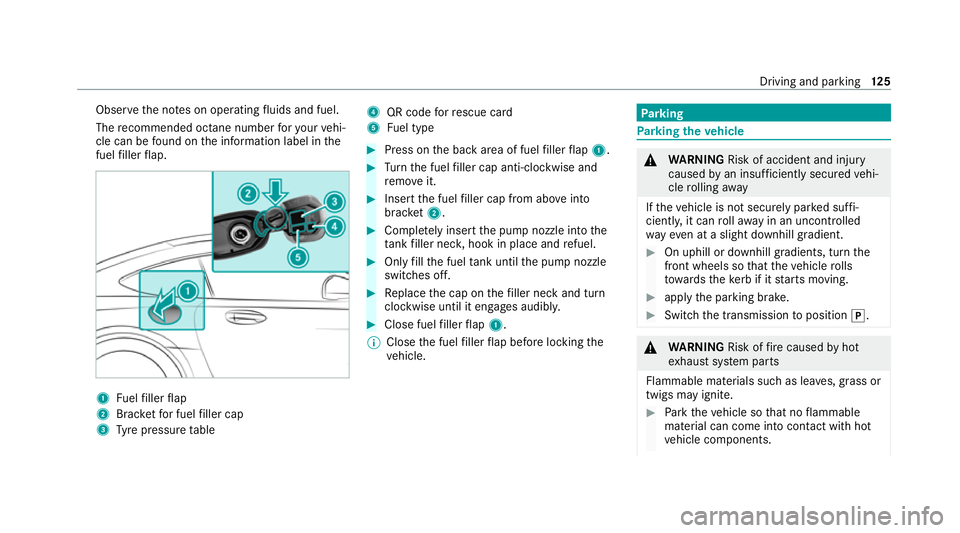
fuel filler flap. 1
Fuelfiller flap
2 Brac ketfo r fuel filler cap
3 Tyre pressure table 4
QR code forre scue card
5 Fuel type #
Press on the back area of fuel filler flap 1. #
Turn the fuel filler cap anti-clockwise and
re mo veit. #
Insert the fuel filler cap from abo veinto
brac ket2. #
Comp lete ly inse rtthe pump nozzle into the
ta nk filler nec k,hook in place and refuel. #
Only fill th e fuel tank until the pump nozzle
switches off. #
Replace the cap on thefiller neck and turn
clockwise until it engages audibl y. #
Close fuel filler flap 1.
% Close the fuel filler flap before locking the
ve hicle. Pa
rking Pa
rking theve hicle &
WARNING Risk of accident and inju ry
caused byan insuf ficiently secu redve hi‐
cle rolling away
If th eve hicle is not securely par ked suf fi‐
ciently, it can rollaw ay in an uncontro lled
wa yev en at a slight downhill gradient. #
On uphill or downhill gradients, turn the
front wheels so that theve hicle rolls
to wa rdsth eke rb if it starts moving. #
apply the parking brake. #
Switch the transmission toposition j. &
WARNING Risk offire caused byhot
ex haust sy stem parts
Flammable materials such as lea ves, grass or
twigs may ignite. #
Park theve hicle so that no flammable
material can come into con tact with hot
ve hicle components. Driving and parking
12 5
Page 312 of 441
&
WARNING Risk of accident from driving
wi th sealed tyres
A tyre temp orarily sealed with tyre sealant
impairs the handling characteristics and is
not suitable for higher speeds. #
Adapt your driving style according lyand
drive carefull y. #
Do not exceed the maximum speed
limit with a tyre that has been repaired
using tyre sealant. #
Obser vethe maximum permissible speed for
a tyre sealed with tyre sealant 80 km/h. #
Affix th e upper section of the TIREFIT sticker
to the instrument clus ter in a location where
it will be easi lyseen bythe driver.
* NO
TEStaining from leaking tyre sealant Af
ter use, excess tyre sealant may leak out
from thefilling hose. #
Therefore, place thefilling hose in the
plastic bag that con tained the TIREFIT
kit. +
ENVIRONMEN
TALNO TEEnvironmental
pollution caused byenvironmen tally ir re‐
sponsible disposal Ty
re sealant contains polluta nts. #
Have the tyre sealant bottle disposed of
professionall y,e.g. at a Mercedes-Benz
Service Centre. #
Stow th e tyre sealant bottle, the tyre inflation
compressor and thewa rning triangle. #
Pull away immediatel y. #
Stop driving af ter appro ximately ten minu tes
and check the tyre pressure using the tyre
inflation compressor.
The tyre pressure must now be at least
13 0 kPa (1.3 bar). &
WARNING Risk of accident due tothe
specified tyre pressure not being
attained
If th e specified tyre pressure is not reached,
th e tyre is too badly damaged. The tyre seal‐
ant cannot repair the tyre in this ins tance.
The braking and driving characteristics may
be great lyimpaired. #
Do not continue driving. #
Consult a qualified specialist workshop. Countries
that ha veMercedes-Benz
Service24h: you will find a sticke r with thete le‐
phone number, e.g. on the B‑pillar on the driver's
side. #
Cor rect the tyre pressure if it is still at least
13 0 kPa (1.3 bar). See the tyre pressure
ta ble on the fuel filler flap forva lues. #
Toincrease the ty repressure: switch on
th e tyre inflation compressor. Breakdown assis
tance 309
Page 326 of 441
&
WARNING Risk of accident from repea‐
te d tyre pressure drop
If th e tyre pressure drops repeatedl y,the
wheel, valve or tyre may be damaged.
Insuf ficient tyre pressure can cause the tyres
to bur st. #
Inspect the tyre for signs of fore ign
objects. #
Check whe ther the wheel or valve has a
leak. #
Ifyo u are unable torectify the damage,
conta ct aqualified specialist workshop. Information on
there commended tyre pressure
fo rth eve hicle's factor y-fitted tyres can be found
on the tyre pressure table on the inside of the
fuel filler flap (/ page 323).
Use a suitable pressure gauge tocheck the tyre
pressure. The outer appearance of a tyre does
not permit any reliable conclusion about the tyre
pressure. Only cor
rect tyre pressures when the tyres are
cold. Conditions for cold tyres:
R The vehicle has been par ked with the tyres
out of direct sunlight for at least thre e hours.
R The vehicle has tr avelled less than 1.6 km.
The vehicle's tyres heat up when driving. As the
te mp erature of the tyres increases, so too does
th e tyre pressure.
Ve hicles with a tyre pressure monitoring sys‐
te m: you can also check the tyre pressure using
th e on-board computer. Ty
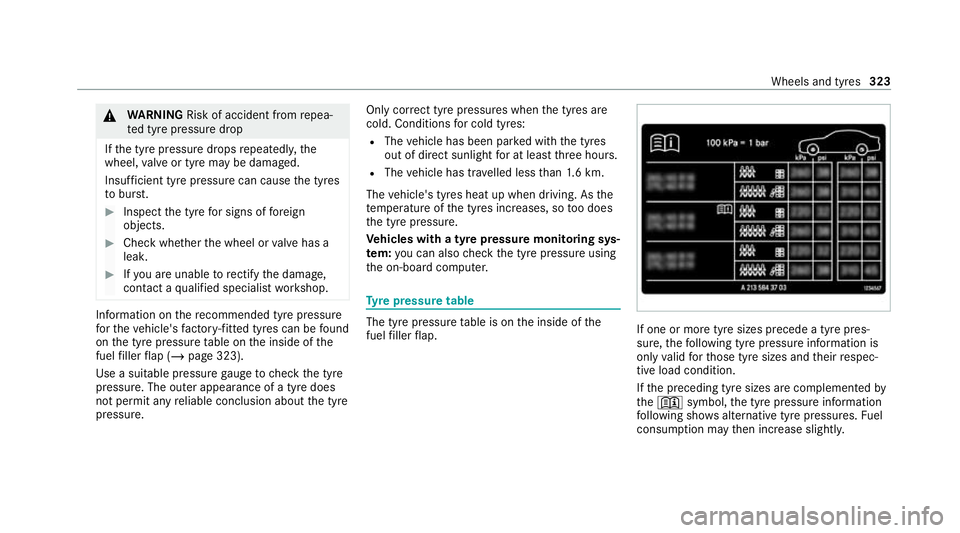
re pressure table The tyre pressure
table is on the inside of the
fuel filler flap. If one or more tyre sizes precede a tyre pres‐
sure,
thefo llowing tyre pressure information is
only valid forth ose tyre sizes and their respec‐
tive load condition.
If th e preceding tyre sizes are complemented by
th e+ symbol, the tyre pressure information
fo llowing sho wsalternative tyre pressures. Fuel
consum ption may then increase slightl y. Wheels and tyres
323