2020 MERCEDES-BENZ AMG GT R-ROADSTER jump start
[x] Cancel search: jump startPage 204 of 441
%
The following values can be set for parame‐
te rs 1 and 2, forex ample:
R Speed
R longitudinal/lateral acceleration
R steering angle
R Engine speed
R engine oil/tyre temp erature
Based on the anal ysis yo u can check and opti‐
mise driving characteristics for any position on
th e tra ck.
Exporting trac ksorraces (USB) #
Select All tracks.
An ove rview of all stored trac ksand races
appea rs. #
Highlight desired trac ksorraces. #
Select ÜOptions. #
Select Export.
The selected trac ksorraces can be expor ted
to a USB storage device connected tothe
ve hicle. Editing trac
ksand recordings #
Select All tracks. #
Highlight the desired trac k. #
Select Üoptions. #
Select Rename orDelete.
or #
Select a trac k. #
Highlight the desired recording. #
Select Üoptions. #
Select Weather orDelete. Setting Drag
Race Multimedia sy
stem:
4 vehicle 5
TRACK PACE 5
Drag Race
Measuring acceleration #
Select Acceleration.
Measurement begins when theve hicle accel‐
erates. Measurement is incremental, in steps
of 50 km/h toa maximum of 300 km/h or
up tothe set maximum speed. Measurement can be
stopped early by
selecting Stoporby stopping theve hicle.
Quar ter-mile race #
Select Quarter Mile.
The time measurement runs until a mile has
been tr avelled or a pr eviously set dis tance
(e.g. quarter mile, third mile or half mile) has
been reached.
% The possible values for setting the end dis‐
ta nce are de term ined bythe sy stem and
cann otbe freely chosen.
Measurement can be stopped early byselecting
Stop orby stopping theve hicle.
Manual start for accele ration and quarter-
mile race #
Select Acceleration orQuarter Mile . #
Select Manual start .
Three red traf fic lights appear one af terthe
ot her. The reaction time measurement starts
when they change togreen at the same time.
The reaction time is displa yed as soon as you
drive off. If you drive off too ear ly,th e mes‐
sage Jump start will appear and acceleration Multimedia sy
stem 201
Page 314 of 441
#
Dispose of batteries in an
environmental lyresponsible manner.
Ta ke dischar ged batteries toaqu alified
specialist workshop or toa collection
point for used batteries. If
yo u ha vetodisconnect the12 V batter y,con‐
ta ct a qualified specialist workshop.
Comply with saf ety no tes and take protective
measures when handling batteries. Risk of
explosion. Fire, naked
flames and smoking are
prohibi ted when handling the batter y.
Av oid creating spar ks. Electrolyte
or battery acid is cor ro‐
sive. Avoid contact with the skin, eyes
or clo thing. Wear suitable pr otective
clo thing, in particular glove s, an apron and a
face mas k.Immedia tely
ri nse electrolyte or acid splashes off
with clean water.Consult a doc tor if
necessar y. We
ar saf etygl asses. Ke
ep children away. Obser
vethis Owner's Manual.
Obser vethefo llowing if you do not intend touse
th eve hicle over an extended pe riod of time:
R Activate standby mode.
R Alternatively: connect the battery toa bat‐
te ry charge r appro vedby Mercedes-Benz or
consult a qualified specialist workshop to
disconnect the batter y. Note
s onstarting assi stance and charging
th e12 V battery When
charging the battery and during starting
assis tance, al ways use the jump-s tart connec‐
tion point in the engine compartment.
* NO
TEDamaging the battery thro ugh
ove rvoltage When using a battery
charge r without a maxi‐
mum charging voltage, the battery or the
ve hicle electronics may be damaged. #
Only use battery charge rs with a maxi‐
mum charging voltage of 14.8 V. When
charging the battery and during starting
assis tance, al ways use the jump-s tart connec‐
tion point in the engine compartment.
* NO
TEDamaging the battery thro ugh
ove rvoltage When using a battery
charge r without a maxi‐
mum charging voltage, the battery or the
ve hicle electronics may be damaged. Breakdown assis
tance 311
Page 315 of 441
#
Only use battery charge rs with a maxi‐
mum charging voltage of 14.8 V. &
WARNING Risk ofexplosion during
ch arging process and starting assis tance
During thech arging process and starting
assis tance, the battery may release an explo‐
sive gas mixture. #
Avoid fire , naked flames, creating
spar ksand smoking. #
Make sure there is suf ficient ventila‐
tion. #
Do not lean over a batter y. &
WARNING Risk ofexplosion from a fro‐
zen battery
A dischar ged battery may freeze at temp era‐
tures slightly abo veor below freezing point.
During starting assis tance or battery charg‐
ing, bat tery gas can be released. #
Alw ays allow a battery tothaw before
ch arging it or per form ing starting assis‐
ta nce. If
th e indicator/warning lamps in the instrument
clus ter do not light up at low temp eratures, it is
ve ry likely that the dischar ged battery has fro‐
zen. In this case you may neither jump-s tart the
ve hicle nor charge the batter y.
The service life of a battery that has been
th awe d may be dramatically shor tened. The
st arting characteristics may be impaired, espe‐
cially at low temp eratures.
It is recommended that you ha veathaw ed bat‐
te ry checked at a qualified specialist workshop.
* NO
TEDama gecaused bynumerous or
ex tended attempt sto start the engine Nume
rous or extended attempt sto start the
engine may damage the catalytic con verter
due tonon-combu sted fuel. #
Avoid numerous and extended attem pts
to start the engine. Obser
vethefo llowing points during starting
assis tance and when charging the battery:
R Only use undamaged jump lead/charging
cables with a suf ficient cross-section and
insula tedte rm inal clamps.
R Non- insulated parts of thete rm inal clamps
must not come into con tact with other me tal
parts while the jump lead/charging cable is
connected tothe battery/jump-s tart connec‐
tion point.
R The jump lead/charging cable must not
come into contact wi thany parts which may
mo vewhen the engine is running.
R Alw ays make sure that nei ther you nor the
battery is elect rostatically charge d.
R Keep away from fire and naked flames.
R Do not lean overth e batter y.
R Take care that the positive term inal of a con‐
nec ted battery does not come into con tact
wi th vehicle parts.
R Never place me tal objects or tools on a bat‐
te ry. 312
Breakdown assis tance
Page 316 of 441
R
When connecting and disconnecting the bat‐
te ry, alw ays obser vethe sequence of battery
te rm inals desc ribed.
Obser vethe additional following points when
ch arging the battery:
R Only use battery charge rs tested and
appr ovedfo r Mercedes-Benz.
R Read the battery charge r's operating instruc‐
tions before charging the batter y.
Obser vethe additional following points during
st arting assis tance:
R Starting assis tance may only be pr ovided
using vehicles, batteries or other jump start
devices with a nominal voltage of 12V.
R The vehicles must not touch.
R Take care toconnect only battery term inals
of identical polarity.
R Obser vethe sequence described for con‐
necting and disconnecting the jumper
cables. R
Vehicles with a petrol engine: jump-start
th eve hicle only when the engine and exhaust
sy stem are cold. St
arting assi stance and charging the 12 V
battery Re
quirements:
R The vehicle is secured with the electric park‐
ing brake.
R Vehicles with automatic transmission: the
transmission is in position j.
R The ignition and all electrical consumers are
switched off.
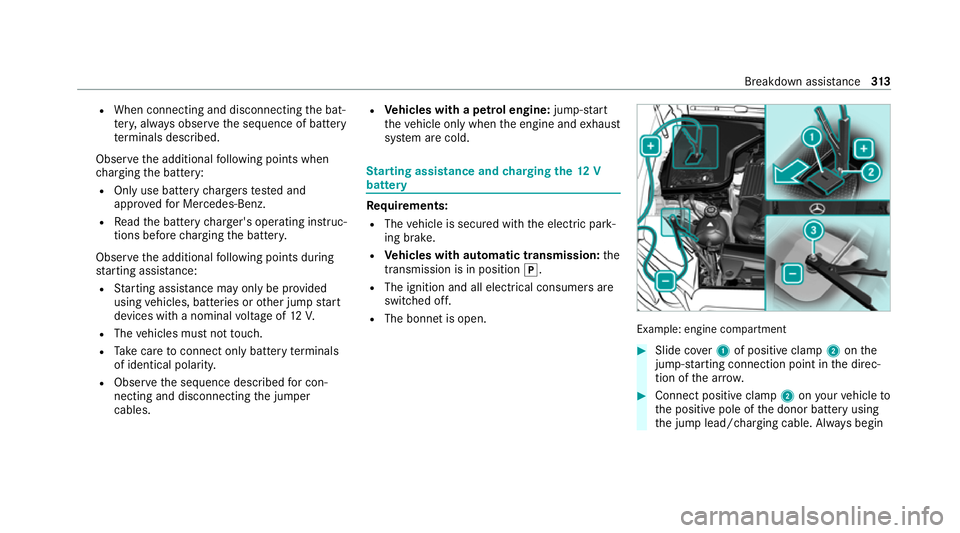
R The bonnet is open. Example: engine compartment
#
Slide co ver1 of positive clamp 2onthe
jump-s tarting connection point in the direc‐
tion of the ar row. #
Connect positive clamp 2onyour vehicle to
th e positive pole of the donor battery using
th e jump lead/charging cable. Alw ays begin Breakdown assis
tance 313
Page 317 of 441
with positive clamp
2onyour ow nve hicle
fi rs t. #
During starting assi stance: start the
engine of the donor vehicle and run at idle
speed. #
Connect the negative pole of the donor bat‐
te ry and ear thpoint 3ofyour ow nve hicle
by using the jump lead/charging cable. Begin
with the donor battery firs t. #
During starting assi stance: start the
engine of your ow nve hicle. #
During thech arging process: start the
ch arging process. #
During starting assi stance: letthe engines
ru nfo r se veral minutes. #
During starting assi stance: before discon‐
necting the jump lead, switch on an electrical
consumer in your ow nve hicle, e.g. there ar
wind owheater or lighting.
When thest arting assis tance/charging process
is compl ete, per form thefo llowing steps: #
First,re mo vethe jump lead/charging cable
from ear thpoint 3and the negative pole of
th e donor batter y,then from positive clamp
2 and the positive pole of the donor bat‐
te ry. Begin ea chtime wi th the conta cts on
yo ur ow nve hicle firs t. #
Afterre moving the jump lead/charging
cable, close co ver1 of positive clamp 2.
Fu rther information can be obtained at a quali‐
fi ed specialist workshop. Re
placing the 12V battery #
Obser vethe no tes on the12 V battery
(/ page 310).
Me rcedes-Benz recommends that you ha vethe
12 V battery replaced at a qualified specialist
wo rkshop, e.g. at a Mercedes-Benz Service
Centre.
If yo uwa nttoreplace the battery yourself,
obse rveth efo llowing no tes:
R Replace a faulty bat tery with a battery which
meets the specific vehicle requ irements. The
vehicle is equipped with a lithium-ion
batter y.Fu llve hicle functionality is only guar‐
anteed with a lithium-ion batter y.Fo r saf ety
re asons, Mercedes-Benz recommends that
yo u on lyuse bat teries which ha vebeen tes‐
te d and appr ovedfo ryo ur vehicle by
Mercedes-Benz.
R Use de tach able parts such as vent hoses,
elbow fittings or term inal co vers from the
battery which is tobe replaced.
R Make sure that theve nt hose is al ways con‐
nected tothe original opening on the side of
th e batter y.
Fit any existing or supplied cell caps.
Otherwise, gases or battery acid could
escape.
R Make sure that de tach able parts are recon‐
nected in the same way. 314
Breakdown assis tance
Page 421 of 441

Marking a
to-do entry as compl eted ....2 44
Noting an incoming call ...................... .244
Selecting functions .............................. 24 4
Switching au tomatic start on/off ........ 24 4
Increase in traf fic information volume
Setting ................................................ .279
Indicator lamps see Warning/indicator lamps
Individual drive prog ram
Con figuring .......................................... 11 8
Selecting .............................................. 11 8
Inspection see AS SYST PLUS
Instrument clus ter
Fu nction/no tes ........................... 162, 16 3
Instrument display Adjusting the lighting ........................... 16 5
Fu nction/no tes ................................... 16 3
Instrument clus ter ................................... 8
Wa rning/indicator lamps .................... .387
Instrument display and on-board
compu ter
Fu nction/no tes ................................... 16 2Instrument lighting
.................................165
Intelligent Light Sy stem
Ad aptive Highbeam Assist .....................93
Interior lighting ........................................ .95
Re ading light ........................................ .95
Setting ................................................... 95
Switch-off del aytime ............................. 95
In te rior pr otection
Fu nction ................................................ 73
Priming/deactivating ............................. 74
Intermediate destination Calculating a route with intermediate
destinations ........................................ 209
En tering ............................................... 209
Modifying ............................................ 209
St arting an automatic filling station
sear ch................................................. 208
St arting the automatic service sta‐
tion sear ch........................................... 214
Internet connection Cancelling permission (mobile
phone) ................................................ .261
Communication module function ........ 258
Connection status .............................. .261 Displ
aying the connection status .........2 61
Editing access da ta(Blue tooth ®
) .........2 61
Information ..........................................2 57
Mobile phone de tails .......................... .261
Re strictions ......................................... 257
Setting access data (Bluetooth ®
) ........ 258
Setting up (Blue tooth®
) .......................2 58
Setting up (business telephony) .......... 259
Setting up (Wi-Fi) ................................ .258
Switching Blue tooth®
profile (DUN/
PA N) .................................................... 260
Internet radio
see TuneIn
iPhone ®
see Apple CarPl ay®
see Mercedes-Benz Link J
Jack Declaration of conformity ......................24
Storage location ..................................3 29
Jump-start connection ............................313
Gene ral no tes ....................................... 31141 8
Index
Page 431 of 441
Software update
Performing ...........................................1 98
Software updates ................................ 197
Sy stem updates ................................... 19 8
Sound PRE-SAFE ®
Sound ................................. 46
Wheels and tyres ................................. 321
Sound see Burmes ter®
high-end Sur round
sound sy stem
see Burmes ter®
sur round sound sy stem
see Tone settings
Sound settings Adjusting the balance .......................... 286
Ad justing treble, mid-range and bass
settings ............................................... 286
Au tomatic volume adjustment ............ .286
Spare wheel see Emer gency spa rewheel
Speech dialogue sy stem
see LINGU ATRO NIC
Speed limit for winter tyres
Setting ................................................ .141 Sports
exhaust
see AMG Performance adjus table
ex haust sy stem
St andard
see Lane Keeping Assist
St anding lights .......................................... .91
St art/s top button
Emotion Start ...................................... 106
Pa rking theve hicle .............................. 12 5
St arting theve hicle ............................. 105
Switching on the po wer supply or
ignition ................................................ 104
St art/s top function
see ECO start/ stop function
St arting
see Vehicle
St arting assi stance
see Jump -sta rt connection
St arting-o ffaid
see Hill Start Assist
St ation
Deleting ............................................... 278
Direct frequency entry ......................... 278Fr
equency fix ....................................... 279
Moving .................................................2 78
Sea rching ............................................ 278
Setting ................................................. 277
St oring .................................................2 78
St ation list
Calling up ............................................ 278
St ation presets
Managing ............................................. 278
St ation tracking
Setting ................................................. 279
Ste ering
Re ar axle steering ................................ 11 0
Ste ering wheel ........................................ .164
Ad justing (electrically) ........................... 82
Ad justing (manually) .............................. 81
Buttons ................................................ 16 4
Operating the memory function ............ 84
Ste ering wheel gearshift paddles ..........121
St ow age areas
see Stow age compartment
St ow age comp artment............................ .87
Armrest ................................................. 87428
Index