2020 MERCEDES-BENZ AMG GT R-ROADSTER spare wheel
[x] Cancel search: spare wheelPage 307 of 441
#
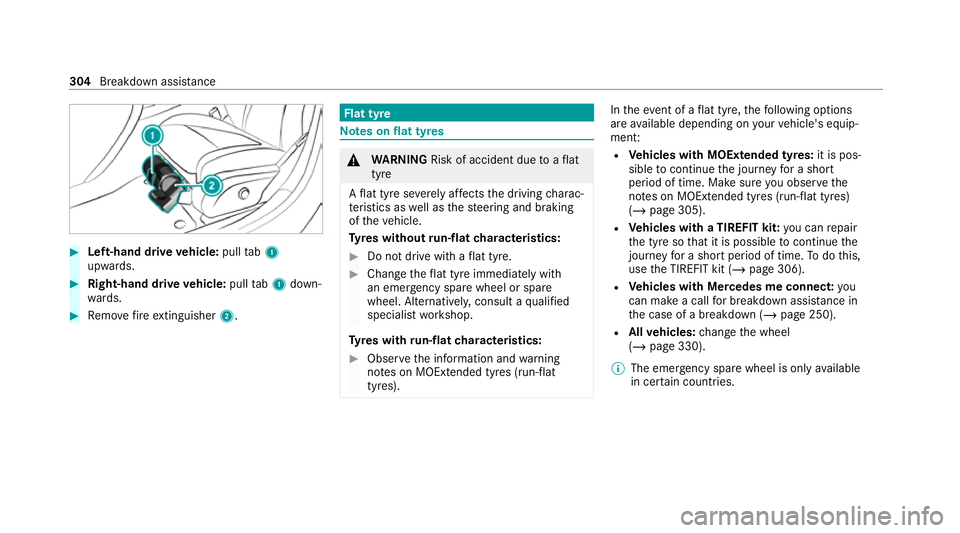
Left-hand drive vehicle: pulltab1
upwards. #
Right-hand drive vehicle: pulltab1 down‐
wa rds. #
Remo vefire extinguisher 2. Flat tyre
Note
s onflat tyres &
WARNING Risk of accident due toaflat
tyre
A flat tyre se verely affects the driving charac‐
te rist ics as well as thesteering and braking
of theve hicle.
Ty res without run-flat characteristics: #
Do not drive with a flat tyre. #
Chan getheflat tyre immediately with
an emer gency spa rewheel or spare
wheel. Alternativel y,consult a qualified
specialist workshop.
Ty res with run-flat characteristics: #
Obse rveth e information and warning
no tes on MOExtended tyres (run-flat
tyres). In
theeve nt of a flat tyre, thefo llowing options
are available depending on your vehicle's equip‐
ment:
R Vehicles with MOExtended tyres: it is pos‐
sible tocontinue the journey for a short
period of time. Make sure you obse rvethe
no tes on MOExtended tyres (run-flat tyres)
(/ page 305).
R Vehicles with a TIREFIT kit: you can repair
th e tyre so that it is possible tocontinue the
jou rney for a short period of time. Todo this,
use the TIREFIT kit (/ page 306).
R Vehicles with Mercedes me connect: you
can make a call for breakdown assi stance in
th e case of a breakdown (/ page 250).
R Allvehicles: change the wheel
(/ page 330).
% The emer gency spa rewheel is only available
in cer tain countries. 304
Breakdown assis tance
Page 325 of 441
#
Neverfit snow chains on the front
wheels. #
Only fit snow chains on there ar wheels
in pairs. *
NO
TEDama getothe wheel trim from fit‐
te d snow chains If sn
ow ch ains are fitted tosteel wheels, the
wheel trims can be damaged. #
Remo vethe wheel trims of steel wheels
before fitting snow chains. Obse
rveth efo llowing no tes when using snow
ch ains:
R Snow ch ains are on ly permissible for cer tain
wheel/tyre combinations. You can obtain
information about this from a Mercedes-Benz
Service Cent re.
R For saf etyre asons, only use snow chainsthat
ha ve been specifically appr ovedfo ryo ur
ve hicle byMercedes-Benz, or snow chains
with the same quality standard. R
If sn ow ch ains are fitted, the maximum per‐
missible speed is 50 km/h.
R Vehicles with le vel control: if snowchains
are fitted, only drive at raised vehicle le vel.
% You can permanently limit the maximum
ve hicle speed for driving with winter tyres
(/ page 141).
% You can deactivate ESP ®
to pull away
( / page 135). This allo ws the wheels to
spin, achieving an increased driving forc e. Ty
re pressure Note
s on tyre pressure &
WARNING Risk of accident due toinsuf‐
fi cient or excessive tyre pressure
Underinflate d oroverinfla ted tyres pose the
fo llowing risks:
R The tyres may bur st, especially as the
load and vehicle speed increase. R
The tyres may wearexc essively and/or
une venly, which may greatlyimpair tyre
traction.
R The driving characteristics, as well as
st eering and braking, may be greatly
impaired. #
Comply with there commended tyre
pressure and check the tyre pressure of
all tyres including the spare wheel regu‐
larly:
R at least once a month
R when the load changes
R before embarking on a lon ger journey
R if operating conditions change, e.g. off-
ro ad driving #
Adjust the tyre pressure as necessar y. Ty
re pressure which is too high or too low can:
R Shor tenth e service life of the tyres.
R Cause increased tyre damage.
R Adversely af fect driving characteristics and
th us driving saf ety, e.g. due toaquaplaning. 322
Wheels and tyres
Page 337 of 441
#
Fitthe new wheel (/ page 334).Fi
tting a new wheel Re
quirements:
R The wheel is remo ved (/ page 333). &
WARNING Risk of accident from losing a
wheel
Oiled, greased or damaged wheel bolt/wheel
nut thre ads or wheel hub/wheel mounting
bolt thre ads can cause the wheel bolts/
wheel nuts tocome loose.
As a result, you could lose a wheel while driv‐
ing. #
Never oil or grease theth re ads. #
Intheeve nt of damage totheth re ads,
con tact a qualified specialist workshop
immediatel y. #
Have the damaged wheel bolts or dam‐
aged hub thre ads replaced. #
Do not continue driving. #
Obser vethe information on thech oice of
tyres (/ page 325).
Fo r tyres with a specified direction of rotation,
an ar row on the side wall of the tyre indicates
th e cor rect dire ction of rotation. Obse rvethe
direction of rotation when fitting.
* NO
TEDama getothe ceramic-brake disc
when changing a wheel Mercedes
-AMG vehicles with cera mic-
brake discs: during remo val and reposition‐
ing of the wheel, the wheel rim can strike the
ceramic-brake disk and damage it. #
Take particular care. #
Ask ano ther person for assi stance or
use a second centring pin. #
Slide the wheel tobe mounted onto the cen‐
tring pin and push it on. #
Notes on fitting an eme rgency spare wheel
(/ page 335). &
WARNING Risk of injury from tightening
wheel bolts and nuts
If yo u tighten the wheel bolts or wheel nuts
when theve hicle is raised, the jack could tip. #
Only tighten wheel bolts or wheel nuts
when theve hicle is on the ground. #
Be sure toobser vethe instructions and
saf ety no tes on "Changing a wheel"
(/ page 325). #
For saf etyre asons, only use wheel bolts
which ha vebeen appr ovedby Mercedes-
Benz and forth e wheel in question. #
Tighten the wheel bolts evenly in a diagonal
pattern in the order indicated until they are
fi nger-tight. #
Unscr ew the cent ring pin. #
Tighten the last wheel bolt until it is finger-
tight. #
Lowe rth eve hicle (/ page 335). 334
Wheels and tyres
Page 338 of 441

Lo
weri ngtheve hicle af ter a wheel change Re
quirements:
R The new wheel has been fitted
(/ page 334). #
Tolowe r the vehicle: turnthe crank of the
jack anti-clo ckwise until theve hicle is once
again standing firm lyon the ground. #
Tighten the wheel bolts evenly in a diagonal
pattern in the order indicated 1to5 with
a maximum of 80 Nm. #
Tighten the wheel bolts evenly in a diagonal
pattern in the order indicated 1to5 the
specified tightening torque of 180 Nm. &
WARNING Risk of injury thro ugh incor‐
re ct tigh tening torque
The wheels could come loose if the wheel
bolts or wheel nuts are not tightened tothe
prescribed tightening torque. #
Ensu rethat the wheel bolts or nuts are
tightened tothe prescribed tightening
to rque. #
Ifyo u are not sure, do not mo vethe
ve hicle. Consult a qualified specialist
wo rkshop and ha vethe tightening tor‐
qu ech ecked immediately. #
Check the tyre pressure of the newly fitted
wheel and adjust it if necessa ry. #
Vehicles with a tyre pressure monitoring
sy stem: restart the tyre pressure monitoring
sy stem (/ page 325).
Exception: the new wheel is an emer gency
spa rewheel. Emer
gency spare wheel Note
s onthe emer gency spare wheel &
WARNING Risk of accident caused by
incor rect wheel and tyre dimensions
The wheel or tyre size and the tyre type of
th e emer gency spa rewheel or spare wheel
and the wheel tobe replaced may dif fer. The
emer gency spa rewheel or spare wheel can
significantly impair driving characteristics of
th eve hicle.
To preve nt hazardous situations: #
Drive carefully. #
Neverfit more than one emer gency
spa rewheel or spare wheel that dif fers
in size. #
Only use an emer gency spa rewheel or
spare wheel brief ly. #
Do not deacti vate ESP ®
. #
Have the emer gency spa rewheel or
spare wheel of a dif fere nt size replaced
at the nearest qualified specialist work‐ Wheels and tyres
335
Page 339 of 441

shop. The new wheel must ha
vethe
cor rect dimensions. Obser
vethefo llowing no tes on fitting an emer‐
ge ncy spa rewheel:
R Check the tyre pressure of the emer gency
spa rewheel fitted. Co rrect the pressure as
necessar y.
R The maximum permissible speed with an
emer gency spa rewheel fitted is 80 km/h.
R Do not fit th e emer gency spa rewheel with
sn ow ch ains.
R Replace the emer gency spa rewheel af ter six
ye ars at the latest, rega rdless of wear.
% Ve
hicles with a tyre pressure monitoring
sy stem: if an emer gency spa rewheel is fit‐
te dth e tyre pressure monitoring sy stem can‐
not function reliabl y.Fo r a few minutes af ter
an emer gency spa rewheel is fitted, the sys‐
te m may still display the tyre pressure of the
re mo ved wheel. Only restart the sy stem
again when the emer gency spa rewheel has
been replaced with a new wheel. Be sure
toalso obse rveth efo llowing fur ther
re lated subjects:
R Notes on tyre pressure (/ page 322)
R Tyre pressure table (/ page 323)
R Notes on fitting tyres (/ page 325) Inflating
the emer gency spare wheel *
NO
TEOverheating due tothe tyre infla‐
tion compressor running too long #
Do not runth e tyre inflation compres‐
sor for longer than ten minu tes without
inter ruption. Re
quirements:
Comply with the manufacturer's saf ety no tes on
th est icke r of the emer gency spa rewheel and on
th e tyre inflation compressor. #
Remo vesticke r with the label 80 km/h from
th e tyre inflation compressor housing and
af fix it tothe instrument clus ter within the
driver's field of vision. #
Remo vethe tyre inflation compressor from
th estow agewell under the boot floor .
(/ page 306) #
Pull filler hose 1and plug 3out of the tyre
inflation compressor housing. #
Insert plug 7offiller hose 1inthe soc ket
on the tyre inflation compressor and then
turn it until plug 7engages. #
Unscr ew the cap from theva lve on the emer‐
ge ncy spa rewheel. #
Screw union nut 2offiller hose 1onto
va lve. 336
Wheels and tyres
Page 418 of 441
E
E-SELECT selector le ver........................... 11 9
Engaging drive position ........................ 121
Engaging neutral .................................. 12 0
Engaging pa rkposition ........................ 12 0
Engaging pa rkposition automatically .. 12 0
Engaging reve rsege ar ........................ .120
Fu nction ............................................... 11 9
E10 ............................................................ 341
Easy entry feature
Fu nction/no tes .....................................83
Setting ................................................... 83
Easy exitfeature
Fu nction/no tes .....................................83
Setting ................................................... 83
EBD (Electronic Brake forc e Distribu‐
tion)
Function/no tes ................................... 13 5
ECO start/s top function .......................... 111
Au tomatic engine start ........................ .111
Au tomatic engine stop .........................1 11
Operation ............................................. 111
Switching off/on .................................. 11 2Electric pa
rking brake ............................ .129
Applying auto matically ........................ 12 9
App lying or releasing manually ............ 13 0
Emergency braking .............................. 13 0
Re leasing automatically ...................... .130
Electrical fuses see Fuses
Electromagnetic compatibility Declaration of conformity ......................20
Emer gency
Fire extinguisher ................................. .303
Fir st-aid kit (so ftsided) ....................... 303
Overview of the help functions .............. 14
Re moving thewa rning triangle ............ 302
Saf etyve st .......................................... 302
Setting up thewa rning triangle .......... .303
Emer gency braking ................................. 13 0
Emer gency braking
see BAS (Brake Assi stSystem)
Emer gency engine start .......................... 318
Emer gency key
Inserting/removing ................................ 61
Locking a door ....................................... 66 Un
locking a door .................................. .66
Emer gency release
Ta ilgate .................................................. 68
Emer gency spare wheel .........................3 35
Inflating ............................................... 336
No tes .................................................. 335
Emotion Start
St arting theve hicle ............................. 106
Engine ECO start/ stop function ....................... 111
Engine number .................................... 338
St arting (k ey) .......................................1 06
St arting (s tart/s top button) ................ 105
St arting assis tance .............................. 313
Switching off (s tart/s top button) ........ 12 5
Engine bonnet Opening/closing ................................ .290
Engine data Displ aying ............................................ 11 9
Engine electronics Notes .................................................. 338
Engine number ........................................3 38 Index
415
Page 431 of 441
Software update
Performing ...........................................1 98
Software updates ................................ 197
Sy stem updates ................................... 19 8
Sound PRE-SAFE ®
Sound ................................. 46
Wheels and tyres ................................. 321
Sound see Burmes ter®
high-end Sur round
sound sy stem
see Burmes ter®
sur round sound sy stem
see Tone settings
Sound settings Adjusting the balance .......................... 286
Ad justing treble, mid-range and bass
settings ............................................... 286
Au tomatic volume adjustment ............ .286
Spare wheel see Emer gency spa rewheel
Speech dialogue sy stem
see LINGU ATRO NIC
Speed limit for winter tyres
Setting ................................................ .141 Sports
exhaust
see AMG Performance adjus table
ex haust sy stem
St andard
see Lane Keeping Assist
St anding lights .......................................... .91
St art/s top button
Emotion Start ...................................... 106
Pa rking theve hicle .............................. 12 5
St arting theve hicle ............................. 105
Switching on the po wer supply or
ignition ................................................ 104
St art/s top function
see ECO start/ stop function
St arting
see Vehicle
St arting assi stance
see Jump -sta rt connection
St arting-o ffaid
see Hill Start Assist
St ation
Deleting ............................................... 278
Direct frequency entry ......................... 278Fr
equency fix ....................................... 279
Moving .................................................2 78
Sea rching ............................................ 278
Setting ................................................. 277
St oring .................................................2 78
St ation list
Calling up ............................................ 278
St ation presets
Managing ............................................. 278
St ation tracking
Setting ................................................. 279
Ste ering
Re ar axle steering ................................ 11 0
Ste ering wheel ........................................ .164
Ad justing (electrically) ........................... 82
Ad justing (manually) .............................. 81
Buttons ................................................ 16 4
Operating the memory function ............ 84
Ste ering wheel gearshift paddles ..........121
St ow age areas
see Stow age compartment
St ow age comp artment............................ .87
Armrest ................................................. 87428
Index