2020 MERCEDES-BENZ AMG GT R-ROADSTER ignition
[x] Cancel search: ignitionPage 322 of 441

Electrical fuses
Note
s on electrical fuses &
WARNING Risk of accident and inju ry
due to ov erloaded lines
If yo u manipulate or bridge a faulty fuse or if
yo ure place it with a fuse with a higher
amperage, the electric line could be overloa‐
ded.
This could result in a fire. #
Alw aysre place faulty fuses with speci‐
fi ed new fuses conta iningthe cor rect
amperage. *
NO
TEDama gedue toincor rect fuses Electrical components or sy
stems may be
damaged byincor rect fuses, or their func‐
tionality may be significant lyimpaired. #
Only use fuses that ha vebeen appr oved
by Mercedes-Benz and which ha vethe
cor rect fuse rating. Blown fuses mu
stbe replaced with fuses of the
same rating, which you can recognise bythe col‐
our and fuse rating. The fuse ratings and fu rther
information tobe obser ved can be found in the
fuse assignment diagram.
Fu se assignment diag ram: onthe fuse box in
th e load compartment (/ page 320).
* NO
TEDama geor malfunctions caused
by moisture Moisture may cause dama
getothe electrical
sy stem or cause it tomalfunction. #
When the fuse box is open, make sure
th at no moisture can enter the fuse
box. #
When closing the fuse box, make sure
th at the seal of the lid is positioned cor‐
re ctly on the fuse box. If
th e newly inser ted fuse also blo ws, ha vethe
cause traced and rectified at a qualified special‐
ist workshop.
Ensure thefo llowing before replacing a fuse:
R The vehicle is secured against rolling away. R
All electrical consumers are switched off.
R The ignition is switched off.
The electrical fuses are located in various fuse
bo xes:
R Fuse box in the front passenger foot we ll
(/ page 319)
R Fuse box in the load compartment on the
left-hand side of theve hicle, when vie wed in
th e direction of tra vel (/ page 320) Opening and closing
the fuse box in the front
passenger foot we ll Obser
vethe no tes on electrical fuses
(/ page 319). Breakd
own assi stance 319
Page 327 of 441
The load conditions "partially laden" and "fully
laden" are defined in
theta ble for dif fere nt num‐
be rs of passengers and amounts of luggage. The
actual number of seats may dif fer from this. Ty
re pressure moni toring sy stem Fu
nction of the ty repressure moni toring sys‐
tem
The sy stem checks the tyre pressure and the
tyre temp erature of the tyres fitted totheve hicle
by means of a tyre pressu resensor.
The tyre pressure and the tyre temp erature
appear in the multifunction display
(/ page 324).
If th ere is a subs tantial pressure loss or if the
tyre temp erature is excessive, you will be
wa rned in thefo llowing ways:
R via display messa ges (/ page 383)
R viatheh warning lamp in the instrument
clus ter
The tyre pressure monitoring sy stem is only an
aid. It is the driver's responsibility toset the tyre pressure
tothere commended cold tyre pressure
suitable forth e operating situation.
In most cases, the tyre pressure monitoring sys‐
te m will auto maticallyupdate the new refere nce
va lues af teryo u ha vechanged the tyre pressure.
Yo u can, ho wever,also update there fere nce val‐
ues byrestarting the tyre pressure monitoring
sy stem manually (/ page 325).
Sy stem limits
The sy stem may be impaired or may not function
in thefo llowing situations:
R the tyre pressure has been set incor rectly
R there is a sudden pressure loss caused, for
ex ample, byafo re ign object penetrating the
tyre
R there is a malfunction caused byano ther
ra dio signal source
Checking the ty repressure with the tyre
pressure moni toring sy stem
Re quirements:
R The ignition is switched on. On-board computer:
4 Service 5
Tyres
One of thefo llowing displa ysappears:
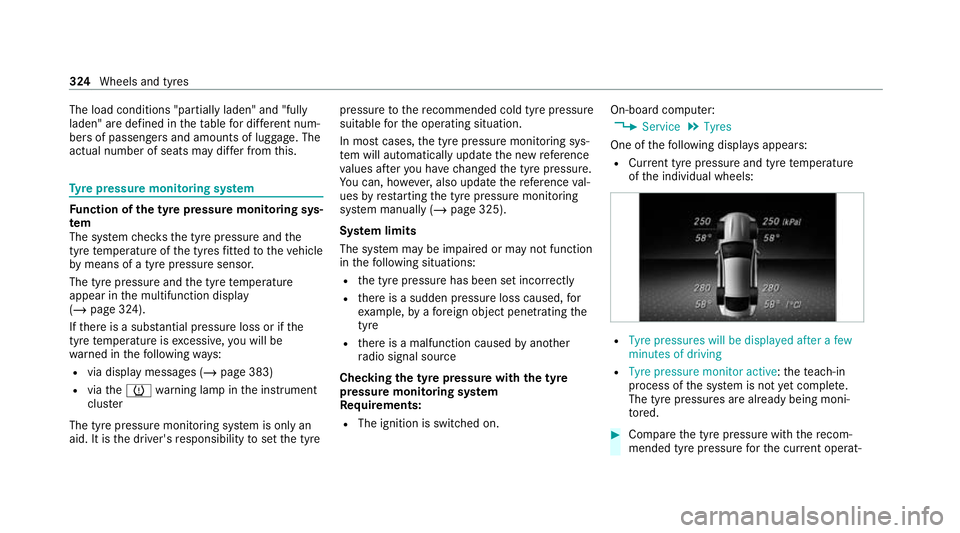
R Cur rent tyre pressure and tyre temp erature
of the individual wheels: R
Tyre pressures will be displayed after a few
minutes of driving
R Tyre pressure monitor active: thete ach-in
process of the sy stem is not yet compl ete.
The tyre pressures are already being moni‐
to re d. #
Compare the tyre pressure with there com‐
mended tyre pressure forth e cur rent operat‐ 324
Wheels and tyres
Page 343 of 441
Operating
fluids Note
s on operating fluids &
WARNING Risk of injury from operating
fl uids harmful to your health
Operating fluids may be poisonous and harm‐
ful to yo ur health. #
Obser vethete xt on the original con‐
ta iners when using, storing or disposing
of operating fluids. #
Alw aysst ore operating fluids sealed in
th eir original conta iners.#
Alw ayske ep children away from operat‐
ing fluids. +
ENVIRONMEN
TALNO TEEnvironmental
pollution caused byenvironmen tally ir re‐
sponsible disposal #
Dispose of operating fluids in an envi‐
ro nmentally responsible manner. Operating
fluids include thefo llowing:
R fuels
R lubricants
R coolant
R brake fluid
R windsc reen washer fluid
R climate cont rol sy stem refrigerant
Only use products app rove dby Mercedes-Benz.
Damage caused bythe use of products that ha ve
not been appr oved is not co veredby the
Mercedes-Benz warranty or goodwill gestures.
Yo u can identify operating fluids appr ovedby
Mercedes-Benz bythefo llowing insc ript ions on
th e conta iner:
R MB- Freigabe (e.g. MB-Fr eigabe 229.51 )
R MB-Appr oval (e.g. MB-App rova l 229.51)
Fu rther information on appr oved operating fluids
is available at thefo llowing locations:
R inthe Mercedes-Benz Specifications for
Operating Fluids byentering the designation
- at https://be vo.mercedes-benz.com -
inthe Mercedes-Benz BeVo app
R at a qualified specialist workshop &
WARNING Risk offire or explosion from
fuel
Fu els are highly flammable. #
Fire, naked flames, smoking and crea‐
tion of spar ksmust be avoided. #
Swit choff the ignition and, if available,
th est ationary heater, before and while
re fuelling theve hicle. &
WARNING Risk of injury from fuels
Fu els are poisonous and hazardous to your
health. #
Do not swallow fuel or let it come into
contact with skin, eyes or clo thing. #
Do not inhale fuel vapour. #
Keep children away from fuel. #
Keep doors and windo wsclosed du ring
th ere fuelling process. 340
Tech nical da ta
Page 344 of 441
If
yo u or other people come into contact with
fuel, obser vethefo llowing: #
Immediately rinse fuel off your skin with
soap and water. #
If fuel comes into contact with your
ey es, immediately rinse them thor‐
oughly with clean water.Seek medical
attention immediately. #
Ifyo u swallow fuel, seek medical atten‐
tion immediatel y.Do not induce vomit‐
ing. #
Change immediately out of clo thing that
has come into con tact with fuel. Fu
el Note
s on fuel grade
Obse rveth e no tes on operating fluids
(/ page 340). *
NO
TEDama gecaused bythe wrong fuel Small amounts of
the wrong fuel may cause
damage tothe fuel sy stem, engine and emis‐
sion control sy stem.
Ne ver under any circums tances refuel with
any of thefo llowing fuels:
R diesel
R regular petrol with an octane number
lo we rth an 91 RON
R petrol with more than 10%ethanol byvol‐
ume, e.g. E15, E20, E85, E100
R petrol with more than 3% me thanol by
vo lume, e.g. M15, M30
R petrol with additives conta ining metal
If yo u ha verefuelled with the wrong fuel: #
Do not switch the ignition on. #
Consult a qualified specialist workshop. If
th eav ailable fuel is not suf ficiently low in sul‐
phu r,th is can produce unpleasant odours. Only
refuel using sulphur- free spark-ignition
engine fuel that con form sto European EN 228,
or an equivalent speci fication.
This fuel may contain up to10%ethanol byvol‐
ume. Your vehicle is suitable for use with E10
fuel.
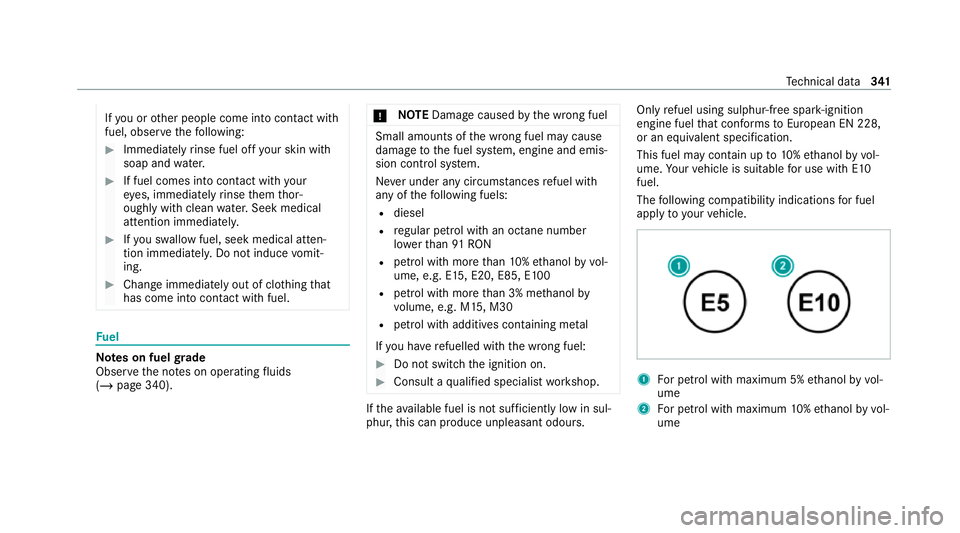
The following compatibility indications for fuel
apply to yourvehicle. 1
For petrol with maximum 5% ethanol byvol‐
ume
2 For petrol with maximum 10%ethanol by vol‐
ume Te
ch nical da ta341
Page 356 of 441
Display messages
Possible causes/consequences and M MSolutions
 Insert key *T
hekey is not de tected continuously.
De tection of theke y is temp orarily malfunctioning or faulty. A warning tone will also sound. #
Inse rttheke y in the ignition lock and turn tothe desired key position. #
Consult a qualified specialist workshop. Lights
Display messages
Possible causes/consequences and M MSolutions
: Left dipped beam (examp le) *T
he cor responding light source is defective. #
Drive on carefully. #
Consult a qualified specialist workshop immediatel y.
% LED light sources: the display message forth e cor responding light appears only when allthe light-emitting
diodes in the light are faulty.
: Malfunction See Owner's
Manual *T
heexterior lighting is malfunctioning. #
Consult a qualified specialist workshop. Display messages and
warning/indicator lamps 353
Page 359 of 441
Ve
hicle Display messages
Possible causes/consequences and M MSolutions
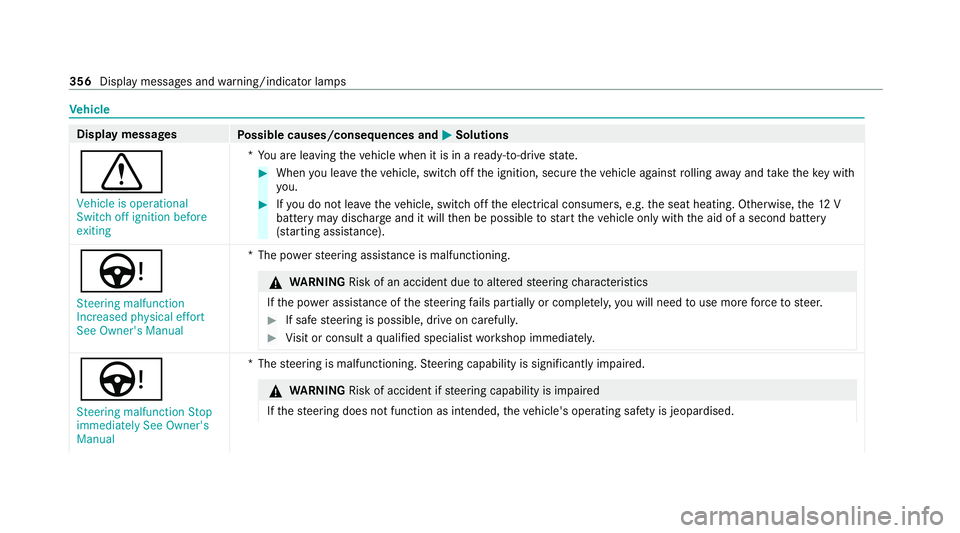
d Vehicle is operational
Switch off ignition before
exiting *Y
ou are leaving theve hicle when it is in a ready-to-drive state. #
When you lea vetheve hicle, switch off the ignition, secure theve hicle against rolling away and take theke y with
yo u. #
Ifyo u do not lea vetheve hicle, switch off the electrical consumers, e.g. the seat heating. Otherwise, the12 V
battery may dischar geand it will then be possible tostart theve hicle only with the aid of a second battery
(s ta rting assis tance).
Ù Steering malfunction
Increased physical effort
See Owner's Manual *T
he po werst eering assis tance is malfunctioning. &
WARNING Risk of an accident due toaltered steering characteristics
If th e po wer assi stance of thesteering fails partially or comple tely, you will need touse more forc eto steer. #
If safe steering is possible, drive on carefully. #
Visit or consult a qualified specialist workshop immediatel y.Ù
Steering malfunction Stop
immediately See Owner's
Manual *T
hesteering is malfunctioning. Steering capability is significant lyimpaired. &
WARNING Risk of accident if steering capability is impaired
If th esteering does not function as intended, theve hicle's operating saf ety is jeopardised. 356
Display messages and warning/indicator lamps
Page 368 of 441
Display messages
Possible causes/consequences and M MSolutions
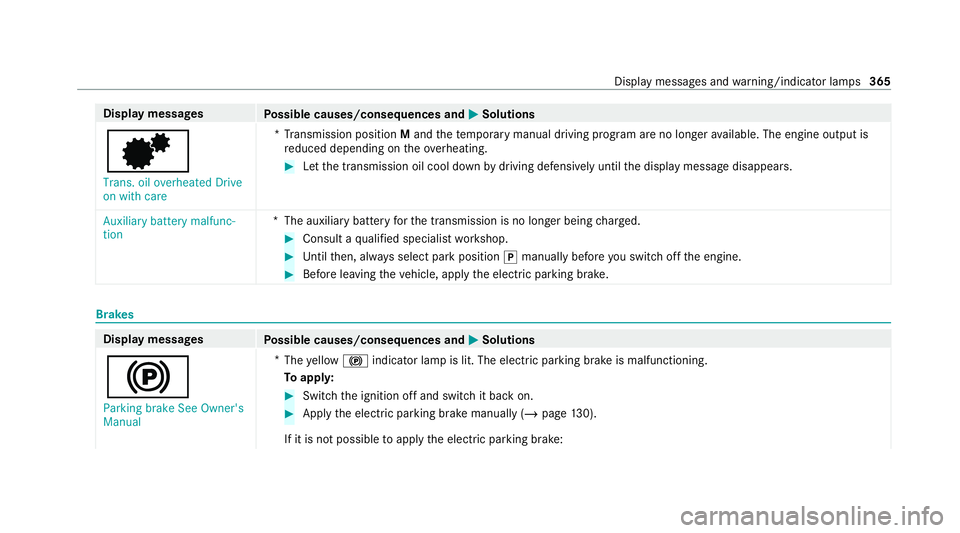
d Trans. oil overheated Drive
on with care *T
ransmission position Mand thete mp orary manual driving program are no longer available. The engine output is
re duced depending on theove rheating. #
Let the transmission oil cool down bydriving defensively until the display message disappears.
Auxiliary battery malfunc-
tion *T
he auxiliary batteryforth e transmission is no longer being charge d. #
Consult a qualified specialist workshop. #
Untilthen, alw ays select park position jmanually before you swit choff the engine. #
Before leaving theve hicle, apply the electric parking brake. Brakes
Display messages
Possible causes/consequences and M MSolutions
! Parking brake See Owner's
Manual *
The yellow ! indicator lamp is lit. The elect ric pa rking brake is malfunctioning.
To appl y: #
Switch the ignition off and switch it back on. #
Apply the electric parking brake manually (/ page130).
If it is not possible toapply the electric parking brake: Display messages and
warning/indicator lamps 365
Page 369 of 441
Display messages
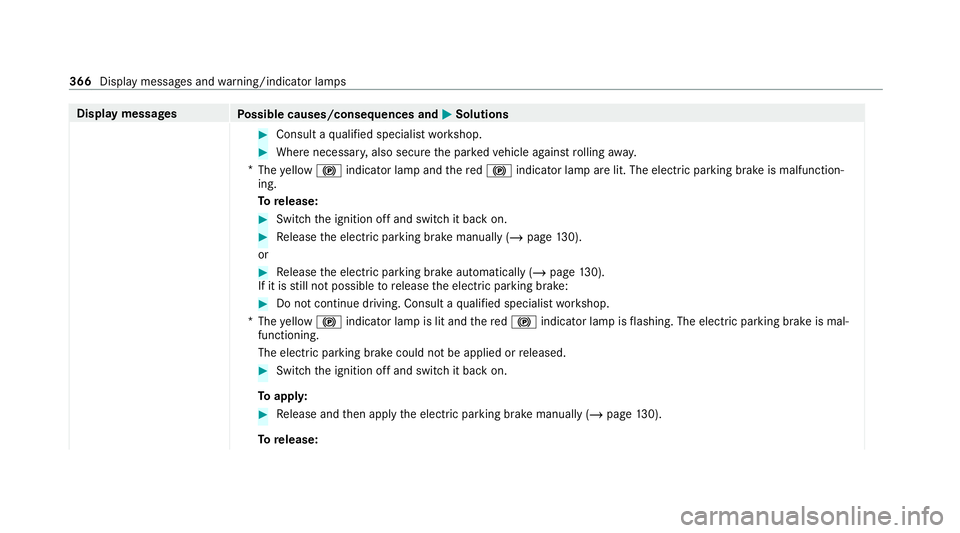
Possible causes/consequences and M MSolutions #
Consult a qualified specialist workshop. #
Where necessar y,also secure the par kedve hicle against rolling away.
* The yellow ! indicator lamp and there d! indicator lamp are lit. The elect ric pa rking brake is malfunction‐
ing.
To release: #
Swit chthe ignition off and switch it back on. #
Release the electric parking brake manually (/ page130).
or #
Release the electric parking brake automatically (/ page130).
If it is still not possible torelease the electric parking brake: #
Do not continue driving. Consult a qualified specialist workshop.
* The yellow ! indicator lamp is lit and there d! indicator lamp is flashing. The electric parking brake is mal‐
functioning.
The electric parking brake could not be applied or released. #
Swit chthe ignition off and switch it back on.
To appl y: #
Release and then apply the electric parking brake manually (/ page130).
To release: 366
Display messages and warning/indicator lamps