2020 MERCEDES-BENZ AMG GT R-ROADSTER ignition
[x] Cancel search: ignitionPage 123 of 441
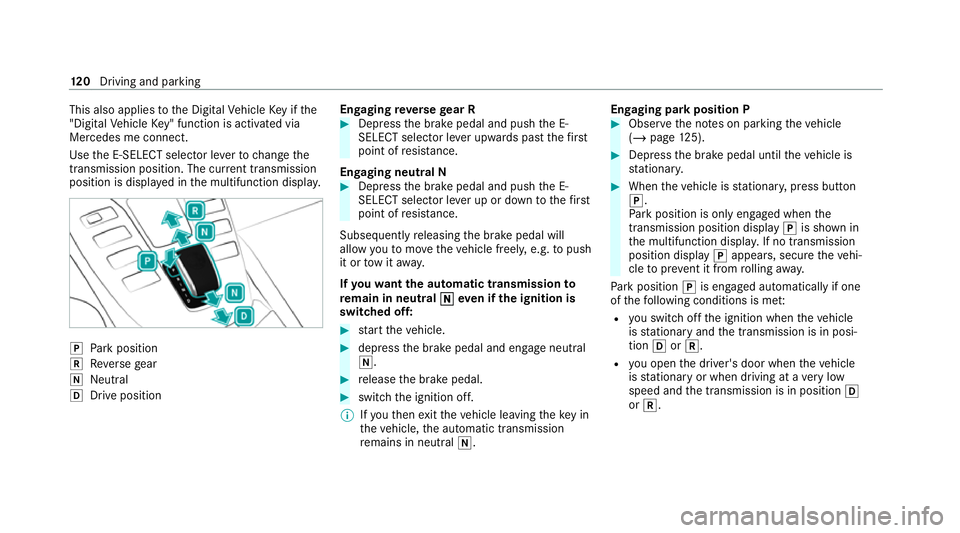
This also applies
tothe Digital Vehicle Key if the
"Digital Vehicle Key" function is activated via
Mercedes me connect.
Use the E-SELECT selector le verto change the
transmission position. The cur rent transmission
position is displ ayed in the multifunction displa y.j
Park position
k Reversege ar
i Neut ral
h Drive position En
gaging reve rsege ar R #
Depress the brake pedal and push the E-
SELECT selector le ver upwards past thefirst
point of resis tance.
En gaging neutral N #
Depress the brake pedal and push the E-
SELECT selector le ver up or down tothefirst
point of resis tance.
Subsequently releasing the brake pedal will
allow youto mo vetheve hicle freel y,e.g. topush
it or tow it away.
If yo uwa ntthe automatic transmission to
re main in neutral i ieven if the ignition is
switched off: #
start theve hicle. #
depress the brake pedal and engage neutral
i. #
release the brake pedal. #
switch the ignition off.
% Ifyo uth en exitth eve hicle leaving theke y in
th eve hicle, the automatic transmission
re mains in neutral i. Engaging park position P #
Obser vethe no tes on parking theve hicle
(/ page 125). #
Depress the brake pedal until theve hicle is
st ationar y. #
When theve hicle is stationar y,press button
j.
Pa rk position is only engaged when the
transmission position display jis shown in
th e multifunction displa y.If no transmission
position display jappears, secure theve hi‐
cle topreve nt it from rolling away.
Pa rk position jis engaged automatically if one
of thefo llowing conditions is me t:
R you swit choff the ignition when theve hicle
is stationary and the transmission is in posi‐
tion hork.
R you open the driver's door when theve hicle
is stationary or when driving at a very low
speed and the transmission is in position h
or k. 12 0
Driving and pa rking
Page 126 of 441
%
Ifyo u ha veactivated manual gearshifting
with the button in the cent reconsole, the
transmission does not react tothe kick‐
down. Glide mode function
Wi
th an anticipatory driving style, Glide mode
helps youto reduce fuel consum ption.
Glide mode is characterised bythefo llowing:
R the combustion engine is disconnected from
th e driv etra in and theve hicle continues to
ro ll.
R theJ symbol appears in the multifunc‐
tion displa y.
Glide mode is activated if thefo llowing condi‐
tions are me t:
R the ECO start/ stop function is switched on.
R drive program =is selected with the drive
setting "Moderate" or "Reduced".
R the speed is within a suitable range.
R thero ad's course is suitable, e.g. no steep
uphill or downhill inclines or tight bends. R
you are no lon ger depressing the accelerator
or brake pedal.
Glide mode is deactivated again if one of the
conditions is no longer met. Re
fuelling Re
fuelling theve hicle &
WARNING Risk offire or explosion from
fuel
Fu els are highly flammable. #
Fire, naked flames, smoking and crea‐
tion of spar ksmust be avoided. #
Swit choff the ignition and, if available,
th est ationary heater, before and while
re fuelling theve hicle. &
WARNING Risk of injury from fuels
Fu els are poisonous and hazardous to your
health. #
Do not swallow fuel or let it come into
contact with skin, eyes or clo thing. #
Do not inhale fuel vapour. #
Keep children away from fuel. #
Keep doors and windo wsclosed du ring
th ere fuelling process.
If yo u or other people come into contact with
fuel, obser vethefo llowing: #
Immediately rinse fuel off your skin with
soap and water. #
If fuel comes into contact with your
ey es, immediately rinse them thor‐
oughly with clean water.Seek medical
attention immediately. #
Ifyo u swallow fuel, seek medical atten‐
tion immediatel y.Do not induce vomit‐
ing. #
Change immediately out of clo thing that
has come into con tact with fuel. Driving and parking
12 3
Page 127 of 441
&
WARNING Risk offire and explosion due
to electros tatic charge
Electros taticch arge can igni tefuel vapour. #
Before you open the fuel filler cap or
ta ke hold of the pump nozzle, touch the
me tallic vehicle body. #
Toavo id creating ano ther electros tatic
ch arge , do not getinto theve hicle again
during there fuelling process. *
NO
TEDama gecaused bythe wrong fuel Ve
hicles with a petrol engine:
Even small amounts of the wrong fuel could
re sult in damage tothe fuel sy stem, the
engine and the emission control sy stem. #
Only refuel using unleaded, sulphu r-free
fuel that con form sto European EN 228,
or an equi valent specification.
Fu el of this specification may conta in upto
10 %ethanol. Your vehicle is suitable for use
with E10 fuel. Ne
verre fuel with one of thefo llowing fuels:
R diesel
R regular petrol with an octane number
lo we rth an 91 RON
R petrol with more than 10%ethanol byvol‐
ume, e.g. E15, E20, E85, E100
R petrol with more than 3% me thanol by
vo lume, e.g. M15, M30
R petrol with additives conta ining metal
If yo u ha veacciden tally refuelled with the
wrong fuel: #
do not swit ch the ignition on. #
Consult a qualified specialist workshop. *
NO
TEDo not use diesel torefuel vehi‐
cles with a petrol engine If
yo u ha veacciden tally refuelled with the
wrong fuel:
R do not swit chthe ignition on. Otherwise
fuel can enter the engine. Even small amounts of
the wrong fuel
could result in damage tothe fuel sy stem
and the engine. The repair costs are high. #
Consult a qualified specialist workshop. #
Have the fuel tank and fuel lines
drained compl etely. *
NO
TEDama getothe fuel sy stem caused
by ove rfilled fuel tanks #
Only fill th e fuel tank until the pump
nozzle switches off. *
NO
TEFuel may spr ayout when you
re mo vethe fuel pump nozzle #
Only fill th e fuel tank until the pump
nozzle switches off. Re
quirements:
R The vehicle is unloc ked.
% Do not get into theve hicle again during the
re fuelling process. Otherwise, electros tatic
ch arge could build up again. 124
Driving and pa rking
Page 129 of 441
#
In particula r,do not park on dry grass‐
land or har vested grain fields. &
WARNING Risk of accident and inju ry
due tochildren left unat tended in the
ve hicle
If ch ildren are left unsupervised in theve hi‐
cle, they could, in part icular:
R open doors, thereby endangering other
persons or road users.
R get out and be stru ck byoncoming traf‐
fi c.
R ope rate ve hicle equipment and become
trapped, forex ample.
In addition, thech ildren could also set the
ve hicle in motion, forex ample by:
R releasing the parking brake.
R change the transmission position.
R start theve hicle. #
Never lea vechildren unat tended in the
ve hicle. #
When leaving theve hicle, alw aysta ke
th eke y with you and lock theve hicle. #
Keep theke y out of reach of children. *
NO
TEDama getotheve hicle due toit
ro lling away #
Alw ays secure theve hicle against roll‐
ing away. #
Bring theve hicle toast andstill byapplying
th e brake pedal. #
On gradients, turn the front wheels so that
th eve hicle will rollto wa rdsth eke rb if it
st arts moving. #
App lythe electric parking brake. #
Enga getransmission position jin a station‐
ary vehicle with the brake pedal applied
(/ page 120). #
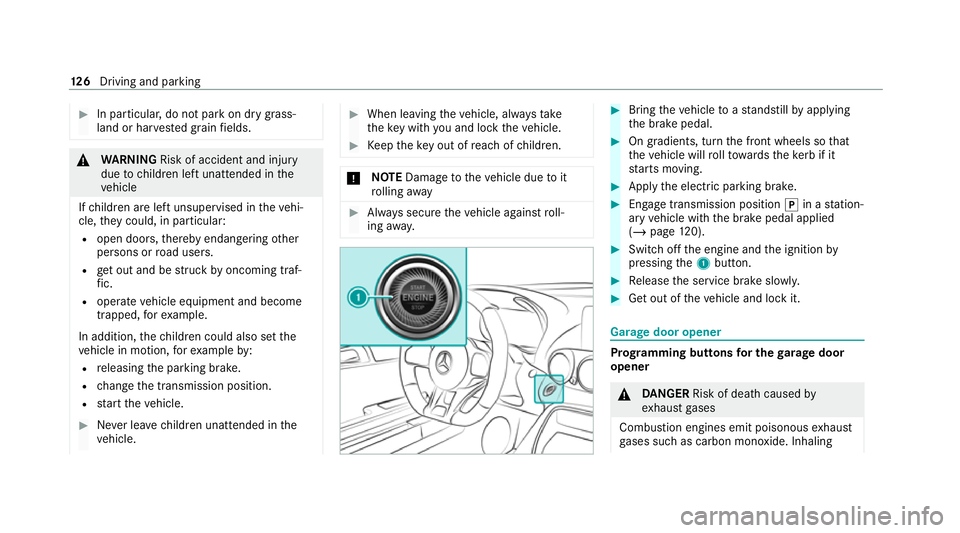
Switch off the engine and the ignition by
pressing the1 button. #
Release the service brake slowl y. #
Get out of theve hicle and lock it. Garage door opener
Prog
ramming buttons for the garage door
opener &
DANG ER Risk of death caused by
ex haust gases
Combustion engines emit poisonous exhaust
ga ses such as carbon monoxide. Inhaling 12 6
Driving and pa rking
Page 130 of 441
th
ese exhaust gases is hazardous tohealth
and leads topoisoning. #
Never lea vethe engine or, if present,
th e auxiliary heating running in an
enclosed space wi thout suf ficient venti‐
lation. &
WARNING Risk of injury when opening
or closing a door with thega rage door
opener
When you operate or program the door with
th e integrated garage door opener, persons
in thera nge of mo vement of the door may
become trapped or be stru ck bythe door. #
Alw ays make sure that nobody is within
th era nge of mo vement of the door. Re
quirements:
R The vehicle has been par ked outside the
ga rage and outside thera nge of mo vement
of the door.
R The engine is switched off.
R The ignition is switched on. %
The garage door opener function is alw ays
av ailable when the ignition is switched on. #
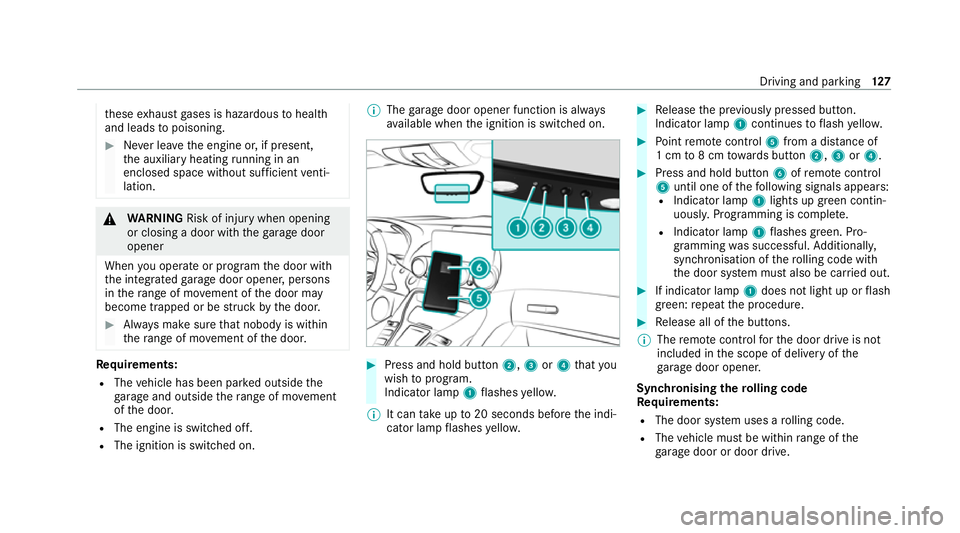
Press and hold button 2,3or4 that you
wish toprog ram.
Indicator lamp 1flashes yello w.
% It can take up to20 seconds before the indi‐
cator lamp flashes yello w. #
Release the pr eviously pressed button.
Indicator lamp 1continues toflash yello w. #
Point remo tecontrol 5from a dist ance of
1 cm to8 cm towa rds button 2,3or4. #
Press and hold button 6ofremo tecontrol
5 until one of thefo llowing signals appears:
R Indicator lamp 1lights up green contin‐
uousl y.Programming is comple te.
R Indicator lamp 1flashes green. Pro‐
gramming was successful. Additionall y,
synchronisation of thero lling code with
th e door sy stem must also be car ried out. #
If indicator lamp 1does not light up or flash
green: repeat the procedure. #
Release all of the buttons.
% The remo tecontrol forth e door drive is not
included in the scope of delivery of the
ga rage door opener.
Synchronising thero lling code
Re quirements:
R The door sy stem uses a rolling code.
R The vehicle must be within range of the
ga rage door or door drive. Driving and parking
127
Page 133 of 441
Electric pa
rking brake function (releasing
automatically)
The elect ric pa rking brake is released when the
fo llowing conditions are fulfilled:
R The driver's door is closed.
R The engine is running.
R The transmission is in position hork and
yo u depress the accelera tor pedal or you
shift from transmission position jtoh or
k when on le velground withthe driver's
door closed.
R Ifth e transmission is in position k,theta il‐
gate must be closed.
R The seat belt tongue is inser ted into the seat
belt buckle of the driver's seat.
If th e seat belt tongue is not inser ted into the
seat belt buckle of the driver's seat, one of the
fo llowing conditions must be fulfilled:
R You shift from transmission position j.
R You ha veprev iously driven at speeds greater
th an 3 km/h. When
the electric parking brake is released, the
re d! indicator lamp in the instrument clus‐
te r goes out.
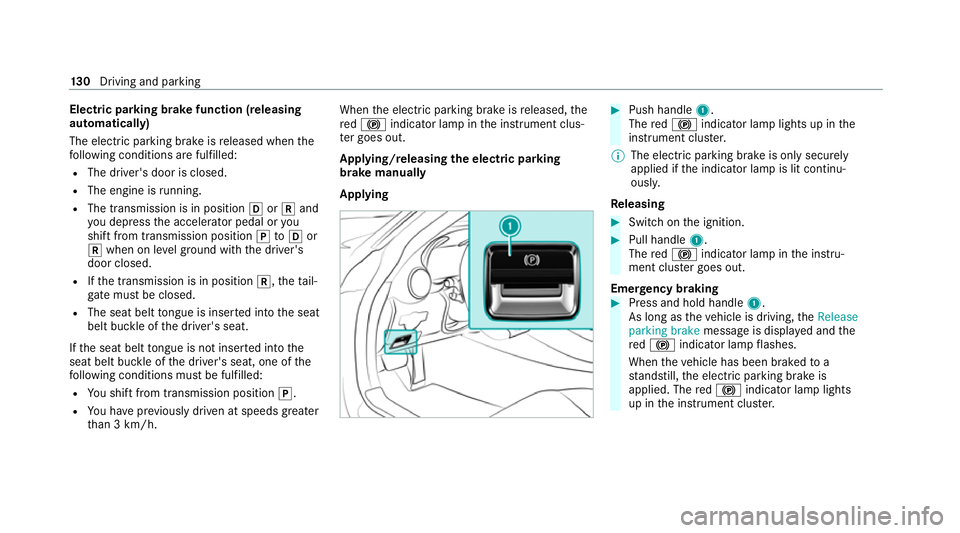
Applying/releasing the electric pa rking
brake manually
Applying #
Push handle 1.
The red! indicator lamp lights up in the
instrument clus ter.
% The electric parking brake is only securely
applied if the indicator lamp is lit continu‐
ously.
Re leasing #
Swit chon the ignition. #
Pull handle 1.
The red! indicator lamp in the instru‐
ment clus ter goes out.
Emer gency braking #
Press and hold handle 1.
As long as theve hicle is driving, theRelease
parking brake message is displa yed and the
re d! indicator lamp flashes.
When theve hicle has been braked to a
st andstill, the electric parking brake is
applied. The red! indicator lamp lights
up in the instrument clus ter. 13 0
Driving and pa rking
Page 140 of 441
Au
tonomous braking function
The autonomous braking function may inter vene
at speeds ab oveappr oximately 7 km/h in the
fo llowing situations:
R Vehicles tr avelling in front:
- Vehicles without Active Dis tance Assi st
DISTRONIC: up toappr oximately
10 5 km/h
- Vehicles with Active Dis tance Assi st
DISTRONIC: up toappr oximately
200 km/h
R Stationary vehicles: uptoappr oximately
50 km/h
Situation-dependent braking assistance
Situation-dependent braking assis tance may
inter vene at speeds ab oveappr oximately
7 km/h in thefo llowing situations:
R Vehicles tr avelling in front: uptoappr ox‐
imately 250 km/h
R Stationary vehicles: uptoappr oximately
70 km/h Cancelling a brake application of
Active
Brake Assi st
Yo u can cancel a brake application of Active
Brake Assi stat any time by:
R Fully depressing the accelera tor pedal or
with kickdown.
R Releasing the brake pedal.
Ac tive Brake Assi stmay cancel the brake appli‐
cation when one of thefo llowing conditions is
fulfilled:
R You manoeuv retoavo idthe obs tacle.
R The reis no longer a risk of collision.
R An obs tacle is no longer de tected in front of
yo ur vehicle.
Sy stem limits
The sy stem may be impaired or may not function
in thefo llowing situations:
R In sno w,rain, fog, heavy spr ay, if there is
gl are, in direct sunlight or in greatlyvarying
light conditions.
R Ifth e sensors are dirty, mis ted up, damaged
or co vered. R
Ifth e sensors are impaired due tointer fer‐
ence from other radar sources, e.g. strong
ra dar reflections in multi-s torey car par ks.
R If a loss of tyre pressure or a defective tyre
has been de tected and display ed.
R Full sy stem per form ance is not available for a
fe w seconds af ter switching on the ignition
or af ter driving off.
R In complex traf fic situations whe reobjects
cannot always be clearly identified.
R Forve hicles if they mo vequickly into the
sensor de tection range.
R On bends wi tha tight radius.
% The Active Brake Assi stsensors adjust auto‐
matically while a cer tain dis tance is being
driven af terth eve hicle has been delivered.
Ac tive Brake Assi stis una vailable or only
partially available during this teach-in period. Driving and parking
137
Page 153 of 441
R
The transmission has been shif tedto the
park position j.
R The ignition is switched on. #
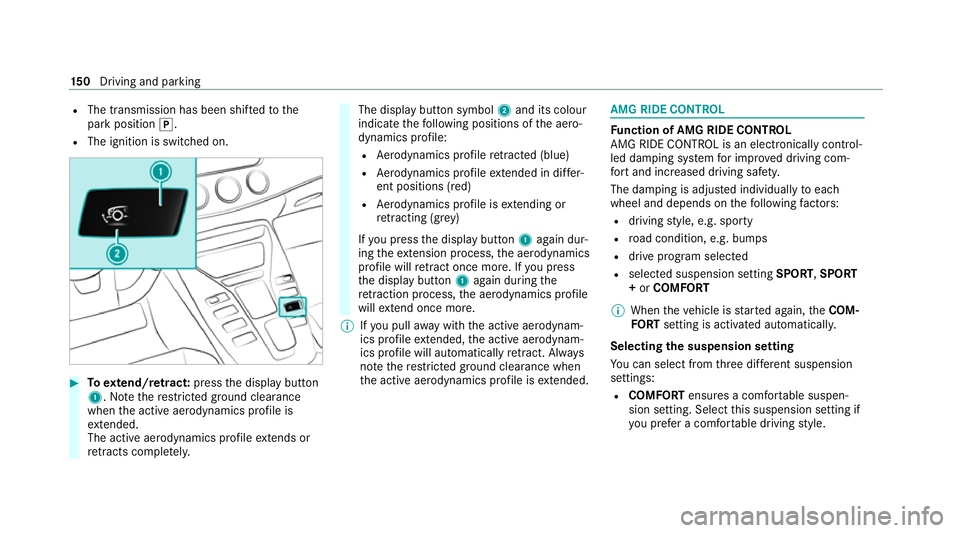
Toextend/r etra ct: press the display button
1. Notethere stricted ground clearance
when the active aerodynamics profile is
ex tended.
The acti veaerodynamics profile extends or
re tracts compl etely. The display button symbol
2and its colour
indicate thefo llowing positions of the aero‐
dynamics profile:
R Aerodynamics profile retracted (blue)
R Aerodynamics profile extended in di ffer‐
ent positions (red)
R Aerodynamics profile is extending or
re tracting (gr ey)
If yo u press the display button 1again dur‐
ing theex tension process, the aerodynamics
profile will retract once more. If you press
th e display button 1again during the
re traction process, the aerodynamics profile
will extend once more.
% Ifyo u pull away with the active aerodynam‐
ics profile extended, the active aerodynam‐
ics profile will automatically retract. Alw ays
no te there stricted ground clearance when
th e active aerodynamics profile is extended. AMG RIDE CONTROL
Fu
nction of AMG RIDE CONTROL
AMG RIDE CONTROL is an electronically control‐
led damping sy stem for impr oved driving com‐
fo rt and inc reased driving saf ety.
The damping is adjus ted individually toeach
wheel and depends on thefo llowing factors:
R driving style, e.g. sporty
R road condition, e.g. bumps
R drive program selec ted
R selected suspension setting SPORT,SPORT
+ or COMFORT
% When theve hicle is star ted again, theCOM‐
FO RT setting is activated automatically.
Selecting the suspension setting
Yo u can select from thre e dif fere nt suspension
settings:
R COMFORT ensures a comfor table suspen‐
sion setting. Select this suspension setting if
yo u prefer a comfor table driving style. 15 0
Driving and pa rking