2020 MERCEDES-BENZ AMG GT R-ROADSTER parking brake
[x] Cancel search: parking brakePage 168 of 441
When
the on-board computer is being operated,
dif fere nt acoustic signals will sound as operating
fe edbac k,e.g. when the end of a list is reached
or when you are sc rolling thro ugh a list.
The following menus are available:
R Service
R Assistance
R Performance
R Trip
R Navigation
R Radio
R Media
R Telephone
R Design
% You can find information about the possible
settings and selections on the menus in the
Digital Owner's Manual. #
Tocall up the menu bar: pressthe left-hand
back button until the menu bar is displa yed. %
Ve
hicles without Active Di stance Assist
DISTRO NIC:press theò button tocall
up the menu bar of the on-board computer. #
Toscroll in the menu bar: swipe left or
ri ght on the left-hand Touch Control. #
Tocall up a menu, submenu or possible
settings on the menu, or confirm a selec‐
tion or setting: pressthe left-hand Touch
Control. #
Toscroll through displa ysor lists on the
menu, or select display content, a func‐
tion, an entry or a displa y:swipe upwards
or down wards on the left-hand Touch Con‐
trol. #
Toexit a submenu: pressthe left-hand back
button. Overview of what is shown on
the multi‐
function display
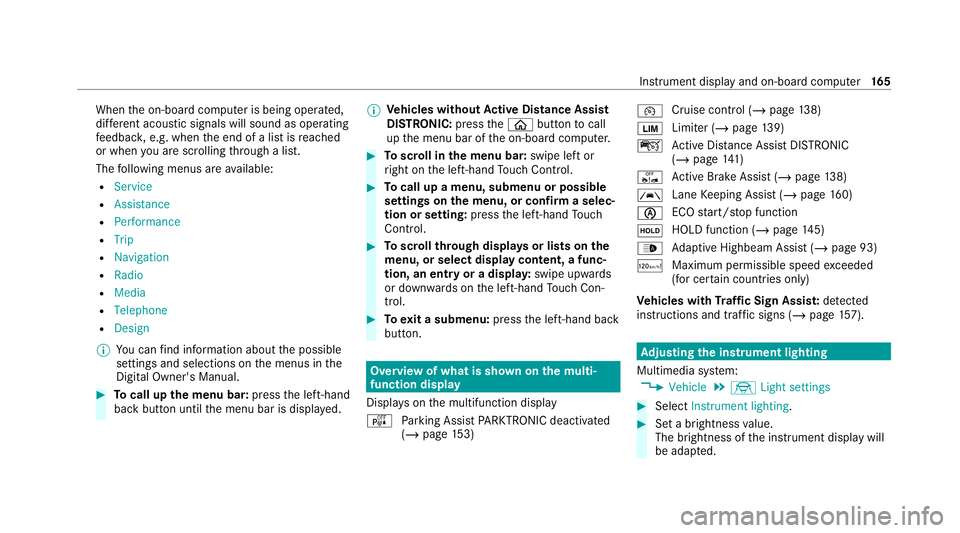
Displa yson the multifunction display
é Parking Assist PARKTRONIC deacti vated
( / page 153) ¯
Cruise
control (/ page 138)
È Limi
ter (/ page139)
ç Active Dis tance Assi stDISTRONIC
(/ page 141)
ê Active Brake Assi st (/ page 138)
à Lane
Keeping Assist (/ page160)
è ECO
start/ stop function
ë HOLD function (/
page145)
_ Ad
aptive Highbeam Assist (/ page 93)
ð Maximum permissible speed exceeded
(for cer tain countries only)
Ve hicles with Traf fic Sign Assis t:de tected
instructions and traf fic signs (/ page 157). Ad
justing the in stru ment lighting
Multimedia sy stem:
4 Vehicle 5
÷ Light settings #
Select Instrument lighting. #
Set a brightness value.
The brightness of the instrument display will
be adap ted. Instrument display and on-board computer
16 5
Page 202 of 441
Yo
u will be informed when the download is com‐
ple teand the sy stem update is ready for ins talla‐
tion.
% Park theve hicle safely in a suitable location
before starting the ins tallation.
Re quirements forth e ins tallation:
R The ignition is switched on.
R The engine is not running.
R Notes and warnings ha vebeen read and
accep ted.
R The parking brake is applied.
If all requirements are met, the sy stem update is
ins talled. The multimedia sy stem cann otbe
operated during the ins tallation and vehicle func‐
tions are restricted.
If er rors should occur during the ins tallation, the
multimedia sy stem automatically attem ptsto
re store the pr evious version. If restoration of the
pr ev ious version is not possible, a symbol
appears on the multimedia sy stem displa y.Con‐
sult a qualified specialist workshop toresol ve
th e problem. Re
set function Multimedia sy
stem:
4 System 5
Reset
Pe rsonal data is dele ted, forex ample:
R Station presets
R Connec ted mobile phones #
Select Yes.
If PIN pr otection is activated, a prom ptappears
asking if you also wish torestore this to thefa c‐
to ry settings during a reset. #
Select Yes. #
Enter the cur rent PIN.
The PIN is reset.
or #
Select No.
The cur rent PIN stay sth e same af terre set‐
ting.
% Ifyo u ha veforg ottenyo ur PIN, a Mercedes-
Benz service centre can deactivate the PIN
pr otection foryo u. A prom
ptappears again asking whe ther you
re ally wish toreset. #
Select Yes.
The multimedia sy stem is reset tothefa ctory
settings. AMG TRA
CKPACE General information
Wi
th AMG TR ACKPA CE, the driving characteris‐
tics on race trac kscan be ana lysed and opti‐
mised. You can drive pr eviously stored race
trac ks(e.g. Hoc kenheimring), or new trac kscan
be recorded and stored. The driven lap times are
st ored forev ery tra ck. These can be ana lysed
and compared to other lap times toachie vethe
best possible race results. Additionall y,accelera‐
tion and braking procedures can be measured
and stored.
Please no te:Use AMG TRA CKPACE on lyon
closed off routes outside the public tra ffic area.
Ad apt your driving style to your personal per‐
fo rm ance and environmen tal conditions. As the
driver, you are sole lyresponsible for driving your Multimedia sy
stem 19 9
Page 302 of 441
Scratches, cor
rosive deposits, areas af fected by
cor rosion and damage caused byincor rect care
cannot al ways be comple tely repaired. In such
cases, visit a qualified specialist workshop.
Yo u can obtain more information on care and
cleaning products from the manufacturer.
In the case of foil-wrapped sur faces, optical dif‐
fe re nces may occur between the sur faces that
we renot pr otected bya decorative foil af ter
re moving a decorative foil.
% Have wo rkor repairs todecorative foils car‐
ri ed out at a qualified specialist workshop,
e.g. in a Mercedes-Benz Service Centre. Note
s on care of car parts &
WARNING Risk of entrapment if the
windscreen wipers are swit ched on while
th e windscreen is being cleaned
If th e windscreen wipers are set in motion
while you are cleaning the windscreen or
wiper blades, you can be trapped bythe
wiper arm. #
Alw ays switch off the windscreen wip‐
ers and the ignition before cleaning the
windscreen or wiper blades. &
WARNING Risk of burn s fromtheta il‐
pipe and tailpipe trims
The exhaust tailpipe and tailpipe trims can
become very hot. If you come into contact
with these parts of theve hicle, you could
burn yourself. #
Alw ays be particular lycareful around
th eta ilpipe and theta ilpipe trims and
supervise children especially closely in
th is area. #
Allow vehicle parts tocool down before
to uching them. Obser
vethe no tes on cleaning and care of the
fo llowing vehicle parts toavoid damage.
Wheels/rims R Use water and acid-free wheel cleaners. R
Do not use acidic wheel cleaners toremo ve
brake dust. This could damage wheel bolts
and brake components.
R Toavo id cor rosion of the brake discs and
brake pads, drive theve hicle for a few
minutes af ter cleaning before parking it. The
brake discs and brake pads warm up and dry
out.
Wi ndo ws
R Clean wind owsinside and outside with a
damp clo thand with a cleaning agent recom‐
mended for Mercedes-Benz.
R Do not use dry clo ths or abrasive or sol vent-
based cleaning agents toclean the inside of
windo ws.
Wi per blades
R Fold out the wiper blades and clean them
using a damp clo th.
R Do not clean the wiper blades too of ten.
Ex terior lighting
R Clean the lenses with a wet sponge and mild
cleaning agent, e.g. car sha mpoo. Maintenance and care
299
Page 318 of 441
To
w- starting or towing away Pe
rm itted towing me thods *
NO
TEDama gefrom auto matic braking If one of
thefo llowing functions is switched
on, theve hicle brakes automatically in cer‐
ta in situations:
R Active Brake Assi st
R Active Dis tance Assi stDISTRONIC
R HOLD function
R Active Parking Assist
To avo id damage totheve hicle, deactivate
th ese sy stems in thefo llowing or similar sit‐
uations: #
During towing #
In a car wash Mercedes-Benz
recommends transporting your
ve hicle in the case of a breakdown, rath er than
to wing it away. Fo
rto wing, use a tow rope or tow bar with bo th
axles on the ground. Do not use tow bar sys‐
te ms. &
WARNING Risk of accident when towing
with steering wheel lock
Yo u will no lon ger be able tosteer theve hicle
if th esteering wheel lock is engaged. #
Alw ays switch on the ignition when tow‐
ing theve hicle with a tow cable or a tow
bar. *
NO
TEDama getotheve hicle due to tow‐
ing away incor rectly #
Obser vethe instructions and no tes on
to wing away. Pe
rm itted towing me thods
Bo th axles on
th e ground Ye
s, maximum 50 km at
50 km/h
Fr ont axle
ra ised No
Re ar axle
ra ised No To
wing theve hicle with bo thaxles on the
gr ound #
Obser vethe no tes on the permitted towing
me thods (/ page315). #
Makesure that the battery is connected and
ch arge d.
Obser vethefo llowing points when the battery is
dischar ged:
R the engine cann otbe star ted
R the electric parking brake cann otbe released
or applied Breakdown assis
tance 315
Page 319 of 441
R
vehicles with automatic transmission: the
automatic transmission cannot be shif tedto
position iorj
% Vehicles with automatic transmission: if
th e automatic transmission cann otbe shif‐
te dto position i, orthe multifunction dis‐
play in the instrument clus ter does not show
anything, ha vetheve hicle transpor tedaw ay
( / page 317). Atowing vehicle with lifting
equipment is requiredforve hicle transpor ta‐
tion.
* NO
TEDama gedue to to wing away at
exc essively high speeds or over long dis‐
ta nces The driv
etra in could be damaged when tow‐
ing at excessively high speeds or over long
dis tances. #
Atowing speed of 50 km/h must not
be exc eeded. #
Atowing dis tance of 50 km must not be
exc eeded. &
WARNING Risk of accident when towing
a ve hicle which is too heavy
If ano ther vehicle is tow- star ted or towed
aw ay, its weight must not exceed the permis‐
sible gross mass of your ow nve hicle, other‐
wise thefo llowing could occur:
R theto wing eye may become de tach ed.
R theve hicle/trailer combination may
swer veoreve nov erturn. #
If ano ther vehicle is tow- star ted or
to we daw ay, its weight must not exceed
th e permissible gross mass of your own
ve hicle. If a
vehicle must be tow- star ted or towe daw ay,
its permissible gross weight must not exceed the
permissible gross weight of theto wing vehicle. #
Information on the permissible gross mass of
th eve hicle can be found on theve hicle iden‐
tification plate (/ page 338). #
Vehicles with automatic transmission: do
not open the driver's door or front passenger door,
otherwise the automatic transmission
automatically shifts toposition j. #
Fittheto wing eye (/ page318). #
Fasten theto w bar.
* NO
TEDama gedue toincor rect connec‐
tion of theto w bar #
Onlyconnect theto w rope or tow bar to
th eto wing eyes. #
Deactivate the automatic locking mechanism
(/ page 65). #
Do not activate the HOLD function. #
Deactivate tow- aw ay protection
(/ page 73). #
Deactivate Active Brake Assi st
( / page 138). #
Vehicles with automatic transmission:
shift the automatic transmission toposition
i. #
Release the electric parking brake. 316
Breakdown assis tance
Page 320 of 441
&
WARNING Risk of accident due tolimi‐
te d saf ety-re lated functions during the
to wing process
Saf ety-re lated functions are limited or no lon‐
ge rav ailable in thefo llowing situations:
R the ignition is switched off.
R the brake sy stem or po werst eering sys‐
te m is malfunctioning.
R the energy supply or the on-board electri‐
cal sy stem is malfunctioning.
When your vehicle is then towe daw ay, signif‐
icantly more ef fort may be requ ired tosteer
and brake than is norm allyrequ ired. #
Use a tow bar. #
Make sure that thesteering wheel can
mo vefreely before towing theve hicle
aw ay. *
NO
TEDama gedue toexcessive tracti ve
po wer If
yo u pull away sharpl y,the tractive po wer
may be too high and theve hicles could be
damaged. #
Pull away slowly and smoo thly. Loading the
vehicle for transport #
Obser vethe no tes on towing away
( / page 315). #
Con nect theto w bar totheto wing eye in
order toload theve hicle. #
Shift the automatic transmission toposition
i.
% The automatic transmission may be loc ked
in position jintheeve nt of damage tothe
electrics. Toshift toi , pr ovide the on-
board electrical sy stem with po wer
( / page 313). #
Load theve hicle onto the transpor ter. #
Shift the automatic transmission toposition
j. #
Use the electric parking brake tosecure the
ve hicle against rolling away. #
Only secure theve hicle bythe wheels. #
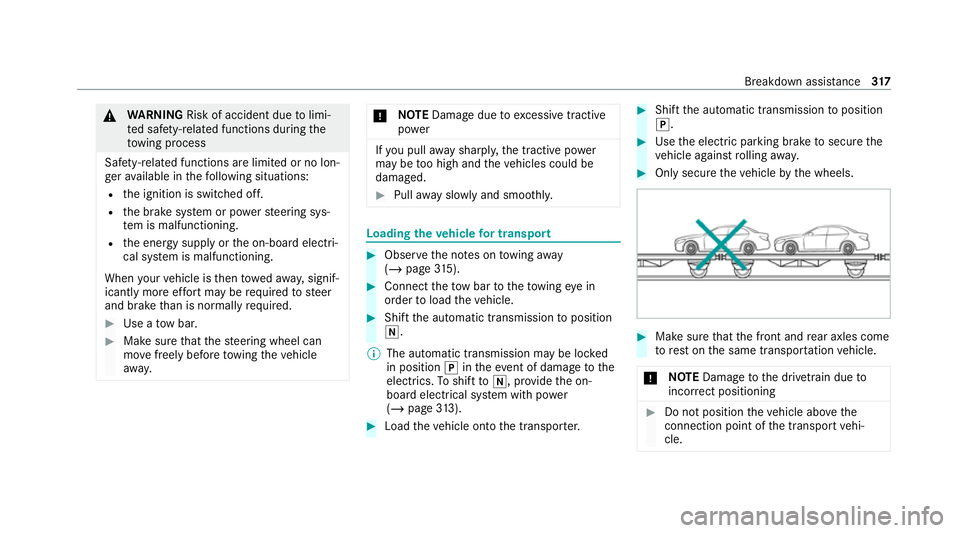
Make sure that the front and rear axles come
to rest on the same transpor tation vehicle.
* NO
TEDama getothe driv etra in due to
incor rect positioning #
Do not position theve hicle abo vethe
connection point of the transport vehi‐
cle. Breakdown assis
tance 317
Page 333 of 441
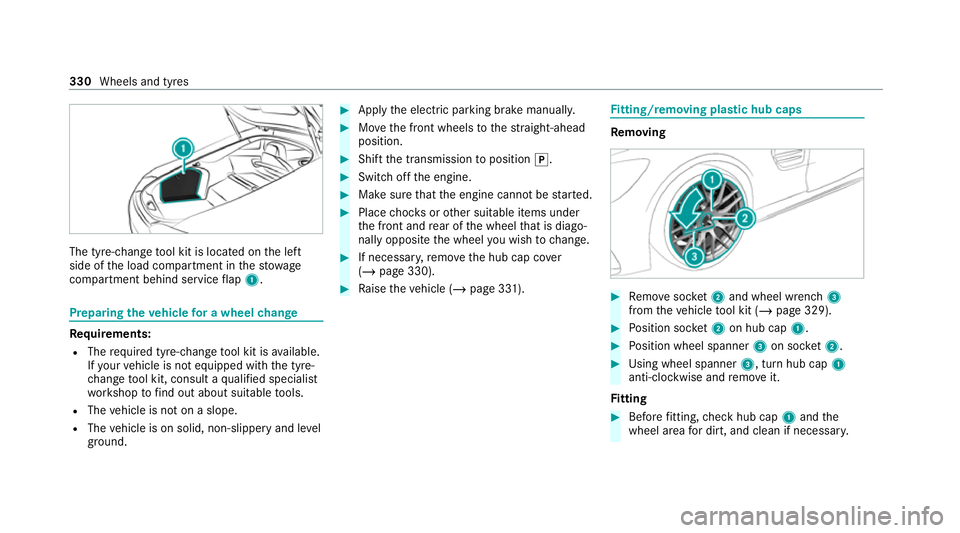
The tyre-change
tool kit is located on the left
side of the load compartment in thestow age
compartment behind service flap 1. Prepa
ring theve hicle for a wheel change Re
quirements:
R The requ ired tyre-change tool kit is available.
If yo ur vehicle is not equipped with the tyre-
ch ange tool kit, consult a qualified specialist
wo rkshop tofind out about suitable tools.
R The vehicle is not on a slope.
R The vehicle is on solid, non-slippery and le vel
ground. #
Apply the electric parking brake manually. #
Movethe front wheels tothest ra ight-ahead
position. #
Shift the transmission toposition j. #
Switch off the engine. #
Make sure that the engine cann otbe star ted. #
Place choc ks orother suitable items under
th e front and rear of the wheel that is diago‐
nally opposite the wheel you wish tochange. #
If necessar y,remo vethe hub cap co ver
( / page 330). #
Raise theve hicle (/ page 331). Fi
tting/ removing pla stic hub caps Re
moving #
Remo vesoc ket2 and wheel wrench 3
from theve hicle tool kit (/ page 329). #
Position soc ket2 on hub cap 1. #
Position wheel spanner 3on soc ket2. #
Using wheel spanner 3, turn hub cap1
anti-clo ckwise and remo veit.
Fi tting #
Before fitting, check hub cap 1and the
wheel area for dirt, and clean if necessar y.330
Wheels and tyres
Page 334 of 441
#
Position hub cap 1and turn until it is in the
ri ght position. #
Position soc ket2 on hub cap 1. #
Position wheel wrench 3on soc ket2 and
tighten hub cap 1.
Speci fied tigh tening torq ue: 25 Nm. Ra
ising theve hicle when changing a wheel Re
quirements:
R There are no persons in theve hicle.
R The vehicle has been prepared for a wheel
ch ange (/ page 330).
Important no tes on using the jack:
R Use only a vehicle-specific jack that has
been appr ovedby Mercedes-Benz toraise
th eve hicle.
R The jack is only designed forra ising and
holding theve hicle for a short time while a
wheel is being changed and not for mainte‐
nance workunder theve hicle. R
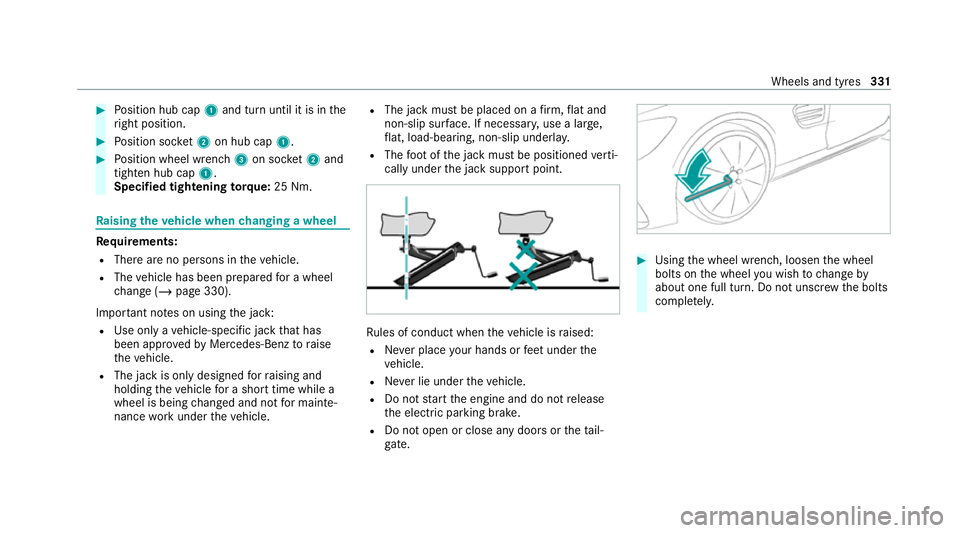
The jack must be placed on a firm ,fl at and
non-slip sur face. If necessar y,use a lar ge,
fl at, load-bearing, non-slip unde rlay.
R The foot ofthe jack must be positioned verti‐
cally under the jack support point. Ru
les of conduct when theve hicle is raised:
R Never place your hands or feet under the
ve hicle.
R Never lie under theve hicle.
R Do not start the engine and do not release
th e electric parking brake.
R Do not open or close any doors or theta il‐
gate. #
Using the wheel wrench, loosen the wheel
bolts on the wheel you wish tochange by
about one full turn. Do not unscr ewthe bolts
comple tely. Wheels and tyres
331