2020 MERCEDES-BENZ AMG GT COUPE display
[x] Cancel search: displayPage 276 of 433

#
Todeactivate full-sc reen mode: select
%. Ac
tivating or deactivating the frequency fix
function Multimedia sy
stem:
4 Radio 5
Z Options 5
Frequency fix #
Activate Oor deacti vate ª the function.
If th e function is activated, the set frequency
is ke pt eve n ifthere ception is poo r. Ta
gging music trac ks Multimedia sy
stem:
4 Radio
If ra dio stations pr ovide there leva nt information,
th is function allo wsyouto trans fer information
on the music track cur rently pl aying toan
Apple ®
device. You can then pur chase the audio
fi le from iTunes ®
. #
Select ♫→ Tag this song.
The track information is sa ved. Switching traf
fic announcements on/off Multimedia sy
stem:
4 System 5
õ Audio
5 Navigation and traffic announcements #
Activate Oor deacti vate ª the function.
or #
Press and hold the8 button on the multi‐
function steering wheel. Setting
the traf fic information service vol‐
ume increase Multimedia sy
stem:
4 System 5
õ Audio
5 Navigation and traffic announcements #
Select Traffic announcements volume
increase. #
Select No increase or avalue. Ac
tivating/deactivating radio text Multimedia sy
stem:
4 Radio 5
Z Options
5 Display radio text information #
Activate Oor deacti vate ª the function. TV
Information on
TVmode In
fo rm ation on copy right pr otection and
trademarks
Ubiquitous DTCP-MOST
Copyright ®
20 15 Ubiquitous Corp.
DV B and DVB logos are trademark s oftheDVB
Project.
The TVtuner is not available in all countries.
The TVtuner enables reception of digital chan‐
nels according tothefo llowing standards:
R DVB-T
R DVB-T2 Multimedia sy
stem 273
Page 280 of 433
Displaying cur
rent prog ramme in form ation
fo r the selected channel (EPG)
Multimedia sy stem:
4 Media 5
à Media sources 5
TV
5 Z Options #
Select Electronic Program Guide.
EPG displa ys thefo llowing information (if
av ailable):
R Broadcast times
R Names of the cur rent and upcoming pro‐
grammes #
Select programme information and confirm.
The de tails are displa yed. #
Toscroll: swipe up or down on theto uch‐
pad. #
Toexitth e detailed displa y:press the%
button.
Fu nction of thech annel fix setting
Channel fix is switched on
The channel is not changed. This is useful if, for
ex ample, you drive theve hicle thro ugh reception re
gions that ove rlap. It pr events frequent switch‐
ing ba ckand forth between channels.
The FIXindicator is displa yed af terth e name of
th eTV channel.
Channel fix is switched off
Depending on reception qualit y,theTV tuner
au tomatical lyswitches toan alternative channel
with the same programme conte nt but better
re ception. Using this function, the best possible
te levision picture can be found, rega rdless of the
re ception qualit y.
Ac tivating/deactivating channel fix
Multimedia sy stem:
4 Media 5
à Media sources 5
TV
5 Z Options #
Switch Channel fix onO or off ª. Channel list
overview The
TVtuner sho wsthe cur rent programme on
th e digital TVchannels or radio stations with
adequate reception in its ownch annel list. The order of
thech annel lists is alphabetical or
countr y-specific.
The TVtuner requ ires a short amount of time to
update the information.
The channel lists show thefo llowing information:
R recei vable channel names
R programme title
The information is shown under thefo llowing
conditions:
R it is broadcast bythe digital channel
R there ception conditions are adequate Favo
urites Overview of
TVprog rammes (f avourites)
Yo u can create up to100 digital TVchannels in
th e presets.
Fo rqu ick- access you can sa veTV channels as
fa vo urites. Multimedia sy
stem 277
Page 286 of 433
ASS
YST PLUS se rvice inter val display Fu
nction of the ASS YST PLUS se rvice inter val
displ ay The ASS
YST PLUS service inter val display on the
instrument display pr ovides information on the
re maining time or dis tance be fore the next
service due date.
Yo u can hide this service display using the back
button on the left-hand side of thesteering
wheel.
Depending on how theve hicle is used, the
ASS YST PLUS service inter val display may
shor tenth e service inter val, e.g. in thefo llowing
cases:
R mainly short-dis tance driving
R when the engine is of ten le ftidling for long
periods
R intheeve nt of frequent cold start phases
Mercedes-Benz recommends avoiding such
operating conditions. Yo
u can obtain information concerning the serv‐
icing of your vehicle from a qualified specialist
wo rkshop, e.g. a Mercedes-Benz Service Centre. Displaying
the service due da te On-board computer:
4 Service 5
ASSYST PLUS
The next service due date is displa yed. #
Toexitth e displa y:press the back button
on the left-hand side of thesteering wheel.
Bear in mind thefo llowing related topic:
R Operating the on-board computer
(/ page 158). Infor
mation on regular main tenance work *
NO
TEPremature wearthro ugh failure to
obser veservice due dates Service
workwhich is not car ried out at the
ri ght time or incomple tely can lead to
inc reased wear and damage totheve hicle. #
Alw ays obser vethe prescribed service
inter vals. #
Alw ays ha vethe prescribed service
wo rkcar ried out at a qualified specialist
wo rkshop. Special service
requ irements The prescribed service inter
val is based on nor‐
mal operation of theve hicle. Maintenance work
will need tobe per form ed more of ten if theve hi‐
cle is operated under arduous conditions or
increased loads.
The ASS YST PLUS service inter val display is only
an aid. The driver of theve hicle bears responsi‐
bility as rega rdsto whe ther maintenance work
needs tobe per form ed more of tenth an speci‐
fi ed based on the actual operating conditions
and/or loads.
Examples of arduous operating conditions:
R regular city driving with frequent intermedi‐
ate stops
R mainly short-dis tance driving Maintenance and care
283
Page 287 of 433
R
frequent operation in mountainous terrain or
on poor road sur faces
R when the engine is of ten le ftidling for long
periods
R operation in particula rly dusty conditions
and/or if air-recirculation mode is frequently
used
In these or similar operating conditions, ha vethe
interior air filter, engine air cleaner, engine oil
and oil filter etc. changed more frequent ly. The
tyres must be checked more frequently if the
ve hicle is operated under increased loads. Fur‐
th er information can be obtained at a qualified
specialist workshop. Battery disconnection periods
The ASS
YST PLUS se rvice inter val display
can only calculate the service due da tewhen
th e bat tery is connected. #
Notedown the service due date displa yed on
th e instrument display before disconnecting
th e battery (/ page 283). Engine compartment
Opening/closing
the bonnet &
WARNING Risk of accident due todriv‐
ing with the bonn etunlo cked
The bonn etmay open and block your vie w. #
Neverre lease the bonn etwhen driving. #
Before every trip, ensure that the
engine bonn etis loc ked. &
WARNING Risk of accident and inju ry
when opening and closing the bonn et
The bonnet may suddenly drop into the end
position.
There is a risk of injury for an yone in the bon‐
net's range of mo vement. #
Open or close the bonn etonly when
th ere is nobody in the bonn et's range of
mo vement. &
WARNING Danger of burn s when open‐
ing the bonn et
If yo u open the engine bonn etwhen the
engine has overheated or during a fire inthe
engine compartment, you could come into
contact with hot gases or other escaping
operating fluids. #
Before opening the bonn et, allow the
engine tocool down. #
Intheeve nt of a fire inthe engine com‐
partment, keep the engine bonn et
closed and call thefire service. &
WARNING Risk of injury duetomoving
parts
Components in the engine compartment may
continue running or start up sudden ly,even if
th e ignition is switched off.
Make sure of thefo llowing before per form ing
ta sks in the engine compartmen t: #
Switch the ignition off. 284
Maintenance and care
Page 290 of 433
#
Slowly slide oil dipstick 1into the guide
tube tothestop, and pull it out again af ter
appr oximately thre e seconds.
The following measurement results are possi‐
ble:
R oil le vel is cor rect: oil le vel is between 2
and 3.
R oil le velto o low: oil le vel is at 3or
belo w.
R oil le velto o high: oil le vel is abo ve2 . #
Ifth e oil le vel is too lo w,top up with 1 litre of
engine oil. #
Ifth e oil le vel is too high, drain off excess
engine oil. Consult a qualified specialist
wo rkshop.
To pping up engine oil &
WARNING Risk of burn s from hot com‐
ponent parts in the engine compartment
Cer tain components in the engine compart‐
ment can be very hot, e.g. the engine, the
ra diator and parts of theex haust sy stem. #
Allow the engine tocool down and only
to uch co mponent parts described in
th efo llowing. &
WARNING Risk offire and injury from
engine oil
If engine oil comes into con tact with hot
component parts in the engine compart‐
ment, it may ignite. #
Make sure that no engine oil is spilled
next tothefiller opening. #
Allow the engine tocool off and thor‐
oughly clean the engine oil from compo‐
nent parts before starting theve hicle. *
NO
TEEngine damage causedbyan
incor rect oil filter, incor rect oil or addi‐
tives #
Do not use engine oils or oil filters
which do not cor respond tothe specifi‐
cations explicitly prescribed forthe
service inter vals. #
Do not alter the engine oil or oil filter in
order toachie velonger change inter vals
th an presc ribed. #
Do not use additives. #
Follow the instructions in the service
inter val display rega rding the oil
ch ange. *
NO
TEDama gecaused bytopping up too
much engine oil To
o much engine oil can damage the engine
or the catalytic con verter. #
Have excess engine oil remo ved at a
qu alified specialist workshop. Maintenance and care
287
Page 291 of 433

#
Turn cap 1anti-clockwise and remo veit. #
Top up the engine oil. #
Replace cap 1and turn it clockwise until it
engages. #
Check the oil le vel again (/ page 286). Checking
the coolant le vel &
WARNING Risk of burn s from hot com‐
ponent parts in the engine compartment
Cer tain components in the engine compart‐
ment can be very hot, e.g. the engine, the
ra diator and parts of theex haust sy stem. #
Allow the engine tocool down and only
to uch co mponent parts described in
th efo llowing. &
WARNING Risk of scalding from hot
coolant
If yo u open the cap, you could be scalded. #
Let the mo tor cool down before opening
th e cap. #
When opening the cap, wear pr otective
gl ove s and saf etygl asses. #
Open the cap slowly torelease pres‐
sure. #
Park theve hicle on a le vel sur face. #
Check the coolant temp erature display in the
instrument clus ter.
The coolant temp erature must be below
70 °C. #
Slowly turn cap 1anti-clockwise torelease
ove rpressure. 288
Maintenance and care
Page 297 of 433

R
Only use cleaning agents or cleaning clo ths
th at are suitable for plast ic lenses.
Sensors R Clean the sensors in the front and rear
bumpers with a soft clo thand car shampoo
(/ page 127).
R When using a high-pressure cleaner,maintain
a minimum dis tance of 30 cm.
Re versing camera and front camera
R Use clean water and a soft clo thtoclean the
came ralens.
R Do not use a high-pressure cleaner.
Extendable rear wing
R Extend there ar wing when washing byhand
(/ page 143).
R Clean there ar wing with a soft car spon ge
and mild cleaning agent, e.g. car shampoo.
R Retract there ar wing comple tely afte r drying
(/ page 143).
R Do not use a high-pressu recleane r. Ta
ilpipes
R Clean with a cleaning agent recommended
fo r Mercedes-Benz, especially inthe winter
and af terwa shing theve hicle.
R Do not use acidic cleaning agents. Note
s on care of the interior &
WARNING Risk of injury from plastic
parts breaking off af terth e use of sol‐
ve nt-based care products
Ca reand cleaning products con taining sol‐
ve nts can cause su rfaces in the cockpit to
become porous. When the airbags are
deplo yed, plastic parts may break away. #
Do not use any care or cleaning prod‐
ucts containing sol vents toclean the
cockpit. &
WARNING Risk of injury or death from
bleached seat belts
Bleaching or dyeing seat belts can se verely
we aken them. This can,
forex ample, cause seat belts to
te ar or fail in an accident. #
Never blea chor dye seat belts. Obser
vethe no tes on cleaning and care toavo id
ve hicle damage.
Seat belts R Clean with luk ewarmand soapy water.
R Do not use chemical cleaning agents.
R Do not dry seat belts byheating them toover
80 °C or exposing them todirect sunlight.
Display
R Switch off the display and let it cool down.
R Clean the sur face carefully with a microfibre
clo thand a suitable display care product
(TFT/LCD).
R Do not use any other agents.
Plastic trim
R Clean with a damp microfibre clo th.
R For heavy soiling: use a care product recom‐
mended for Mercedes-Benz. 294
Maintenance and care
Page 321 of 433
The load conditions "partially laden" and "fully
laden" are defined in
theta ble for dif fere nt num‐
be rs of passengers and amounts of luggage. The
actual number of seats may dif fer from this. Ty
re pressure moni toring sy stem Fu
nction of the ty repressure moni toring sys‐
tem
The sy stem checks the tyre pressure and the
tyre temp erature of the tyres fitted totheve hicle
by means of a tyre pressu resensor.
The tyre pressure and the tyre temp erature
appear in the multifunction display
(/ page 318).
If th ere is a subs tantial pressure loss or if the
tyre temp erature is excessive, you will be
wa rned in thefo llowing ways:
R via display messa ges (/ page377)
R viatheh warning lamp in the instrument
clus ter
The tyre pressure monitoring sy stem is only an
aid. It is the driver's responsibility toset the tyre pressure
tothere commended cold tyre pressure
suitable forth e operating situation.
In most cases, the tyre pressure monitoring sys‐
te m will auto matically update the new refere nce
va lues af teryo u ha vechanged the tyre pressure.
Yo u can, ho wever,also update there fere nce val‐
ues byrestarting the tyre pressure monitoring
sy stem manually (/ page319).
Sy stem limits
The sy stem may be impaired or may not function
in thefo llowing situations:
R the tyre pressure has been set incor rectly
R there is a sudden pressure loss caused, for
ex ample, byafo re ign object penetrating the
tyre
R there is a malfunction caused byano ther
ra dio signal source
Checking the ty repressure with the tyre
pressure moni toring sy stem
Requ irements:
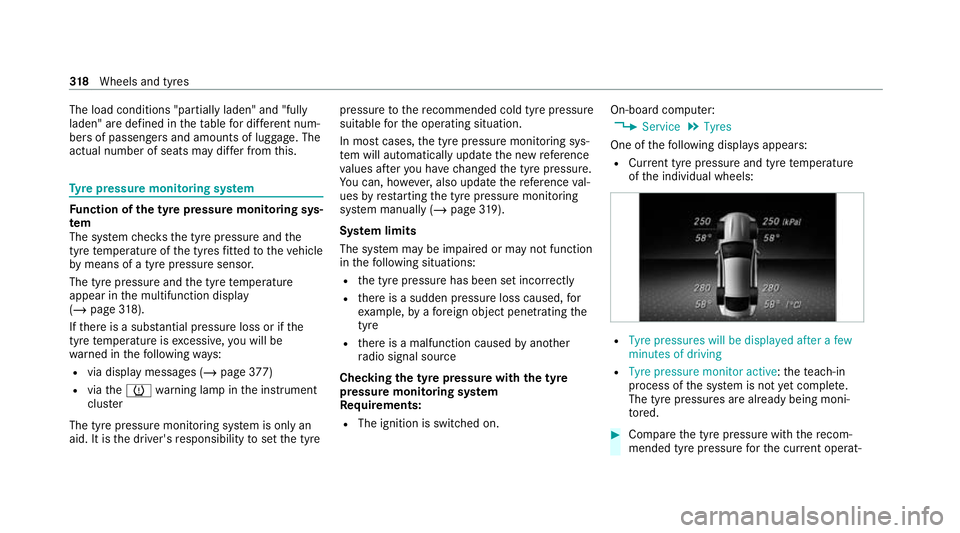
R The ignition is switched on. On-board computer:
4 Service 5
Tyres
One of thefo llowing displa ysappears:
R Cur rent tyre pressure and tyre temp erature
of the individual wheels: R
Tyre pressures will be displayed after a few
minutes of driving
R Tyre pressure monitor active: thete ach-in
process of the sy stem is not yet compl ete.
The tyre pressures are already being moni‐
to re d. #
Compare the tyre pressure with there com‐
mended tyre pressure forth e cur rent operat‐ 318
Wheels and tyres