2020 MASERATI GRANTURISMO stop start
[x] Cancel search: stop startPage 78 of 286

Front Seats
Seats and seat belts are part of the
Occupant Restraint System of the
vehicle. For further information, see
chapter “Occupant Restraint System”
in Section “Before Starting”.
WARNING!
Be sure everyone in your vehicle is in a
seat and using a seat belt properly.
Seat Adjustments
The seats can only be adjusted with
the key in the ignition switch inMAR
(ON)position.
It is however possible, when the door
is closed, to operate the seat for
approx. 15 seconds after turning the
key toSTOP (OFF)position and then
for other 15 seconds after the last
operation.
The power seats switches are located
on the outboard side of the seat
cushion.
Use the front switch1to move the
seat up or down, forward or rearward
or to recline the seat cushion.
Use the switch2to adjust the lumbar
support and recline the seatback.Seat Forward/Rearward Adjustment
The seat can be adjusted both forward
and rearward.
Push the seat switch1forward or
rearward, the seat will move in the
direction of the switch.
Release the switch1when the desired
position is reached.
Seat Up/Down Adjustment
The height of the seat can be adjusted
up- or downward.
Grip switch1from the center and push
it down or up.
Release the switch1when the desired
position is reached.
CAUTION!
If the seat's movement does not work,
make sure that the corresponding fuse
is not tripped (see chapter “FuseReplacement” in section “Maintenance
and Care”).
Seat Tilt Control (Up/Down)
The angle of the seat cushion can be
adjusted in four directions.
Pull upward or push the front of the
switch1, to move the front cushion
seat in the direction of the switch.
Release the switch1when the desired
position is reached.
Perform the same maneuver by acting
on the back of the switch1.
Seatback Inclination Control
The angle of the seatback can be
adjusted forward or rearward.
Push the seatback switch2forward or
rearward, the upper seatback will
move in the direction of the switch.
Release the switch2when the desired
position is reached.
WARNING!
Sitting in a reclined position while the
vehicle is in motion could be
dangerous. The seatback should not
be tilted back too far.
The 3-point shoulder/lap belt must be
firmly secured against the occupant’s
body in order to function properly.
Therefore, both the driver’s and
Understanding the Vehicle
3
74
Page 82 of 286

To recall one of the stored positions
with the door open, press the relative
button “1”, “2” or “3” briefly.
To recall a stored position with the
door closed, press the corresponding
button until hearing a tone that
confirms the seat has stopped.
NOTE:
•To stop the seat, press one of the
buttons - “1”, “2” or “3” -, or one of
the adjustment controls.
•Malfunctioning of the seat control
unit is indicated by a sequence of 5
tones emitted when the key in the
ignition switch is turned toSTOP
(OFF)position. Contact an
Authorized Maserati Dealerto have
the malfunction corrected.
Each system is independent of the
others and can be operated separately
using specific buttons for each seat.
System Initialization Procedure
Following any power cut-out (e.g.
after using the battery master switch
or dead battery), check the seats to
ensure that they are operating
properly when the power supply is
available.
Perform the following procedures on
both seats in the event of a
malfunction.The key in the ignition switch must be
inSTOP (OFF)position and the door on
the side of the seat concerned closed.
Open the door and begin the
following procedure within 5 seconds,
then complete it within 10 seconds:
• forward - STOP;
• backward - STOP;
• forward - STOP;
• backward - STOP;
• tilt the seatback fully forward and
wait until the seat performs two
complete travels (forward and
backward);
• move the seatback to its normal
upright position.
NOTE:
If you need to disconnect the battery,
wait at least 30 seconds from the last
seat movement. If you disconnect the
battery before, you will have to run
the initialization procedure.
Seatback Facilitated Tilt
This function only active when the
door is open, moves the seat forward
automatically when the seatback is
reclined forward to facilitate access to
the rear seat or exiting the vehicle. The
seat returns to their original position
when the seatback is tilted back again.Rear Seats
Rear seats can fit two passengers.
Seats and seat belts are parts of the
occupant restraint system of the
vehicle.
WARNING!
Be sure everyone in your vehicle is in a
seat and using a seat belt properly.
NOTE:
See chapter “Occupants Restraint
Systems” in section “Before Starting”
for seat belt positioning.
Rear Head Restraints
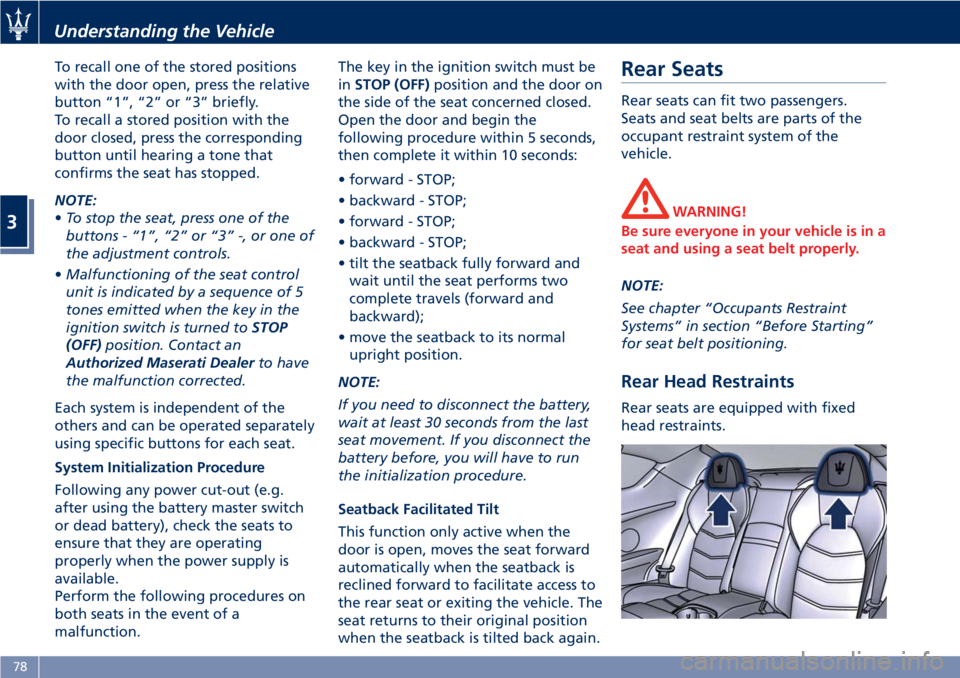
Rear seats are equipped with fixed
head restraints.
Understanding the Vehicle
3
78
Page 95 of 286

Rain Sensing Wipers
This feature detects moisture on the
windshield through an inside rearview
mirror integrated sensor.
The rain sensor adapts the frequency
of the windshield wiper strokes (in the
intermittent operation mode) to the
intensity of the rain.
All the other functions controlled by
the right-hand multifunction lever
(windshield wipers off, in continuous
slow and fast operation mode and in
temporary fast operation mode)
remain the same.
The rain sensor is activated
automatically by moving the
right-hand multifunction lever to
"AUTO" position. The sensor has a
setting range that varies progressively:
from the windshield wiper stationary
position - when the windshield is dry -
to the windshield wiper second speed
- in conditions of pouring rain.To regulate the frequency of
intermittent operation, with the
right-hand multifunction lever in
"AUTO" position, turn the end section
of the lever.
Rotating the end section clockwise,
intermittent operation varies from fast
intermittent wipe (max.) to slow
intermittent wipe (min).
If the engine is turned off during
automatic windshield wiper
operation, with the right-hand
multifunction lever in "AUTO"
position, to reactivate the function the
next time the engine is started, the
lever must be moved to "OFF" (stop
position) then back to "AUTO"
position.CAUTION!
• The rain sensing feature may not
function properly by ice or dried salt
water on the windshield.
• Use on the windshield of RainX
®or
products containing wax or silicone
may reduce rain sensor performance.
Rain Sensor Failure
When the rain sensor is activated, in
the event that it is malfunctioning, the
windshield wiper will be switched on
in intermittent operation mode and
the sensing range will be set by the
user, regardless of whether or not
there is rain on the windshield.
The
symbol appears on the
instrument cluster display.
In this case, we recommend that you
cut-out the rain sensor and turn on
the wiper, if necessary, in continuous
mode. Contact theAuthorized
Maserati Dealeras soon as possible.
Understanding the Vehicle
3
91
Page 103 of 286

General Information
While programming HomeLink®,itis
advisable to disconnect the drive
motor of the gate/door to be remote
controlled, since the numerous driving
pulses launched for this operation
might damage it.
If the battery fails or is disconnected,
the stored settings are not deleted.
If the gate/door was manufactured
prior to April 1982 (not equipped with
safety systems or automatic stop in the
event of an obstacle in the range of
action), the gate/door cannot be
controlled by HomeLink
®.
If you have questions, call (800)
355-3515.
WARNING!
California Proposition 65
Operating, servicing and maintaining
a passenger vehicle or off-road vehicle
can expose you to chemicals including
such as, engine exhaust, carbon
monoxide, phthalates and lead, that
which are know to the State of
California to cause cancer and birth
defects or other reproductive harm. To
minimize exposure, avoid breathing
exhaust, do not idle the engine except
as necessary, service your vehicle in awell-ventilated area and wear gloves
or wash your hands frequently when
servicing your vehicle. For more
information go to:
www.P65Warnings.ca.gov/passenger-
vehicle
Programming
• Press and hold buttons "1" and "3".
• After about 20 seconds, the LED
starts flashing.
• Release the buttons.
• Hold the remote control for the
device to be controlled close to the
HomeLink
®control panel (0-30 cm/
0-12 in).
• Simultaneously press and hold the
button on the hand-held remote
control and one of the three
HomeLink
®buttons "1", "2" or "3".
• Successful programming is signaled
by the LED flashing faster.
• Release the buttons.
To program the other buttons, repeat
the operations skipping the first three
steps.
Use
• When the signal of the device to be
activated reaches its operatingrange, press the dedicated
HomeLink
®button.
• The LED remains on while the signal
is being transmitted.
The devices controlled through the
HomeLink
®function can always be
activated using the original remote
controls.
Should the so programmed
HomeLink
®not activate the system to
be controlled, this may be due to the
fact that this system is controlled by a
remote control with a rolling code.
A rolling activation code can be
recognized in the following ways:
• consulting the instruction manual
provided with the device to be
controlled;
• despite the fact that the HomeLink
®
programming procedure has been
carried out correctly, the HomeLink®
function does not activate the
device;
• holding the dedicated HomeLink
®
button pressed down, the LED
briefly flashes fast and then remains
on for 2 seconds; this sequence is
repeated for about 20 seconds.
Understanding the Vehicle
3
99
Page 108 of 286

Calibration Selection
The driver can select, in relation to
road surface conditions, vehicle speed,
driving style and comfort, one of the
two calibration levels provided by the
system: normal or sports-style.
•Normal calibration, active when
SPORT drive mode is disabled
("SPORT" button not pressed), favors
comfort and higher driving stability
with low and average grip
conditions.
•Sport-style calibration, active when
SPORT drive mode is enabled
("SPORT" button pressed) , favors
wheel drive and permits a
dynamic-style driving with optimal
road holding.
Whenever the engine is started, the
system automatically activates
NORMAL drive mode, even if SPORT
drive mode was selected before the
engine was last turned off.
The sport-style calibration can be
selected only with the key in the
ignition switch inMAR (ON)position
and it is enabled by pressing button
"SPORT", even while driving.
When SPORT drive mode is activated,
the word “SPORT” on the instrument
cluster display and the LED on the
button illuminate.WARNING!
SPORT drive mode should not be
activated if the road surface is rough
or slippery.
The electronic suspension control
system works in combination with the
ESC system.
When the suspension is set to normal
calibration, stability is increased under
medium and low grip conditions, while
when it is set to sport-style calibration,
the ESC system optimizes a sportier
driving.
WARNING!
In low- and medium-grip conditions
(e.g., rain, snow, ice, sand, etc.) it is
advisable not to use SPORT drive
mode, even with the ESC system
enabled.
Malfunction Indicators
If one or more electric components in
the system prove to be malfunctioning
while driving, the ECU illuminates the
amber warning light accompanied
by the message “Check suspensions”
on the display. In addition, the ECU
calibrates the shock absorbers to apreset value, thus ensuring a safe
vehicle set up.
Should the malfunction involve one
shock absorber only, this will no longer
be controlled by the ECU and will
therefore remain set as it was when
the fault occurred. It is therefore
possible for one of the four shock
absorbers to work with a fixed
calibration, different from that of the
other ones.
In any case, safe and secure vehicle
driving is always ensured at low
speeds.
CAUTION!
In the event of a malfunction in the
suspension control electronic system,
which will be indicated by the
illumination of the amber warning
light on the display while driving, keep
a moderate speed and have the vehicle
checked as soon as possible by an
Authorized Maserati Dealer.
If a malfunction occurs while driving,
and this is signaled by the illumination
of the
amber warning light on the
display, it is advisable to stop the
vehicle as soon as possible, turn the
key in the ignition switch toSTOP
(OFF)position and then restart the
engine.
Understanding the Vehicle
3
104
Page 122 of 286

Engine Temperature Warning Light
This warning light coupled
with the light on the coolant
thermometer notifies when
the engine is overheated. If
the temperature reaches critical levels
this warning light will illuminate in red
color combined with the related
message on display.
If the indicator light switches on while
driving, safely pull over and stop the
vehicle. If the A/C system is on, turn it
off. Also, shift the transmission into N
(Neutral) and idle the vehicle. If the
temperature does not return to
normal, immediately turn the engine
off and contact anAuthorized
Maserati Dealer.
Check “Engine Overheating” in section
“In an Emergency” for more
information.
Doors and Lids Open Warning Light
This warning light indicates
that the doors or lids are open
or not properly closed. The
instrument cluster display also
shows an image of the vehicle with the
part not closed highlighted in red and
the related message.
WARNING!
Before starting off, close any doors
and lids that are open or not properly
closed.
Fuel Cutout Enabled Warning Light
This warning light illuminates
when a collision activates the
inertia switch, thus cutting off
the fuel supply.
WARNING!
After a collision, if you smell fuel or
note leakages from the fuel system,
do not reactivate the switch in order
to prevent the risk of fire.
Windshield and Headlights Washer
Low Fluid Indicator
This indicator will illuminate
for 10 seconds to indicate a
low level of the windshield
and headlights washer fluid. A
related message will be displayed.
See “Maintenance Procedures” in
section “Maintenance and Care” for
fluid filling.Lighting System Failure Warning Light
This warning light illuminates
in the case of a system failure
or burning-out of the position,
turn signal, rear fog and
license plate light bulbs.
See "Bulb Replacement" in section
"Maintenance and Care" for further
details.
Stop Light Failure Warning Light
This warning light illuminates
in the case of a system failure
or burning-out of the stop
light bulbs.
See "Bulb Replacement" in section
"Maintenance and Care" for further
details.
Twilight Sensor Failure Warning Light
This warning light illuminates
in the case of a failure of the
twilight sensor.
Contact anAuthorized
Maserati Dealerto have the vehicle
checked.
Dashboard Instruments and Controls
4
118
Page 139 of 286

•Set Time Hours
With “Sync with GPS Time” feature
unchecked and this mode selected,
you can set the hours manually
from 1 to 24. To select, touch the
“+” or “–” softkeys to adjust the
hours.
•Set Time Minutes
With “Sync with GPS Time” feature
unchecked and this mode selected,
you can set the minutes manually
from 0 to 59. To select, touch the
“+” or “–” softkeys as done for the
hours.
•Time Format
When in this mode, you can select
the time format display. To change
the current setting, touch and
release the “12 Hrs” or “24 Hrs”
softkey.•Show Time In Status Bar
This feature will allow you to turn
on or shut off the digital clock in
the status bar.
•Set Date in Cluster (DD/MM/YY)
When in this mode, you can set the
date manually in the status bar of
the MTC+ and on the instrument
cluster display. Touch the “+” or “-”
softkeys to adjust “Day”, “Month”
and “Year”.
Safety & Driving Assistant
Touch this softkey to set the following
modes.
•Stop & Go Parking Sensors
This feature allows you to disable
the parking sensors signal under
special traffic conditions.
See “Park Assist” in section “Before
Starting” for further information.
•ParkView Camera with Dynamic
Guidelines
When this feature is selected, by
moving the transmission lever in R
(Reverse) position, the rearview
image with dynamic guidelines will
appear on MTC+ display.
The feature can be set to “On” or
“Off”.•ParkView Camera Off Delay
By selecting this feature, when the
transmission lever is moved out of R
(Reverse), the rear view image with
dynamic guidelines will be displayed
for up to 10 seconds after shifting
unless the forward vehicle speed
exceeds 8 mph (12 km/h), or the
transmission is shifted into P (Park)
or the key in the ignition switch is
turned inSTOP (OFF)position.
The feature can be set to “On” or
“Off”.
•Instrument Panel Buzzer Volume
This feature allows adjusting the
volume of the acoustic signal that
accompanies some instrument panel
warnings (EPB overheating, seat
and rearview mirror position
storage).
The volume can be set to 7 levels
identified by numbers from "1" to
"7" by pressing the "+" or "–"
softkey.
•Light Sensor
This feature allows to adjust the
sensitivity of the twilight sensor for
turning on the lights.
The feature can be set to 3 levels:
"Low", "Medium" (default setting)
and "High".
Dashboard Instruments and Controls
4
135
Page 146 of 286

• left-hand/right-hand vent air
distribution;
• fan speed (stepless change);
• compressor activation;
• air recirculation.
All the functions listed above can be
modified manually, i.e. the user can
select one or more of these functions
as desired, using the control panel.
The manual selections always have
priority over the automatic ones and
are memorized until the user chooses
the automatic control again.
When a function has been set
manually, the other automatic
functions will not be affected.
The following parameters/functions
can be set/modified manually:
• left-hand/right-hand side air
temperature;
• fan speed;
• air distribution on 7 positions
(left-hand/ right-hand);
• compressor activation;
• single/dual-zone distribution priority;
• defrosting/defogging function (MAX
DEF);
• air recirculation;
• automatic/manual control of the
system;
• heated rear window;• system deactivation;
• opening/closing of air duct leading
to rear vents.
Activation
The system can be started up in a
number of ways. It is however
advisable to begin by pressing one of
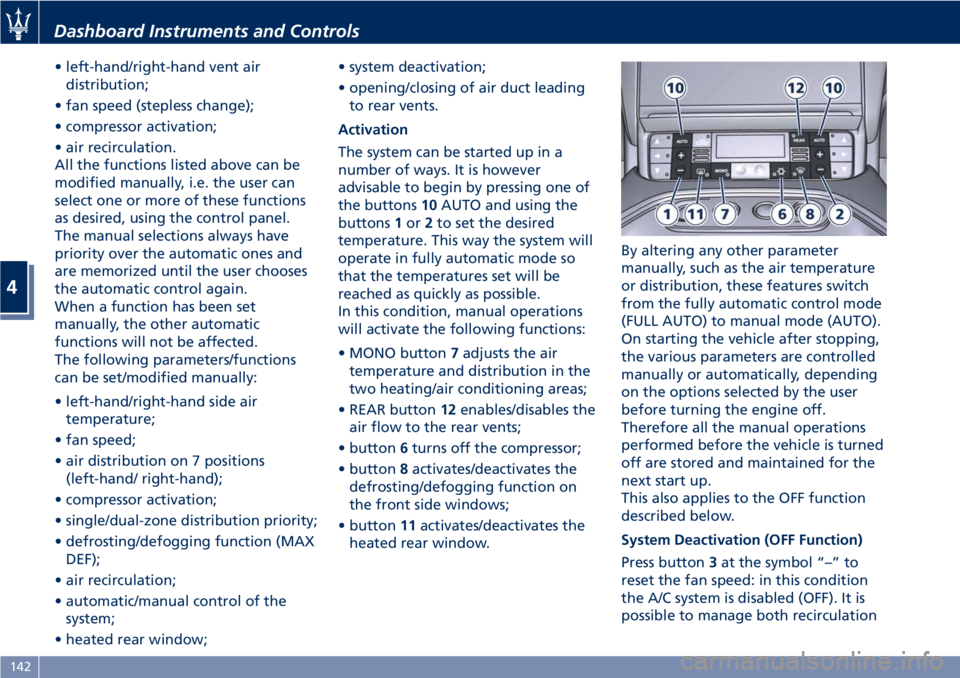
the buttons10AUTO and using the
buttons1or2to set the desired
temperature. This way the system will
operate in fully automatic mode so
that the temperatures set will be
reached as quickly as possible.
In this condition, manual operations
will activate the following functions:
• MONO button7adjusts the air
temperature and distribution in the
two heating/air conditioning areas;
• REAR button12enables/disables the
air flow to the rear vents;
• button6turns off the compressor;
• button8activates/deactivates the
defrosting/defogging function on
the front side windows;
• button11activates/deactivates the
heated rear window.By altering any other parameter
manually, such as the air temperature
or distribution, these features switch
from the fully automatic control mode
(FULL AUTO) to manual mode (AUTO).
On starting the vehicle after stopping,
the various parameters are controlled
manually or automatically, depending
on the options selected by the user
before turning the engine off.
Therefore all the manual operations
performed before the vehicle is turned
off are stored and maintained for the
next start up.
This also applies to the OFF function
described below.
System Deactivation (OFF Function)
Press button3at the symbol “–” to
reset the fan speed: in this condition
the A/C system is disabled (OFF). It is
possible to manage both recirculation
Dashboard Instruments and Controls
4
142