2020 MASERATI GRANTURISMO CONVERTIBLE trunk release
[x] Cancel search: trunk releasePage 224 of 296

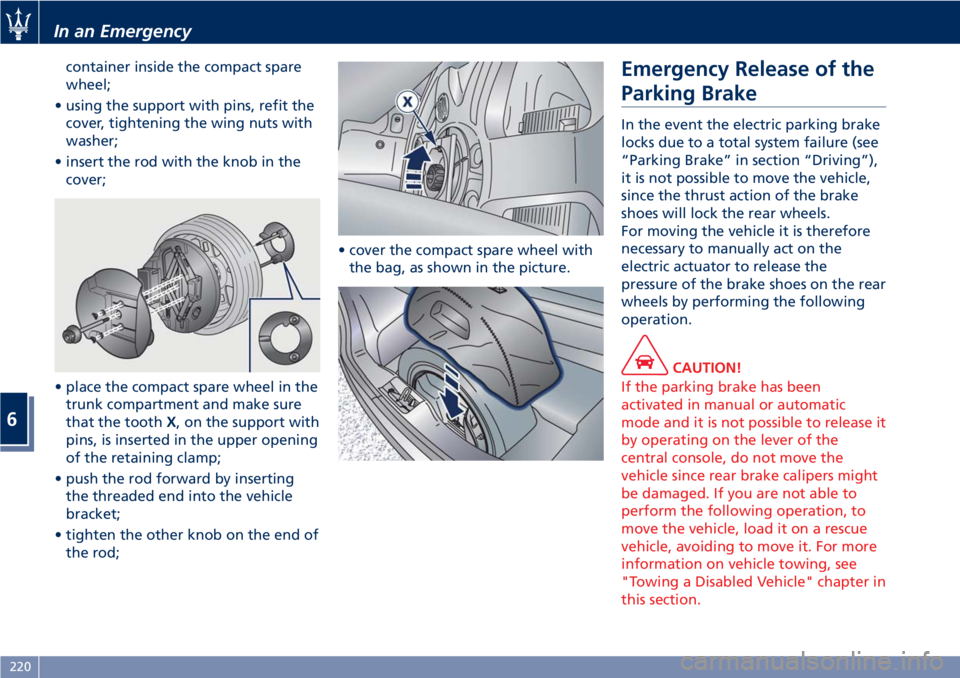
container inside the compact spare
wheel;
• using the support with pins, refit the
cover, tightening the wing nuts with
washer;
• insert the rod with the knob in the
cover;
• place the compact spare wheel in the
trunk compartment and make sure
that the toothX, on the support with
pins, is inserted in the upper opening
of the retaining clamp;
• push the rod forward by inserting
the threaded end into the vehicle
bracket;
• tighten the other knob on the end of
the rod;• cover the compact spare wheel with
the bag, as shown in the picture.Emergency Release of the
Parking Brake
In the event the electric parking brake
locks due to a total system failure (see
“Parking Brake” in section “Driving”),
it is not possible to move the vehicle,
since the thrust action of the brake
shoes will lock the rear wheels.
For moving the vehicle it is therefore
necessary to manually act on the
electric actuator to release the
pressure of the brake shoes on the rear
wheels by performing the following
operation.
CAUTION!
If the parking brake has been
activated in manual or automatic
mode and it is not possible to release it
by operating on the lever of the
central console, do not move the
vehicle since rear brake calipers might
be damaged. If you are not able to
perform the following operation, to
move the vehicle, load it on a rescue
vehicle, avoiding to move it. For more
information on vehicle towing, see
"Towing a Disabled Vehicle" chapter in
this section.
In an Emergency
6
220
Page 225 of 296

Manual Release Procedure
To manually release the parking brake,
you need to use the special tool
provided in the tool kit (see "Tool Kit"
in this section).
Proceed as follows:
• remove any luggage and/or the bag
containing the compact spare wheel
(if equipped) from the trunk
compartment;
• remove the floor panel from the
trunk compartment;
• remove the inside covering panel
from the battery compartment;
• remove the container in the rear
part of the trunk compartment
unscrewing its fastenings;
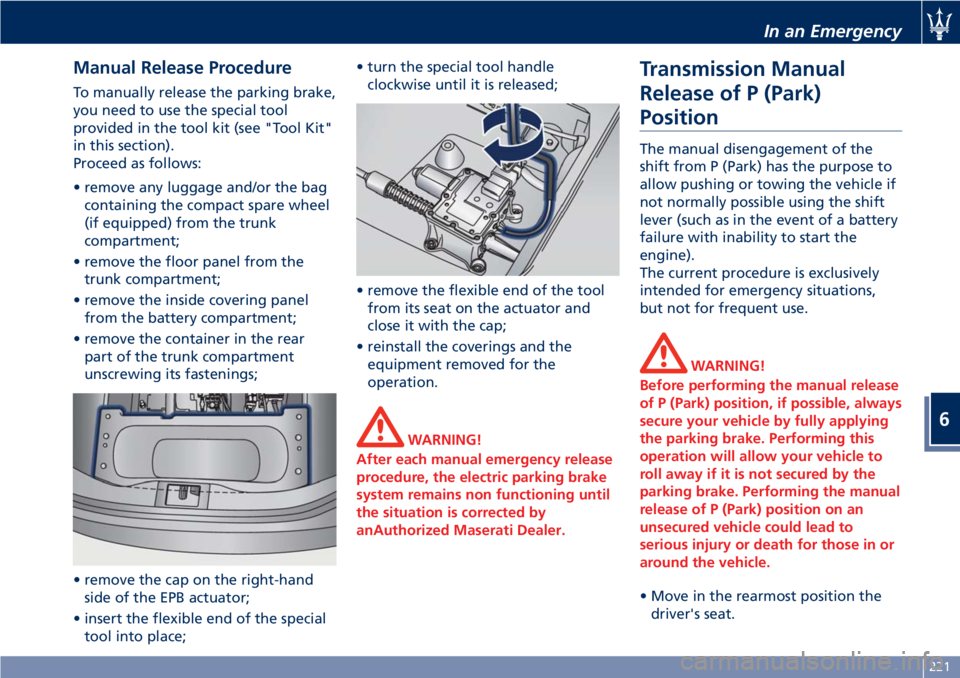
• remove the cap on the right-hand
side of the EPB actuator;
• insert the flexible end of the special
tool into place;• turn the special tool handle
clockwise until it is released;
• remove the flexible end of the tool
from its seat on the actuator and
close it with the cap;
• reinstall the coverings and the
equipment removed for the
operation.
WARNING!
After each manual emergency release
procedure, the electric parking brake
system remains non functioning until
the situation is corrected by
anAuthorized Maserati Dealer.
Transmission Manual
Release of P (Park)
Position
The manual disengagement of the
shift from P (Park) has the purpose to
allow pushing or towing the vehicle if
not normally possible using the shift
lever (such as in the event of a battery
failure with inability to start the
engine).
The current procedure is exclusively
intended for emergency situations,
but not for frequent use.
WARNING!
Before performing the manual release
of P (Park) position, if possible, always
secure your vehicle by fully applying
the parking brake. Performing this
operation will allow your vehicle to
roll away if it is not secured by the
parking brake. Performing the manual
release of P (Park) position on an
unsecured vehicle could lead to
serious injury or death for those in or
around the vehicle.
• Move in the rearmost position the
driver's seat.
In an Emergency
6
221
Page 230 of 296

WARNING!
•Using booster packs that have not
been checked, which could therefore
release a too high charging voltage
(higher than 14 V), in extreme
environmental conditions (for
example: closed areas or without
proper ventilation and temperatures
higher than 122°F/50°C or lower
than -4°F/-20°C) create the right
conditions for ignition which could
then cause the battery to explode.
Therefore you shall always perform
jump-starting operations using the
adequate tools and in the best
environmental conditions, taking all
necessary precautions.
•Do not attempt jump-starting if the
discharged battery is frozen. It could
rupture or explode during jump start
and cause personal injury.
•Do not carry out this procedure if
you have not done it before:
incorrect maneuvers can originate
high electrical discharges and even
cause the battery to explode.
•To avoid the risk of explosion or fire,
do not approach the battery withopen flames or cigarettes that could
generate sparks.
NOTE:
If you need to disconnect the battery
from the vehicle electrical system, see
“Maintenance - Free Battery” in
section “Maintenance and Care”).
Access the Battery
The battery is stored in the trunk.
• Open the trunk lid (see “Open and
Close the Trunk Lid” in section
“Before Starting”).
• Remove any luggage from the trunk
compartment.
• Remove the floor panel from the
trunk compartment.
• Remove the inside covering panel
from the battery compartment.Remove the cover from the right side
of the battery which protects the
positive pole.
Jump-Start Procedure
WARNING!
•The battery is secured to the vehicle
with a metal clamp (indicated in the
picture), so be extremely careful not
to let the clips on the end of the
cables come into contact with it.
•Remove any metal jewelry such as
watch bands or bracelets that might
make an inadvertent electrical
contact. You could be seriously
injured.
•Do not allow the vehicles involved in
the jump-starting operation to touch
each other as this could establish a
ground connection and cause
personal injury.
• Turn off the heater, radio, and all
unnecessary electrical accessories.
• Set the parking brake, shift the
automatic transmission into P (Park)
and turn the key in the ignition
switch toSTOP (OFF)position.
• If using another vehicle to jump start
the battery, park the vehicle within
In an Emergency
6
226
Page 250 of 296

Always use washer fluid when using
the wipers to remove salt or dirt from
a dry windshield.
Avoid using the wiper blades to
remove frost or ice from the
windshield. Keep the blade rubber out
of contact with petroleum products
such as engine oil, gasoline, etc.
Spray nozzles
If the jet does not work, first check
that there is fluid in the pan (see
paragraph “Level checks” in this
section) then check that the nozzles
are not clogged.
Blades Replacement
• Move the right multifunction lever
into “OFF” position, (see chapter
“Windshield Wipers and Washers” in
section “Understanding the
Vehicle”).
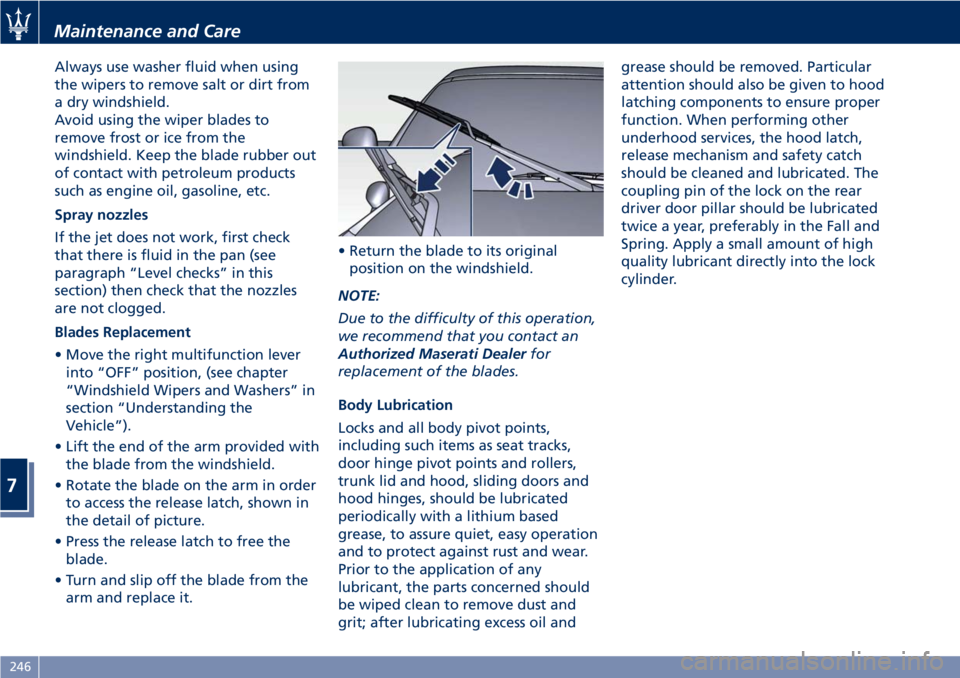
• Lift the end of the arm provided with
the blade from the windshield.
• Rotate the blade on the arm in order
to access the release latch, shown in
the detail of picture.
• Press the release latch to free the
blade.
• Turn and slip off the blade from the
arm and replace it.• Return the blade to its original
position on the windshield.
NOTE:
Due to the difficulty of this operation,
we recommend that you contact an
Authorized Maserati Dealerfor
replacement of the blades.
Body Lubrication
Locks and all body pivot points,
including such items as seat tracks,
door hinge pivot points and rollers,
trunk lid and hood, sliding doors and
hood hinges, should be lubricated
periodically with a lithium based
grease, to assure quiet, easy operation
and to protect against rust and wear.
Prior to the application of any
lubricant, the parts concerned should
be wiped clean to remove dust and
grit; after lubricating excess oil andgrease should be removed. Particular
attention should also be given to hood
latching components to ensure proper
function. When performing other
underhood services, the hood latch,
release mechanism and safety catch
should be cleaned and lubricated. The
coupling pin of the lock on the rear
driver door pillar should be lubricated
twice a year, preferably in the Fall and
Spring. Apply a small amount of high
quality lubricant directly into the lock
cylinder.
Maintenance and Care
7
246
Page 252 of 296

(Continued)
quick coupling from the negative
pole (–) of the battery.
If the battery needs to be removed
from its compartment, you must first
detach the terminal clamp from
negative pole (–) and then the other
terminal clamp from positive pole (+),
after removing the protective cover.
Battery poles are marked positive (+)
and negative (–) and are identified on
the battery case.
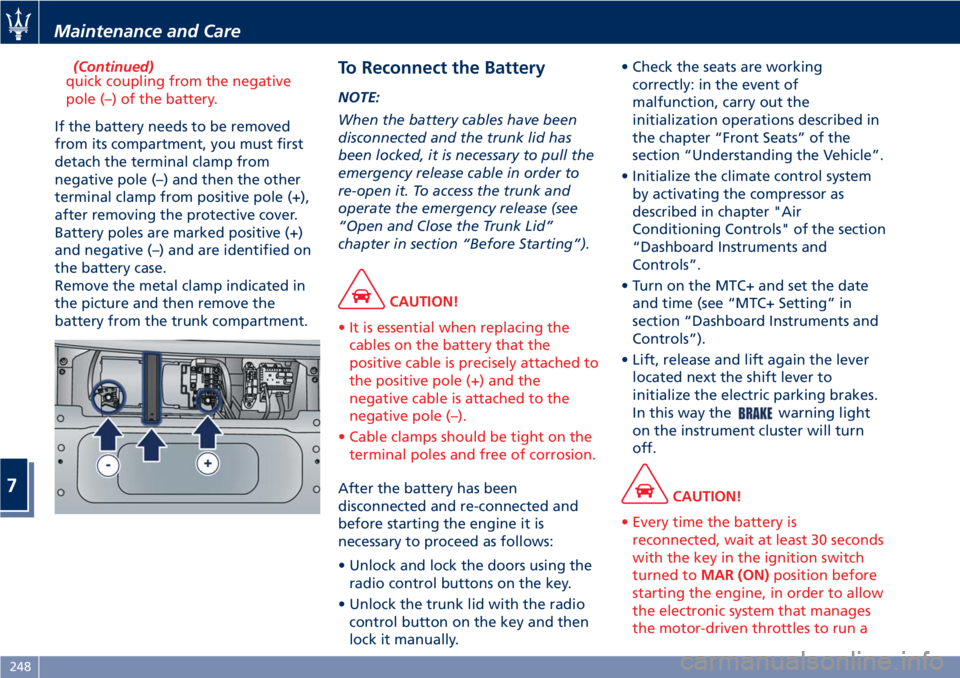
Remove the metal clamp indicated in
the picture and then remove the
battery from the trunk compartment.
To Reconnect the Battery
NOTE:
When the battery cables have been
disconnected and the trunk lid has
been locked, it is necessary to pull the
emergency release cable in order to
re-open it. To access the trunk and
operate the emergency release (see
“Open and Close the Trunk Lid”
chapter in section “Before Starting”).
CAUTION!
• It is essential when replacing the
cables on the battery that the
positive cable is precisely attached to
the positive pole (+) and the
negative cable is attached to the
negative pole (–).
• Cable clamps should be tight on the
terminal poles and free of corrosion.
After the battery has been
disconnected and re-connected and
before starting the engine it is
necessary to proceed as follows:
• Unlock and lock the doors using the
radio control buttons on the key.
• Unlock the trunk lid with the radio
control button on the key and then
lock it manually.• Check the seats are working
correctly: in the event of
malfunction, carry out the
initialization operations described in
the chapter “Front Seats” of the
section “Understanding the Vehicle”.
• Initialize the climate control system
by activating the compressor as
described in chapter "Air
Conditioning Controls" of the section
“Dashboard Instruments and
Controls”.
• Turn on the MTC+ and set the date
and time (see “MTC+ Setting” in
section “Dashboard Instruments and
Controls”).
• Lift, release and lift again the lever
located next the shift lever to
initialize the electric parking brakes.
In this way the
warning light
on the instrument cluster will turn
off.
CAUTION!
• Every time the battery is
reconnected, wait at least 30 seconds
with the key in the ignition switch
turned toMAR (ON)position before
starting the engine, in order to allow
the electronic system that manages
the motor-driven throttles to run a
Maintenance and Care
7
248
Page 293 of 296

Tires
Department of Transportation
Uniform Tire Quality Grades. . . .189
General Information.........187
Inflation Pressure...........284
Punctured Tire.............214
Replacement Tires..........192
Snow Chains..............193
Tire Pressure..............190
Tire Pressure Checkup........191
Tire Repair Kit.............214
Tire Safety Information.......187
Tires Durability.............192
TPMS - Tire Pressure Monitoring
System..................194
Tread Wear Indicators........191
Winter Tires...............193
ToolKit ...................212
Towing the Vehicle...........228
TPMS System................194
Transmission, Automatic
Automatic Transmission Lever . .160
Malfunction and Overheating
Conditions................166
Transmission Manual Release of
P (Park) Position............221
Trip - Onboard Computer.......167
Trunk
Trunk Safety...............37
Trunk Compartment Lid.........35Trunk Lid
Trunk Lid Emergency Release from
inside the Trunk.............37
Updating....................7
USB, AUX and SD Memory Card
Ports....................132
Vehicle Identification Data
Homologation Labels.........18
Vehicle Identification Number
(VIN)....................17
Warning and Information Labels .18
Voice Commands.............156
Warning Icons.................6
Warning/Indicator Lights on TFT
Display...................126
Warnings when Driving.........14
Warranty and Service............8
Warranty Information..........10
Wheels
Tires Maintenance..........263
Wheels Rims Maintenance....
.265
Windows
Auto Down/Auto Up Feature....34
Reset Auto-Up/Down.........35
Windshield Wipers and Washers . . .89
Adding Washer, Headlight Washer
Fluid....................243
Rain Sensing Wipers..........90
Windshield and Headlight
Washers..................91Windshield Wipers...........89
Wiper Maintenance and Blades
Replacement..............245
Index
9
289