2020 MASERATI GRANTURISMO CONVERTIBLE brake light
[x] Cancel search: brake lightPage 11 of 296

Abbreviations
Some descriptions and terms with
particular meanings are found in this
manual in abbreviated form.
A/CAir-Conditioning System.
ABSAnti-Lock Braking System.
ALCAdaptive Light Control.
ALRAutomatic Locking Retractor.
ASRAnti-Slip Regulation.
BOSBrake Override System.
CANController Area Network.
CCCruise Control.
CRSChild Restraint System.
DRLDaytime Running Lights.
EBDElectronic Brake-force
Distribution.
ECUElectronic Control Unit.
EDREvent Data Recorder.
EPBElectric Parking Brake.
ESCElectronic Stability Control.
ETDEmergency Tensioning
Device.
FTPFlash To Pass.
HBAHydraulic Brake Assistance.
ICEIncrease Control and
Efficiency.LATCHLower Anchors and Tether
for CHildren.
MILMalfunction Indicator Light.
MTC+Maserati Touch Control Plus.
OBDOn Board Diagnostics.
ORCOccupant Restraint
Controller.
RHDRight-Hand Drive.
SBRSeat Belt Reminder.
TFTThin Film Transistor.
TPMSTire Pressure Monitoring
System.
VINVehicle Identification
Number.
Updating
Constant improvements are being
performed to maintain this vehicle's
high level of quality. Therefore, there
may be differences between this
manual and your vehicle.
Maserati reserves the right to carry
out design and functional changes
and to provide updates or
improvements.
This Owner's Manual illustrates and
describes all versions of the current
vehicle model. Therefore, some of the
equipment and accessories in this
publication may not appear on your
vehicle; please only consider the
information related to your vehicle.
All specifications and illustrations
contained in this manual are as of the
Manual publishing date.
NOTE:
The updated version of the on-board
documentation can be consulted by
accessing the section “SERVICES” on
the websitewww.maserati.comor by
using the specific apps developed for
the more common Tablet and
Smartphone.
Introduction
1
7
Page 34 of 296

transmitter, and some mobile or CB
radios.Doors
WARNING!
•For personal security and safety in
the event of an accident, or robbery
lock the vehicle doors before you
drive as well as when parking and
leaving the vehicle unattended.
•When leaving the vehicle, always
remove the key and lock your
vehicle.
•Do not allow children to be in a
vehicle unattended or with access to
an unlocked vehicle. A child or
others could be seriously or fatally
injured. Children should be warned
not to touch the parking brake
trigger, brake pedal or the shift
lever.
•Do not leave the key in or near the
vehicle, and do not leave ignition
switch in the ACC or MAR (ON)
position. A child could operate
power windows, other controls, or
start the engine and the vehicle.
•Before opening a door, make sure
the maneuver can be performed
safely.
Opening from the Outside
Turn off the security alarm system and
the centralized door locking system by
pressing the
unlock button on the
radio control case (see chapter
“Vehicle Security Alarm” in this
section) or insert and turn the key in
the lock on one of the front doors.
To open the door, press the front
button inside each handle.
The vehicle is equipped with power
locks which move the mechanical parts
when pressing this button.
As these are electric locks, a slight
pressure on the front button will
unlock the doors.
Before Starting
2
30
Page 66 of 296

the distance (maximum/average/
minimum) and the position
(front/rear/central/side) of the obstacle
detected.
The color represents the distance,
while the field represents the position.
The green color represents the
maximum distance detected, the
yellow color the medium distance and
the red color the minimum one. The
rear sensors are not shown in the
image on the instrument cluster
display if only the front sensors are
active.
WARNING!
For the system to operate correctly the
sensors positioned on the bumper
must be kept clean (remove any mud,
dirt, snow or ice).
Sensor Range
The sensors allow the system to
monitor the front and rear of the
vehicle; they are positioned so as to
monitor the central and lateral zones
at the front and at the rear of the
vehicle.
In the event of an obstacle located in a
central area, this will be detected at
distances of less than 35 in (0,9 m) at
the front and 59 in (1,50 m) at the rear,
depending on the type of obstacle and
its dimensions.
If the obstacle is located in a lateral
position, it will be detected at
distances of less than 31 in (0,8 m).
Failure Indicators
The system ECU checks all the
components every time R (Reverse)
gear is engaged.
In the event that the parking sensors
fail, the relative
warning light and
message illuminate on the instrument
cluster display.
In the event of a failure signal, stop
the vehicle and turn the key in the
ignition switch toSTOP (OFF)position.
Then try cleaning the sensors or
moving the vehicle away from any
possible ultrasound sources (e.g.
pneumatic truck brakes or pneumatichammers) and rotate the key to the
MAR (ON)position. So, if the
operating failure cause has been
eliminated, system full operation will
be recovered. If however, the failure
beep continues, contact anAuthorized
Maserati Dealerto have the system
checked.
Cleaning the Park Assist
Sensors
When cleaning the sensors, take
special care not to scratch or damage
them; therefore, do not use dry, rough
or hard cloths.
The sensors must be washed with clean
water, possibly adding car shampoo.
Should you need to repaint the
bumper or in case of paint touch-ups
in the sensor area, please contact
exclusively theAuthorized Maserati
Dealer. Incorrect paint application
could affect the parking sensors
operation.
Park Assist System Usage
Precautions
NOTE:
•Jackhammers, large trucks, and other
vibrations could affect the
performance of Park Assist.
Before Starting
2
62
Page 70 of 296

Vehicle Safety Checks
Seat Belts
• Inspect the belt system periodically,
checking for cuts, frays, and loose
parts. Damaged parts must be
replaced immediately.
• Do not disassemble or modify the
system.
• If the belt has been sharply pulled,
for example as the result of an
accident, the safety belt, together
with the anchoring devices, the
anchoring device mounting screws
and the pretensioner must be
completely replaced. Even if the belt
does not present any exterior signs
of wear or damage, it may have lost
its restraining properties.
Air bag Warning Light
The
warning light should illuminate
and remain lit for a few seconds bulb
checking when the key in the ignition
switch is turned inMAR (ON)position
(see “Supplemental Restraint System
(SRS) — Air bags” chapter in this
section).
•Ifthe
warning light does not
illuminate while starting, contact an
Authorized Maserati Dealer.•Ifthe
warning light stays on,
flickers, or comes on while driving,
have the system checked by an
Authorized Maserati Dealer.
Defroster
Check operation by selecting the
defrost mode and place the fan system
on high speed (see “Air Conditioning
Controls” chapter in section
“Dashboard Instruments and
Controls”).
You should be able to feel the air
directed against the windshield and
front side windows. Contact an
Authorized Maserati Dealerfor service
if your defroster is inoperable.
Floor Mat
Always use floor mats designed to fit
the footwell of your vehicle. Use only
floor mats that leave the pedal area
unobstructed and that are firmly
secured so that they cannot slip out of
position and interfere with the pedals
or impair safe operation of your
vehicle.
NOTE:
TheAuthorized Maserati Dealercan
provide you with any information
about the available Maserati floor
mats included in the “Genuine
Accessories” range.
WARNING!
Pedals that cannot move freely can
cause loss of vehicle control and
increase the risk of serious personal
injury.
•Always make sure that floor mats
are properly attached to the proper
fasteners.
•Never place or install floor mats or
other floor coverings in the vehicle
that cannot be properly secured to
prevent them from moving and
interfering with the pedals.
•Never put floor mats or other floor
coverings on top of already installed
floor mats. Additional floor mats and
other coverings will reduce the size
of the pedal area and interfere with
the pedals.
•Check mounting of mats on a regular
basis. Always properly reinstall and
secure floor mats that have been
removed for cleaning.
•Always make sure that objects
cannot fall into the driver footwell
while the vehicle is moving. Objects
can become trapped under the brake
pedal and accelerator pedal causing
a loss of vehicle control.
Before Starting
2
66
Page 71 of 296

•Mounting posts must be properly
installed, if not equipped from the
factory. Failure to properly follow
floor mat installation or mounting
can cause interference with the
brake pedal and accelerator pedal
operation causing loss of control of
the vehicle.
Tires
• Examine tires for excessive tread
wear and uneven wear patterns.
• Check for stones, nails, glass, or
other objects lodged in the tread or
sidewall.
• Inspect the tread for cuts and cracks.
• Inspect sidewalls for cuts, cracks and
bulges.
• Check the wheel nuts for tightness.
• Check the tires (see “Tire Inflation
Pressure” chapter in section
“Features and Specifications”) for
proper cold inflation pressure.
Lights and Indicator Lights
• Have someone observe the
operation of exterior lights while
you operate the controls (see
“Lights” chapter in section
“Understanding the Vehicle”).
• Check turn signal and high beam
indicator lights on the instrumentcluster (see “Instrument Cluster”
chapter in section “Dashboard
Instruments and Controls”).
Door Latches
• Check for positive closing, latching,
and locking of doors and trunk lid
(see chapter “Doors” and “Open and
Close the Trunk Lid” in this section).
Fluid Leaks
• Check area under vehicle after
overnight parking for recent fluid
leaks (oil, fuel, etc.).
• If gasoline fumes are detected or
fluid leaks are suspected, contact an
Authorized Maserati Dealer.
WARNING!
California Proposition 65
Operating, servicing and maintaining
a passenger vehicle or off-road vehicle
can expose you to chemicals including
such as, engine exhaust, carbon
monoxide, phthalates and lead, that
which are know to the State of
California to cause cancer and birth
defects or other reproductive harm. To
minimize exposure, avoid breathing
exhaust, do not idle the engine except
as necessary, service your vehicle in a
well-ventilated area and wear glovesor wash your hands frequently when
servicing your vehicle. For more
information go to:
www.P65Warnings.ca.gov/passenger-
vehicle
Before Starting
2
67
Page 111 of 296

Cargo Area
WARNING!
To help protect against personal
injury, passengers must not be seated
in the rear cargo area. The rear cargo
space is intended for load carrying
purposes only, not for passengers,
who should sit in seats and use seat
belts.
Vehicle Load Carrying Capacity
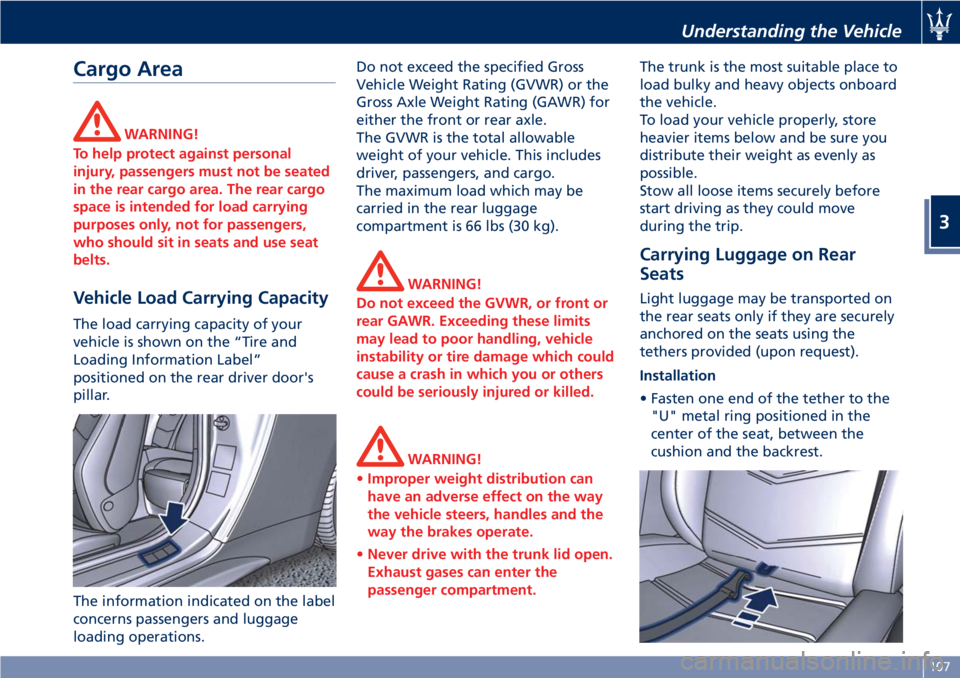
The load carrying capacity of your
vehicle is shown on the “Tire and
Loading Information Label”
positioned on the rear driver door's
pillar.
The information indicated on the label
concerns passengers and luggage
loading operations.Do not exceed the specified Gross
Vehicle Weight Rating (GVWR) or the
Gross Axle Weight Rating (GAWR) for
either the front or rear axle.
The GVWR is the total allowable
weight of your vehicle. This includes
driver, passengers, and cargo.
The maximum load which may be
carried in the rear luggage
compartment is 66 lbs (30 kg).
WARNING!
Do not exceed the GVWR, or front or
rear GAWR. Exceeding these limits
may lead to poor handling, vehicle
instability or tire damage which could
cause a crash in which you or others
could be seriously injured or killed.
WARNING!
•Improper weight distribution can
have an adverse effect on the way
the vehicle steers, handles and the
way the brakes operate.
•Never drive with the trunk lid open.
Exhaust gases can enter the
passenger compartment.
The trunk is the most suitable place to
load bulky and heavy objects onboard
the vehicle.
To load your vehicle properly, store
heavier items below and be sure you
distribute their weight as evenly as
possible.
Stow all loose items securely before
start driving as they could move
during the trip.
Carrying Luggage on Rear
Seats
Light luggage may be transported on
the rear seats only if they are securely
anchored on the seats using the
tethers provided (upon request).
Installation
• Fasten one end of the tether to the
"U" metal ring positioned in the
center of the seat, between the
cushion and the backrest.
Understanding the Vehicle
3
107
Page 118 of 296

Sport Skyhook Suspension
(for versions/markets,
where provided)
The electronic system controlling the
vehicle suspension uses the
sophisticated on board sensors and is
aimed at optimizing vehicle
performance.
The system is capable of constantly
monitoring suspension damping by
means of the actuator fitted on each
shock absorber (Skyhook type). This
way, the shock absorber setting is
suited to the road surface conditions
and vehicle dynamics, thus improving
passenger comfort and road-holding.
By pressing button “SPORT” on the
central console the driver can choose,
even while driving, a normal or
dynamic-type setting for the
suspension, depending on their own
driving style.This way, the system operates with a
shock absorber “softer” setting in
NORMAL drive mode, and a “harder”
setting if SPORT drive mode is selected
(see “Drive Mode” in section
“Driving”).
The strategy used by the system
controlling suspension damping is
aimed at reducing the vertical
oscillations of the vehicle (rolling and
pitching) to a minimum.
The activation of SPORT drive mode
sets the suspension for sports-style
driving and acts on the ASR and
gearbox systems as well, modifying
their setting for dynamic-style driving.
System Components
The system is controlled by an ECU
which manages the solenoid valves on
each shock absorber in response to the
sensor signals, thus adjusting
suspension damping and setting.The sensors which enable the ECU to
calculate the vehicle speed, vertical
and side acceleration, as well as the
instantaneous braking system pressure,
thereby controlling suspension
damping, are the following:
• front left-hand vertical acceleration
sensor;
• front right-hand vertical acceleration
sensor;
• rear vertical acceleration sensor;
• front left-hand wheel acceleration
sensor;
• front right-hand wheel acceleration
sensor;
• lateral acceleration sensor;
• driving speed sensor;
• brake pedal switch.
Self-diagnostics
Whenever the engine is started, the
system performs a self-diagnostic cycle.
If a malfunction is found, the
amber
warning light is displayed
accompanied by the message “Check
suspensions” (see paragraph
"Malfunction Indicators" in this
chapter).
Understanding the Vehicle
3
114
Page 125 of 296

Left Turn Signal Indicator Light
The indicator lights up when
the left turn signals or the
hazard flashers are turned on.
The indicator light will flash at
the same frequency of the turn signals
and is controlled by the left
multifunction lever.
If the vehicle electronics sense that the
vehicle drives for more than 1 mile
(1.6 km) with either turn signal on, a
continuous sound will alert the driver
to turn the signal off.
If the indicator flashes at a rapid rate,
check for a defective exterior light
bulb.
Rear Fog Light Indicator
This indicator lights up when
the rear fog lights are
switched on.
Tire Pressure Monitoring Light (*)
This indicator light is
connected to the Tire Pressure
Monitoring System (TPMS).
Under normal conditions, the
warning light should illuminate when
the key in the ignition switch is in
MAR (ON)position and should go off
as soon as the engine is started.
If the warning light remains lit or
illuminates while driving, the pressureof one or more tires is too low: the
related message will be displayed.
If the warning light flashes prior to
remain on, it indicates that the system
is temporarily unavailable.
This warning light illuminates even
when you calibrate the TPMS and
remains lit until the system is
calibrated.
Please refer to “Tire Pressure
Monitoring System (TPMS)” in section
“Driving” for further information.
Telltales on Tachometer
Following telltales are displayed on
the tachometer and related messages
are visible for 10 seconds on the
central sector of the display, unless
otherwise indicated (see “TFT Display”
in this chapter).Anti-Lock Brake Light (*)
This light, and its related
message, indicate possible
malfunctions of the Anti-Lock
Brake System (ABS).
The light will turn on when the key in
the ignition switch is inMAR (ON)
position and may stay on for 4
seconds. If the ABS light remains lit or
turns on while driving, the Anti-Lock
portion of the brake system is not
functioning and requires service.
However, the conventional brake
system will continue to operate
normally if the
indicator light is
switched off. If the ABS light turns on
while driving, or if it does not switch
on when the key in the ignition switch
is inMAR (ON)position, please visit as
soon as possible anAuthorized
Maserati Dealerin order to restore the
Anti-Lock brakes functions.
Seat Belt Reminder Light (*)
When the key in the ignition
switch is inMAR (ON)
position, the seat belt
reminder light will light up for
a few seconds as a bulb check.
During the bulb check, you will hear
an acoustic signal if one or both front
seat belts are unbuckled.
Dashboard Instruments and Controls
4
121