2020 LEXUS RX350 tow
[x] Cancel search: towPage 169 of 516
1694-1. Before driving
4
Driving
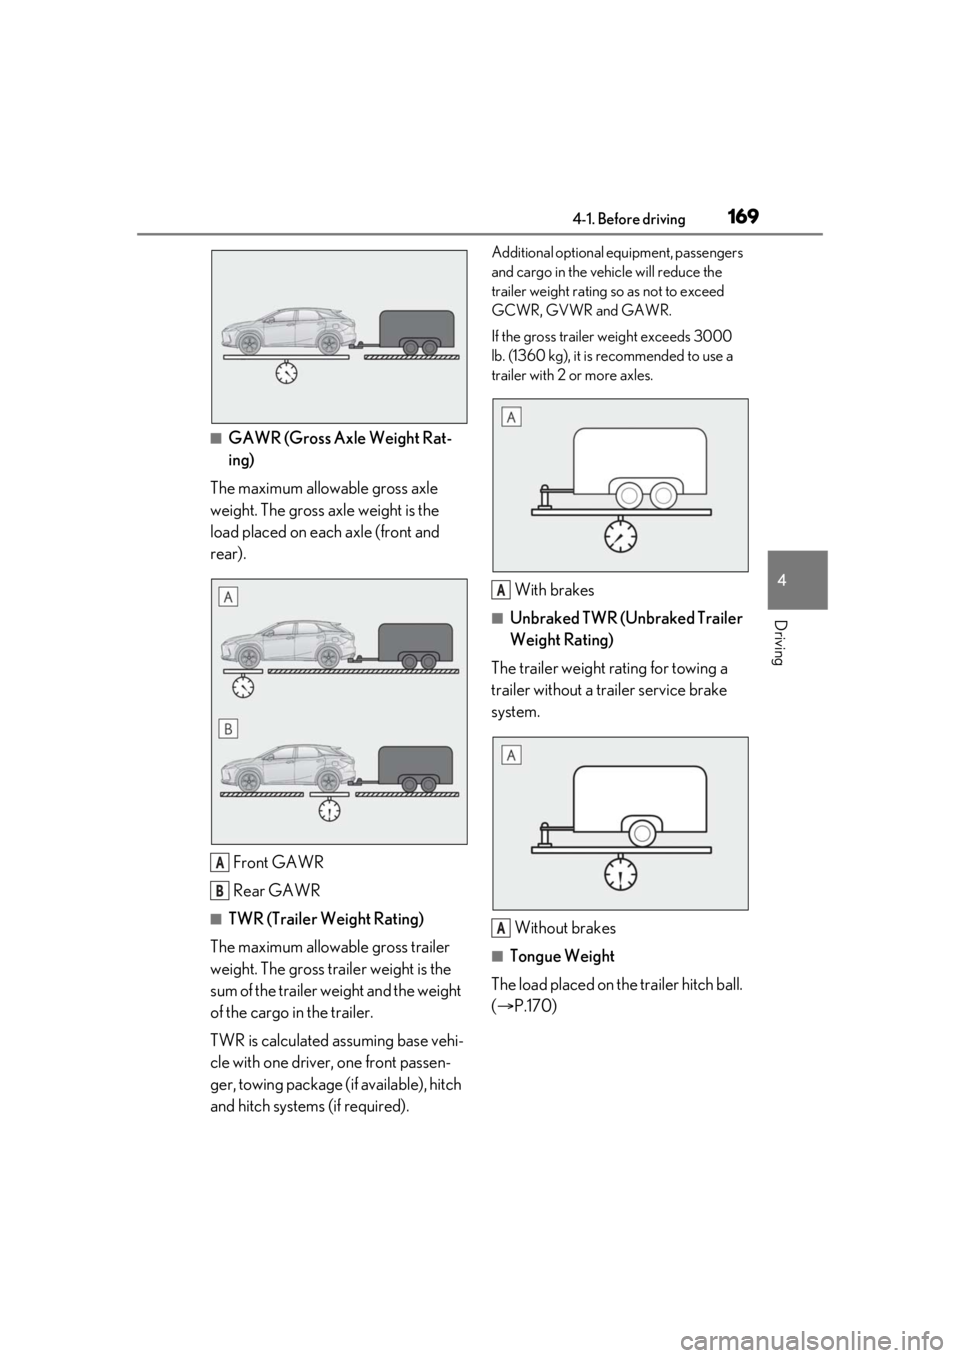
■GAWR (Gross Axle Weight Rat-
ing)
The maximum allowable gross axle
weight. The gross axle weight is the
load placed on each axle (front and
rear).
Front GAWR
Rear GAWR
■TWR (Trailer Weight Rating)
The maximum allowable gross trailer
weight. The gross trailer weight is the
sum of the trailer weight and the weight
of the cargo in the trailer.
TWR is calculated assuming base vehi-
cle with one driver, one front passen-
ger, towing package (if available), hitch
and hitch systems (if required).
Additional optional equipment, passengers
and cargo in the vehicle will reduce the
trailer weight rating so as not to exceed
GCWR, GVWR and GAWR.
If the gross trailer weight exceeds 3000
lb. (1360 kg), it is recommended to use a
trailer with 2 or more axles.
With brakes
■Unbraked TWR (Unbraked Trailer
Weight Rating)
The trailer weight rating for towing a
trailer without a trailer service brake
system.
Without brakes
■Tongue Weight
The load placed on the trailer hitch ball.
( P.170)
A
B
A
A
Page 170 of 516

1704-1. Before driving
The gross trailer weight must never
exceed 3500 lb. (1585 kg).
The gross combinat ion weight must
never exceed the following:
RX350
2WD models: 9165 lb. (4157 kg)
AWD models: 9360 lb. (4246 kg)
RX350L
2WD models: 9205 lb. (4175 kg)
AWD models: 9360 lb. (4246 kg)
The gross vehicle weight must never
exceed the GVWR indicated on the
Certification Label. ( P.452)
The gross axle weight on each axle
must never exceed the GAWR indi-
cated on the Certification Label.
( P.452)
If the gross trailer weight is over the
unbraked TWR, trailer service
brakes are required.
If the gross trailer weight is over
2000 lb. (907 kg), a sway control
device with sufficient capacity is
required. Confirm that the gross trailer weight,
gross combination we
ight, gross vehi-
cle weight, gross axle weight and
tongue weight are all within the limits.
■GCWR*
RX350
2WD models: 9165 lb. (4157 kg)
AWD models: 9360 lb. (4246 kg)
RX350L
2WD models: 9400 lb. (4263 kg)
AWD models: 9485 lb. (4302 kg)
■TWR*
3500 lb. (1585 kg)
■Unbraked TWR*
1000 lb. (453 kg)
*: This models meet the tow-vehicle traile- ring requirement of SAE International
per SAE J2807.
A recommended tongue weight
varies in accordance with the types
of trailers or towing as described
below.
To ensure the recommended values
shown below, the trailer must be
loaded by referring to the following
instructions.
•Tongue Weight
The gross trailer weight should be distrib-
uted so that the tongue weight is 9% to
11%.
Weight limits
GCWR, TWR and Unbraked
TWR
Trailer Tongue Weight
Page 171 of 516
1714-1. Before driving
4
Driving
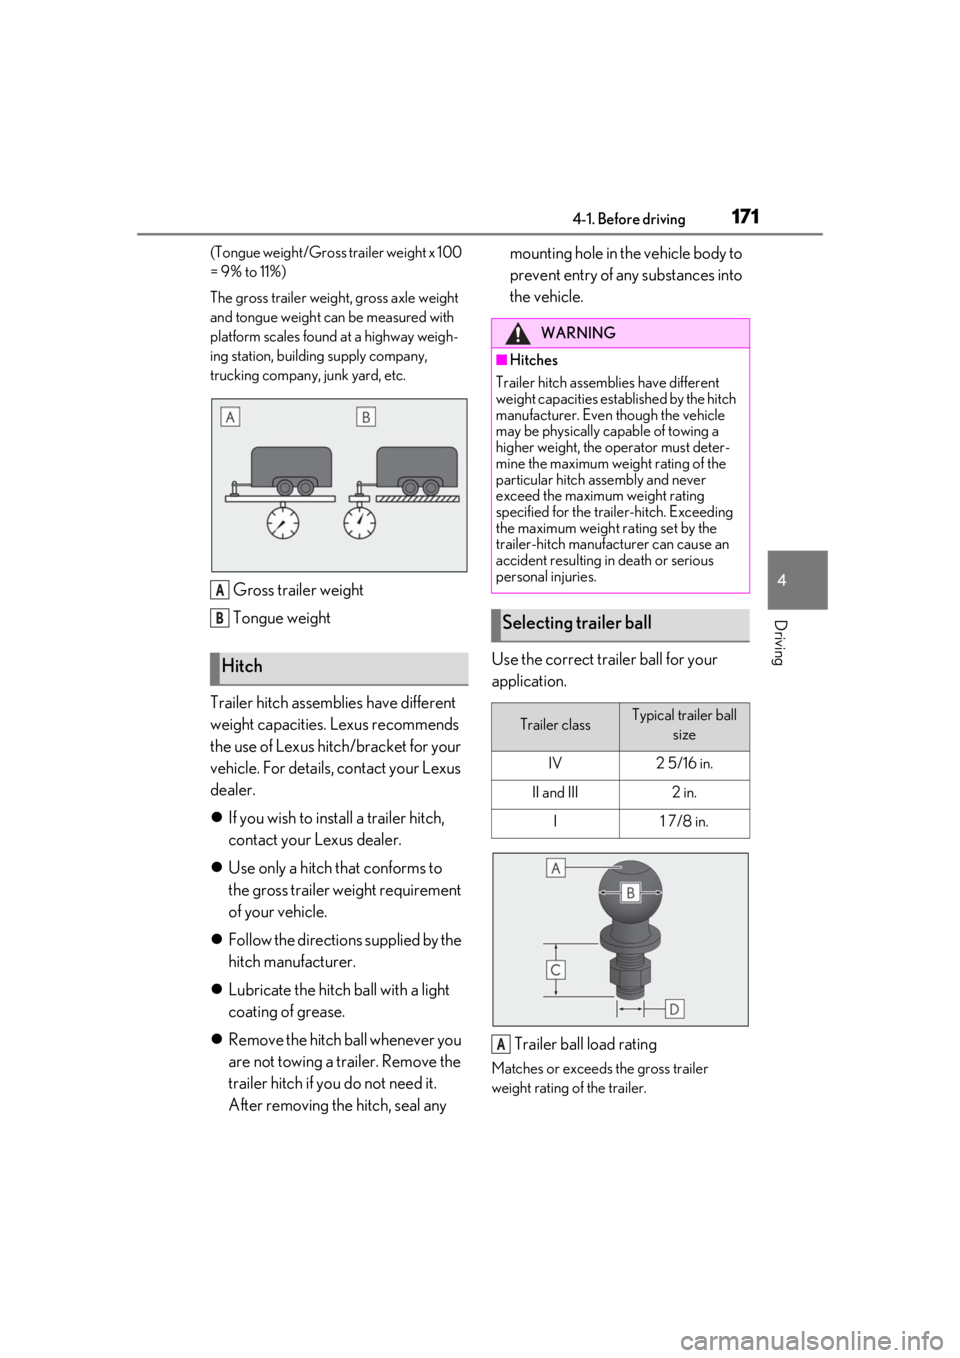
(Tongue weight/Gross trailer weight x 100
= 9% to 11%)
The gross trailer weight, gross axle weight
and tongue weight can be measured with
platform scales found at a highway weigh-
ing station, building supply company,
trucking company, junk yard, etc.
Gross trailer weight
Tongue weight
Trailer hitch assemblies have different
weight capacities. Lexus recommends
the use of Lexus hitch/bracket for your
vehicle. For details, contact your Lexus
dealer.
If you wish to install a trailer hitch,
contact your Lexus dealer.
Use only a hitch that conforms to
the gross trailer weight requirement
of your vehicle.
Follow the directions supplied by the
hitch manufacturer.
Lubricate the hitch ball with a light
coating of grease.
Remove the hitch ball whenever you
are not towing a trailer. Remove the
trailer hitch if you do not need it.
After removing the hitch, seal any mounting hole in the vehicle body to
prevent entry of any substances into
the vehicle.
Use the correct trailer ball for your
application.
Trailer ball load rating
Matches or exceeds the gross trailer
weight rating of the trailer.
Hitch
A
B
WARNING
■Hitches
Trailer hitch assemblies have different
weight capacities established by the hitch
manufacturer. Even though the vehicle
may be physically capable of towing a
higher weight, the operator must deter-
mine the maximum weight rating of the
particular hitch assembly and never
exceed the maximum weight rating
specified for the trailer-hitch. Exceeding
the maximum weight rating set by the
trailer-hitch manufacturer can cause an
accident resulting in death or serious
personal injuries.
Selecting trailer ball
Trailer classTypical trailer ball size
IV2 5/16 in.
II and III2 in.
I1 7/8 in.
A
Page 172 of 516
1724-1. Before driving
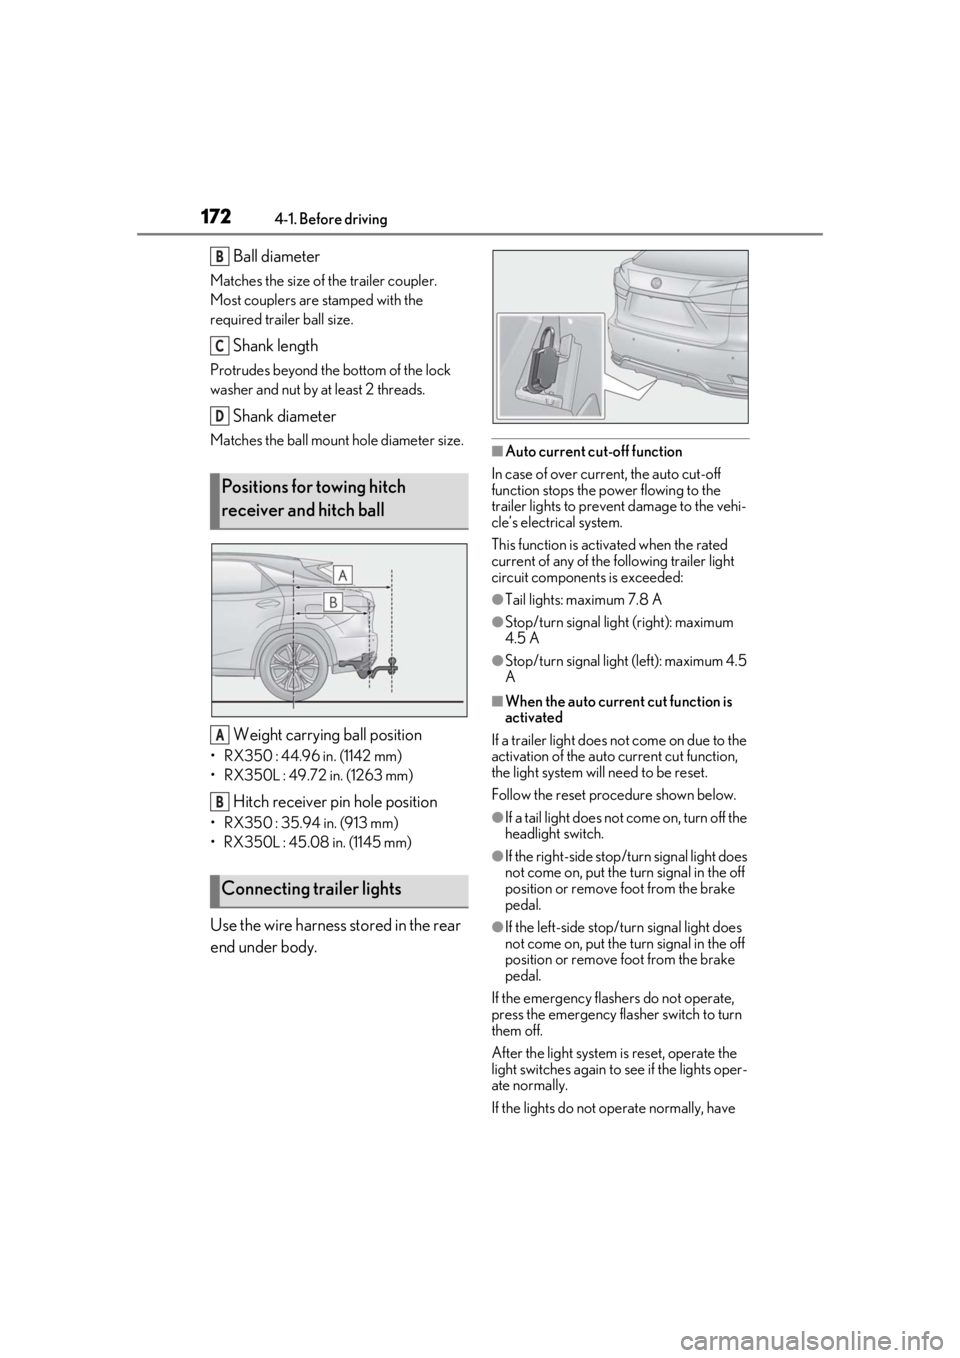
Ball diameter
Matches the size of the trailer coupler.
Most couplers are stamped with the
required trailer ball size.
Shank length
Protrudes beyond the bottom of the lock
washer and nut by at least 2 threads.
Shank diameter
Matches the ball mount hole diameter size.
Weight carrying ball position
• RX350 : 44.96 in. (1142 mm)
• RX350L : 49.72 in. (1263 mm)
Hitch receiver pin hole position
• RX350 : 35.94 in. (913 mm)
• RX350L : 45.08 in. (1145 mm)
Use the wire harness stored in the rear
end under body.
■Auto current cut-off function
In case of over current, the auto cut-off
function stops the power flowing to the
trailer lights to prevent damage to the vehi-
cle’s electrical system.
This function is activ ated when the rated
current of any of the following trailer light
circuit components is exceeded:
●Tail lights: maximum 7.8 A
●Stop/turn signal light (right): maximum
4.5 A
●Stop/turn signal light (left): maximum 4.5
A
■When the auto current cut function is
activated
If a trailer light does not come on due to the
activation of the auto current cut function,
the light system will need to be reset.
Follow the reset procedure shown below.
●If a tail light does not come on, turn off the
headlight switch.
●If the right-side stop/turn signal light does
not come on, put the turn signal in the off
position or remove foot from the brake
pedal.
●If the left-side stop/t urn signal light does
not come on, put the turn signal in the off
position or remove foot from the brake
pedal.
If the emergency flashers do not operate,
press the emergency flasher switch to turn
them off.
After the light system is reset, operate the
light switches again to see if the lights oper-
ate normally.
If the lights do not operate normally, have
Positions for towing hitch
receiver and hitch ball
Connecting trailer lights
B
C
D
A
B
Page 173 of 516

1734-1. Before driving
4
Driving
the vehicle inspected by your Lexus dealer.
Your vehicle will handle differently
when towing a trailer. Help to avoid an
accident, death or serious injury, keep
the following in mind when towing:
Speed limits for towing a trailer vary
by state or province. Do not exceed
the posted towing speed limit.
Lexus recommends that the vehi-
cle-trailer speed limit is 65 mph
(104 km/h) on a flat, straight, dry
road. Do not exceed this limit, the
posted towing speed limit or the
speed limit for your trailer as set
forth in your trailer owner’s manual,
whichever is lowest. Instability of the
towing vehicle-trailer combination
(trailer sway) increases as speed
increases. Exceed ing speed limits
may cause loss of control.
Before starting out, check the trailer
lights, tires and the vehicle-trailer
connections. Recheck after driving
a short distance.
Practice turning, stopping and
reversing with the trailer attached in
an area away from traffic until you
become accustomed to the feel of
the vehicle-trailer combination.
Reversing with a tr ailer attached is
difficult and requires practice. Grip
the bottom of the steering wheel
and move your hand to the left to
move the trailer to the left. Move
your hand to the right to move the
trailer to right. (This is generally opposite to reversing without a
trailer attached.) Avoid sharp or
prolonged turning. Have someone
guide you when reversing to reduce
the risk of an accident.
As stopping distance is increased
when towing a trailer, vehicle-to
vehicle distance should be
increased. For each 10 mph (16
km/h) of speed, allow at least one
vehicle and trailer length.
Avoid sudden braking as you may
skid, resulting in the trailer jackknif-
ing and a loss of vehicle control. This
is especially true on wet or slippery
surfaces.
Avoid jerky starts or sudden accel-
eration.
Avoid jerky steering and sharp
turns, and slow down before making
turn.
Note that when making a turn, the
trailer wheels will be closer than the
vehicle wheels to the inside of the
turn. Compensate by making a
wider than normal turning radius.
Slow down before making a turn, in
cross winds, on wet or slippery sur-
faces, etc. Increasing vehicle speed
can destabilize the trailer.
Take care when passing other vehi-
cles. Passing requires considerable
distance. After pass ing a vehicle, do
not forget the length of your trailer,
and be sure you have plenty of room
before changing lanes.
To maintain engine braking effi-
ciency and charging system perfor-
Trailer towing tips
Page 175 of 516
1754-1. Before driving
4
Driving
Dinghy towing
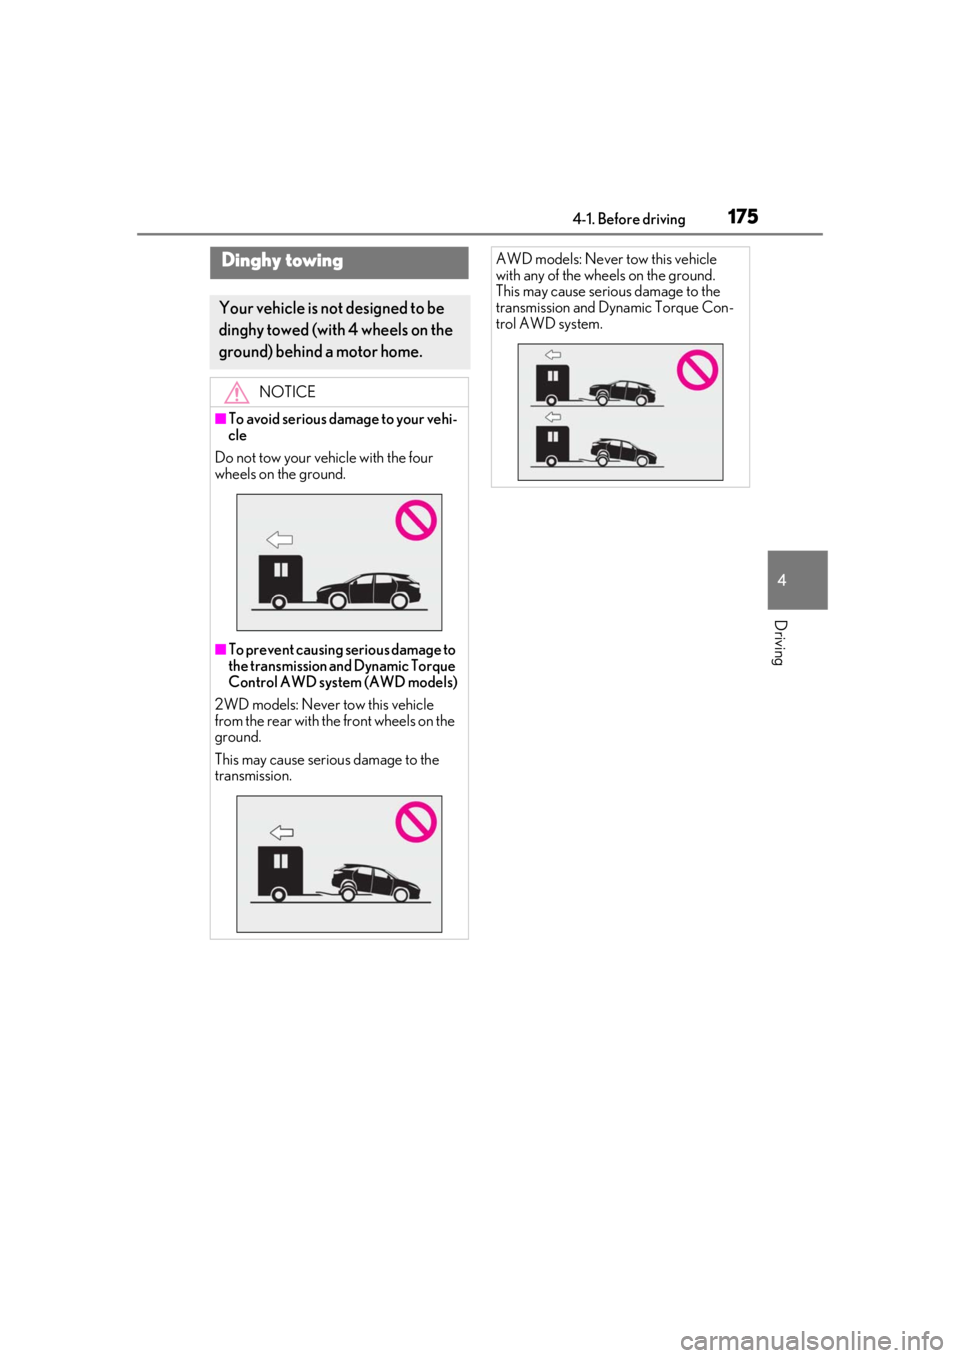
Your vehicle is not designed to be
dinghy towed (with 4 wheels on the
ground) behind a motor home.
NOTICE
■To avoid serious damage to your vehi-
cle
Do not tow your vehicle with the four
wheels on the ground.
■To prevent causing serious damage to
the transmission and Dynamic Torque
Control AWD system (AWD models)
2WD models: Never tow this vehicle
from the rear with the front wheels on the
ground.
This may cause serious damage to the
transmission.
AWD models: Never tow this vehicle
with any of the wheels on the ground.
This may cause serious damage to the
transmission and Dynamic Torque Con-
trol AWD system.
Page 192 of 516
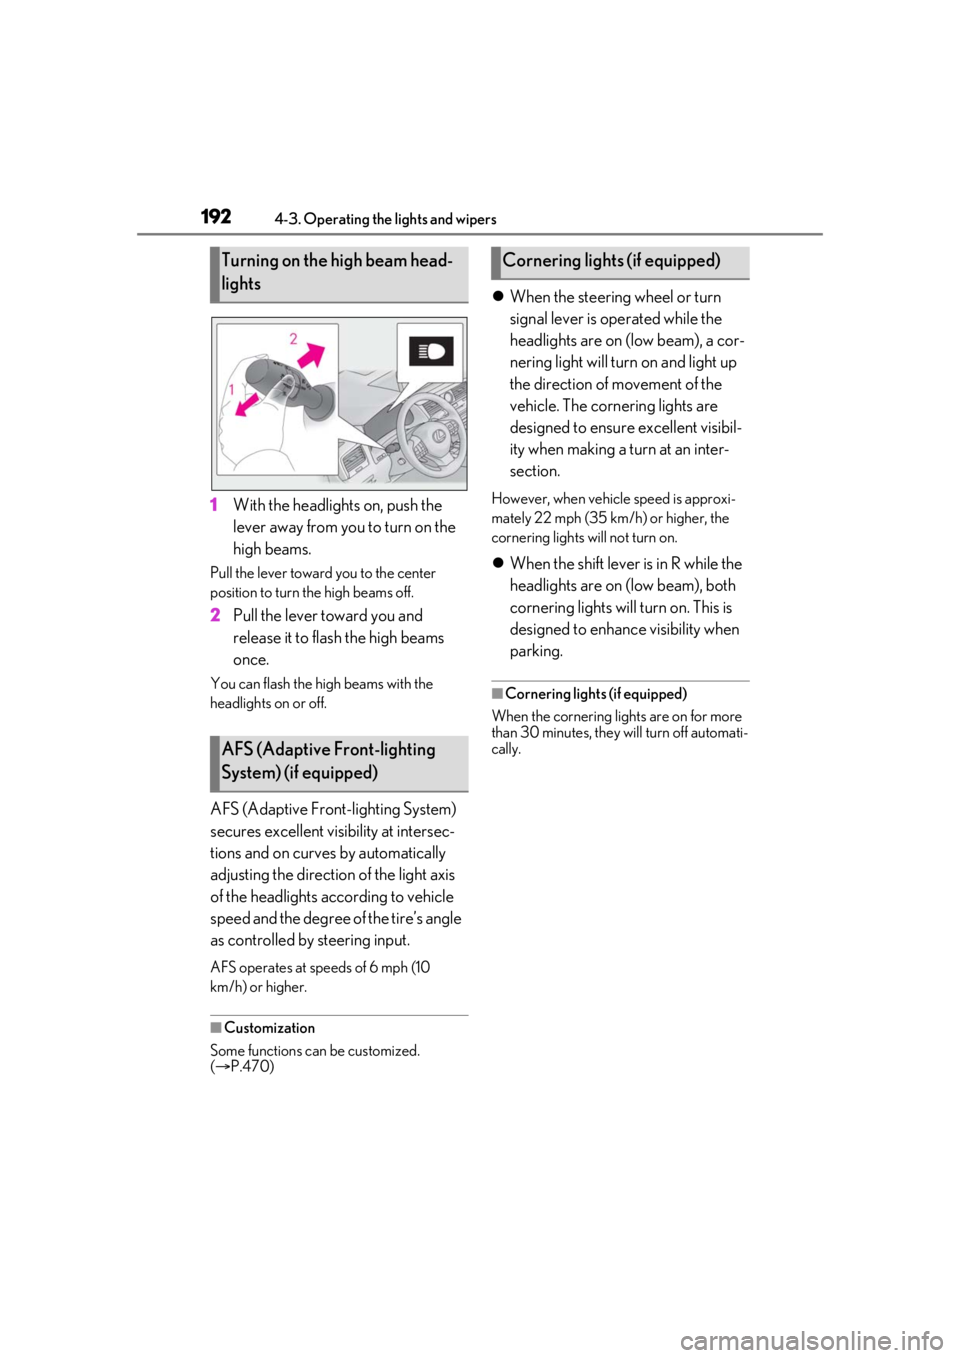
1924-3. Operating the lights and wipers
1With the headlights on, push the
lever away from you to turn on the
high beams.
Pull the lever toward you to the center
position to turn the high beams off.
2Pull the lever toward you and
release it to flash the high beams
once.
You can flash the high beams with the
headlights on or off.
AFS (Adaptive Front-lighting System)
secures excellent visibility at intersec-
tions and on curves by automatically
adjusting the direction of the light axis
of the headlights according to vehicle
speed and the degree of the tire’s angle
as controlled by steering input.
AFS operates at sp eeds of 6 mph (10
km/h) or higher.
■Customization
Some functions can be customized.
( P.470)
When the steering wheel or turn
signal lever is operated while the
headlights are on (low beam), a cor-
nering light will turn on and light up
the direction of movement of the
vehicle. The cornering lights are
designed to ensure excellent visibil-
ity when making a turn at an inter-
section.
However, when vehicle speed is approxi-
mately 22 mph (35 km/h) or higher, the
cornering lights will not turn on.
When the shift lever is in R while the
headlights are on (low beam), both
cornering lights will turn on. This is
designed to enhance visibility when
parking.
■Cornering lights (if equipped)
When the cornering lights are on for more
than 30 minutes, they will turn off automati-
cally.
Turning on the high beam head-
lights
AFS (Adaptive Front-lighting
System) (if equipped)
Cornering lights (if equipped)
Page 194 of 516

1944-3. Operating the lights and wipers
out its headlights turned on is detected.
●House lights, street lights, traffic signals,
and illuminated billboards or signs and
other reflective objects may cause the
high beams to change to the low beams,
or the low beams to remain on.
●The following factors may affect the
amount of time taken for the high beams
to turn on or off:
• The brightness of the headlights, fog
lights, and tail lights of vehicles ahead
• The movement and direction of vehicles ahead
• When a vehicle ahead only has opera- tional lights on one side
• When a vehicle ahead is a two-wheeled
vehicle
• The condition of the road (gradient, curve, condition of th e road surface, etc.)
• The number of passengers and amount of luggage in the vehicle
●The high beams may turn on or off unex-
pectedly.
●Bicycles or similar vehicles may not be
detected.
●In the following situations the system may
not be able to correctly detect the sur-
rounding brightness le vel. This may cause
the low beams to remain on or the high
beams to flash or dazzle pedestrians or
vehicles ahead. In such a case, it is neces-
sary to manually switch between the high
and low beams.
• When driving in inclement weather
(heavy rain, snow, fog, sandstorms, etc.)
• When the windshield is obscured by fog, mist, ice, dirt, etc.
• When the windshield is cracked or dam- aged
• When the camera sensor is deformed or
dirty
• When the temperature of the camera sensor is extremely high
• When the surrounding brightness level is equal to that of head lights, tail lights or
fog lights
• When headlights or tail lights of vehicles
ahead are turned off, dirty, changing
color, or not aimed properly
• When the vehicle is hit by water, snow,
dust, etc. from a preceding vehicle
• When driving through an area of inter-mittently changing brightness and dark-
ness
• When frequently and repeatedly driving
ascending/descending roads, or roads
with rough, bumpy or uneven surfaces
(such as stone-paved roads, gravel roads,
etc.)
• When frequently and repeatedly taking curves or driving on a winding road
• When there is a highly reflective object ahead of the vehicle, such as a sign or
mirror
• When the back of a preceding vehicle is highly reflective, such as a container on a
truck
• When the vehicle’s headlights are dam- aged or dirty, or are not aimed properly
• When the vehicle is listing or titling due to
a flat tire, a trailer being towed, etc.
• When the headlights are changed between the high beams and low beams
repeatedly in an abnormal manner
• When the driver believes that the high beams may be flashing or dazzling
pedestrians or other drivers
■Temporarily lowering sensor sensitivity
The sensitivity of the sensor can be tempo-
rarily lowered.
1 Turn the engine switch off while the fol-
lowing conditions are met.
●The headlight switch is in or .
●The headlight switch lever is in high beam
position.
●Automatic High Beam switch is on.
2 Turn the engine switch to IGNITION
ON mode.
3 Within 60 seconds after step 2 , repeat
pulling the headlight switch lever to the
original position then pushing it to the
high beam position quickly 10 times,
then leave the lever in high beam posi-
tion.
4 If the sensitivity is changed, the Auto-
matic High Beam indicator is turn on
and off 3 times.
Automatic High Beam (headlights) may
turn on even when the vehicle is stopped.