2020 LEXUS RX350 tow
[x] Cancel search: towPage 107 of 516

1073-2. Opening, closing and locking the doors
3
Before driving
If the rear bumper has been touched for a
while, wait for a short time before
attempting to operate the Hands Free
Power Back Door again.
●When standing excessively close to the
rear bumper
●When an external radio wave source
interferes with the communication
between the electronic key and the vehi-
cle ( P.114)
●When the vehicle is parked near metal, or
an external radio wave or electrical noise
source which affects the sensitivity of the
Hands Free Power Back Door, such as a
pay parking spot, gas station, electrically
heated road, fluorescent light, or metal
plate
●When the vehicle is near a TV tower,
electric power plant, radio station, large
display, airport or other facility that gen-
erates strong radio waves or electrical
noise
●When a large amount of water is applied
to the rear bumper, such as when the
vehicle is being washed or in heavy rain
●When mud, snow, ice, etc. is attached to
the rear bumper
●When the vehicle has been parked for a
while near objects that may move and
contact the rear bumper, such as plants
●When an accessory is installed to the rear
bumper
If an accessory has been installed, turn the
Hands Free Power Back Door (kick sen-
sor) operation setting off.
●RX350L: When a tire other than the
spare tire is stored in the spare tire stor-
age area
■Preventing unintentional operation of
the Hands Free Power Back Door (if
equipped)
When an electronic ke y is in the operation
detection area, the Ha nds Free Power Back
Door may operate unintentionally, so be
careful in the following situations:
●When a large amount of water is applied
to the rear bumper, such as when the
vehicle is being washed or in heavy rain
●When dirt is wiped off the rear bumper
●When a small animal or small object, such
as a ball, moves under the rear bumper
●When an object is moved from under the
rear bumper
●If someone is swinging their legs while sit-
ting on the rear bumper
●If the legs or another part of someone’s
body contacts the rear bumper while
passing by the vehicle
●When the vehicle is parked near an elec-
trical noise source which affects the sen-
sitivity of the Hands Free Power Back
Door, such as a pay parking spot, gas sta-
tion, electrically heated road, or fluores-
cent light
●When the vehicle is near a TV tower,
electric power plant, radio station, large
display, airport or ot her facility that gen-
erates strong radio waves or electrical
noise
●When the vehicle is parked in a place
where objects such as plants are near the
rear bumper
●If luggage, etc. is set near the rear
bumper
●If accessories or a vehicle cover is
installed/removed ne ar the rear bumper
●When the vehicle is being towed
To prevent unintentiona l operation, turn the
Hands Free Power Back Door (kick sensor)
operation setting off.
■When reconnecting the battery
To enable the power back door to operate
properly, close the power back door manu-
ally.
■Jam protection function
Sensors are installed in the right and left
sides of the power back door. When the
door is automatically closing and the sen-
sors are pushed due to an object being
caught, etc., the jam protection function will
operate.
From that position the door will automati-
cally move a little in the opposite direction
and then the function will stop.
Page 114 of 516

1143-2. Opening, closing and locking the doors
■If “Key Left inside Vehicle” is shown on
the multi-information display
An attempt was made to lock the doors
using the smart access system with
push-button start while the electronic key
was still inside the vehicle. Retrieve the elec-
tronic key from the vehicle and lock the
doors again.
■Battery-saving function
The battery-saving fu nction will be acti-
vated in order to prevent the electronic key
battery and the battery from being dis-
charged while the vehicl e is not in operation
for a long time.
●In the following situations, the smart
access system with pu sh-button start may
take some time to unlock the doors.
• The electronic key has been left in an
area of approximately 6 ft. (2 m) of the
outside of the vehicle for 10 minutes or
longer.
• The smart access system with push-but- ton start has not been used for 5 days or
longer.
●If the smart access system with push-but-
ton start has not been used for 14 days or
longer, the doors cannot be unlocked at
any doors except the driver’s door. In this
case, take hold of the driver’s door han-
dle, or use the wireless remote control or
the mechanical key, to unlock the doors.
■Turning an electronic key to bat-
tery-saving mode
When battery-saving mode is set, battery
depletion is minimized by stopping the elec-
tronic key from re ceiving radio waves. Press twice while pressing and holding
. Confirm that the electronic key indica-
tor flashes 4 times.
While the battery-saving mode is set, the
smart access system with push-button start
cannot be used. To cancel the function,
press any of the electronic key buttons.
■Conditions affecting operation
The smart access system with push-button
start, wireless remote control and engine
immobilizer system use weak radio waves.
In the following situations, the communica-
tion between the electronic key and the
vehicle may be affected, preventing the
smart access system with push-button start,
wireless remote control and engine immo-
bilizer system from operating properly.
(Ways of coping: P.441)
●When the electronic key battery is
depleted
●Near a TV tower, electric power plant,
gas station, radio stat ion, large display,
airport or other fac ility that generates
strong radio waves or electrical noise
●When the electronic key is in contact
with, or is covered by the following metal-
lic objects
• Cards to which aluminum foil is attached
• Cigarette boxes that have aluminum foil inside
• Metallic wallets or bags
•Coins
• Hand warmers made of metal
• Media such as CDs and DVDs
●When other wireless keys (that emit radio
waves) are being used nearby
●When carrying the electronic key
together with the following devices that
emit radio waves
• Portable radio, cellular phone, cordless
phone or other wireless communication
SituationCorrection
procedure
The engine switch was
turned to ACCESSORY
mode while the driver’s
door was open (The
driver’s door was opened
when the engine switch
was in ACCESSORY
mode).
Turn the engine
switch off and
close the
driver’s door.
Page 124 of 516
1243-3. Adjusting the seats
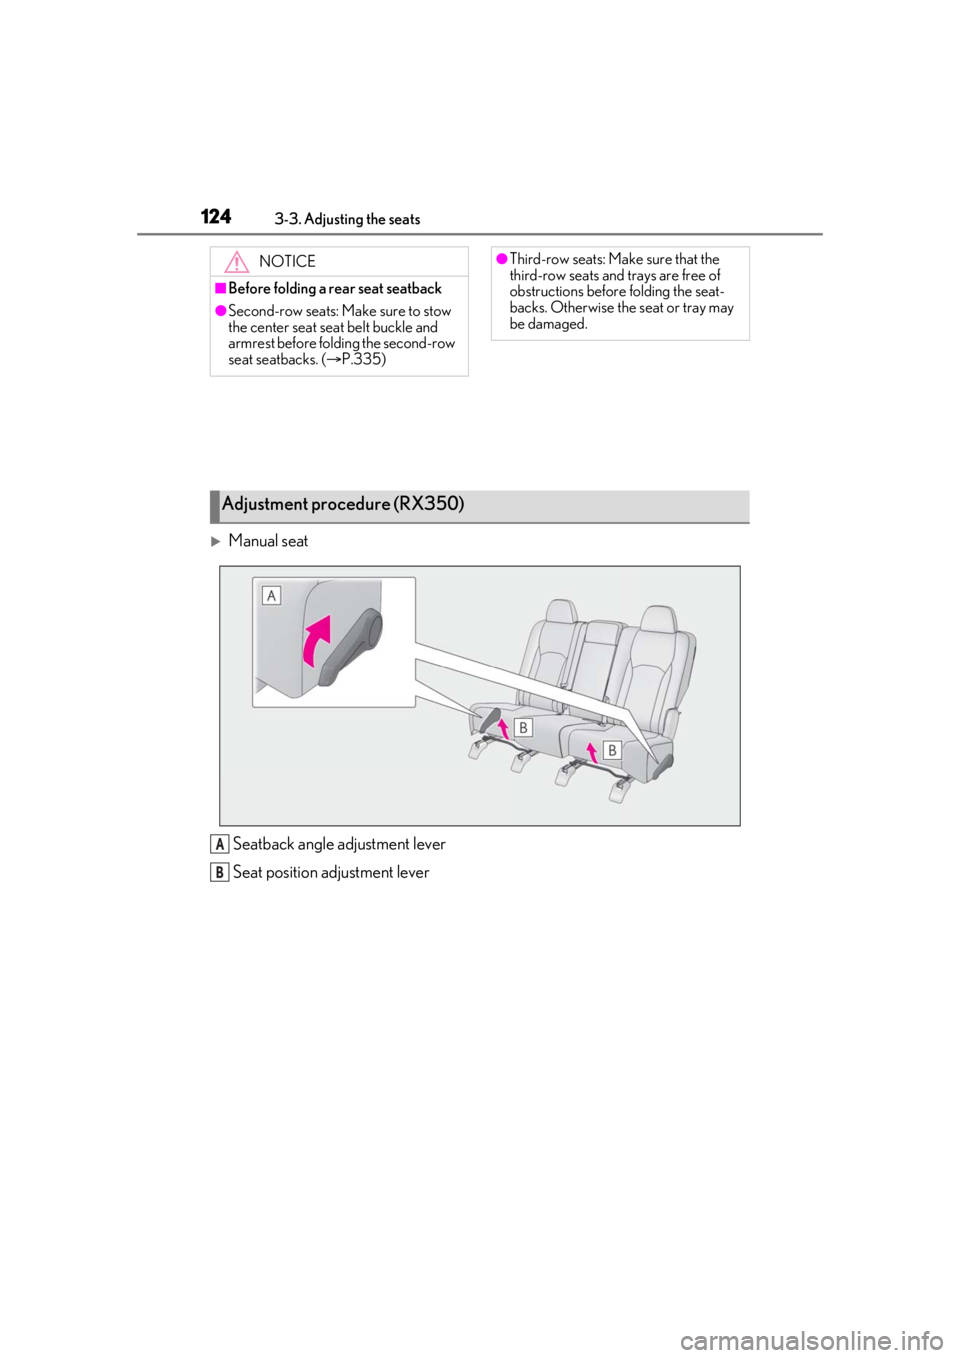
Manual seatSeatback angle adjustment lever
Seat position adjustment lever
NOTICE
■Before folding a rear seat seatback
●Second-row seats: Make sure to stow
the center seat seat belt buckle and
armrest before folding the second-row
seat seatbacks. ( P.335)
●Third-row seats: Ma ke sure that the
third-row seats and trays are free of
obstructions before folding the seat-
backs. Otherwise the seat or tray may
be damaged.
Adjustment procedure (RX350)
A
B
Page 127 of 516
1273-3. Adjusting the seats
3
Before driving
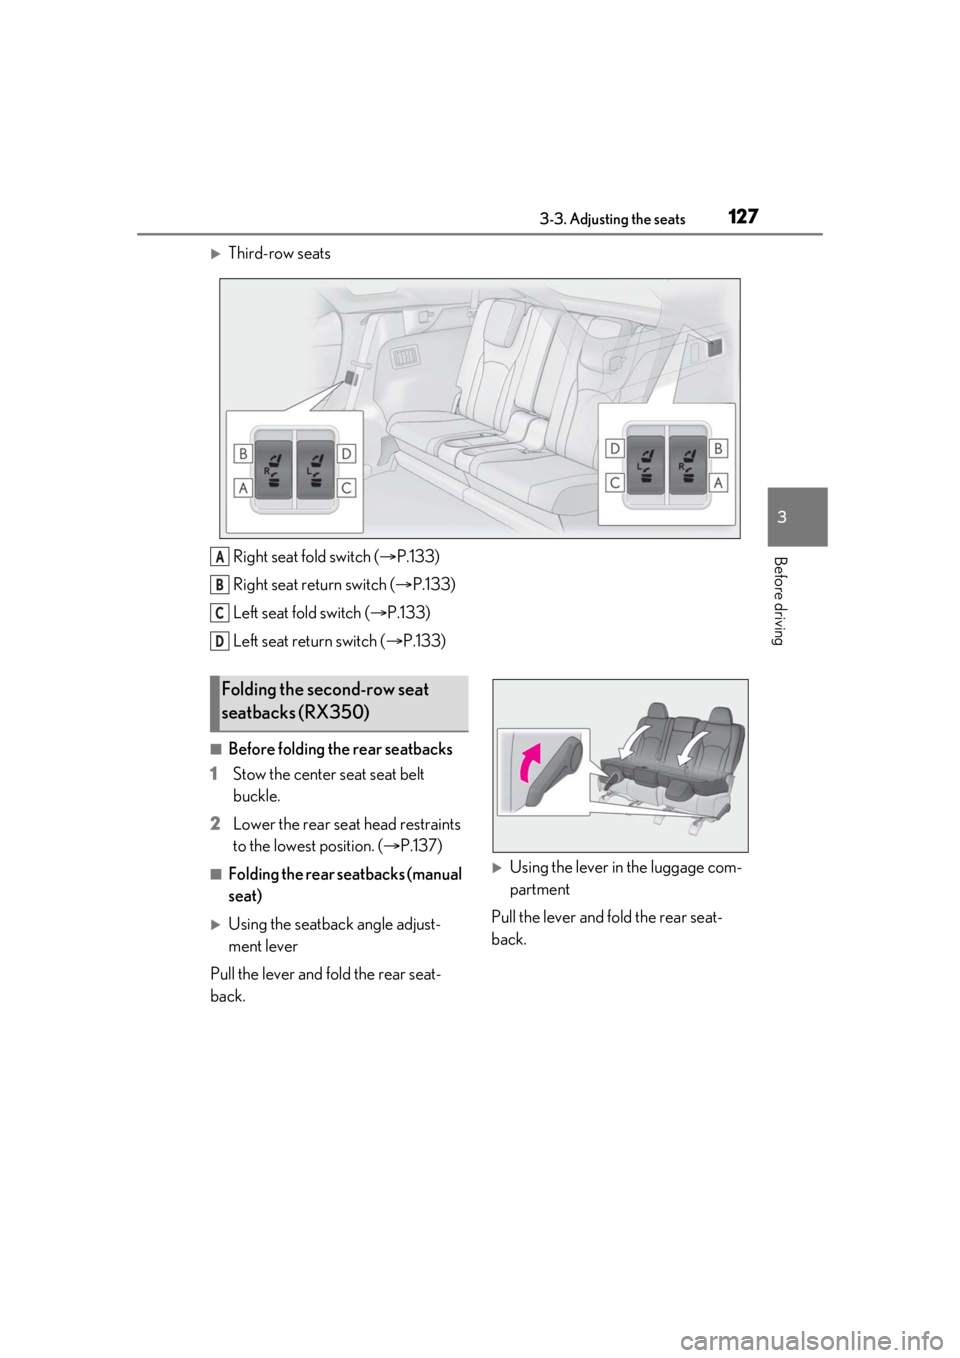
Third-row seatsRight seat fold switch ( P.133)
Right seat return switch ( P.133)
Left seat fold switch ( P.133)
Left seat return switch ( P.133)
■Before folding the rear seatbacks
1 Stow the center seat seat belt
buckle.
2 Lower the rear seat head restraints
to the lowest position. ( P.137)
■Folding the rear seatbacks (manual
seat)
Using the seatback angle adjust-
ment lever
Pull the lever and fold the rear seat-
back.
Using the lever in the luggage com-
partment
Pull the lever and fold the rear seat-
back.
A
B
C
D
Folding the second-row seat
seatbacks (RX350)
Page 130 of 516
1303-3. Adjusting the seats
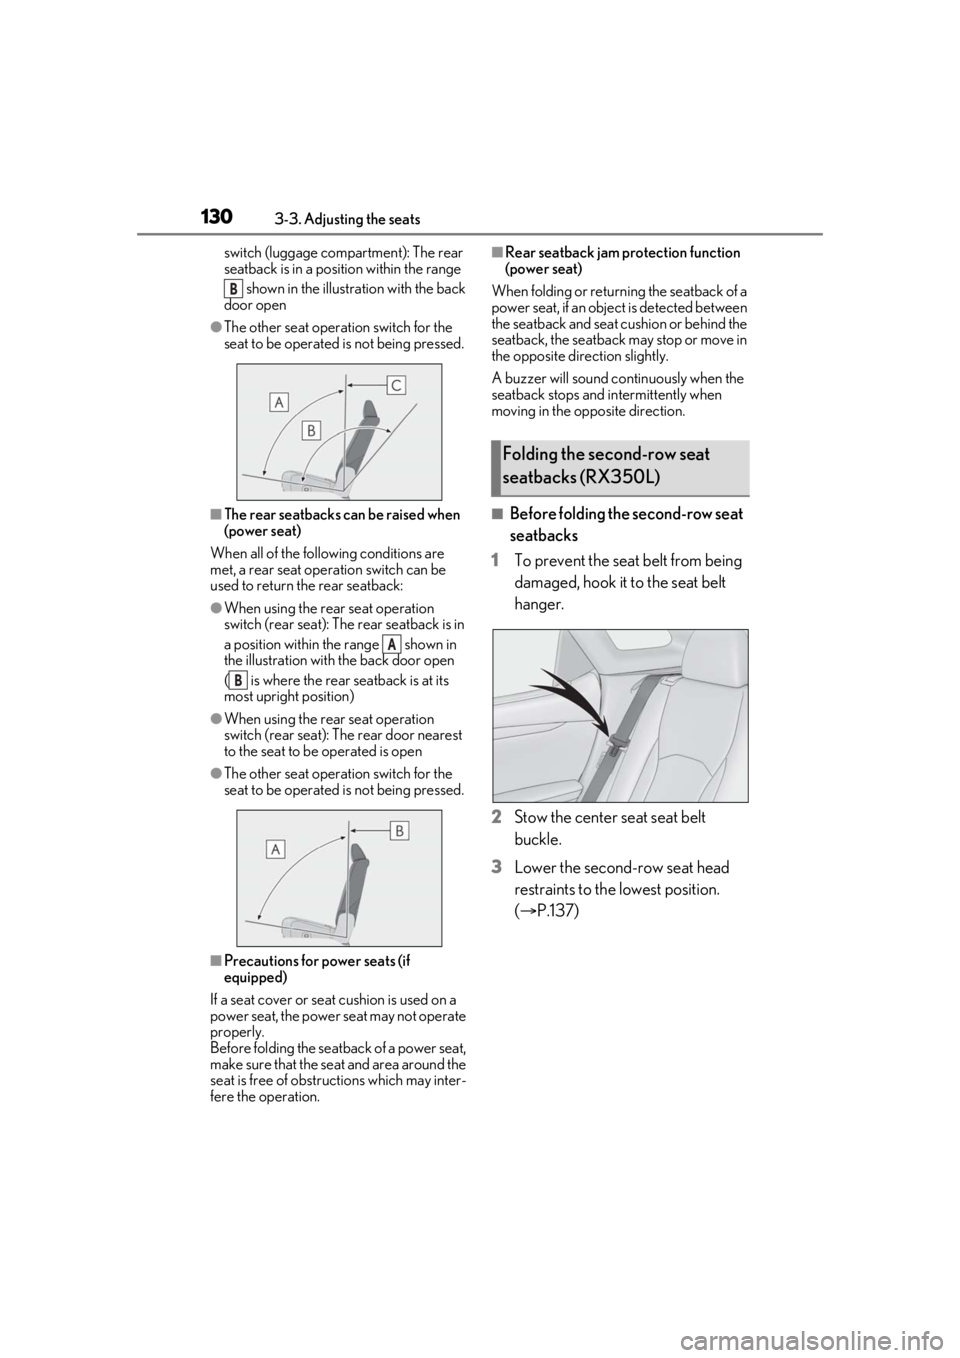
switch (luggage compartment): The rear
seatback is in a position within the range shown in the illustration with the back
door open
●The other seat operation switch for the
seat to be operated is not being pressed.
■The rear seatbacks can be raised when
(power seat)
When all of the following conditions are
met, a rear seat operation switch can be
used to return the rear seatback:
●When using the rear seat operation
switch (rear seat): The rear seatback is in
a position within the range shown in
the illustration with the back door open
( is where the rear seatback is at its
most upright position)
●When using the rear seat operation
switch (rear seat): The rear door nearest
to the seat to be operated is open
●The other seat operation switch for the
seat to be operated is not being pressed.
■Precautions for power seats (if
equipped)
If a seat cover or seat cushion is used on a
power seat, the power seat may not operate
properly.
Before folding the seat back of a power seat,
make sure that the seat and area around the
seat is free of obstru ctions which may inter-
fere the operation.
■Rear seatback jam protection function
(power seat)
When folding or return ing the seatback of a
power seat, if an object is detected between
the seatback and seat cushion or behind the
seatback, the seatback may stop or move in
the opposite direction slightly.
A buzzer will sound continuously when the
seatback stops and in termittently when
moving in the opposite direction.
■Before folding the second-row seat
seatbacks
1 To prevent the seat belt from being
damaged, hook it to the seat belt
hanger.
2 Stow the center seat seat belt
buckle.
3 Lower the second-row seat head
restraints to the lowest position.
(P.137)
B
A
B
Folding the second-row seat
seatbacks (RX350L)
Page 138 of 516
1383-3. Adjusting the seats
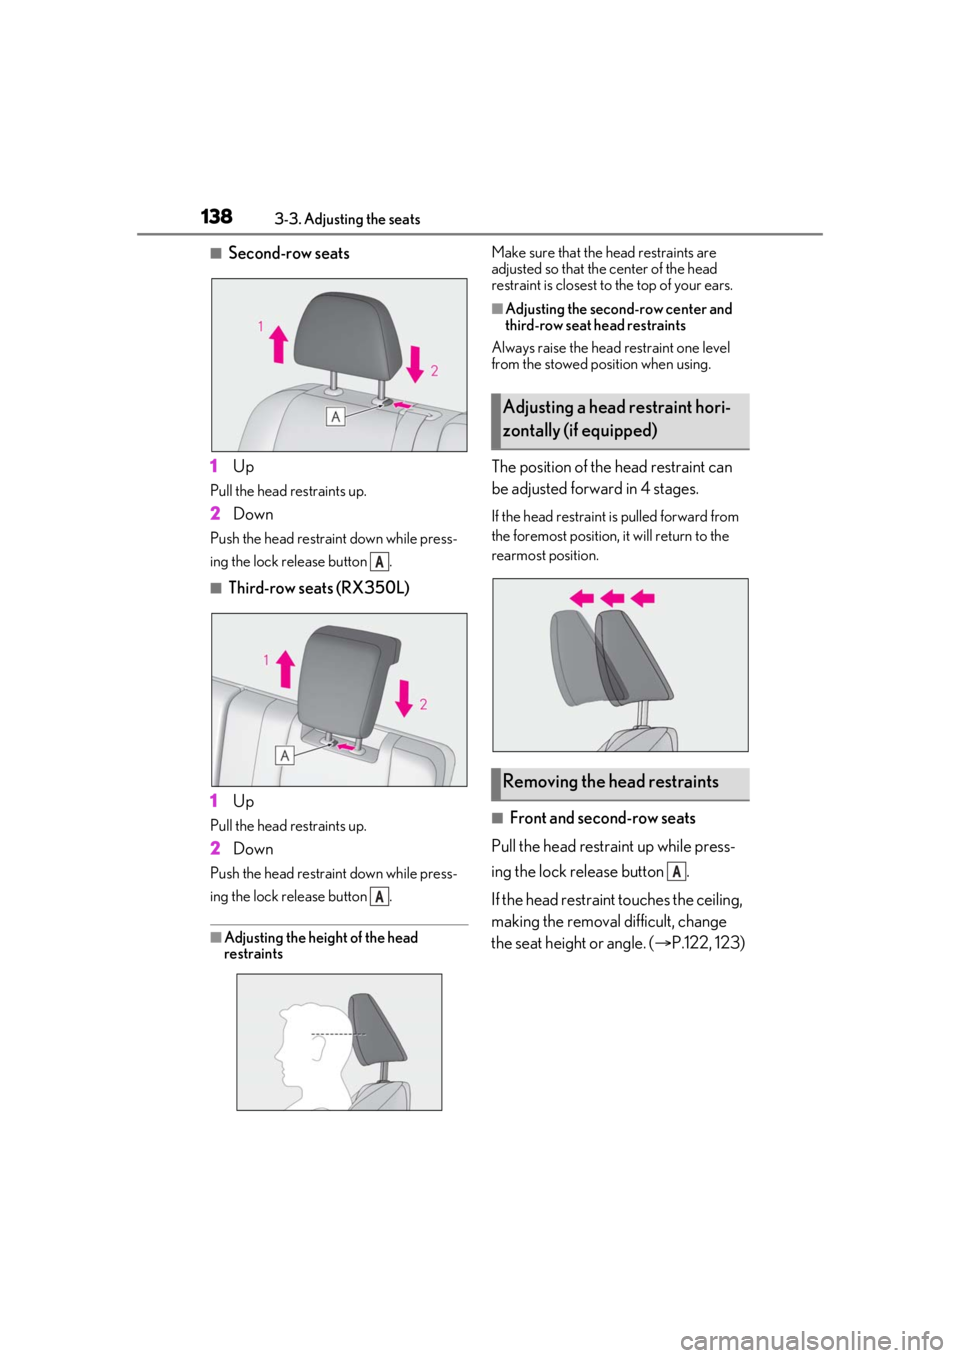
■Second-row seats
1 Up
Pull the head restraints up.
2Down
Push the head restraint down while press-
ing the lock release button .
■Third-row seats (RX350L)
1 Up
Pull the head restraints up.
2Down
Push the head restraint down while press-
ing the lock release button .
■Adjusting the height of the head
restraints Make sure that the head restraints are
adjusted so that the center of the head
restraint is closest to the top of your ears.
■Adjusting the second-row center and
third-row seat head restraints
Always raise the head restraint one level
from the stowed position when using.
The position of the head restraint can
be adjusted forward in 4 stages.
If the head restraint is pulled forward from
the foremost position, it will return to the
rearmost position.
■Front and second-row seats
Pull the head restraint up while press-
ing the lock release button .
If the head restraint touches the ceiling,
making the removal difficult, change
the seat height or angle. ( P.122, 123)
A
A
Adjusting a head restraint hori-
zontally (if equipped)
Removing the head restraints
A
Page 140 of 516
1403-4. Adjusting the steering wheel and mirrors
3-4.Adjusting the steering wheel and mirrors
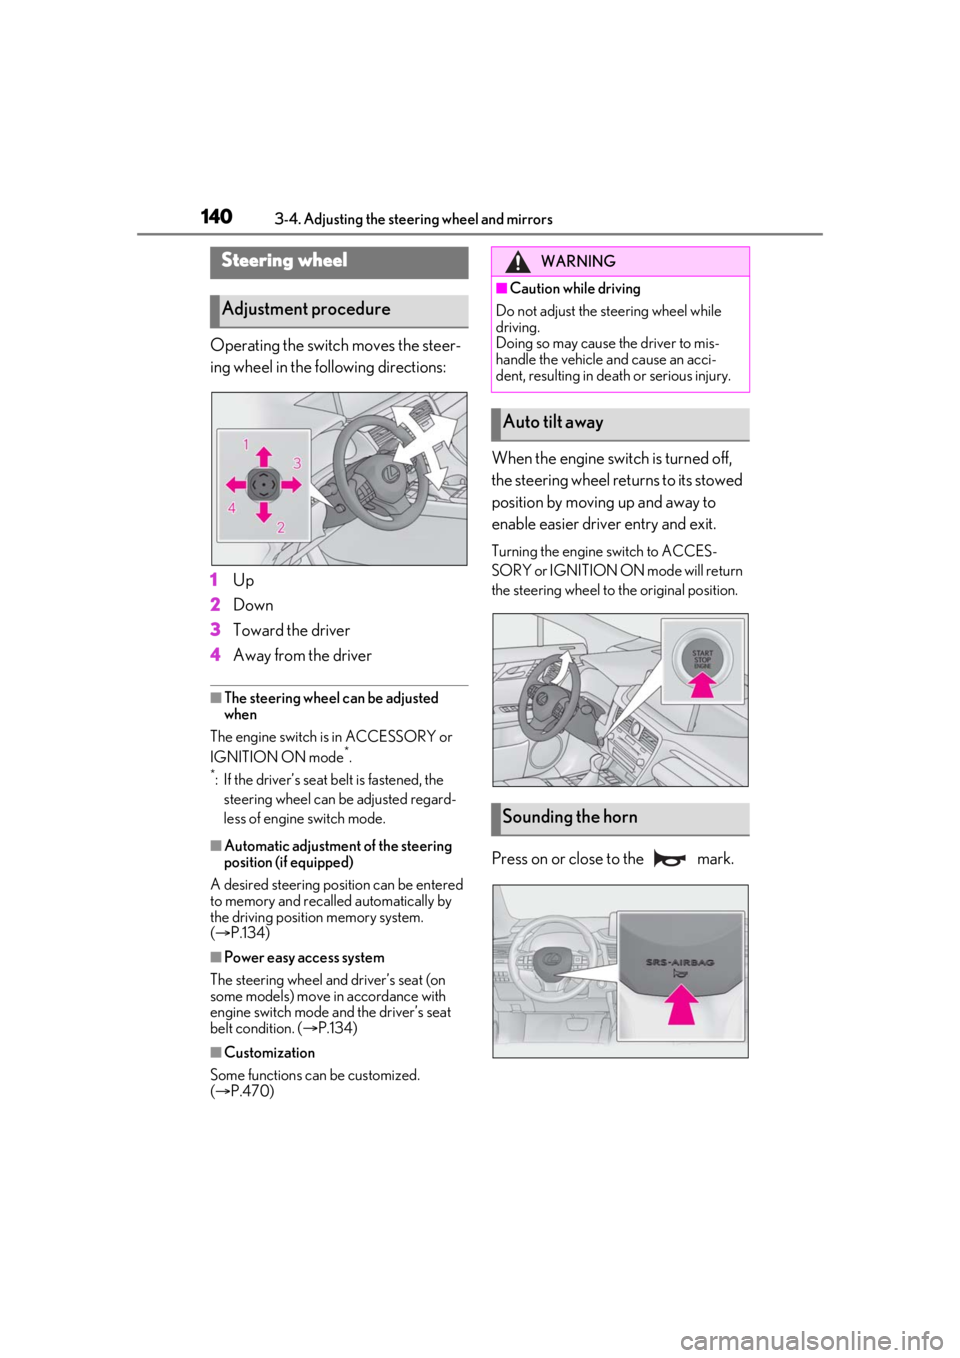
Operating the switch moves the steer-
ing wheel in the following directions:
1Up
2 Down
3 Toward the driver
4 Away from the driver
■The steering wheel can be adjusted
when
The engine switch is in ACCESSORY or
IGNITION ON mode
*.
*: If the driver’s seat belt is fastened, the steering wheel can be adjusted regard-
less of engine switch mode.
■Automatic adjustment of the steering
position (if equipped)
A desired steering position can be entered
to memory and recalled automatically by
the driving position memory system.
( P.134)
■Power easy access system
The steering wheel and driver’s seat (on
some models) move in accordance with
engine switch mode and the driver’s seat
belt condition. ( P.134)
■Customization
Some functions can be customized.
( P.470)
When the engine swit ch is turned off,
the steering wheel returns to its stowed
position by moving up and away to
enable easier driver entry and exit.
Turning the engine switch to ACCES-
SORY or IGNITION ON mode will return
the steering wheel to the original position.
Press on or close to the mark.
Steering wheel
Adjustment procedure
WARNING
■Caution while driving
Do not adjust the steering wheel while
driving.
Doing so may cause the driver to mis-
handle the vehicle and cause an acci-
dent, resulting in death or serious injury.
Auto tilt away
Sounding the horn
Page 143 of 516
1433-4. Adjusting the steering wheel and mirrors
3
Before driving
nor “R”.
To set the mirror angle used when the vehi-
cle is reversing, adjust the mirror angle at a
desired position with the shift lever in R.
The adjusted angle will be memorized and
the mirror will automatically tilt to the mem-
orized angle whenever the shift lever is
shifted to R from next time.
The memorized downward tilt position of
the mirror is linked to the normal position
(angle adjusted with the shift lever in other
than R). Therefore, if the normal position is
changed after adjustment, the tilt position
will also change.
When the normal position is changed, read-
just the angle in reversing.
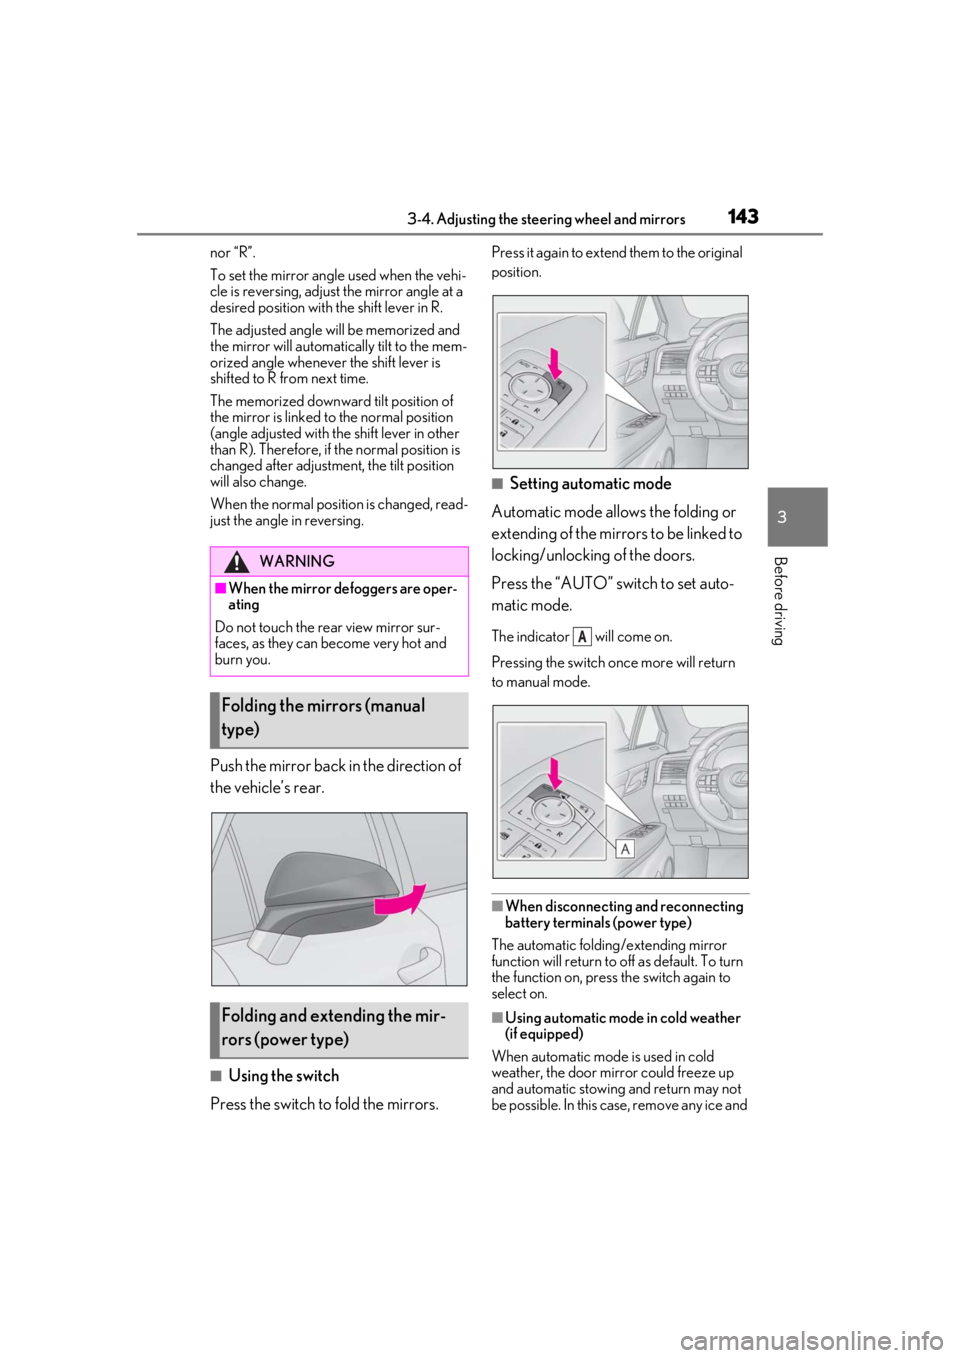
Push the mirror back in the direction of
the vehicle’s rear.
■Using the switch
Press the switch to fold the mirrors.
Press it again to extend them to the original
position.
■Setting automatic mode
Automatic mode allows the folding or
extending of the mirrors to be linked to
locking/unlocking of the doors.
Press the “AUTO” switch to set auto-
matic mode.
The indicator will come on.
Pressing the switch on ce more will return
to manual mode.
■When disconnecting and reconnecting
battery terminals (power type)
The automatic folding/extending mirror
function will return to off as default. To turn
the function on, press the switch again to
select on.
■Using automatic mode in cold weather
(if equipped)
When automatic mode is used in cold
weather, the door mirror could freeze up
and automatic stowing and return may not
be possible. In this case, remove any ice and
WARNING
■When the mirror defoggers are oper-
ating
Do not touch the rear view mirror sur-
faces, as they can become very hot and
burn you.
Folding the mirrors (manual
type)
Folding and extending the mir-
rors (power type)
A