2020 LEXUS RX350 charging
[x] Cancel search: chargingPage 68 of 516

681-4. Theft deterrent system
■Alarm-operated door lock
In the following cases, depending on the sit-
uation, the door may automatically lock to
prevent improper entry into the vehicle:
●When a person remaining in the vehicle
unlocks the door and the alarm is acti-
vated.
●While the alarm is activated, a person
remaining in the vehicle unlocks the door.
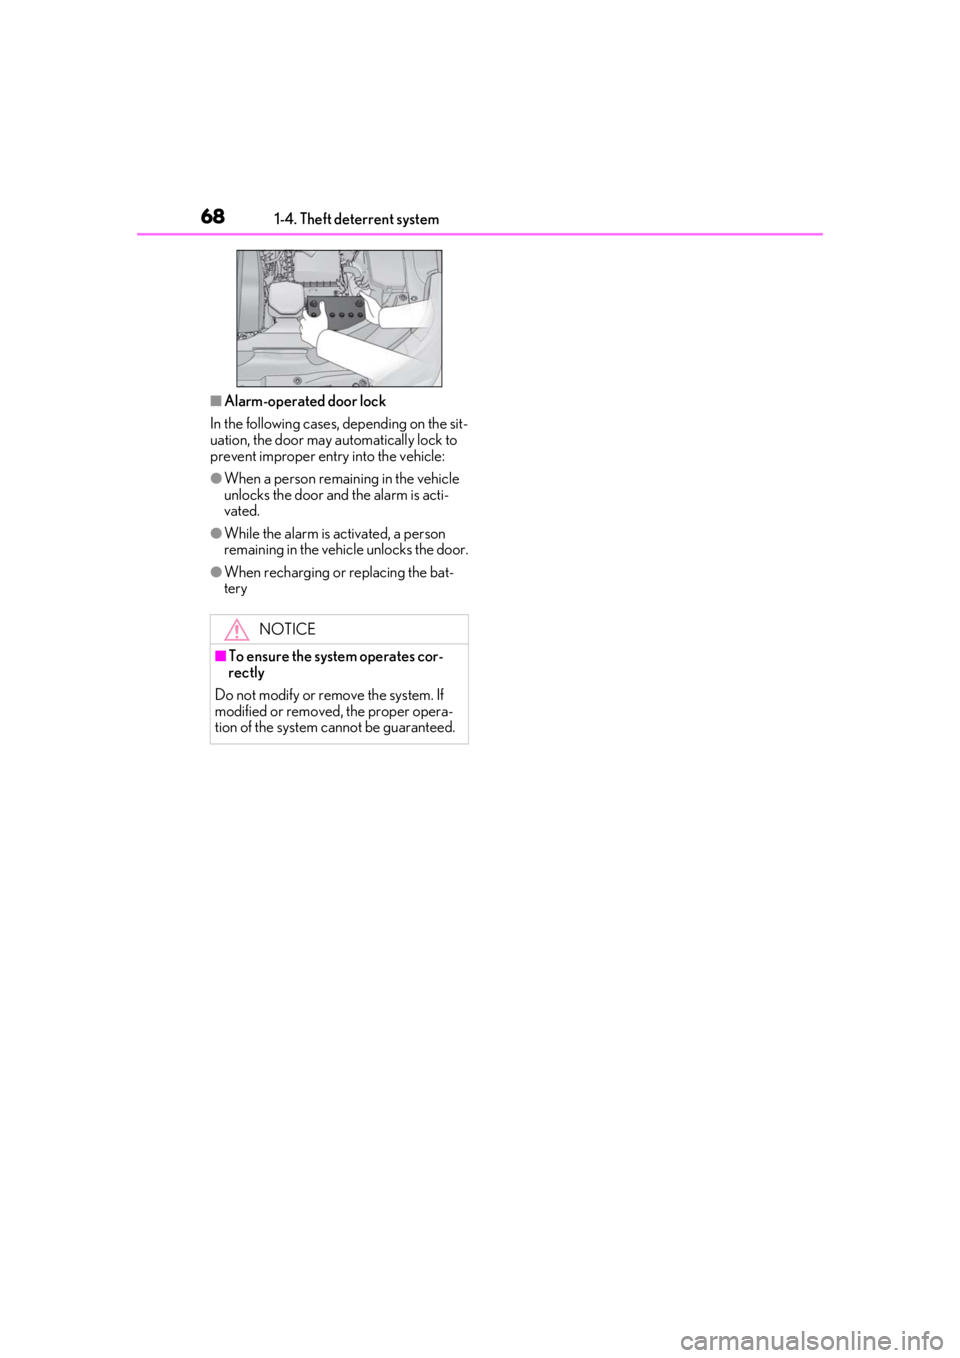
●When recharging or replacing the bat-
tery
NOTICE
■To ensure the system operates cor-
rectly
Do not modify or remove the system. If
modified or removed, the proper opera-
tion of the system cannot be guaranteed.
Page 71 of 516

712-1. Instrument cluster
2
Vehicle status information and indicators
Warning lights inform the driver of mal-
functions in the indicated vehicle’s sys-
tems.
Warning lights
(U.S.A.)
Brake system warning light*1
( P.413)
(red)
(Canada)
Brake system warning light*1
( P.413)
(yellow)
Brake system warning light*1
( P.413)
High coolant temperature
warning light
*2 ( P.413)
Charging system warning
light
*3 ( P.414)
Low engine oil pressure warn-
ing light
*2 ( P.414)
(U.S.A.)
Malfunction indicator lamp*1
( P.414)
(Canada)
Malfunction indicator lamp*1
( P.414)
SRS warning light
*1 ( P.414)
(U.S.A.)
ABS warning light*1 ( P.415)
(Canada)
ABS warning light*1 ( P.415)
Brake Override System warn-
ing light/Drive-Start Control
warning light
*2 ( P.415)
(red)
Electric power st eering system
warning light
*1 ( P.415)
(yellow)
Electric power steering system
warning light
*1 ( P.415)
Low fuel level warning light
( P.416)
Driver’s and front passenger’s
seat belt reminder light
( P.416)
(RX350)
Rear passengers’ seat
belt reminder light
*4
( P.416)
(RX350L)
Rear passengers’ seat
belt reminder
light
*4( P.416)
Tire pressure warning light
*1
( P.417)
(orange)
LTA indicator ( P.417)
(flashes)
Intuitive parking assist OFF indi-
cator
*1 (if equipped) ( P.417)
(flashes)
RCTA OFF indicator*1 (if
equipped) ( P.417)
(flashes)
PKSB OFF indicator*1 (if
equipped) ( P.418)
(flashes or
illuminates)PCS warning light*1 ( P.418)
Slip indicator
*1 ( P.418)
(flashes)
(U.S.A.)
Parking brake indicator
( P.419)
(flashes)
(Canada)
Parking brake indicator
( P.419)
Page 94 of 516

943-1. Key information
3-1.Key information
The following keys are provided with
the vehicle.
Electronic keys
• Operating the smart access system with push-button start ( P.113)
• Operating the wireless remote control function ( P.95)
Mechanical keys
Key number plate
■When riding in an aircraft
When bringing an elec tronic key onto an
aircraft, make sure you do not press any
buttons on the electronic key while inside
the aircraft cabin. If you are carrying an
electronic key in your bag, etc., ensure that
the buttons are not likely to be pressed acci-
dentally. Pressing a button may cause the
electronic key to em it radio waves that
could interfere with the operation of the air-
craft.
■Electronic key battery depletion
●The standard battery life is 1 to 2 years.
●If the battery becomes low, an alarm will
sound in the cabin when the engine is
stopped.
●To reduce key battery depletion when the
electronic key is to not be used for long
periods of time, set the electronic key to
the battery-saving mode. ( P.114)
●As the electronic key always receives
radio waves, the battery will become
depleted even if the electronic key is not
used. The following symptoms indicate
that the electronic key battery may be
depleted. Replace the battery when nec-
essary.
• The smart access system with push-but- ton start or the wireless remote control
does not operate.
• The detection area becomes smaller.
• The LED indicator on the key surface does not turn on.
●To avoid serious dete rioration, do not
leave the electronic key within 3 ft. (1 m)
of the following electrical appliances that
produce a magnetic field:
•TVs
• Personal computers
• Cellular phones, cordless phones and battery chargers
• Recharging cellular phones or cordless
phones
•Table lamps
• Induction cookers
■Replacing the battery
P.389
■Confirmation of the registered key
number
The number of keys already registered to
the vehicle can be confirmed. Ask your
Lexus dealer for details.
■If “A New Key has been Registered
Contact Your Dealer for Details” is
shown on the multi-information display
This message will be displayed each time
the driver’s door is opened when the doors
are unlocked from the outside for approxi-
mately one week after a new electronic key
has been registered.
If this message is disp layed but you have not
had a new electronic key registered, ask
your Lexus dealer to check if an unknown
electronic key (other than those in your
possession) has be en registered.
Keys
The keys
A
B
C
Page 132 of 516

1323-3. Adjusting the seats
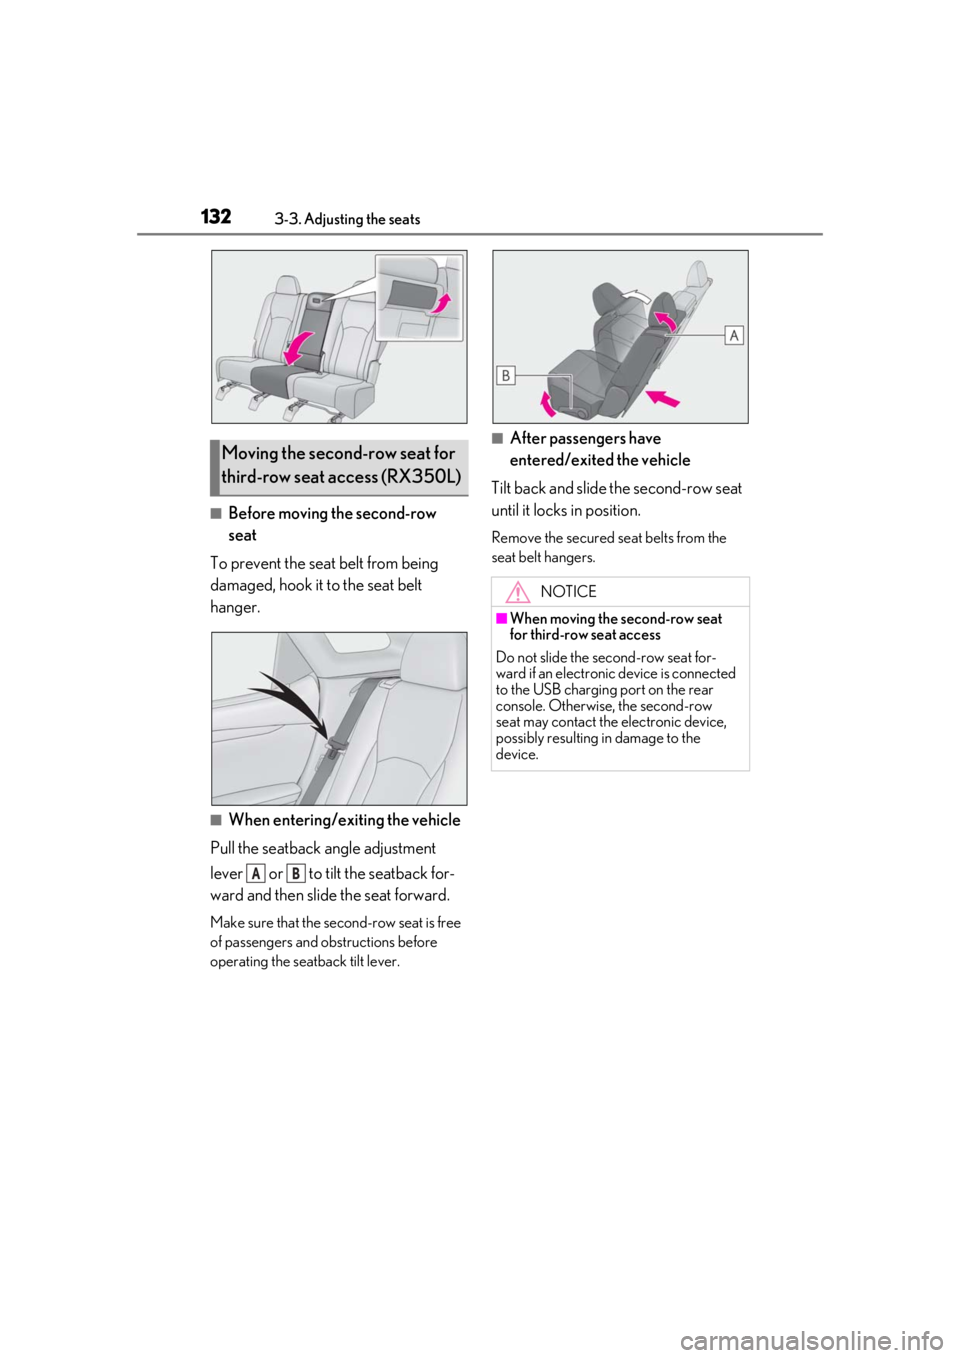
■Before moving the second-row
seat
To prevent the seat belt from being
damaged, hook it to the seat belt
hanger.
■When entering/exiting the vehicle
Pull the seatback angle adjustment
lever or to tilt the seatback for-
ward and then slid e the seat forward.
Make sure that the seco nd-row seat is free
of passengers and ob structions before
operating the seatback tilt lever.
■After passengers have
entered/exited the vehicle
Tilt back and slide the second-row seat
until it locks in position.
Remove the secured se at belts from the
seat belt hangers.
Moving the second-row seat for
third-row seat access (RX350L)
AB
NOTICE
■When moving the second-row seat
for third-row seat access
Do not slide the second-row seat for-
ward if an electronic device is connected
to the USB charging port on the rear
console. Otherwise, the second-row
seat may contact the electronic device,
possibly resulting in damage to the
device.
Page 173 of 516

1734-1. Before driving
4
Driving
the vehicle inspected by your Lexus dealer.
Your vehicle will handle differently
when towing a trailer. Help to avoid an
accident, death or serious injury, keep
the following in mind when towing:
Speed limits for towing a trailer vary
by state or province. Do not exceed
the posted towing speed limit.
Lexus recommends that the vehi-
cle-trailer speed limit is 65 mph
(104 km/h) on a flat, straight, dry
road. Do not exceed this limit, the
posted towing speed limit or the
speed limit for your trailer as set
forth in your trailer owner’s manual,
whichever is lowest. Instability of the
towing vehicle-trailer combination
(trailer sway) increases as speed
increases. Exceed ing speed limits
may cause loss of control.
Before starting out, check the trailer
lights, tires and the vehicle-trailer
connections. Recheck after driving
a short distance.
Practice turning, stopping and
reversing with the trailer attached in
an area away from traffic until you
become accustomed to the feel of
the vehicle-trailer combination.
Reversing with a tr ailer attached is
difficult and requires practice. Grip
the bottom of the steering wheel
and move your hand to the left to
move the trailer to the left. Move
your hand to the right to move the
trailer to right. (This is generally opposite to reversing without a
trailer attached.) Avoid sharp or
prolonged turning. Have someone
guide you when reversing to reduce
the risk of an accident.
As stopping distance is increased
when towing a trailer, vehicle-to
vehicle distance should be
increased. For each 10 mph (16
km/h) of speed, allow at least one
vehicle and trailer length.
Avoid sudden braking as you may
skid, resulting in the trailer jackknif-
ing and a loss of vehicle control. This
is especially true on wet or slippery
surfaces.
Avoid jerky starts or sudden accel-
eration.
Avoid jerky steering and sharp
turns, and slow down before making
turn.
Note that when making a turn, the
trailer wheels will be closer than the
vehicle wheels to the inside of the
turn. Compensate by making a
wider than normal turning radius.
Slow down before making a turn, in
cross winds, on wet or slippery sur-
faces, etc. Increasing vehicle speed
can destabilize the trailer.
Take care when passing other vehi-
cles. Passing requires considerable
distance. After pass ing a vehicle, do
not forget the length of your trailer,
and be sure you have plenty of room
before changing lanes.
To maintain engine braking effi-
ciency and charging system perfor-
Trailer towing tips
Page 191 of 516

1914-3. Operating the lights and wipers
4
Driving
The sensor may not function properly if an
object is placed on the sensor, or anything
that blocks the sensor is affixed to the wind-
shield.
Doing so interferes with the sensor detect-
ing the level of ambient light and may cause
the automatic headlight system to malfunc-
tion.
■Automatic light off system
●When the headlights come on: The head-
lights and tail lights turn off 30 seconds
after a door is opened and closed if the
engine switch is turned to ACCESSORY
mode or turned off. (The lights turn off
immediately if on the key is pressed
after all the doors are locked.)
●When only the tail lights are on: The tail
lights turn off automatically if the engine
switch is turned to ACCESSORY mode
or turned off and the driver’s door is
opened.
To turn the lights on again, turn the engine
switch to IGNITION ON mode, or turn the
light switch off once and then back to
or .
■Automatic headlight leveling system (if
equipped)
The level of the headlights is automatically
adjusted according to the number of pas-
sengers and the loading condition of the
vehicle to ensure that the headlights do not
interfere with other road users.
■Light reminder buzzer
A buzzer sounds when the engine switch is
turned off or turned to ACCESSORY
mode and the driver’s door is opened while
the lights are turned on.
■Welcome lighting
If the headlight switch is turned to and
the surrounding area is dark, unlocking the
doors using the smart access system with
push-button start or wireless remote con-
trol will turn the parking lights and tail lights
on automatically.
■Windshield wiper linked headlight illu-
mination
When driving during daytime with the
headlight switch turned to , if the wind-
shield wipers are used, the headlights will
turn on automatically after several seconds
to help enhance the visibility of your vehicle.
■Battery-saving function
In order to prevent the battery of the vehicle
from discharging, if the headlights and/or
tail lights are on when the engine switch is
turned off the battery saving function will
operate and automatically turn off all the
lights after approximately 20 minutes.
When the engine switch is turned to IGNI-
TION ON mode, the battery-saving func-
tion will be disabled.
When any of the following are performed,
the battery-saving function is canceled
once and then reactivated. All the lights will
turn off automatically 20 minutes after the
battery- saving function has been reacti-
vated:
●When the headlight switch is operated
●When a door is opened or closed
■Customization
Some functions can be customized.
( P.470)
NOTICE
■To prevent battery discharge
Do not leave the lights on longer than
necessary when the engine is off.
Page 327 of 516

3275-6. Using the other interior features
5
Interior features
5-6.Using the other interior features
The USB charging ports are used to
supply 2.1 A of electricity at 5 V to
external devices.
The USB charging ports are for
charging only. They are not designed
for data transfer or other purposes.
Depending on the external device, it
may not charge properly. Refer to the
manual included with the device
before using a USB charging port.
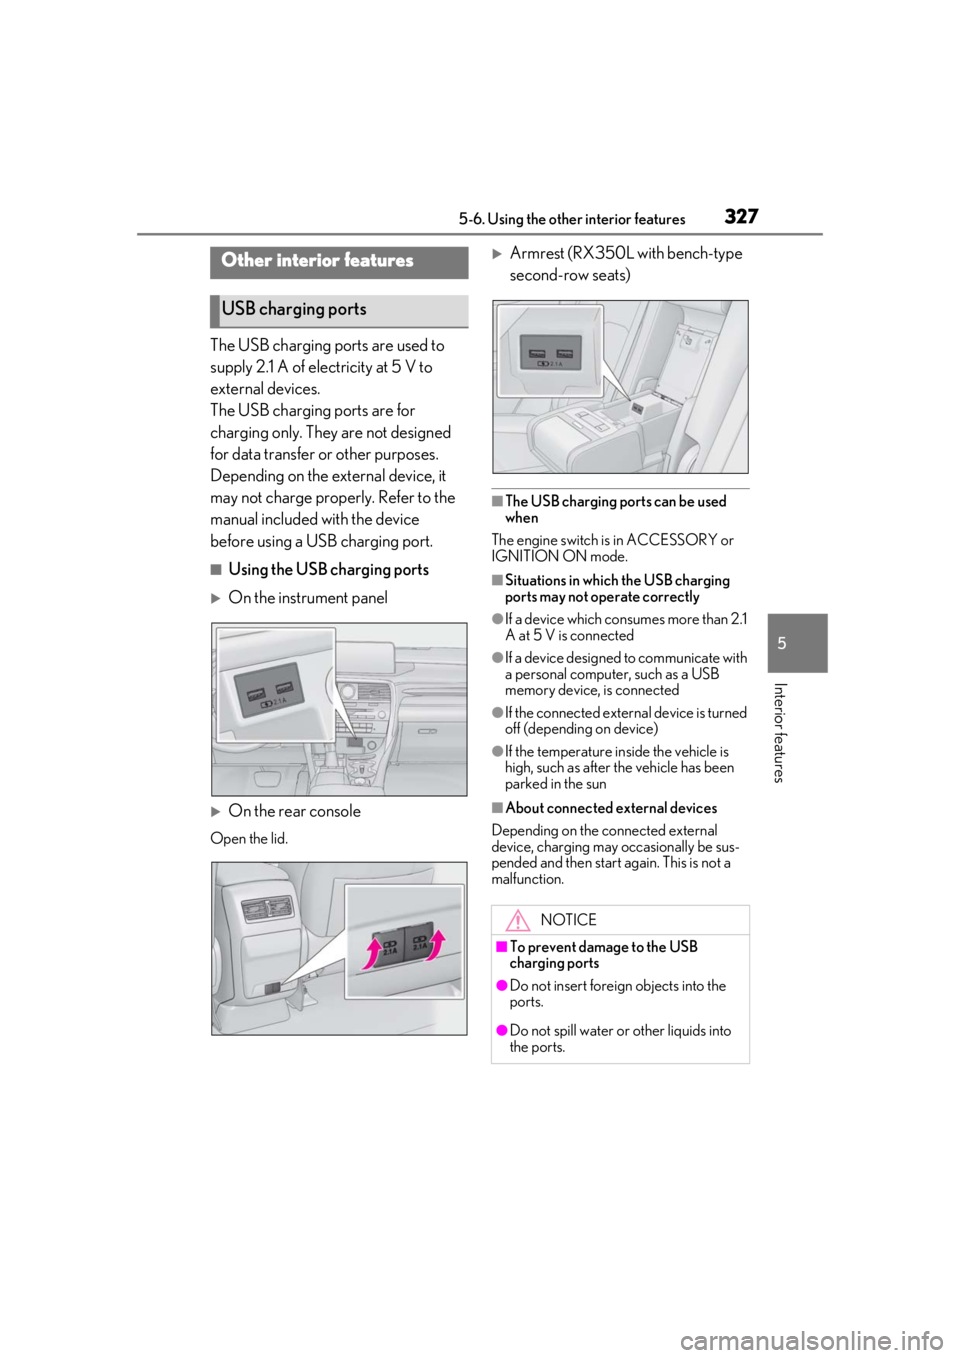
■Using the USB charging ports
On the instrument panel
On the rear console
Open the lid.
Armrest (RX350L with bench-type
second-row seats)
■The USB charging ports can be used
when
The engine switch is in ACCESSORY or
IGNITION ON mode.
■Situations in whic h the USB charging
ports may not operate correctly
●If a device which consumes more than 2.1
A at 5 V is connected
●If a device designed to communicate with
a personal computer, such as a USB
memory device, is connected
●If the connected external device is turned
off (depending on device)
●If the temperature inside the vehicle is
high, such as after the vehicle has been
parked in the sun
■About connected external devices
Depending on the connected external
device, charging may occasionally be sus-
pended and then start again. This is not a
malfunction.
Other interior features
USB charging ports
NOTICE
■To prevent damage to the USB
charging ports
●Do not insert foreign objects into the
ports.
●Do not spill water or other liquids into
the ports.
Page 328 of 516

3285-6. Using the other interior features
A portable device, such as a smart-
phone or mobile battery, can be
charged by just placing it on the
charging area, provided the device is
compatible with the Qi wireless
charging standard created by the
Wireless Power Consortium.
The wireless charger cannot be used
with a portable device that is larger
than the charging area. Additionally,
depending on the portable device, the
wireless charger may not operate
properly. Refer to the operation man-
ual of the portable device.
■The “Qi” symbol
The “Qi” symbol is a trademark of the
Wireless Power Consortium.
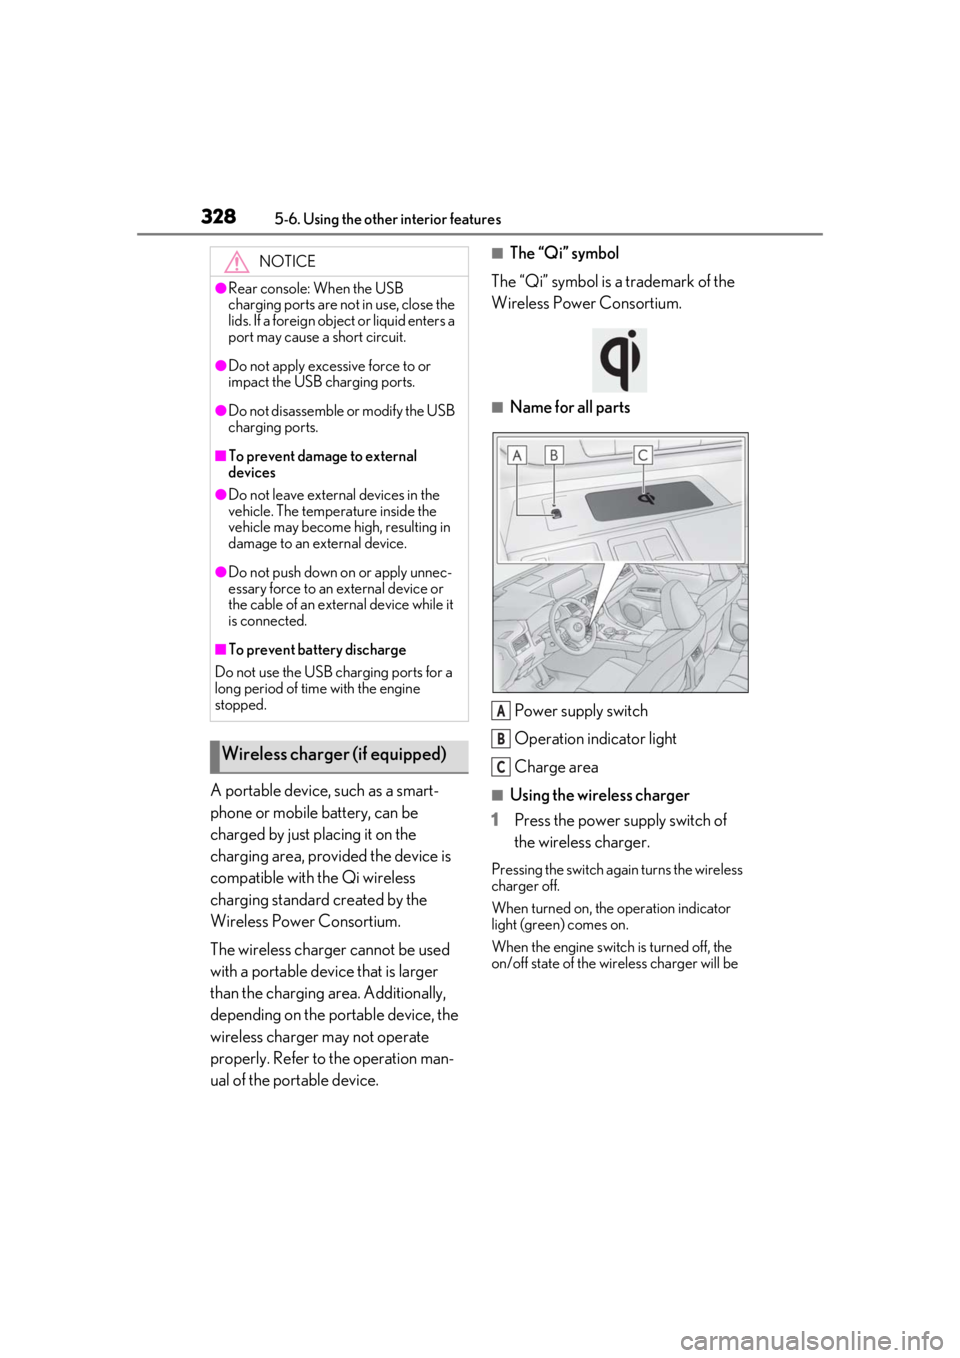
■Name for all parts
Power supply switch
Operation indicator light
Charge area
■Using the wireless charger
1 Press the power supply switch of
the wireless charger.
Pressing the switch again turns the wireless
charger off.
When turned on, the operation indicator
light (green) comes on.
When the engine switch is turned off, the
on/off state of the wi reless charger will be
NOTICE
●Rear console: When the USB
charging ports are not in use, close the
lids. If a foreign object or liquid enters a
port may cause a short circuit.
●Do not apply excessive force to or
impact the USB charging ports.
●Do not disassemble or modify the USB
charging ports.
■To prevent damage to external
devices
●Do not leave external devices in the
vehicle. The temperature inside the
vehicle may become high, resulting in
damage to an external device.
●Do not push down on or apply unnec-
essary force to an external device or
the cable of an external device while it
is connected.
■To prevent battery discharge
Do not use the USB charging ports for a
long period of time with the engine
stopped.
Wireless charger (if equipped)
A
B
C