2020 INFINITI QX60 language
[x] Cancel search: languagePage 34 of 276
![INFINITI QX60 2020 Infiniti Connection 2. Getting started
Setting itemResult
[Voice Recognition] Displays the voice recognition function setting screen.
“Voice Recognition settings” (page 7-14)
[Camera/Sonar] Displays the camera/sonar INFINITI QX60 2020 Infiniti Connection 2. Getting started
Setting itemResult
[Voice Recognition] Displays the voice recognition function setting screen.
“Voice Recognition settings” (page 7-14)
[Camera/Sonar] Displays the camera/sonar](/manual-img/42/35140/w960_35140-33.png)
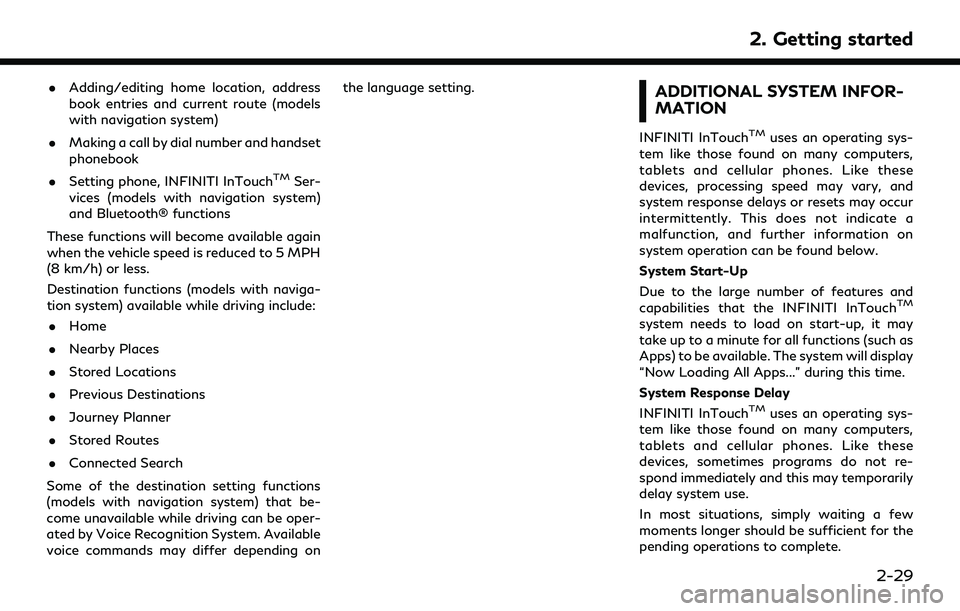
2. Getting started
Setting itemResult
[Voice Recognition] Displays the voice recognition function setting screen.
“Voice Recognition settings” (page 7-14)
[Camera/Sonar] Displays the camera/sonar system setting screen.
For additional information, refer to the vehicle Owner’s Manual.
[Drive Mode Enhancement] Displays the Drive Mode Enhancement setting screen.
For additional information, refer to the vehicle Owner’s Manual.
[Driver Assistance] Displays the Driver Assistance setting screen.
For additional information, refer to the vehicle Owner’s Manual.
[Other] [Language] Set the Language to your preferred settings.
“Language setting” (page 2-24)
[Language & Units] Displays the language and units setting screen.
“Language & Units settings” (page 2-25)
[Keyboard Type] Set the Keyboard Type to [ABC] or [QWERTY].
[Low on Fuel Alert] Set the fuel low notification to on/off.
[Software Information] Display the Software Information.
2-20
Page 38 of 276

2. Getting started
Language setting (if so equipped)
This changes the display language used in the system.
Available setting items may vary depending on models and specifications.
1. Display the Settings menu screen.
“Displaying operation screen” (page 2-10)
2. Touch [Other].
3. Touch [Language].
Setting item Action
[System Language] Select the language of the display.
INFO:
. Do not change the ignition switch position while changing the language.
. The Voice Recognition System can be used only if the language is supported by the Voice Recognition System.
. Depending on the language selected, available voice commands for the Voice Recognition System may differ.
2-24
Page 39 of 276

Language & Units settings (if so equipped)
This changes the display language and measurement unit used in the system.
Available setting items may vary depending on models and specifications.
1. Display the Settings menu screen.
“Displaying operation screen” (page 2-10)
2. Touch [Other].
3. Touch [Language & Units].
Setting item Action
[System Language] Select the language of the display, voice announcements, and voice recognition functions.
[Fuel Economy Unit Settings] Select the preferred fuel economy unit.
[Tire Pressure Units] Select the preferred tire pressure unit.
[Temperature Units] Select the preferred temperature unit.
INFO:
. Do not change the ignition switch position while changing the language.
. The Voice Recognition System can be used only if the language is supported by the Voice Recognition System.
. Depending on the language selected, available voice commands for the Voice Recognition System may differ.
2. Getting started
2-25
Page 43 of 276

.Adding/editing home location, address
book entries and current route (models
with navigation system)
. Making a call by dial number and handset
phonebook
. Setting phone, INFINITI InTouch
TMSer-
vices (models with navigation system)
and Bluetooth® functions
These functions will become available again
when the vehicle speed is reduced to 5 MPH
(8 km/h) or less.
Destination functions (models with naviga-
tion system) available while driving include: . Home
. Nearby Places
. Stored Locations
. Previous Destinations
. Journey Planner
. Stored Routes
. Connected Search
Some of the destination setting functions
(models with navigation system) that be-
come unavailable while driving can be oper-
ated by Voice Recognition System. Available
voice commands may differ depending on the language setting.
ADDITIONAL SYSTEM INFOR-
MATION
INFINITI InTouchTMuses an operating sys-
tem like those found on many computers,
tablets and cellular phones. Like these
devices, processing speed may vary, and
system response delays or resets may occur
intermittently. This does not indicate a
malfunction, and further information on
system operation can be found below.
System Start-Up
Due to the large number of features and
capabilities that the INFINITI InTouch
TM
system needs to load on start-up, it may
take up to a minute for all functions (such as
Apps) to be available. The system will display
“Now Loading All Apps...” during this time.
System Response Delay
INFINITI InTouch
TMuses an operating sys-
tem like those found on many computers,
tablets and cellular phones. Like these
devices, sometimes programs do not re-
spond immediately and this may temporarily
delay system use.
In most situations, simply waiting a few
moments longer should be sufficient for the
pending operations to complete.
2. Getting started
2-29
Page 52 of 276

3. Audio system
USB (Universal Serial Bus) CON-
NECTION PORT
WARNING
Do not connect, disconnect or operate the
USB memory device while driving.
Doing so can be a distraction. If dis-
tracted you could lose control of your
vehicle and cause an accident or serious
injury.
CAUTION
.Do not force the USB memory device
into the USB connection port. Insert-
ing the USB memory device tilted or
upside down into the port may da-
mage the port. Make sure that the
USB memory device is connected
correctly into the USB connection
port.
. Do not grab the USB connection port
cover (if so equipped) when pulling
the USB memory device out of the
port. This could damage the port and
the cover. .
Do not leave the USB cable in a place
where it can be pulled unintentionally.
Pulling the cable may damage the
port.
The vehicle is not equipped with a USB
memory device. USB memory devices should
be purchased separately as necessary.
This system cannot be used to format USB
memory devices.
To format a USB memory device, use a
personal computer.
In some jurisdictions, the USB memory
device for the front seats plays only sound
without images for regulatory reasons, even
when the vehicle is parked.
This system supports various USB memory
devices, USB hard drives and iPod® players.
Some USB memory devices may not be
supported by this system. . Partitioned USB memory devices may
not play correctly.
. Some characters used in other languages
(Chinese, Japanese, etc.) may not appear
properly in the display. Using English
language characters with a USB memory
device is recommended. General notes for USB use:
Refer to your device manufacturer’s owner
information regarding the proper use and
care of the device.
Notes for iPod® use:
“Made for iPod®” and “Made for iPhone®”
mean that an electronic accessory has been
designed to connect specifically to iPod® or
iPhone®, respectively, and has been certified
by the developer to meet Apple performance
standards. Apple is not responsible for the
operation of this device or its compliance
with safety and regulatory standards. Please
note that the use of this accessory with
iPod® or iPhone® may affect wireless
performance.
Apple, the Apple logo, iPhone®, iPod®, iPod
classic®, iPod nano®, and iPod touch® are
trademarks of Apple Inc., registered in the
U.S. and other countries. Lightning
TMis a
trademark of Apple Inc. App StoreSMis a
service mark of Apple Inc.
. Improperly plugging in the iPod® may
cause a check-mark to be displayed on/
off (flickering). Always make sure that
the iPod® is connected properly.
3-8
Page 83 of 276
![INFINITI QX60 2020 Infiniti Connection [Driver’s Audio Stage]When this item is turned on, a better sound quality will be provided to the driver’s position. The driver can enjoy
a more crisp and clear sound that is specialized for the d INFINITI QX60 2020 Infiniti Connection [Driver’s Audio Stage]When this item is turned on, a better sound quality will be provided to the driver’s position. The driver can enjoy
a more crisp and clear sound that is specialized for the d](/manual-img/42/35140/w960_35140-82.png)
[Driver’s Audio Stage]When this item is turned on, a better sound quality will be provided to the driver’s position. The driver can enjoy
a more crisp and clear sound that is specialized for the driver’s seat position. The prominence of the effect of
this feature depends on the type of music that is played. For some music, it may be difficult to recognize the
effect of this feature.
. [Display Album Cover Art]
Turn this item on to display image files from the media device. If the media device does not contain images, no image will be displayed.
. [Radio Settings]
Setting Items Action
[HD Radio Mode (AM)] When this item is turned on, the analog and digital reception switches automatically.
When this item is turned off, the reception is fixed in the analog mode.
[HD Radio Mode (FM)]
. [DVD Settings]
Setting Items Action
[Angle] Images and movies can be viewed in different angles if the DVD contains this data. Switch the angle
number by touching [+]/[-].
[CM Skip] Select commercial skip length from 15, 30 and 60 seconds.
[DRC] Select the DRC (Dynamic Range Compression) setting from OFF, 1 and 2. DRC allows tuning of the
dynamic range of sound recorded in the Dolby Digital format.
[Angle Mark] Turn the angle mark display on/off. When this item is turned on, [Multi Angle] will be displayed on the DVD
screen.
[Menu Skip] DVD menus are automatically configured and the contents will be played directly when this item is turned
on. Note that some discs may not be played directly even if this item is turned on.
[DOWN MIX] When this item is turned on, a multi-channel recording will be converted to a traditional two channel
(stereo) recording.
[DVD Language] Enter the language code of the preferred language.
3. Audio system
3-39
Page 84 of 276
![INFINITI QX60 2020 Infiniti Connection 3. Audio system
[Language]Changeable items will vary depending on the type of DVD.
For DVD-V:
Audible language can be changed by touching [+]/[-].
For Video CD:
Select the sound setting from Main audi INFINITI QX60 2020 Infiniti Connection 3. Audio system
[Language]Changeable items will vary depending on the type of DVD.
For DVD-V:
Audible language can be changed by touching [+]/[-].
For Video CD:
Select the sound setting from Main audi](/manual-img/42/35140/w960_35140-83.png)
3. Audio system
[Language]Changeable items will vary depending on the type of DVD.
For DVD-V:
Audible language can be changed by touching [+]/[-].
For Video CD:
Select the sound setting from Main audio, Sub audio and Main/Sub audio.
For DVD VR:
Select the sound setting from Main audio 1, Sub audio 1, Main/Sub audio 1, Main audio 2, Sub audio 2 and
Main/Sub audio 2.
[Subtitle] The subtitle language can be changed by touching [+]/[-].
[DVD Screen Settings] Touch to adjust the DVD aspect ratio.
[PG/PL Mode] Touch to switch the PG/PL mode setting.
INFO:
The Available setting items differ depending on the DVD. . [AUX Settings]
Setting Items Action
[AUX Image Display] The image display size setting can be selected from [Normal], [Wide] and [Cinema].
[Volume Setting] The volume setting can be selected from [Low], [Medium] and [High].
3-40
Page 102 of 276

3. Audio system
Use the remote controller and take the
following steps to operate the rear displays
in the rear seats:
1. Turn on the rear displays using<
>on
the remote controller.
2. Push
the DVD (if so equipped), AUX (if so
equipped), USB or HDMI interface
devices.
When USB is selected for the first time
after the USB memory device is con-
nected, select a file you with to play from
the File Browser screen.
Menus
Push