2020 INFINITI QX60 light
[x] Cancel search: lightPage 47 of 276

(single station) FM having slightly more
range than stereo FM. External influences
may sometimes interfere with FM station
reception even if the FM station is within 25
miles (40 km). The strength of the FM signal
is directly related to the distance between
the transmitter and receiver. FM signals
follow a line-of-sight path, exhibiting many
of the same characteristics as light. For
example they will reflect off objects.
Fade and drift: As your vehicle moves away
from a station transmitter, the signals will
tend to fade and/or drift.
Static and flutter: During signal interference
from buildings, large hills or due to antenna
position, usually in conjunction with in-
creased distance from the station transmit-
ter, static or flutter can be heard. This can be
reduced by lowering the treble setting to
reduce the treble response.
Multipath reception: Because of the reflec-
tive characteristics of FM signals, direct and
reflected signals reach the receiver at the
same time. The signals may cancel each
other, resulting in momentary flutter or loss
of sound.AM radio reception
AM signals, because of their low frequency,
can bend around objects and skip along the
ground. In addition, the signals can bounce
off the ionosphere and be bent back to
earth. Because of these characteristics, AM
signals are also subject to interference as
they travel from transmitter to receiver.
Fading: Occurs while the vehicle is passing
through freeway underpasses or in areas
with many tall buildings. It can also occur for
several seconds during ionospheric turbu-
lence even in areas where no obstacles exist.
Static: Caused by thunderstorms, electrical
power lines, electric signs and even traffic
lights.
HD RadioTMTechnology reception
(for U.S.)
HD RadioTMTechnology reception needs to
be activated to receive HD Radio broad-
casts.
“Audio settings” (page 3-38)
This enables you to receive radio broadcasts
digitally (where available), providing a better
quality sound with clear reception. When
this feature is not activated or HD Radio
broadcasts are not available, you will receive analog radio (AM/FM) broadcasts.
Satellite radio reception
When the satellite radio is used for the first
time or the vehicle battery (12V battery) has
been replaced, the satellite radio may not
work properly. This is not a malfunction.
Wait more than 10 minutes with the satellite
radio ON and the vehicle outside of any
metal or large building for the satellite radio
to receive all of the necessary data.
The satellite radio mode requires an active
SiriusXM® Satellite Radio subscription. The
satellite service is available only to those at
least 18 and older in the 48 contiguous
United States and DC.
The satellite radio performance may be
affected if cargo carried on the roof blocks
the satellite radio signal.
If possible, do not put cargo near the
satellite antenna.
A buildup of ice on the satellite radio
antenna can affect satellite radio perfor-
mance. Remove the ice to restore satellite
radio reception.
3. Audio system
3-3
Page 48 of 276

3. Audio system
COMPACT DISC (CD) PLAYER
.Do not force a compact disc into the CD
insert slot. This could damage the CD
and/or CD player.
. Trying to load a CD with the CD door
closed could damage the CD and/or CD player.
. During cold or rainy weather, the player
may malfunction due to the humidity. If
this occurs, remove the CD and dehumi-
dify or ventilate the player completely.
. The player may skip while driving on
rough roads.
. The CD player sometimes cannot func-
tion when the passenger compartment
temperature is extremely high. Decrease
the temperature before use.
. Only use high quality 4.7 in (12 cm) round
discs that have the “COMPACT disc
DIGITAL AUDIO” logo on the disc or
packaging.
. Do not expose the CD to direct sunlight.
. CDs that are of poor quality, are dirty,
scratched, or covered with fingerprints,
or that have pin holes may not work
properly.
. The following CDs may not work prop-
erly:
— Copy control compact discs (CCCD)
— Recordable compact discs (CD-R) — Rewritable compact discs (CD-RW)
. Do not use the following CDs as they
may cause the CD player to malfunction.
— 3.1 in (8 cm) discs
— CDs that are not round
— CDs with a paper label
— CDs that are warped, scratched, or have abnormal edges
. This audio system can only play prere-
corded CDs. It has no capabilities to
record or burn CDs.
. If a CD cannot be played, error messages
similar to the following may be displayed.
— Disc read error: Indicates a CLV/Focus, TOC or Ac-
cess error. Check and re-insert the
CD. Make sure that it is inserted
correctly.
— Eject disc, please: Indicates a mechanism error. If the
CD can be ejected, eject and re-insert
the CD. If the CD cannot be ejected, it
is recommended you contact an
INFINITI retailer.
— Unplayable error: Indicates that no readable files are
found on the inserted CD. Check the
3-4
Page 52 of 276

3. Audio system
USB (Universal Serial Bus) CON-
NECTION PORT
WARNING
Do not connect, disconnect or operate the
USB memory device while driving.
Doing so can be a distraction. If dis-
tracted you could lose control of your
vehicle and cause an accident or serious
injury.
CAUTION
.Do not force the USB memory device
into the USB connection port. Insert-
ing the USB memory device tilted or
upside down into the port may da-
mage the port. Make sure that the
USB memory device is connected
correctly into the USB connection
port.
. Do not grab the USB connection port
cover (if so equipped) when pulling
the USB memory device out of the
port. This could damage the port and
the cover. .
Do not leave the USB cable in a place
where it can be pulled unintentionally.
Pulling the cable may damage the
port.
The vehicle is not equipped with a USB
memory device. USB memory devices should
be purchased separately as necessary.
This system cannot be used to format USB
memory devices.
To format a USB memory device, use a
personal computer.
In some jurisdictions, the USB memory
device for the front seats plays only sound
without images for regulatory reasons, even
when the vehicle is parked.
This system supports various USB memory
devices, USB hard drives and iPod® players.
Some USB memory devices may not be
supported by this system. . Partitioned USB memory devices may
not play correctly.
. Some characters used in other languages
(Chinese, Japanese, etc.) may not appear
properly in the display. Using English
language characters with a USB memory
device is recommended. General notes for USB use:
Refer to your device manufacturer’s owner
information regarding the proper use and
care of the device.
Notes for iPod® use:
“Made for iPod®” and “Made for iPhone®”
mean that an electronic accessory has been
designed to connect specifically to iPod® or
iPhone®, respectively, and has been certified
by the developer to meet Apple performance
standards. Apple is not responsible for the
operation of this device or its compliance
with safety and regulatory standards. Please
note that the use of this accessory with
iPod® or iPhone® may affect wireless
performance.
Apple, the Apple logo, iPhone®, iPod®, iPod
classic®, iPod nano®, and iPod touch® are
trademarks of Apple Inc., registered in the
U.S. and other countries. Lightning
TMis a
trademark of Apple Inc. App StoreSMis a
service mark of Apple Inc.
. Improperly plugging in the iPod® may
cause a check-mark to be displayed on/
off (flickering). Always make sure that
the iPod® is connected properly.
3-8
Page 76 of 276

3. Audio system
.The LightningTMconnector works with
iPhone® 5, iPhone® 5s, iPod touch®
(5th generation) and iPod nano® (7th
generation).
. The 30–pin connector works with
iPhone® 4S, iPhone® 4, iPhone® 3GS,
iPhone® 3G, iPhone®, iPod touch® (1st
through 4th generation), iPod classic®
and iPod nano® (1st through 6th gen-
eration).
. USB works with iPhone® 5, iPhone® 4S,
iPhone® 4, iPhone® 3GS, iPhone® 3G,
iPhone®, iPod touch® (1st through 5th
generation), iPod classic® and iPod
nano® (1st through 7th generation).How to view iPod® operation screen
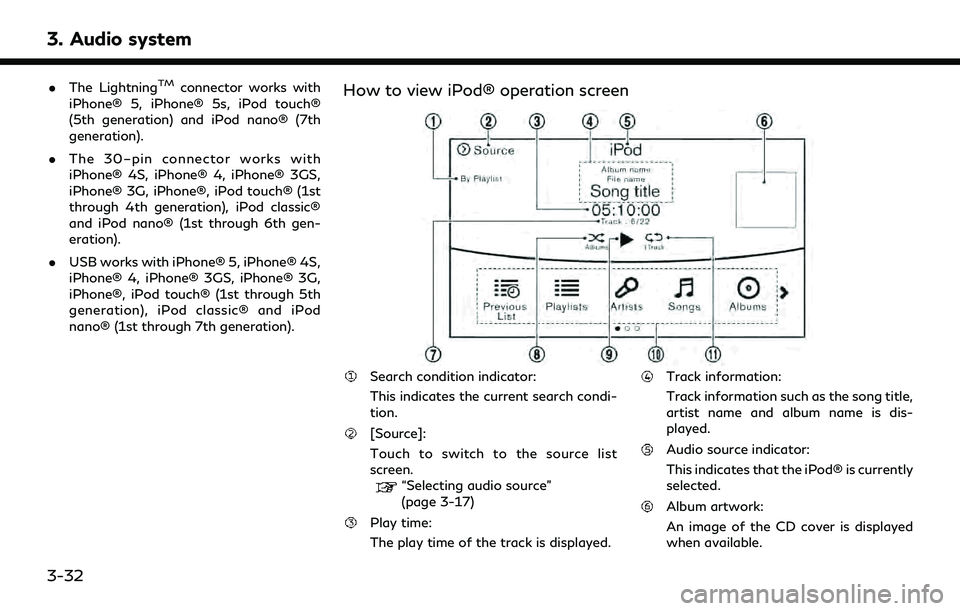
Search condition indicator:
This indicates the current search condi-
tion.
[Source]:
Touch to switch to the source list
screen.
“Selecting audio source”
(page 3-17)
Play time:
The play time of the track is displayed.
Track information:
Track information such as the song title,
artist name and album name is dis-
played.
Audio source indicator:
This indicates that the iPod® is currently
selected.
Album artwork:
An image of the CD cover is displayed
when available.
3-32
Page 85 of 276

DISC/USB MEMORY DEVICE
CARE AND CLEANING
DISCS
. Handle a disc by its edges. Never touch
the surface of the disc. Do not bend the
disc.
. Always place discs in their storage cases
when they are not being used.
. To clean a disc, wipe the surface from
the center to the outer edge using a
clean, soft cloth. Do not wipe the disc
using a circular motion.
Do not use a conventional record cleaner or alcohol intended for industrial use.
. The inner and outer edges of a new disc
may be rough. Remove the rough edges
by rubbing the inner and outer edges
with the side of a pen or pencil as
illustrated.
USB MEMORY DEVICE
.Never touch the terminal portion of the
USB memory device.
. Do not place heavy objects on the USB
memory device.
. Do not store the USB memory device in
very humid locations.
. Do not expose the USB memory device
to direct sunlight.
. Do not spill any liquids on the USB
memory device.
Refer to the owner’s manual for the USB
memory device for details.
GRACENOTE® END USER LI-
CENSE AGREEMENT
This application or device contains software
from Gracenote, Inc. of Emeryville, Califor-
nia (“Gracenote”).The software from Grace-
note (the “Gracenote Software”) enables this
application to perform disc and/or file
identification and obtain music-related in-
formation, including name, artist, track, and
title information (“Gracenote Data”) from
online servers or embedded databases (col-
lectively, “Gracenote Servers”) and to per-
form other functions. You may use
Gracenote Data only by means of the
intended End-User functions of this applica-
tion or device.
You agree that you will use Gracenote Data,
the Gracenote Software, and Gracenote
Servers for your own personal non-commer-
cial use only. You agree not to assign, copy,
transfer, or transmit the Gracenote Soft-
ware or any Gracenote Data to any third
part. YOU AGREE NOT TO USE OR EX-
PLOIT GRACENOTE DATA, THE GRACE
SOFTWARE, OR GRACENOTE SERVERS,
EXCEPT WHEN EXPRESSLY PERMITTED
HEREIN.
You agree that your non-exclusive license to
3. Audio system
3-41
Page 97 of 276

Push to go back to the previous screen.
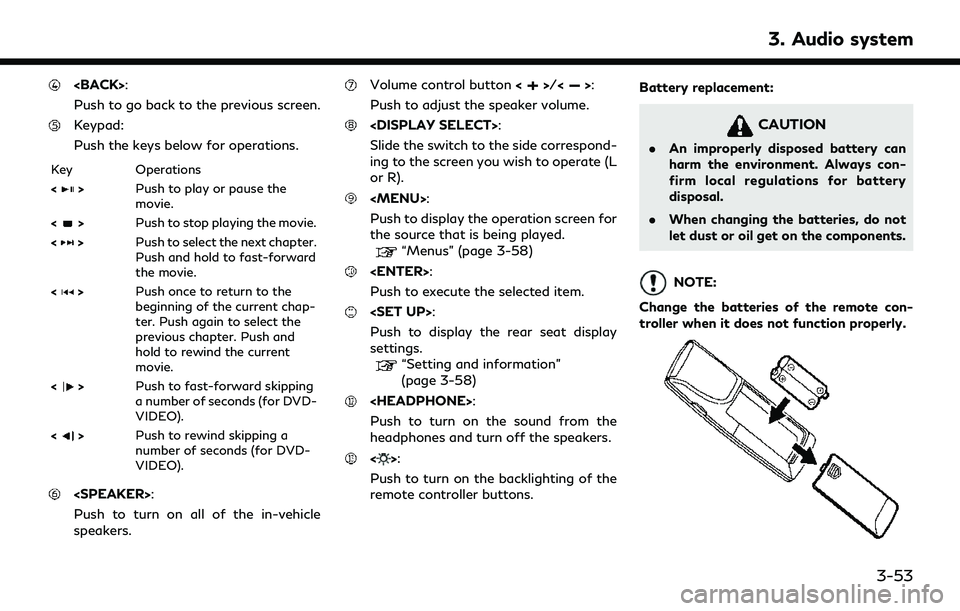
Keypad:
Push the keys below for operations.
Key Operations
<
>Push to play or pause the
movie.
<
> Push to stop playing the movie.
<
> Push to select the next chapter.
Push and hold to fast-forward
the movie.
<
> Push once to return to the
beginning of the current chap-
ter. Push again to select the
previous chapter. Push and
hold to rewind the current
movie.
<
> Push to fast-forward skipping
a number of seconds (for DVD-
VIDEO).
<
> Push to rewind skipping a
number of seconds (for DVD-
VIDEO).
Push to turn on all of the in-vehicle
speakers.
Volume control button <>/<>:
Push to adjust the speaker volume.
Slide the switch to the side correspond-
ing to the screen you wish to operate (L
or R).
Page 103 of 276
![INFINITI QX60 2020 Infiniti Connection Available items. [System Settings]
. [Display Settings]
. [Information]
System settings
To change the settings of the Mobile
Entertainment System, push <SET UP>on
the remote controller and select [Sys INFINITI QX60 2020 Infiniti Connection Available items. [System Settings]
. [Display Settings]
. [Information]
System settings
To change the settings of the Mobile
Entertainment System, push <SET UP>on
the remote controller and select [Sys](/manual-img/42/35140/w960_35140-102.png)
Available items. [System Settings]
. [Display Settings]
. [Information]
System settings
To change the settings of the Mobile
Entertainment System, push
the remote controller and select [System
Settings].
Select the preferred item and adjust the
setting using the remote controller.
Available items:
. [Aspect Ratio]
Select the image size from Normal, Wide,
Cinema and Full.
. [Language]
The language displayed on the screen
can be changed. Select [Manual] and
then select a preferred language from
the list. To apply the same language that
is applied to the front display, select
[Auto].
The language of the rear menu screens
can be set independently from the front
display. The rear display language set- tings will be applied to both the rear left
and rear right displays.
. [Operation Guide]
When this item is turned on, an explana-
tion for the menu highlighted on the
screen will appear at the bottom of the
screen.
. [DivX® VOD]
DivX® VOD license information can be
viewed.
Display settings
To change the rear display settings, push
select [Display Settings].
Select the preferred item and adjust the
setting using the remote controller.
Available items:
. [Display Adjustment]
— [Picture Mode] Select image quality from Normal,
Dynamic, Cinema and Game.
— [Auto Bright] Select from Normal, Bright, OFF and
Dark. The brightness of the screen is
adjusted automatically according to
the brightness inside the vehicle compartment. The sensor is located
on the right side corner of the rear
displays.
— [Brightness]/[Tint]/[Contrast]/[Col- or]/[Black Level]
Adjust the levels using <
>or <>
on the remote controller.
— [Default] Select this item to reset the screen
settings to the default value.
. [Automatic Detail Enhancement]
The enhancement of the contrast for
details can be adjusted automatically
with this function. Select the level of
the function from High, Medium and
Low.
. [Super Resolution]
Blurred images with a low resolution can
be converted and adjusted into more
crisp, clearer images. Select the level of
the function from High, Medium or Low.
. [Automatic Contrast Adjustment]
Objects in dark images that are difficult
to view can be adjusted and enhanced
automatically for clearer viewing. Select
the level of the function from High,
Medium or Low.
3. Audio system
3-59
Page 107 of 276

CARE AND MAINTENANCE
CAUTION
.Do not apply excessive force to the
monitor screen.
. Avoid touching or scratching the
monitor as it may become dirty or
damaged.
. Do not attempt to operate the system
in extreme temperature conditions
[below -4°F (–20°C) and above
158°F (70°C)].
. Do not attempt to operate the system
in extreme humidity (less than 10% or
more than 75%).
. For cleaning, turn the rear displays off
and use a soft dry cloth. Never use a
rough cloth, alcohol, benzine, thinner
or any kind of solvent or paper towel
with a chemical cleaning agent. They
will scratch or cause discoloration to
the displays. If dirt does not come off
with a dry cloth, slightly dampen the
cloth with neutral detergent.
3. Audio system
3-63