Page 353 of 480
6-3
What to do in an emergency
If you Have a Flat Tire While
Driving
If a tire goes flat while you are driving:
Take your foot off the accelerator
pedal and let the vehicle slow down
while driving straight ahead. Do not
apply the brakes immediately or
attempt to pull off the road as this
may cause loss of vehicle control
resulting in an accident. When the
vehicle has slowed to such a speed
that it is safe to do so, brake care-
fully and pull off the road. Drive off
the road as far as possible and park
on firm, level ground. If you are on
a divided highway, do not park in
the median area between the two
traffic lanes.
When the vehicle is stopped, press
the hazard warning flasher button,
move the shift lever into P (Park),
and apply the parking brake, and
place the ignition switch in the
LOCK/OFF position.
Have all passengers get out of the
vehicle. Be sure they all get out on
the side of the vehicle that is away
from traffic.
When changing a flat tire, follow
the instructions provided later in
this chapter.
If the Engine Doesn't Turn
Over or Turns Over Slowly
Be sure the shift lever is in N
(Neutral) or P (Park). The engine
starts only when the shift lever is in
N (Neutral) or P (Park).
Check the battery connections to
be sure they are clean and tight.
Turn on the interior light. If the light
dims or goes out when you operate
the starter, the battery is drained.
Do not push or pull the vehicle to
start it. This could cause damage to
your vehicle. See instructions for
"Jump Starting" provided in this
chapter.
If the Engine Turns Over
Normally but Doesn't Start
Check the fuel level and add fuel if
necessary.
If the engine still does not start, have
your vehicle checked by an author-
ized HYUNDAI dealer.
6
I IF
F
T
TH
HE
E
E
EN
NG
GI
IN
NE
E
W
WI
IL
LL
L
N
NO
OT
T
S
ST
TA
AR
RT
T
Push or pull starting the vehicle
may cause the catalytic con-
verter to overload which can
lead to damage to the emission
control system.
CAUTION
Page 355 of 480
6-5
What to do in an emergency
6
Information
An inappropriately disposed
battery can be harmful to the
environment and human
health. Dispose of the battery
according to your local law(s)
or regulations.
To prevent damage to your vehicle:
Only use a 12-volt power supply
(battery or jumper system) to
jump start your vehicle.
Do not attempt to jump start
your vehicle by push-starting.
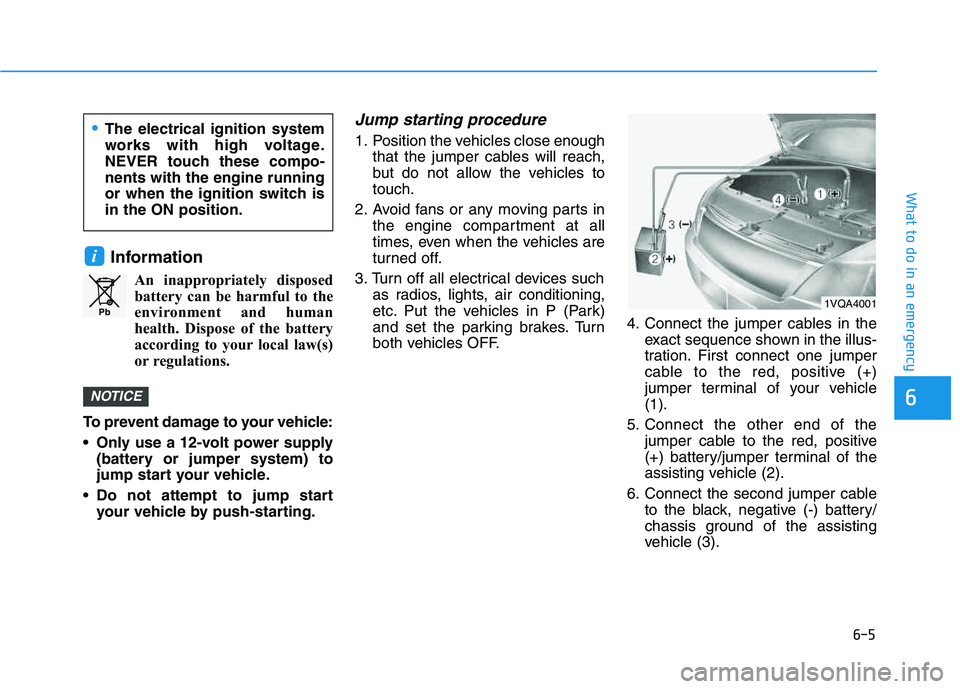
Jump starting procedure
1. Position the vehicles close enough
that the jumper cables will reach,
but do not allow the vehicles to
touch.
2. Avoid fans or any moving parts in
the engine compartment at all
times, even when the vehicles are
turned off.
3. Turn off all electrical devices such
as radios, lights, air conditioning,
etc. Put the vehicles in P (Park)
and set the parking brakes. Turn
both vehicles OFF.4. Connect the jumper cables in the
exact sequence shown in the illus-
tration. First connect one jumper
cable to the red, positive (+)
jumper terminal of your vehicle
(1).
5. Connect the other end of the
jumper cable to the red, positive
(+) battery/jumper terminal of the
assisting vehicle (2).
6. Connect the second jumper cable
to the black, negative (-) battery/
chassis ground of the assisting
vehicle (3).
NOTICE
i
Pb
The electrical ignition system
works with high voltage.
NEVER touch these compo-
nents with the engine running
or when the ignition switch is
in the ON position.
1VQA4001
Page 368 of 480
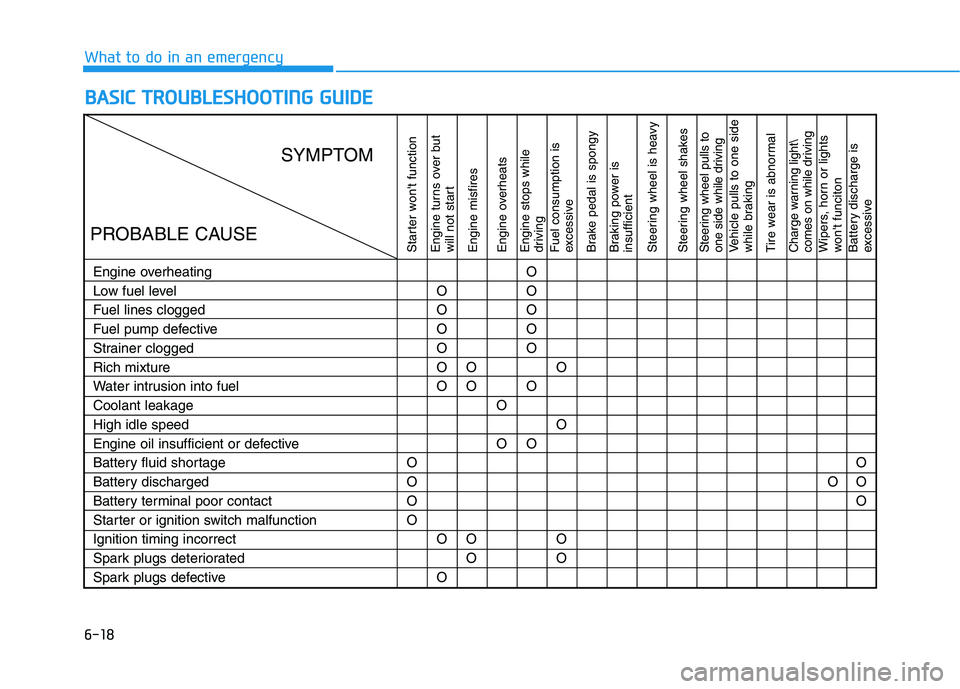
6-18
B BA
AS
SI
IC
C
T
TR
RO
OU
UB
BL
LE
ES
SH
HO
OO
OT
TI
IN
NG
G
G
GU
UI
ID
DE
E
What to do in an emergency
Starter won't function
Engine turns over but
will not start
Engine misfires
Engine overheats
Engine stops while
driving
Fuel consumption is
excessive
Brake pedal is spongy
Braking power is
insufficient
Steering wheel is heavy
Steering wheel shakesSteering wheel pulls to
one side while drivingVehicle pulls to one side
while braking
Tire wear is abnormalCharge warning light\
comes on while drivingWipers, horn or lights
won't funciton
Battery discharge is
excessive
Engine overheating
Low fuel level
Fuel lines clogged
Fuel pump defective
Strainer clogged
Rich mixture
Water intrusion into fuel
Coolant leakage
High idle speed
Engine oil insufficient or defective
Battery fluid shortage
Battery discharged
Battery terminal poor contact
Starter or ignition switch malfunction
Ignition timing incorrect
Spark plugs deteriorated
Spark plugs defectiveO
O
O
OO
O
O
O
O
O
O
OO
O
O
OO
OO
O
O
O
O
O
OO
O
O
OOO
O
O
SYMPTOM
PROBABLE CAUSE
Page 369 of 480
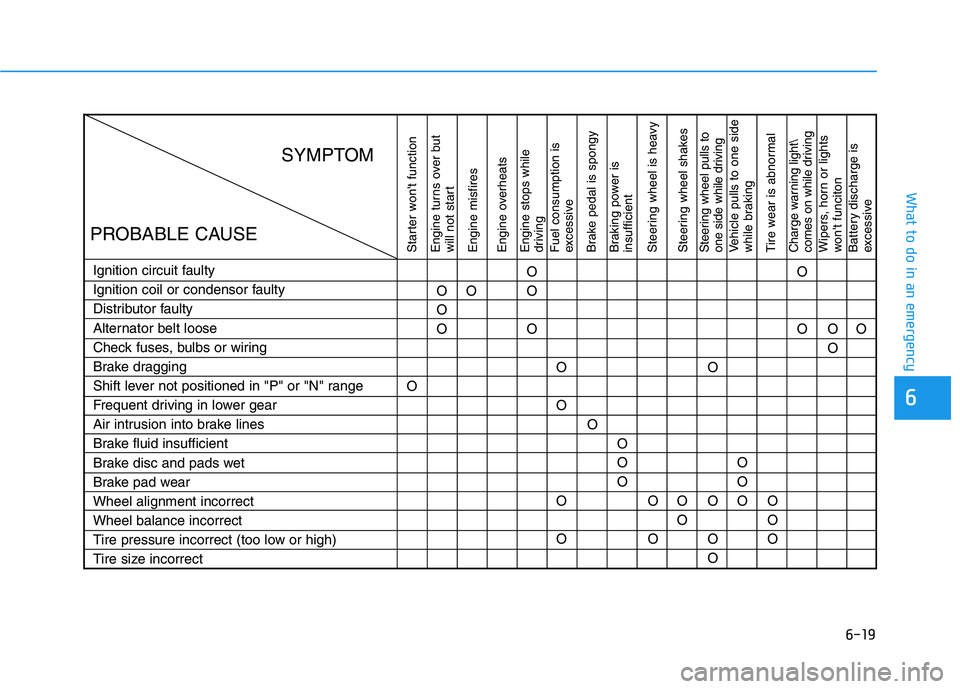
6-19
What to do in an emergency
6
Starter won't function
Engine turns over but
will not start
Engine misfires
Engine overheats
Engine stops while
driving
Fuel consumption is
excessive
Brake pedal is spongy
Braking power is
insufficient
Steering wheel is heavy
Steering wheel shakesSteering wheel pulls to
one side while drivingVehicle pulls to one side
while braking
Tire wear is abnormalCharge warning light\
comes on while drivingWipers, horn or lights
won't funciton
Battery discharge is
excessive
Ignition circuit faulty
Ignition coil or condensor faulty
Distributor faulty
Alternator belt loose
Check fuses, bulbs or wiring
Brake dragging
Shift lever not positioned in "P" or "N" range
Frequent driving in lower gear
Air intrusion into brake lines
Brake fluid insufficient
Brake disc and pads wet
Brake pad wear
Wheel alignment incorrect
Wheel balance incorrect
Tire pressure incorrect (too low or high)
Tire size incorrectOO
O
OO
O
O
O
O
O
OO
OO
O
O
OO
O
OO
O
OO
O O
O
O
O
O
O
OO
OO
SYMPTOM
PROBABLE CAUSE
Page 371 of 480
7
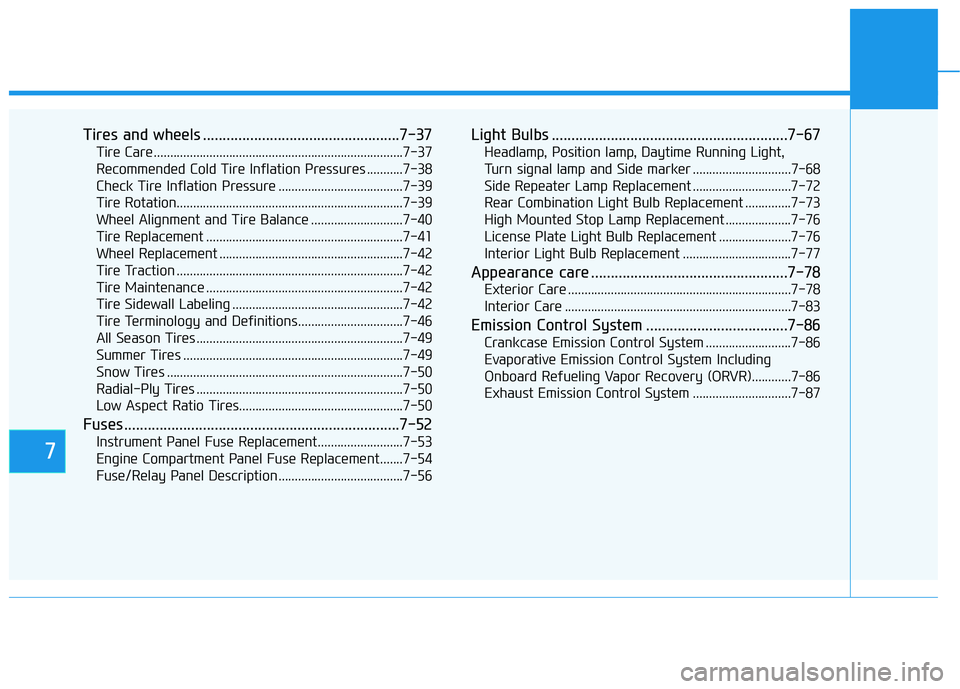
Tires and wheels ..................................................7-37
Tire Care ............................................................................7-37
Recommended Cold Tire Inflation Pressures ...........7-38
Check Tire Inflation Pressure ......................................7-39
Tire Rotation.....................................................................7-39
Wheel Alignment and Tire Balance ............................7-40
Tire Replacement ............................................................7-41
Wheel Replacement ........................................................7-42
Tire Traction .....................................................................7-42
Tire Maintenance ............................................................7-42
Tire Sidewall Labeling ....................................................7-42
Tire Terminology and Definitions................................7-46
All Season Tires ...............................................................7-49
Summer Tires ...................................................................7-49
Snow Tires ........................................................................7-50
Radial-Ply Tires ...............................................................7-50
Low Aspect Ratio Tires..................................................7-50
Fuses ......................................................................7-52
Instrument Panel Fuse Replacement..........................7-53
Engine Compartment Panel Fuse Replacement.......7-54
Fuse/Relay Panel Description ......................................7-56
Light Bulbs ............................................................7-67
Headlamp, Position lamp, Daytime Running Light,
Turn signal lamp and Side marker ..............................7-68
Side Repeater Lamp Replacement ..............................7-72
Rear Combination Light Bulb Replacement ..............7-73
High Mounted Stop Lamp Replacement ....................7-76
License Plate Light Bulb Replacement ......................7-76
Interior Light Bulb Replacement .................................7-77
Appearance care ..................................................7-78
Exterior Care ....................................................................7-78
Interior Care .....................................................................7-83
Emission Control System ....................................7-86
Crankcase Emission Control System ..........................7-86
Evaporative Emission Control System Including
Onboard Refueling Vapor Recovery (ORVR)............7-86
Exhaust Emission Control System ..............................7-87
Page 375 of 480
7-6
Maintenance
Owner Maintenance Schedule
When you stop for fuel:
• Check the engine oil level.
Check the coolant level in the
engine coolant reservoir.
Check the windshield washer fluid
level.
Check the for low or under-inflated
tires.
While operating your vehicle:
Note any changes in the sound of
the exhaust or any smell of
exhaust fumes in the vehicle.
Check for vibrations in the steering
wheel. Notice if there is any
increased steering effort or loose-
ness in the steering wheel, or
change in its straight-ahead posi-
tion.
Notice if your vehicle constantly
turns slightly or "pulls" to one side
when traveling on smooth, level
road.
When stopping, listen and check
for unusual sounds, pulling to one
side, increased brake pedal travel
or "hard-to-push" brake pedal.
If any slipping or changes in the
operation of your transmission
occurs, check the transmission
fluid level.
Check the automatic transmission/
dual clutch transmission P (Park)
function. Check the parking brake.
Check for fluid leaks under your
vehicle (water dripping from the air
conditioning system during or after
use is normal).
At least monthly:
Check coolant level in the engine
coolant reservoir.
Check the operation of all exterior
lights, including the brake lights,
turn signals and hazard warning
flashers.
Check the inflation pressures of all
tires including the spare for tires
that are worn, show uneven wear,
or are damaged.
Check for loose wheel lug nuts. Be careful when checking your
engine coolant level when the
engine is hot. This may result in
coolant being blown out of the
opening and cause serious
burns and other injuries.
WARNING
Page 401 of 480
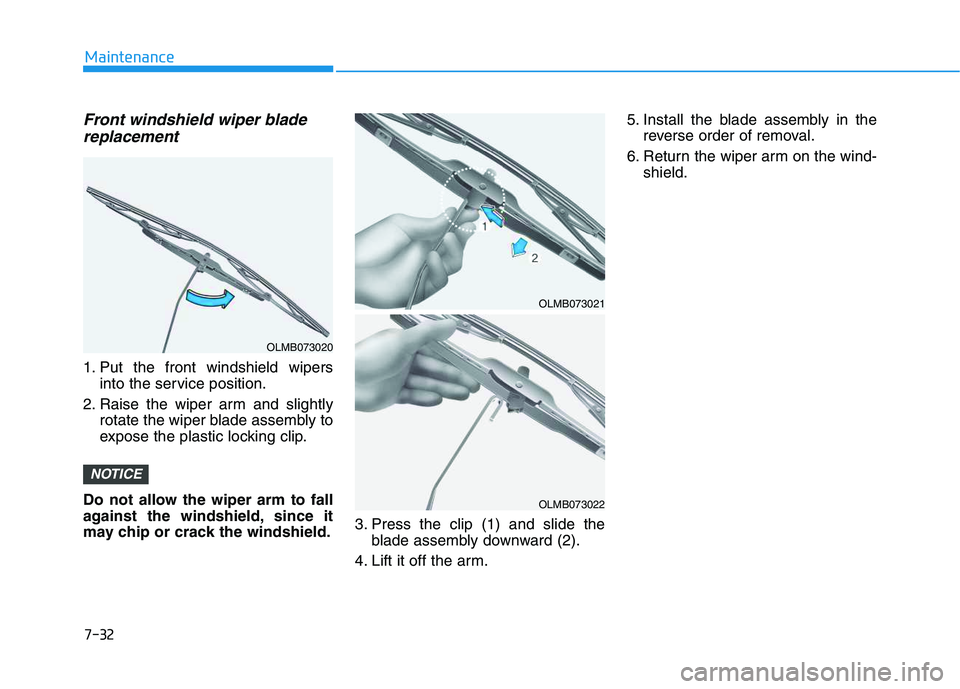
Front windshield wiper blade
replacement
1. Put the front windshield wipers
into the service position.
2. Raise the wiper arm and slightly
rotate the wiper blade assembly to
expose the plastic locking clip.
Do not allow the wiper arm to fall
against the windshield, since it
may chip or crack the windshield.3. Press the clip (1) and slide the
blade assembly downward (2).
4. Lift it off the arm.5. Install the blade assembly in the
reverse order of removal.
6. Return the wiper arm on the wind-
shield.
NOTICE
7-32
Maintenance
OLMB073020
OLMB073022OLMB073021
Page 402 of 480
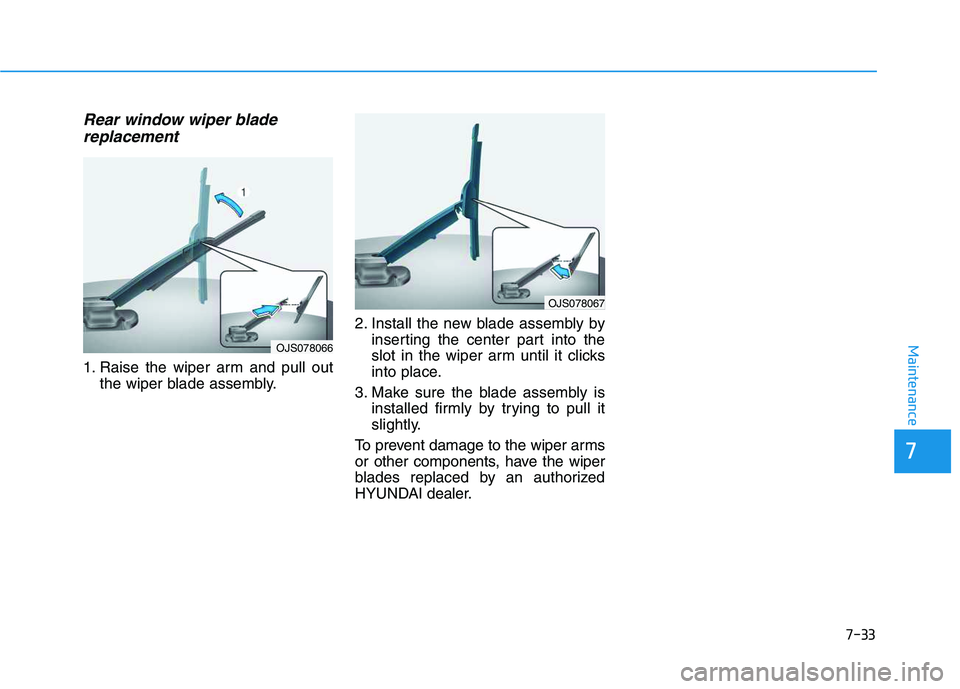
Rear window wiper blade
replacement
1. Raise the wiper arm and pull out
the wiper blade assembly.2. Install the new blade assembly by
inserting the center part into the
slot in the wiper arm until it clicks
into place.
3. Make sure the blade assembly is
installed firmly by trying to pull it
slightly.
To prevent damage to the wiper arms
or other components, have the wiper
blades replaced by an authorized
HYUNDAI dealer.
7-33
7
Maintenance
OJS078067
OJS078066