Page 86 of 480

3-86
Convenient features of your vehicle
Turn signals and lane change
signals
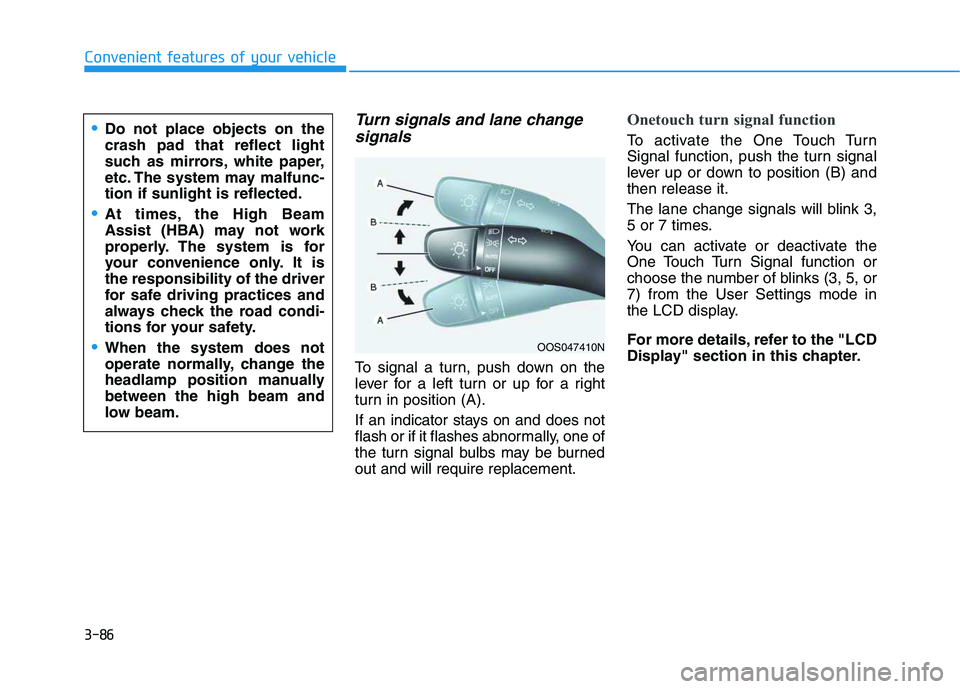
To signal a turn, push down on the
lever for a left turn or up for a right
turn in position (A).
If an indicator stays on and does not
flash or if it flashes abnormally, one of
the turn signal bulbs may be burned
out and will require replacement.
Onetouch turn signal function
To activate the One Touch Turn
Signal function, push the turn signal
lever up or down to position (B) and
then release it.
The lane change signals will blink 3,
5 or 7 times.
You can activate or deactivate the
One Touch Turn Signal function or
choose the number of blinks (3, 5, or
7) from the User Settings mode in
the LCD display.
For more details, refer to the "LCD
Display" section in this chapter.
OOS047410N
Do not place objects on the
crash pad that reflect light
such as mirrors, white paper,
etc. The system may malfunc-
tion if sunlight is reflected.
At times, the High Beam
Assist (HBA) may not work
properly. The system is for
your convenience only. It is
the responsibility of the driver
for safe driving practices and
always check the road condi-
tions for your safety.
When the system does not
operate normally, change the
headlamp position manually
between the high beam and
low beam.
Page 371 of 480

7
Tires and wheels ..................................................7-37
Tire Care ............................................................................7-37
Recommended Cold Tire Inflation Pressures ...........7-38
Check Tire Inflation Pressure ......................................7-39
Tire Rotation.....................................................................7-39
Wheel Alignment and Tire Balance ............................7-40
Tire Replacement ............................................................7-41
Wheel Replacement ........................................................7-42
Tire Traction .....................................................................7-42
Tire Maintenance ............................................................7-42
Tire Sidewall Labeling ....................................................7-42
Tire Terminology and Definitions................................7-46
All Season Tires ...............................................................7-49
Summer Tires ...................................................................7-49
Snow Tires ........................................................................7-50
Radial-Ply Tires ...............................................................7-50
Low Aspect Ratio Tires..................................................7-50
Fuses ......................................................................7-52
Instrument Panel Fuse Replacement..........................7-53
Engine Compartment Panel Fuse Replacement.......7-54
Fuse/Relay Panel Description ......................................7-56
Light Bulbs ............................................................7-67
Headlamp, Position lamp, Daytime Running Light,
Turn signal lamp and Side marker ..............................7-68
Side Repeater Lamp Replacement ..............................7-72
Rear Combination Light Bulb Replacement ..............7-73
High Mounted Stop Lamp Replacement ....................7-76
License Plate Light Bulb Replacement ......................7-76
Interior Light Bulb Replacement .................................7-77
Appearance care ..................................................7-78
Exterior Care ....................................................................7-78
Interior Care .....................................................................7-83
Emission Control System ....................................7-86
Crankcase Emission Control System ..........................7-86
Evaporative Emission Control System Including
Onboard Refueling Vapor Recovery (ORVR)............7-86
Exhaust Emission Control System ..............................7-87
Page 437 of 480
7-68
Maintenance
Headlamp, Position lamp,
Daytime Running Light, Turn
signal lamp and Side marker
Type A
(1) Headlamp (High)
(2) Headlamp (Low)
(3) Turn signal lamp
(4) Position lamp &
Daytime running light (DRL)
(5) Side marker Always handle them carefully, and
avoid scratches and abrasions. If
the bulbs are lit, avoid contact with
liquids.
Never touch the glass with bare
hands. Residual oil may cause the
bulb to overheat and burst when lit.
A bulb should be operated only
when installed in a headlamp.
If a bulb becomes damaged or
cracked, replace it immediately
and carefully dispose of it.
Handle halogen bulbs with
care. Halogen bulbs contain
pressurized gas that will pro-
duce flying pieces of glass that
could cause injuries if broken.
Wear eye protection when
changing a bulb. Allow the
bulb to cool down before han-
dling it.
WARNING
OLMB073042L
OJS078057N
Page 438 of 480
![HYUNDAI VELOSTER 2020 Owners Manual 7-69
7
Maintenance
[1] : High beam, [2] : Low beam
Headlamp
1. Open the hood.
2. Disconnect the negative battery
cable.
3. Remove the headlamp bulb cover
by turning it counterclockwise.
4. Disconnect HYUNDAI VELOSTER 2020 Owners Manual 7-69
7
Maintenance
[1] : High beam, [2] : Low beam
Headlamp
1. Open the hood.
2. Disconnect the negative battery
cable.
3. Remove the headlamp bulb cover
by turning it counterclockwise.
4. Disconnect](/manual-img/35/58890/w960_58890-437.png)
7-69
7
Maintenance
[1] : High beam, [2] : Low beam
Headlamp
1. Open the hood.
2. Disconnect the negative battery
cable.
3. Remove the headlamp bulb cover
by turning it counterclockwise.
4. Disconnect the headlamp bulb
socket-connector.5. Remove the bulb from the head-
lamp assembly.
6. Install a new headlamp bulb and
snap the headlamp bulb retaining
wire into position by aligning the
wire with the groove on the bulb.
7. Connect the headlamp bulb sock-
et-connector.
8. Install the headlamp bulb cover by
turning it clockwise.
Information
The headlamp aiming should be
adjusted after an accident or after the
headlamp assembly is reinstalled at an
authorized HYUNDAI dealer.
Turn signal
1. Open the hood.
2. Disconnect the negative battery
cable.
3. Remove the socket (1) from the
assembly by turning the socket
counterclockwise until the tabs on
the socket align with the slots on
the assembly.
4. Remove the bulb from the socket
by pressing it in and rotating it
counterclockwise until the tabs on
the bulb align with the slots in the
socket. Pull the bulb out of the
socket.
iOJS078028OJS078027 ■High/Low beam
Page 439 of 480
7-70
Maintenance
5. Install a new bulb by inserting it
into the socket and rotating it until
it locks into place.
6. Install the socket in the assembly
by aligning the tabs on the socket
with the slots in the assembly.
7. Push the socket into the assembly
and turn the socket clockwise.
Position lamp and daytime running
light
Your vehicle is equipped with LED
lamps. LED lamps do not have
replaceable bulbs. If the LED lamp
does not operate, have the vehicle
checked by an authorized HYUNDAI
dealer.Side marker lamp
1. Open the hood.
2. Disconnect the negative battery
cable.
3. Remove the socket from the
assembly by turning the socket
counterclockwise until the tabs on
the socket align with the slots on
the assembly.
4. Remove the bulb from the socket
by pulling out the bulb.
5. Insert a new bulb.
Type B
(1) Headlamp (High)
(2) Headlamp (Low)
(3) Turn signal lamp
(4) Position lamp &
Daytime running light (DRL)
(5) Side marker
OJS078058N
OJS078070N
Page 441 of 480

7-72
Maintenance
8. Install the headlamp bulb cover by
turning it clockwise.
Information
The headlamp aiming should be
adjusted after an accident or after the
headlamp assembly is reinstalled at an
authorized HYUNDAI dealer.
Turn signal
1. Open the hood.
2. Disconnect the negative battery
cable.3. Remove the socket from the
assembly by turning the socket
counterclockwise until the tabs on
the socket align with the slots on
the assembly.
4. Remove the bulb from the socket
by pressing it in and rotating it
counterclockwise until the tabs on
the bulb align with the slots in the
socket. Pull the bulb out of the
socket.
5. Install a new bulb by inserting it
into the socket and rotating it until
it locks into place.
6. Install the socket in the assembly
by aligning the tabs on the socket
with the slots in the assembly.
7. Push the socket into the assembly
and turn the socket clockwise.
Side Repeater Lamp
Replacement
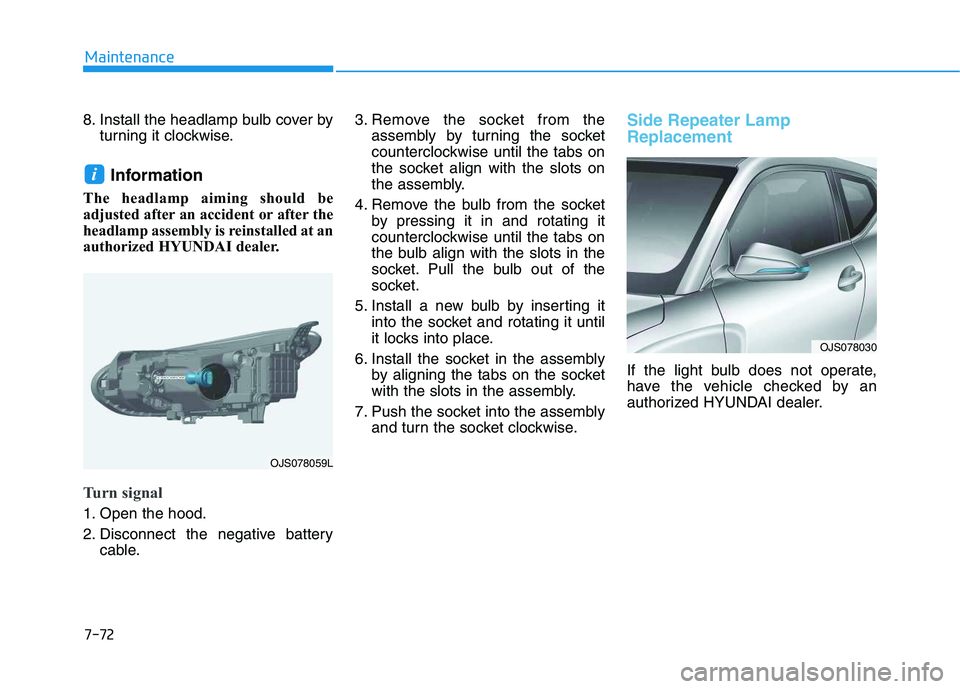
If the light bulb does not operate,
have the vehicle checked by an
authorized HYUNDAI dealer.
i
OJS078030
OJS078059L
Page 442 of 480
7-73
7
Maintenance
Rear Combination Light Bulb
Replacement
(1) Stop/Tail lamp
(2) Tail lamp or Stop/Tail lamp
(3) Turn signal lamp
(4) Backup lamp
(5) Side marker
Side marker and Stop/Tail lamp
light
Your vehicle is equipped with LED
lamps. LED lamps do not have
replaceable bulbs. If the LED lamp
does not operate, have the vehicle
checked by an authorized HYUNDAI
dealer.
Stop/Tail lamp and turn signal lamp
1. Open the tailgate.
2. Open the lamp assembly retaining
screw covers.
3. Loosen the lamp assembly retain-
ing screws with a cross-tip screw-
driver.4. Remove the rear combination
lamp assembly from the body of
the vehicle.
5. Remove the socket from the
assembly by turning the socket
counterclockwise until the tabs on
the socket align with the slots on
the assembly.
OJS078032OJS078033
OJS078031N
Page 443 of 480
7-74
Maintenance
[A] : Stop/Tail lamp [B] : Turn signal lamp
6. Remove the bulb from the socket
by pressing it in and rotating it
counterclockwise until the tabs on
the bulb align with the slots in the
socket. Pull the bulb out of the
socket.7. Insert a new bulb by inserting it
into the socket and rotating it until
it locks into place.
8. Install the socket into the assem-
bly by aligning the tabs on the
socket with the slots in the assem-
bly. Push the socket into the
assembly and turn the socket
clockwise.
9. Reinstall the lamp assembly to the
body of the vehicle.
Tail lamp and backup lamp
1. Turn off the engine.
2. Open the tailgate.
3. Remove the service cover using a
flat-blade screwdriver.
OJS078034OJS078035L
■Type A
OJS078036L
■Type B