2020 Hyundai Tucson turn signal bulb
[x] Cancel search: turn signal bulbPage 170 of 637
3-84
Convenient features of your vehicle
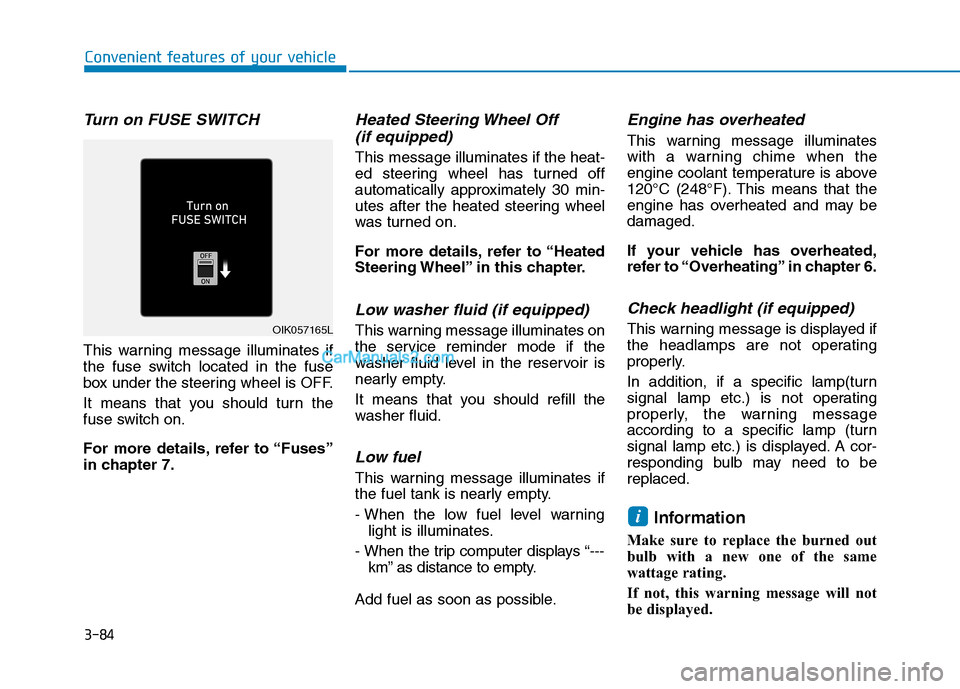
Turn on FUSE SWITCH
This warning message illuminates if
the fuse switch located in the fuse
box under the steering wheel is OFF.
It means that you should turn the
fuse switch on.
For more details, refer to “Fuses”
in chapter 7.
Heated Steering Wheel Off
(if equipped)
This message illuminates if the heat-
ed steering wheel has turned off
automatically approximately 30 min-
utes after the heated steering wheel
was turned on.
For more details, refer to “Heated
Steering Wheel” in this chapter.
Low washer fluid (if equipped)
This warning message illuminates on
the service reminder mode if the
washer fluid level in the reservoir is
nearly empty.
It means that you should refill the
washer fluid.
Low fuel
This warning message illuminates if
the fuel tank is nearly empty.
- When the low fuel level warning
light is illuminates.
- When the trip computer displays “---
km” as distance to empty.
Add fuel as soon as possible.
Engine has overheated
This warning message illuminates
with a warning chime when the
engine coolant temperature is above
120°C (248°F). This means that the
engine has overheated and may be
damaged.
If your vehicle has overheated,
refer to “Overheating” in chapter 6.
Check headlight (if equipped)
This warning message is displayed if
the headlamps are not operating
properly.
In addition, if a specific lamp(turn
signal lamp etc.) is not operating
properly, the warning message
according to a specific lamp (turn
signal lamp etc.) is displayed. A cor-
responding bulb may need to be
replaced.
Information
Make sure to replace the burned out
bulb with a new one of the same
wattage rating.
If not, this warning message will not
be displayed.
i
OIK057165L
Page 199 of 637
3-113
Convenient features of your vehicle
3
Turn signals and lane change
signals
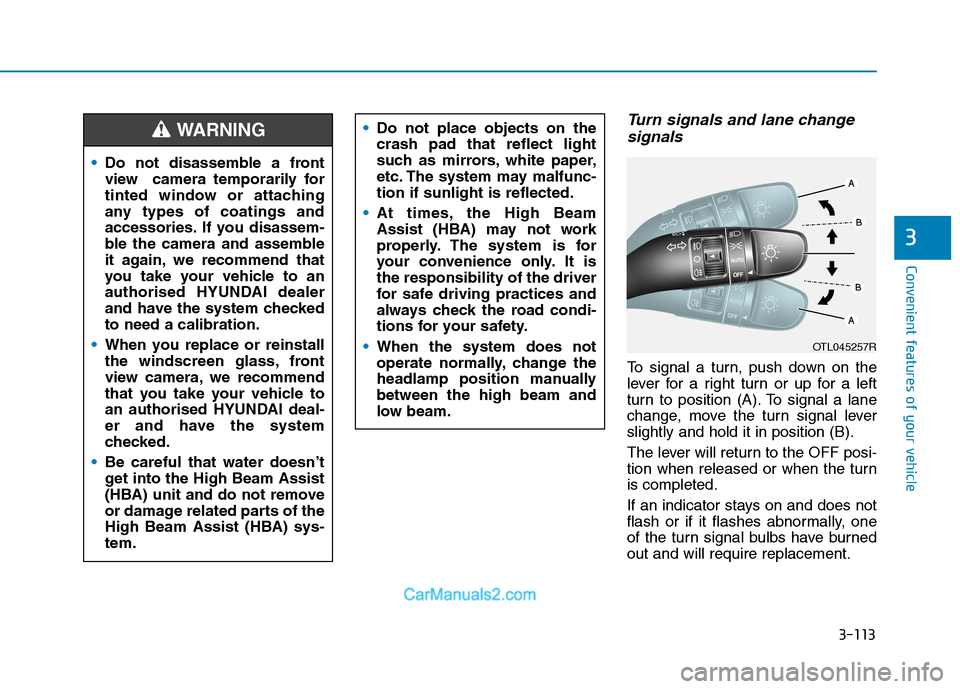
To signal a turn, push down on the
lever for a right turn or up for a left
turn to position (A). To signal a lane
change, move the turn signal lever
slightly and hold it in position (B).
The lever will return to the OFF posi-
tion when released or when the turn
is completed.
If an indicator stays on and does not
flash or if it flashes abnormally, one
of the turn signal bulbs have burned
out and will require replacement.
OTL045257R
Do not disassemble a front
view camera temporarily for
tinted window or attaching
any types of coatings and
accessories. If you disassem-
ble the camera and assemble
it again, we recommend that
you take your vehicle to an
authorised HYUNDAI dealer
and have the system checked
to need a calibration.
When you replace or reinstall
the windscreen glass, front
view camera, we recommend
that you take your vehicle to
an authorised HYUNDAI deal-
er and have the system
checked.
Be careful that water doesn’t
get into the High Beam Assist
(HBA) unit and do not remove
or damage related parts of the
High Beam Assist (HBA) sys-
tem.
WARNING Do not place objects on the
crash pad that reflect light
such as mirrors, white paper,
etc. The system may malfunc-
tion if sunlight is reflected.
At times, the High Beam
Assist (HBA) may not work
properly. The system is for
your convenience only. It is
the responsibility of the driver
for safe driving practices and
always check the road condi-
tions for your safety.
When the system does not
operate normally, change the
headlamp position manually
between the high beam and
low beam.
Page 484 of 637
5-167
Driving your vehicle
5
Distance
Stay at least twice as far behind the
vehicle ahead as you would when
driving your vehicle without a trailer.
This can help you avoid situations
that require heavy braking and sud-
den turns.
Passing
You will need more passing distance
up ahead when you're towing a trail-
er. And, because of the increased
vehicle length, you'll need to go
much farther beyond the passed
vehicle before you can return to your
lane.
Reversing
Hold the bottom of the steering
wheel with one hand. Then, to move
the trailer to the left, move your hand
to the left. To move the trailer to the
right, move your hand to the right.
Always reverse slowly and, if possi-
ble, have someone guide you.
Making turns
When you are turning with a trailer,
make wider turns than normal. Do
this so your trailer won't strike soft
shoulders, kerbs, road signs, trees,
or other objects. Avoid jerky or sud-
den manoeuvres. Signal well in
advance.
Turn signals
When you tow a trailer, your vehicle
has to have a different turn signal
flasher and extra wiring. The green
arrows on your instrument cluster will
flash whenever you signal a turn or
lane change. Properly connected,
the trailer lights will also flash to alert
other drivers you're about to turn,
change lanes, or stop.
When towing a trailer, the green
arrows on your instrument cluster will
flash for turns even if the bulbs on
the trailer are burned out. Thus, you
may think drivers behind you are
seeing your signals when, in fact,
they are not. It's important to check
occasionally to be sure the trailer
bulbs are still working. You must also
check the lights every time you dis-
connect and then reconnect the
wires.
Page 518 of 637
7
Battery...................................................................7-49
For best battery service................................................7-49
Battery capacity label ....................................................7-51
Battery recharging .........................................................7-51
Reset items .......................................................................7-52
Tyres and wheels .................................................7-53
Tyre care ...........................................................................7-53
Recommended cold tyre inflation pressures ...........7-53
Checking tyre inflation pressure.................................7-55
Tyre rotation ....................................................................7-56
Wheel alignment and tyre balance.............................7-57
Tyre replacement ............................................................7-57
Wheel replacement .........................................................7-59
Tyre traction .....................................................................7-59
Tyre maintenance ...........................................................7-59
Tyre sidewall labeling .....................................................7-59
Low aspect ratio tyre.....................................................7-64
Fuses ......................................................................7-65
Fuse/Relay panel description ......................................7-71
Light bulbs.............................................................7-83
Headlamp, Low Beam Assist-Static,
Parking lamp, Turn signal lamp and
Daytime running lamp bulb replacement ..................7-84
Front fog lamp .................................................................7-87
Side repeater lamp replacement .................................7-88
Rear combination light bulb replacement .................7-88
High mounted stop lamp replacement .......................7-91
Licence plate light bulb replacement .........................7-91
Interior light bulb replacement ....................................7-92
Appearance care ..................................................7-94
Exterior care ....................................................................7-94
Interior care ...................................................................7-100
Emission control system ...................................7-103
Crankcase emission control system .........................7-103
Evaporative emission control system ......................7-103
Exhaust emission control system .............................7-104
Page 600 of 637
7-84
Maintenance
Headlamp, Low Beam Assist-
Static, Parking lamp, Turn sig-
nal lamp and Daytime running
lamp bulb replacement
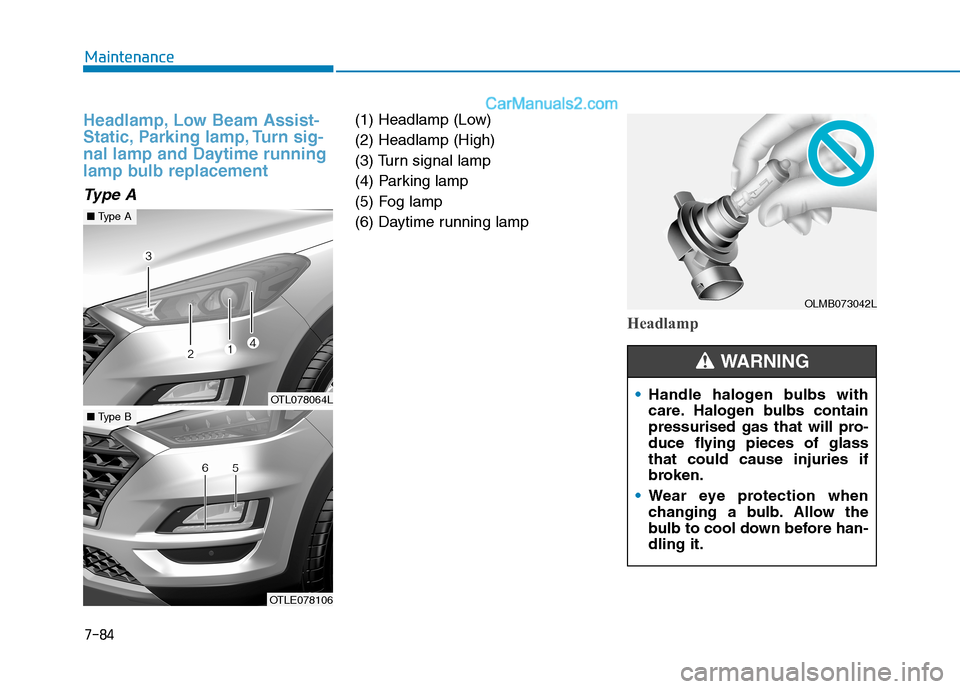
Type A
(1) Headlamp (Low)
(2) Headlamp (High)
(3) Turn signal lamp
(4) Parking lamp
(5) Fog lamp
(6) Daytime running lamp
Headlamp
OLMB073042L
Handle halogen bulbs with
care. Halogen bulbs contain
pressurised gas that will pro-
duce flying pieces of glass
that could cause injuries if
broken.
Wear eye protection when
changing a bulb. Allow the
bulb to cool down before han-
dling it.
WARNING
OTL078064L
■Type A
OTLE078106
■Type B
Page 602 of 637
7-86
Maintenance
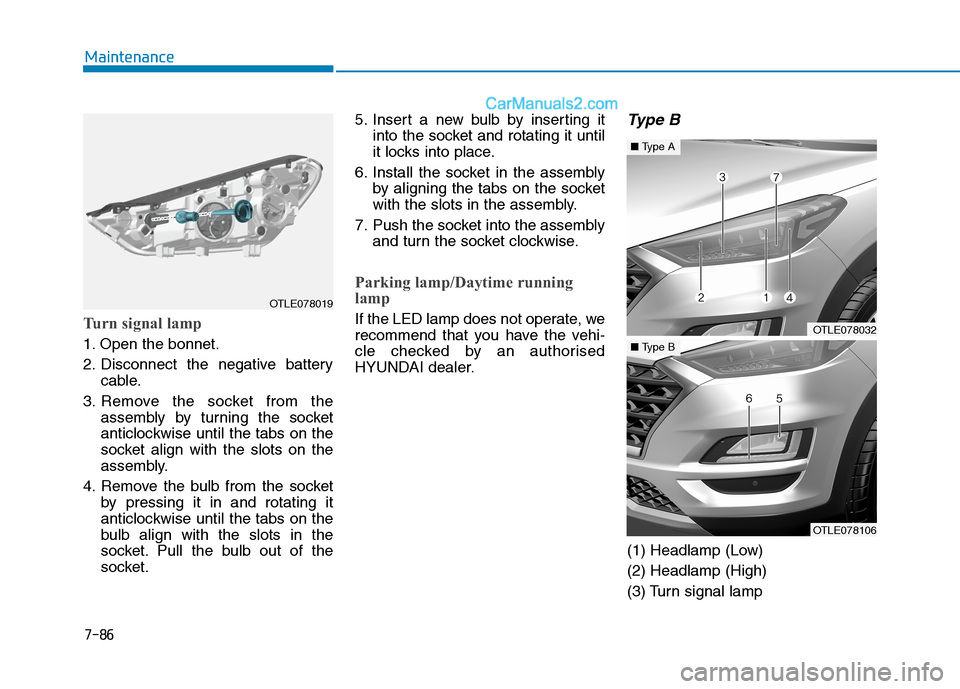
Turn signal lamp
1. Open the bonnet.
2. Disconnect the negative battery
cable.
3. Remove the socket from the
assembly by turning the socket
anticlockwise until the tabs on the
socket align with the slots on the
assembly.
4. Remove the bulb from the socket
by pressing it in and rotating it
anticlockwise until the tabs on the
bulb align with the slots in the
socket. Pull the bulb out of the
socket.5. Insert a new bulb by inserting it
into the socket and rotating it until
it locks into place.
6. Install the socket in the assembly
by aligning the tabs on the socket
with the slots in the assembly.
7. Push the socket into the assembly
and turn the socket clockwise.
Parking lamp/Daytime running
lamp
If the LED lamp does not operate, we
recommend that you have the vehi-
cle checked by an authorised
HYUNDAI dealer.
Type B
(1) Headlamp (Low)
(2) Headlamp (High)
(3) Turn signal lamp
OTLE078019
OTLE078032
■Type A
OTLE078106
■Type B
Page 604 of 637
7-88
Maintenance
Side repeater lamp replace-
ment
If the LED lamp does not operate, we
recommend that you have the vehi-
cle checked by an authorised
HYUNDAI dealer.
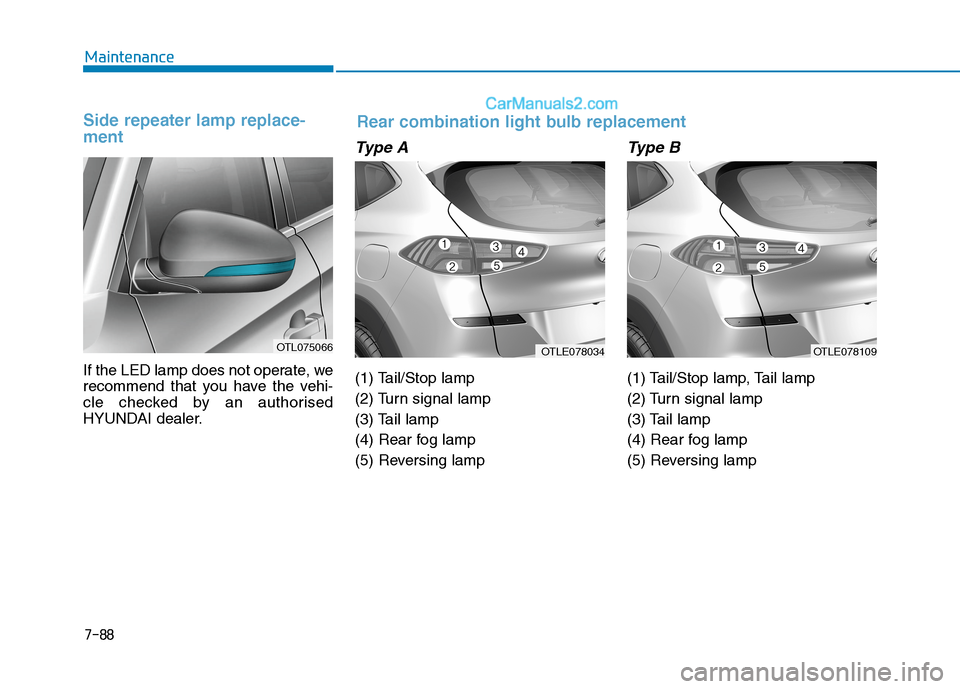
Type A
(1) Tail/Stop lamp
(2) Turn signal lamp
(3) Tail lamp
(4) Rear fog lamp
(5) Reversing lamp
Type B
(1) Tail/Stop lamp, Tail lamp
(2) Turn signal lamp
(3) Tail lamp
(4) Rear fog lamp
(5) Reversing lamp
OTL075066OTLE078034OTLE078109
Rear combination light bulb replacement
Page 605 of 637
7-89
7
Maintenance
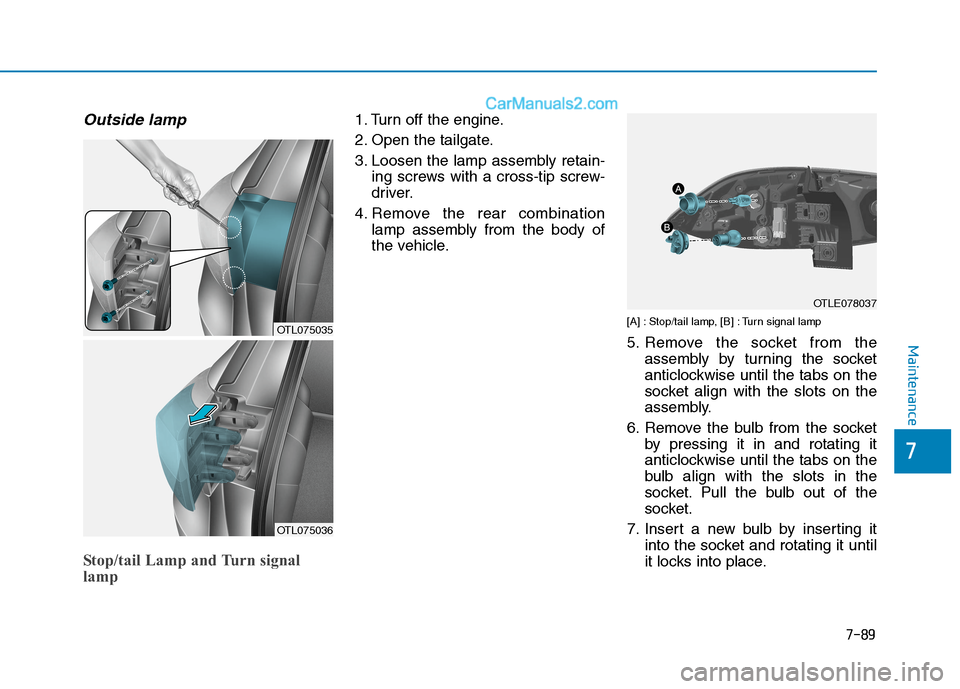
Outside lamp
Stop/tail Lamp and Turn signal
lamp
1. Turn off the engine.
2. Open the tailgate.
3. Loosen the lamp assembly retain-
ing screws with a cross-tip screw-
driver.
4. Remove the rear combination
lamp assembly from the body of
the vehicle.
[A] : Stop/tail lamp, [B] : Turn signal lamp
5. Remove the socket from the
assembly by turning the socket
anticlockwise until the tabs on the
socket align with the slots on the
assembly.
6. Remove the bulb from the socket
by pressing it in and rotating it
anticlockwise until the tabs on the
bulb align with the slots in the
socket. Pull the bulb out of the
socket.
7. Insert a new bulb by inserting it
into the socket and rotating it until
it locks into place.OTL075035
OTL075036
OTLE078037