Page 11 of 637
F11
Introduction
Biodiesel (for New Zealand)
Commercially supplied Diesel blends
of no more than 7% biodiesel, com-
monly known as "B7 Diesel" may be
used in your vehicle if the Biodiesel
meets EN 14214 or equivalent spec-
ifications. (EN stands for "European
Norm"). The use of biofuels exceed-
ing 7%, made from rapeseed methyl
ester (RME), vegetable oil methyl
ester (VME) etc. or mixing diesel
exceeding 7% with biodiesel will
cause increased wear or damage to
the engine and fuel system.
Repair or replacement of worn or
damaged components due to the
use of non approved fuels will not be
covered by the manufactures war-
ranty.No special run-in period is needed.
By following a few simple precau-
tions for the first 1,000 km you may
add to the performance, economy
and life of your vehicle.
Do not race the engine.
Whilst driving, keep your engine
speed (rpm, or revolutions per
minute) between 2,000 rpm and
4,000 rpm.
Do not maintain a single speed for
long periods of time, either fast or
slow. Varying engine speed is
needed to properly run-in the
engine.
Avoid hard stops, except in emer-
gencies, to allow the brakes to seat
properly.
Don't tow a trailer during the first
2,000 km of operation. Never use any fuel, whether
diesel, B7 biodiesel or other-
wise, that fails to meet the lat-
est petroleum industry speci-
fication.
Never use any fuel additives
or treatments that are not rec-
ommended or approved by
the vehicle manufacturer.CAUTION
V VE
EH
HI
IC
CL
LE
E
R
RU
UN
N-
-I
IN
N
P
PR
RO
OC
CE
ES
SS
S
Page 16 of 637
1-3
Your vehicle at a glance
E EX
XT
TE
ER
RI
IO
OR
R
O
OV
VE
ER
RV
VI
IE
EW
W
(
(I
II
I)
)
1
1. Antenna ....................................................4-3
2. Rear window wiper blade .......................7-48
3. Fuel filler door.........................................3-44
4. Towing hook ............................................6-25
5. Rear combination lamp ..........................7-88
6. Tailgate ...................................................3-47
7. High mounted stop lamp ........................7-91
8. Rear View Monitor ................................3-128
9. Parking Distance Warning system
(Reverse) ..............................................3-131
OTLE018002
■Rear view
The actual shape may differ from the illustration.
Page 34 of 637
2-13
Safety system of your vehicle
2
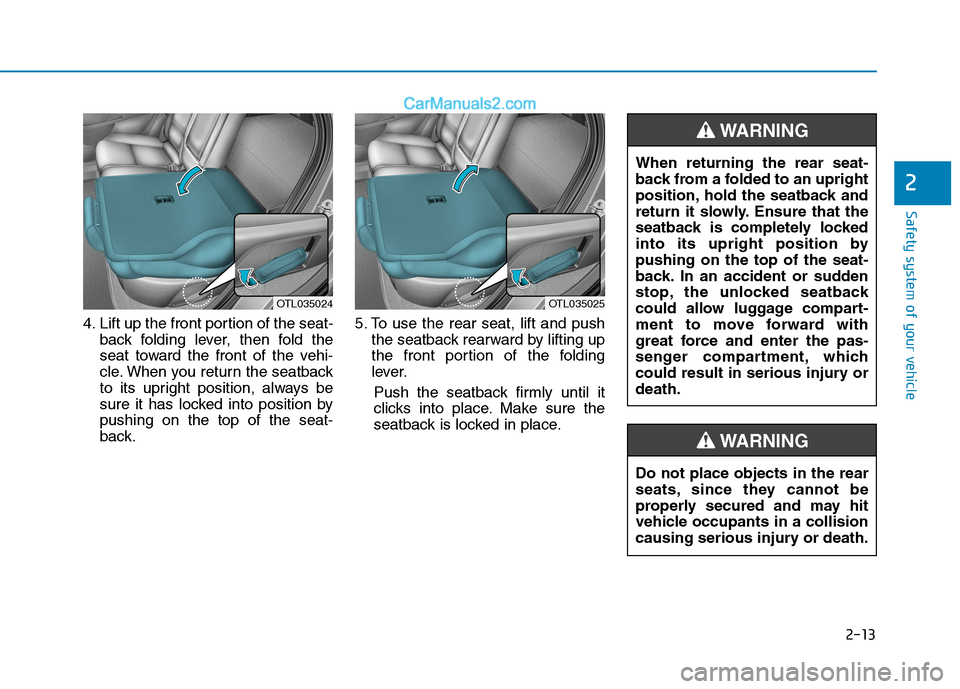
4. Lift up the front portion of the seat-
back folding lever, then fold the
seat toward the front of the vehi-
cle. When you return the seatback
to its upright position, always be
sure it has locked into position by
pushing on the top of the seat-
back.5. To use the rear seat, lift and push
the seatback rearward by lifting up
the front portion of the folding
lever.
Push the seatback firmly until it
clicks into place. Make sure the
seatback is locked in place.
OTL035024OTL035025
Do not place objects in the rear
seats, since they cannot be
properly secured and may hit
vehicle occupants in a collision
causing serious injury or death.
WARNING
When returning the rear seat-
back from a folded to an upright
position, hold the seatback and
return it slowly. Ensure that the
seatback is completely locked
into its upright position by
pushing on the top of the seat-
back. In an accident or sudden
stop, the unlocked seatback
could allow luggage compart-
ment to move forward with
great force and enter the pas-
senger compartment, which
could result in serious injury or
death.
WARNING
Page 38 of 637
2-17
Safety system of your vehicle
2
If you recline the seatback
towards the front with the head-
rest and seat cushion raised, the
headrest may come in contact
with the sunvisor or other parts of
the vehicle.
Removal/Reinstall
To remove the headrest:
1. Recline the seatback (2) with
using the seatback angle lever or
switch (1).2. Raise the headrest as far as it can
go.
3. Press the headrest release button
(3) whilst pulling the headrest up
(4).
NOTICE
NEVER allow anyone to travel in
a seat with the headrest
removed.
WARNING
OLF034015
OTL035010R
■Type A
OTLE035011R
■Type B
Page 52 of 637
2-31
Safety system of your vehicle
2
4. Insert the tongue plate (A) into the
hole on the belt assembly cover.Stowing the rear seat belt
The rear seat belt buckles can be
stowed in the pocket between the
rear seatback and cushion when not
in use.
Pre-tensioner seat belt
(Driver and front passenger)
Your vehicle is equipped with driver's
and front passenger's Pre-tensioner
Seat Belts (Retractor Pre-tensioner
and Emergency Fastening Device
(EFD)). The purpose of the pre-ten-
sioner is to make sure the seat belt
fits tightly against the occupant's
body in certain frontal collisions. The
pre-tensioner seat belts may be acti-
vated in crashes where the frontal
collision is severe enough, together
with the air bags.
OTLE035078OLMB033037
OTL035053R
Page 79 of 637
2-58
Safety system of your vehicle
Why didn’t my air bag go off in
a collision?
There are certain types of accidents
in which the air bag would not be
expected to provide additional pro-
tection. These include rear impacts,
second or third collisions in multiple
impact accidents, as well as low
speed impacts. Damage to the vehi-
cle indicates a collision energy
absorption, and is not an indicator of
whether or not an air bag should
have inflated.
Air bag collision sensors
(if equipped)
To reduce the risk of an air bag
deploying unexpectedly and
causing serious injury or death:
Do not hit or allow any objects
to impact the locations where
air bags or sensors are
installed.
Do not perform maintenance
on or around the air bag sen-
sors. If the location or angle of
the sensors is altered, the air
bags may deploy when they
should not or may not deploy
when they should.
Do not install bumper guards
or replace the bumper with a
non-genuine part. This may
adversely affect the collision
and air bag deployment per-
formance.
WARNING
Place the ignition switch to
the LOCK/OFF or ACC posi-
tion, when the vehicle is being
towed to prevent inadvertent
air bag deployment.
We recommend that all air bag
repairs are conducted by an
authorised HYUNDAI dealer.
Page 97 of 637
3-11
Convenient features of your vehicle
3
Loss of a smart key
A maximum of two smart keys can
be registered to a single vehicle. If
you happen to lose your smart key, it
is recommended that you should
immediately take the vehicle and
remaining key to your authorised
HYUNDAI dealer or tow the vehicle,
if necessary.
Smart key precautions
The smart key will not work if any of
the following occur:
The smart key is close to a radio
transmitter such as a radio station
or an airport which can interfere
with normal operation of the trans-
mitter.
The smart key is near a mobile two
way radio system or a mobile
phone.
Another vehicle’s smart key is
being operated close to your vehi-
cle.
When the smart key does not work
correctly, open and close the door
with the mechanical key. If you have
a problem with the smart key, it is
recommended that you contact an
authorised HYUNDAI dealer.If the smart key is in close proximity
to your mobile phone, the signal
could be blocked by your mobile
phone's normal operational signals.
This is especially important when the
phone is active such as making and
receiving calls, text messaging,
and/or sending/receiving emails.
Avoid placing the smart key and your
mobile phone in the same pants or
jacket pocket and always try to main-
tain an adequate distance between
the two devices.
People with medical devices
such as implanted pacemakers
or cardiac defibrillators should
not carry the smart key near the
heart. The smart key system
may affect the operation of such
implanted medical devices.
Failure to do so may result in
interference with the medical
device, which could result in
serious injury.
WARNING
Page 100 of 637
3-14
Convenient features of your vehicle
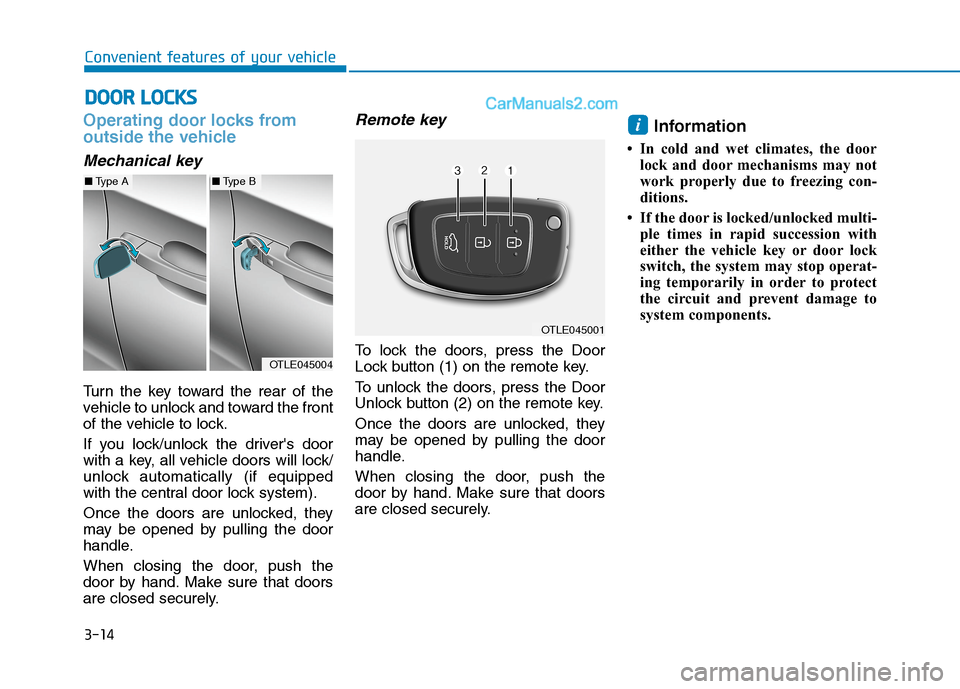
Operating door locks from
outside the vehicle
Mechanical key
Turn the key toward the rear of the
vehicle to unlock and toward the front
of the vehicle to lock.
If you lock/unlock the driver's door
with a key, all vehicle doors will lock/
unlock automatically (if equipped
with the central door lock system).
Once the doors are unlocked, they
may be opened by pulling the door
handle.
When closing the door, push the
door by hand. Make sure that doors
are closed securely.
Remote key
To lock the doors, press the Door
Lock button (1) on the remote key.
To unlock the doors, press the Door
Unlock button (2) on the remote key.
Once the doors are unlocked, they
may be opened by pulling the door
handle.
When closing the door, push the
door by hand. Make sure that doors
are closed securely.
Information
• In cold and wet climates, the door
lock and door mechanisms may not
work properly due to freezing con-
ditions.
• If the door is locked/unlocked multi-
ple times in rapid succession with
either the vehicle key or door lock
switch, the system may stop operat-
ing temporarily in order to protect
the circuit and prevent damage to
system components.
i
D DO
OO
OR
R
L
LO
OC
CK
KS
S
OTLE045001
OTLE045004
■Type A■Type B