2020 Hyundai Tucson ECO mode
[x] Cancel search: ECO modePage 174 of 637
3-88
Convenient features of your vehicle
Fuel economy
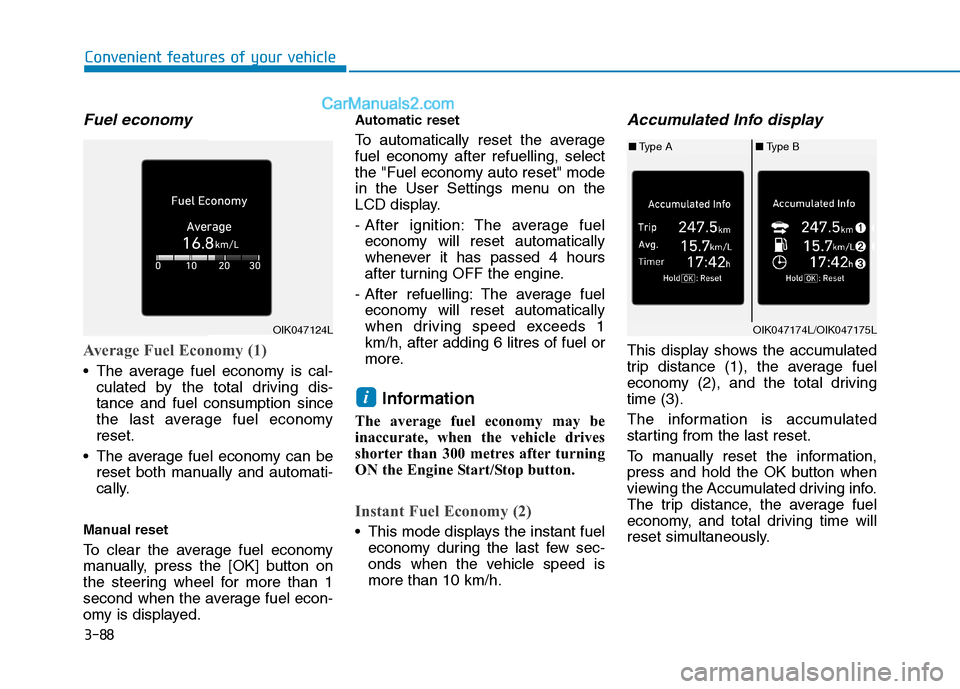
Average Fuel Economy (1)
The average fuel economy is cal-
culated by the total driving dis-
tance and fuel consumption since
the last average fuel economy
reset.
The average fuel economy can be
reset both manually and automati-
cally.
Manual reset
To clear the average fuel economy
manually, press the [OK] button on
the steering wheel for more than 1
second when the average fuel econ-
omy is displayed.
Automatic reset
To automatically reset the average
fuel economy after refuelling, select
the "Fuel economy auto reset" mode
in the User Settings menu on the
LCD display.
- After ignition: The average fuel
economy will reset automatically
whenever it has passed 4 hours
after turning OFF the engine.
- After refuelling: The average fuel
economy will reset automatically
when driving speed exceeds 1
km/h, after adding 6 litres of fuel or
more.
Information
The average fuel economy may be
inaccurate, when the vehicle drives
shorter than 300 metres after turning
ON the Engine Start/Stop button.
Instant Fuel Economy (2)
This mode displays the instant fuel
economy during the last few sec-
onds when the vehicle speed is
more than 10 km/h.
Accumulated Info display
This display shows the accumulated
trip distance (1), the average fuel
economy (2), and the total driving
time (3).
The information is accumulated
starting from the last reset.
To manually reset the information,
press and hold the OK button when
viewing the Accumulated driving info.
The trip distance, the average fuel
economy, and total driving time will
reset simultaneously.
i
OIK047124LOIK047174L/OIK047175L
■Type A■Type B
Page 192 of 637
3-106
Convenient features of your vehicle
Information
If the engine does not start within 10
seconds after the preheating is com-
pleted, set the ignition switch or
Engine Start/Stop Button to the
LOCK or OFF position for 10 seconds
and then to the ON position in order
to preheat the engine again.
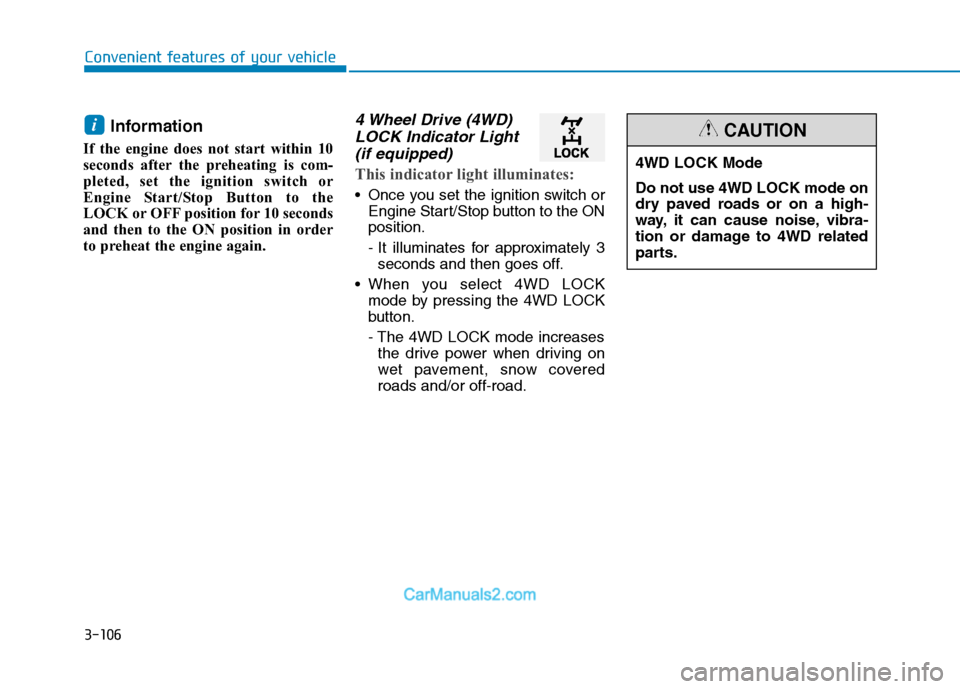
4 Wheel Drive (4WD)
LOCK Indicator Light
(if equipped)
This indicator light illuminates:
Once you set the ignition switch or
Engine Start/Stop button to the ON
position.
- It illuminates for approximately 3
seconds and then goes off.
When you select 4WD LOCK
mode by pressing the 4WD LOCK
button.
- The 4WD LOCK mode increases
the drive power when driving on
wet pavement, snow covered
roads and/or off-road.
i
4WD LOCK Mode
Do not use 4WD LOCK mode on
dry paved roads or on a high-
way, it can cause noise, vibra-
tion or damage to 4WD related
parts.
CAUTION
Page 202 of 637
3-116
Convenient features of your vehicle
Battery saver function
The purpose of this feature is to pre-
vent the battery from being dis-
charged. The system automatically
turns off the parking lamps when the
driver turns the engine off and opens
the driver-side door.
With this feature, the parking lamps
will turn off automatically if the driver
parks on the side of the road at night.
If necessary, to keep the lamps on
when the engine is turned off, per-
form the following:
1) Open the driver-side door.
2) Turn the parking lamps OFF and
ON again using the light switch on
the steering column.
Headlamp delay function
(if equipped)
If you place the ignition switch in to
the ACC or OFF position with the
headlamps ON, the headlamps
(and/or parking lamps) remain on for
about 5 minutes. However, with the
engine off if the driver’s door is
opened and closed, the headlamps
(and/or parking lamps) are turned off
after 15 seconds.
The headlamps (and/or parking
lamps) can be turned off by pressing
the lock button on the smart key
twice or turning the light switch to the
OFF or AUTO position. However, if
you turn the light switch to the AUTO
position when it is dark outside, the
headlamps will not be turned off.
You can activate or deactivate the
Headlamp Delay function from the
User Settings Mode on the LCD dis-
play.For more details, refer to
"LCD Display" in this chapter.If the driver gets out of the vehicle
through other doors (except the
driver's door), the battery saver
function does not operate and the
headlamp delay function does not
turn off automatically. Therefore, It
causes the battery to be dis-
charged. In this case, make sure
to turn off the lamps before get-
ting out of the vehicle.
NOTICE
Page 205 of 637
3-119
Convenient features of your vehicle
3
Also if "Convenience →Welcome
mirror/light" is selected in the User
Settings mode on the LCD display
and the outside rearview mirrors
folding switch is in the AUTO posi-
tion, the outside rearview mirrors will
unfold automatically (if equipped).
Door handle lamps (if equipped)
When all the doors (and tailgate) are
closed and locked, the door handle
lamps will come on for about 15 sec-
onds if any of the following are per-
formed.
When the door unlock button is
pressed on the remote key or
smart key.
When the button on the outside
door handle is pressed.
When "Convenience →Welcome
mirror/light" is selected in the User
Settings mode on the LCD display
and you approach the vehicle with
the smart key in possession (if
equipped).
Headlamp and Parking lamp
When the headlamps (lamp switch is
in the headlamps or AUTO position)
is on and all doors (and tailgate) are
locked and closed, the parking lamps
and headlamps will come on for 15
seconds if/the following occurs:
The door unlock button is pressed
on the remote key or smart key.
At this time, if you press the door lock
or unlock button, the parking lamp
and headlamp will turn off immedi-
ately.
You can activate or deactivate the
Welcome Light from the User
Settings Mode on the LCD display.
For more details, refer to "LCD
Display" in this chapter.
Interior lamp
When the interior lamp switch is in
the DOOR position and all doors
(and tailgate) are closed and locked,
the interior lamp will come on for 30
seconds if any of the following are
performed.
When the door unlock button is
pressed on the remote key or
smart key.
When the button of the outside
door handle is pressed.
At this time, if you press the door lock
or unlock button, the interior lamp will
turn off immediately.
Page 235 of 637
3-149
Convenient features of your vehicle
3
Information
• When using the air conditioning sys-
tem, monitor the temperature gauge
closely whilst driving up hills or in
heavy traffic when outside tempera-
tures are high. Air conditioning sys-
tem operation may cause engine
overheating. Continue to use the
blower fan but turn the air condi-
tioning system off if the temperature
gauge indicates engine overheating.
• When opening the windows in
humid weather, air conditioning
may create water droplets inside the
vehicle. Since excessive water
droplets may cause damage to elec-
trical equipment, the air condition-
ing should only be used with the
windows closed.
Air conditioning system operation
tips
If the vehicle has been parked in
direct sunlight during hot weather,
open the windows for a short time
to let the hot air inside the vehicle
escape.
To help reduce moisture inside of
the windows on rainy or humid
days, decrease the humidity inside
the vehicle by operating the air
conditioning system.
During air conditioning system
operation, you may occasionally
notice a slight change in engine
speed as the air conditioning com-
pressor cycles. This is a normal
system operation characteristic.
Use the air conditioning system
every month only for a few minutes
to ensure maximum system per-
formance.
When using the air conditioning
system, you may notice clear water
dripping (or even puddling) on the
ground under the vehicle. This is a
normal system operation charac-
teristic. Operating the air conditioning sys-
tem in the recirculated air position
provides maximum cooling, how-
ever, continual operation in this
mode may cause the air inside the
vehicle to become stale.
During cooling operation, you may
occasionally notice a misty air flow
because of rapid cooling and
humid air intake. This is a normal
system operation characteristic.
i
Page 249 of 637
3-163
Convenient features of your vehicle
3
Air conditioning system operation
tips
If the vehicle has been parked in
direct sunlight during hot weather,
open the windows for a short time
to let the hot air inside the vehicle
escape.
Use air conditioning to reduce
humidity and moisture inside the
vehicle on rainy or humid days.
During air conditioning system
operation, you may occasionally
notice a slight change in engine
speed as the air conditioning com-
pressor cycles. This is a normal
system operation characteristic.
Use the air conditioning system
every month only for a few minutes
to ensure maximum system per-
formance.
When using the air conditioning
system, you may notice clear water
dripping (or even puddling) on the
ground under the vehicle. This is a
normal system operation charac-
teristic. Operating the air conditioning sys-
tem in the recirculated air position
provides maximum cooling, how-
ever, continual operation in this
mode may cause the air inside the
vehicle to become stale.
During cooling operation, you may
occasionally notice a misty air flow
because of rapid cooling and
humid air intake. This is a normal
system operation characteristic.
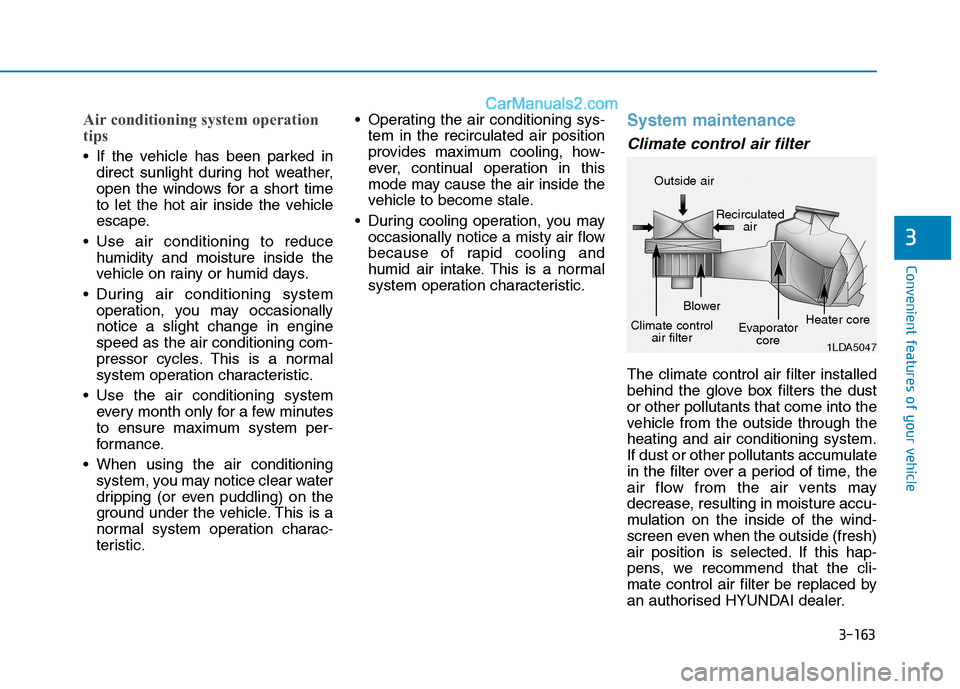
System maintenance
Climate control air filter
The climate control air filter installed
behind the glove box filters the dust
or other pollutants that come into the
vehicle from the outside through the
heating and air conditioning system.
If dust or other pollutants accumulate
in the filter over a period of time, the
air flow from the air vents may
decrease, resulting in moisture accu-
mulation on the inside of the wind-
screen even when the outside (fresh)
air position is selected. If this hap-
pens, we recommend that the cli-
mate control air filter be replaced by
an authorised HYUNDAI dealer.
1LDA5047
Outside air
Recirculated
air
Climate control
air filterBlower
Evaporator
coreHeater core
Page 266 of 637
3-180
To charge a mobile phone
The wireless mobile phone charging
system charges only the Qi-enabled
mobile phones ( ). Read the label
on the mobile phone accessory
cover or visit your mobile phone
manufacturer’s website to check
whether your mobile phone supports
the Qi technology.
The wireless charging process starts
when you put a Qi-enabled mobile
phone on the wireless charging unit.
1. Remove other items, including the
smart key, from the wireless
charging unit. If not, the wireless
charging process may be inter-
rupted. Place the mobile phone
on the centre of charging pad.
2. The indicator light is orange when
the mobile phone is charging. The
indicator light turns green when
phone charging is complete.
3. You can turn ON or OFF the wire-
less charging function in the User
Settings Mode on the instrument
cluster. For further information,
refer to the “LCD Display Modes”
in this chapter.If your mobile phone is not charging:
- Slightly change the position of the
mobile phone on the charging pad.
- Make sure the indicator light is
orange.
The indicator light will blink orange
for 10 seconds if there is a malfunc-
tion in the wireless charging system.
In this case, temporarily stop the
charging process, and re-attempt to
wirelessly charge your mobile phone
again.
The system warns you with a mes-
sage on the LCD display if the mobile
phone is still on the wireless charg-
ing unit after the engine is turned
OFF and the front door is opened.
For certain mobile phones, the mes-
sage may not be displayed.
(This is due to the characteristic of
the certain mobile phone and the
wireless mobile phone charging sys-
tem is normal.)Information
For some manufacturers' mobile
phones, the system may not warn you
even though the mobile phone is left
on the wireless charging unit. This is
due to the particular characteristic of
the mobile phone and not a malfunc-
tion of the wireless charging.
i
Convenient features of your vehicle
Page 279 of 637
4-4
Multimedia System
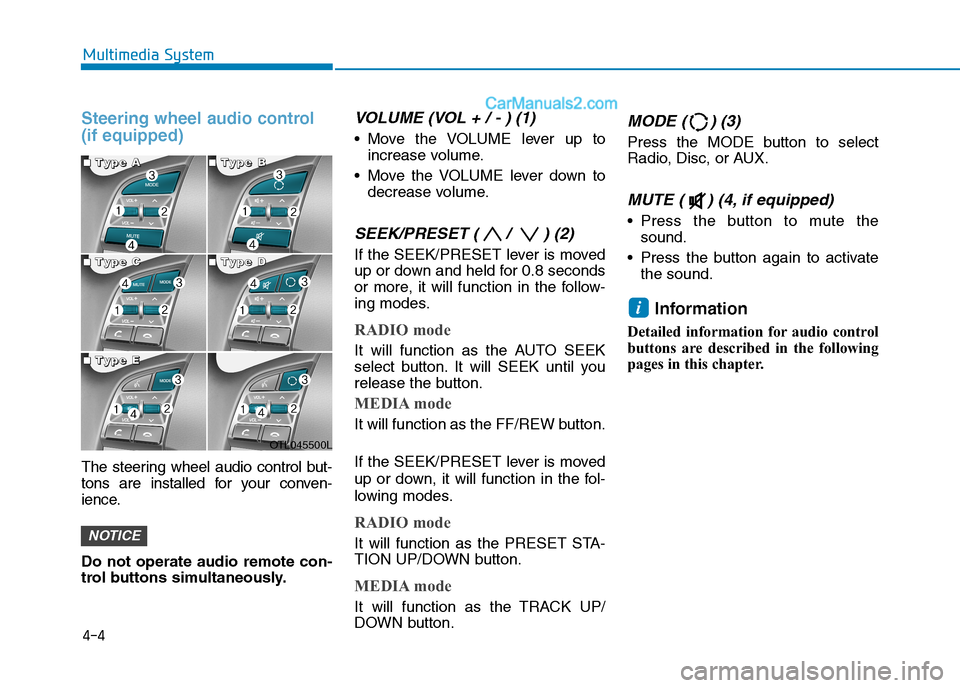
Steering wheel audio control
(if equipped)
The steering wheel audio control but-
tons are installed for your conven-
ience.
Do not operate audio remote con-
trol buttons simultaneously.
VOLUME (VOL + / - ) (1)
Move the VOLUME lever up to
increase volume.
Move the VOLUME lever down to
decrease volume.
SEEK/PRESET ( / ) (2)
If the SEEK/PRESET lever is moved
up or down and held for 0.8 seconds
or more, it will function in the follow-
ing modes.
RADIO mode
It will function as the AUTO SEEK
select button. It will SEEK until you
release the button.
MEDIA mode
It will function as the FF/REW button.
If the SEEK/PRESET lever is moved
up or down, it will function in the fol-
lowing modes.
RADIO mode
It will function as the PRESET STA-
TION UP/DOWN button.
MEDIA mode
It will function as the TRACK UP/
DOWN button.
MODE ( ) (3)
Press the MODE button to select
Radio, Disc, or AUX.
MUTE ( ) (4, if equipped)
Press the button to mute the
sound.
Press the button again to activate
the sound.
Information
Detailed information for audio control
buttons are described in the following
pages in this chapter.
i
NOTICE
OTL045500L
■ ■ ■ ■T
T T T
y y y y
p p p p
e e e e
A A A A■
■ ■ ■T
T T T
y y y y
p p p p
e e e e
B B B B
■
■ ■ ■T
T T T
y y y y
p p p p
e e e e
C C C C■
■ ■ ■T
T T T
y y y y
p p p p
e e e e
D D D D
■
■ ■ ■T
T T T
y y y y
p p p p
e e e e
E E E E