2020 Hyundai Sonata park assist
[x] Cancel search: park assistPage 359 of 537

06
6-75
Type AType AType BType B
OTM058087LOTM058087LODN8059289LODN8059289L
Check Blind-Spot Collision-Avoidance
Assist (BCA) system
If there is a problem with BCA system,
a w
arning message will appear. The
system will turn off automatically. BCW
will still operate even if BCA system turns
off due to malfunction. Have the vehicle
inspected by an authorized HYUNDAI
dealer.
Limitations of the System
The driver must be cautious in the below
situations, because the system may not
detect other vehicles or objects in certain
circumstances.
• The system may not work around 15 seconds after starting the vehicle or
the initialization or rebooting of the
front view camera.
• When a trailer or carrier is installed.
• The vehicle drives in inclement weather such as heavy rain or snow.
• The sensors are polluted with rain, snow, mud, etc.
• The rear bumper where the sensors are located is covered with a foreign
object such as a bumper sticker, a
bumper guard, a bike rack, etc.
• The rear bumper is damaged, or the sensor is out of the original default
position.
• The vehicle height gets lower or higher due to heavy loading in a trunk,
abnormal tire pressure, etc.
• When the temperature of the rear bumper is high.
• When the sensors are blocked by other vehicles, walls or parking-lot
pillars.
• The vehicle drives on a curved road.
• The vehicle drives through a tollgate.
• The road pavement (or the peripheral ground) abnormally contains metallic
components (i.e. possibly due to
subway construction).
• There is a fixed object near the vehicle, such as a guardrail.
Page 406 of 537

While Driving6-122
WARNING
• Always be aware of road conditions
while driving and be alert for
unexpected situations even though
Rear Cross-Traffic Collision Warning
system and Rear Cross-Traffic
Collision-Avoidance Assist system
are operating.
• Rear Cross-Traffic Collision Warning
system and Rear Cross-Traffic
Collision-Avoidance Assist system
are supplemental systems to assist
you. Do not entirely rely on the
systems. Always pay attention, while
driving, for your safety.
• Rear Cross-Traffic Collision Warning
system and Rear Cross-Traffic
Collision-Avoidance Assist system
are not substitutes for proper and
safe driving. Always drive safely and
use caution when backing up the
vehicle.
System Setting and Activation
System setting
• The driver can activate the systems
by placing the ignition switch to the
ON position and by selecting “User
Settings → Driver Assistance → Parking
Safety → Rear Cross-Traffic Safety”.
RCCW and RCCA turn on and get
ready to be activated when ‘Rear
Cross-Traffic safety’ is selected.
• When the engine is turned off then on again, the systems are always ready to
be activated.
• When the system is initially turned on and when the engine is turned off
then on again, the warning light will
illuminate for 3 seconds on the side
view mirror.
The driver can select the initial warning
activation time in the User Settings in
the LCD display or infotainment system
display by selecting ‘User Settings →
Driver Assistance → Warning Timing’.
Page 407 of 537

06
6-123
The options for the initial Rear Cross-
Traffic Collision Warning includes the
following: - Normal: When this condition is selected, the
initial Rear Cross-Traffic Collision
Warning is activated normally. If this
setting feels sensitive, change the
option to ‘Later’.
The warning activation time may feel
late if the a vehicle at the side or rear
abruptly accelerates.
- Later: Select this warning activation time
when the traffic is light and you are
driving at a low speed.
Information
If you change the warning timing, the
warning time of other systems may
change. Always be aware before changing
the warning timing.
The driver can select the warning volume
of Rear Cross-Traffic Collision Warning
by selecting ‘User Settings → Driver
Assistance → Warning Volume → High/
Medium/Low’.
Information
If you change the warning volume, the
warning volume of other systems may
change. Always be aware before changing
the warning volume.
Operating conditions
To operate:
Go to the “User Settings → Driver
Assistance → Parking Safety → Rear Cross-
Traffic Safety” on the LCD display or
infotainment system display. The system
will turn on and standby to activate.
The system will activate when vehicle
speed is below 7 mph (10 km/h) and with
the shift button in R (Reverse).
The system will not activate when the vehicle speed exceeds 7 mph (10
km/h). The system will activate again
when the speed is below 5 mph (8
km/h).
The system’s detecting range is
approximately 1 ~ 65 ft (0.5 ~ 20 m). An
approaching vehicle will be detected if
their vehicle speed is within 5 ~ 22.5 mph
(8 ~ 36 km/h).
Note that the detecting range and
operating speed may vary under certain
conditions. As always, use caution and
pay close attention to your surroundings
when backing up your vehicle.
Page 412 of 537

While Driving6-128
If any of these conditions occur, the
system will turn off automatically.
When BCW canceled warning message
is displayed in the cluster, check to make
sure that the rear bumper is free from
any dirt or snow in the areas where the
sensor is located. Remove any dirt, snow,
or foreign material that could interfere
with the radar sensors.
After any dirt or debris is removed, the
system should operate normally after
about 10 minutes of driving the vehicle.
If the system still does not operate
normally have your vehicle inspected by
an authorized HYUNDAI dealer.
Information
Turn off BCW, BCA and RCCA system
when a trailer or carrier is installed.
Deactivate BCW and BCA system
by selecting “User Settings → Driver
Assistance → Blind-Spot Safety → Off”
Deactivate RCCW and RCCA system
by deselecting “User Settings → Driver
Assistance → Parking Safety → Rear
Cross-Traffic Safety”.
Type AType AType BType B
OAD058169LOAD058169LOTM058151LOTM058151L
Check Blind-Spot Collision Warning
(BCW) system
If there is a problem with BCW system,
a w
arning message will appear. The
system will turn off automatically. RCCW
and RCCA will not operate also if BCW
system turns off due to malfunction.
Have the vehicle inspected by an
authorized HYUNDAI dealer.
Limitations of the System
The driver must be cautious in the below
situations, because the system may not
detect other vehicles or objects in certain
circumstances.
• When a trailer or carrier is installed.
• The vehicle drives in inclement weather such as heavy rain or snow.
• The radar sensor is polluted with rain, snow, mud, etc.
• The rear bumper where the radar sensors are located is covered with
a foreign object such as a bumper
sticker, a bumper guard, a bike rack,
etc.
• The rear bumper is damaged, or the sensor is out of the original default
position.
Page 433 of 537

07
7-5
Jump starting procedure
1. Position the vehicles close enough that the jumper cables will reach, but
do not allow the vehicles to touch.
2. Avoid fans or any moving parts in the engine compartment at all times, even
when the vehicles are turned off.
3. Turn off all electrical devices such as radios, lights, air conditioning, etc.
Put the vehicles in P (Park) and set
the parking brakes. Turn both vehicles
OFF.
ODN8A079022ODN8A079022
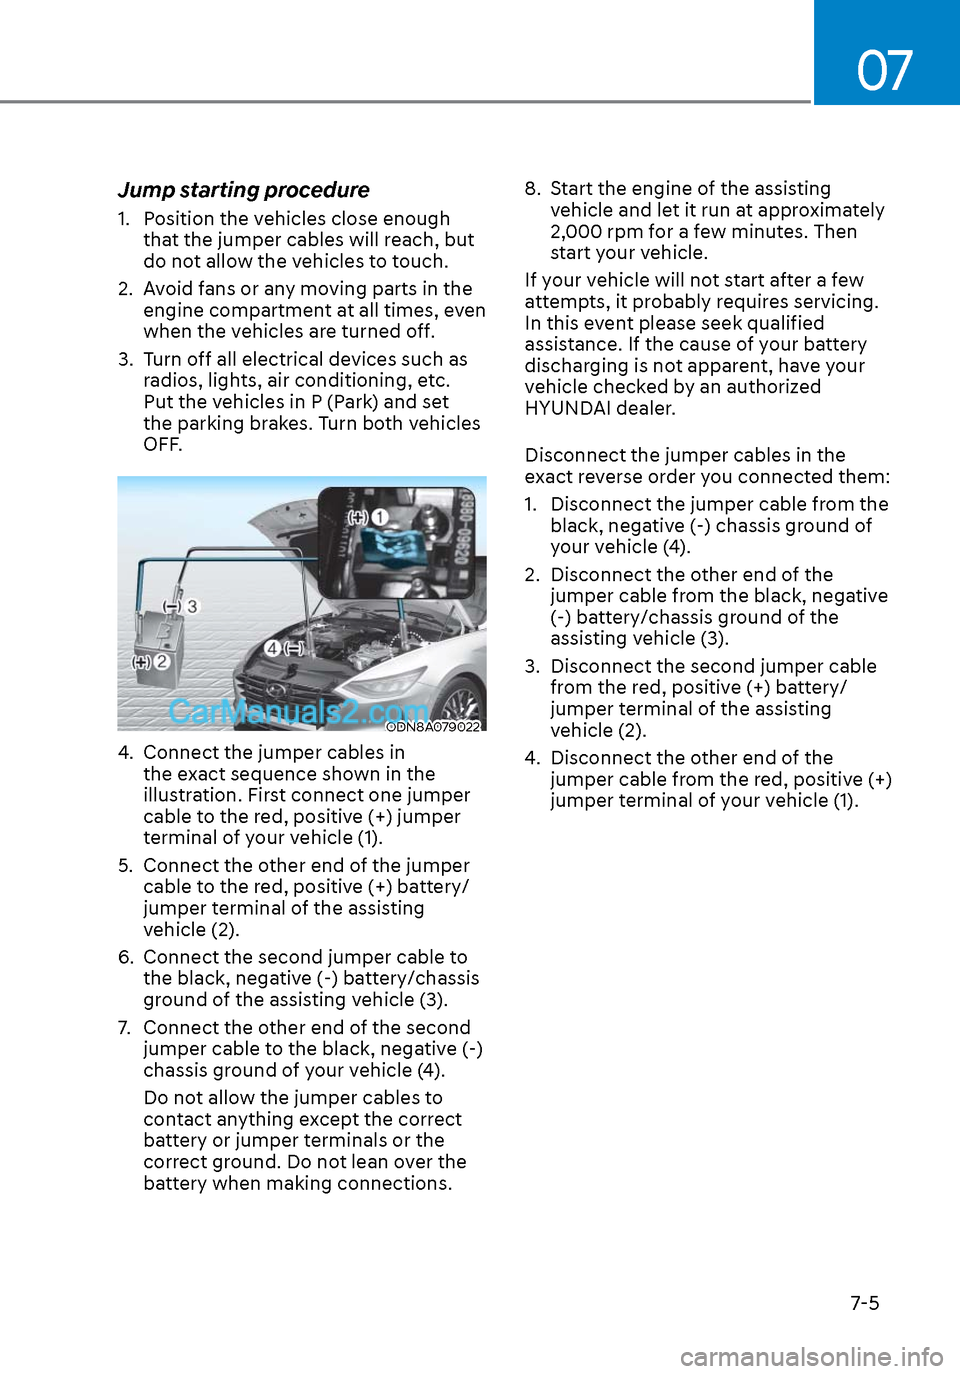
4. Connect the jumper cables in the exact sequence shown in the
illustration. First connect one jumper
cable to the red, positive (+) jumper
terminal of your vehicle (1).
5. Connect the other end of the jumper cable to the red, positive (+) battery/
jumper terminal of the assisting
vehicle (2).
6. Connect the second jumper cable to the black, negative (-) battery/chassis
ground of the assisting vehicle (3).
7. Connect the other end of the second jumper cable to the black, negative (-)
chassis ground of your vehicle (4).
Do not allow the jumper cables to
contact anything except the correct
battery or jumper terminals or the
correct ground. Do not lean over the
battery when making connections. 8. Start the engine of the assisting
vehicle and let it run at approximately
2,000 rpm for a few minutes. Then
start your vehicle.
If your vehicle will not start after a few
attempts, it probably requires servicing.
In this event please seek qualified
assistance. If the cause of your battery
discharging is not apparent, have your
vehicle checked by an authorized
HYUNDAI dealer.
Disconnect the jumper cables in the
exact reverse order you connected them:
1. Disconnect the jumper cable from the black, negative (-) chassis ground of
your vehicle (4).
2. Disconnect the other end of the jumper cable from the black, negative
(-) battery/chassis ground of the
assisting vehicle (3).
3. Disconnect the second jumper cable from the red, positive (+) battery/
jumper terminal of the assisting
vehicle (2).
4. Disconnect the other end of the jumper cable from the red, positive (+)
jumper terminal of your vehicle (1).
Page 434 of 537

Emergency Situations7-6
If your temperature gauge indicates
overheating, you experience a loss of
power, or hear loud pinging or knocking,
the engine may be overheating. If this
happens, you should:
1. Pull off the road and stop as soon as it is safe to do so.
2. Place the shift button in P (Park) and set the parking brake. If the air
conditioning is ON, turn it OFF.
3. If engine coolant is running out under the vehicle or steam is coming out
from the hood, stop the engine. Do
not open the hood until the coolant
has stopped running or the steaming
has stopped. If there is no visible
loss of engine coolant and no steam,
leave the engine running and check
to be sure the engine cooling fan is
operating. If the fan is not running,
turn the engine off.
WARNING
While the engine is running,
keep hands, clothing and tools
away from the moving parts
such as the cooling fan and
drive belt to prevent serious
injury.
4. Check for coolant leaking from the radiator, hoses or under the vehicle. (If
the air conditioning had been in use, it
is normal for cold water to be draining
from it when you stop.)
5. If engine coolant is leaking out, stop the engine immediately and call the
nearest authorized HYUNDAI dealer
for assistance.
WARNING
Your vehicle is equipped
with a pressurized coolant
reserve tank. NEVER remove
the engine coolant reservoir
tank/radiator cap or the drain
plug while the engine and
radiator are HOT. Hot coolant
and steam may blow out under
pressure, causing serious
injury.
Turn the engine off and wait until the
engine cools down. Use extreme care
when removing the engine coolant
reservoir tank/radiator cap. Wrap
a towel or thick rag around it, and
turn it counterclockwise slowly to
release some of the pressure from the
system. Step back while the pressure is
released.
When you are sure all the pressure has
been released, continue turning the cap
counterclockwise to remove it.
6. If you cannot find the cause of the overheating, wait until the engine
temperature has returned to normal.
Then, if coolant has been lost,
carefully add coolant to the reservoir
to bring the fluid level in the reservoir
up to the halfway mark.
7. Proceed with caution, keeping alert for further signs of overheating. If
overheating happens again, call
an authorized HYUNDAI dealer for
assistance.
CAUTION
Serious loss of coolant indicates a
leak in the cooling system and should
be checked as soon as possible by an
authorized HYUNDAI dealer.
IF THE ENGINE OVERHEATS
Page 441 of 537

07
7-13
Changing Tires
WARNING
A vehicle can slip or roll off of a jack
causing serious injury or death to you or
those nearby. Take the following safety
precautions:
• Never place any portion of your body
under a vehicle that is supported by
a jack.
• NEVER attempt to change a tire in
the lane of traffic. ALWAYS move the
vehicle completely off the road on
level, firm ground away from traffic
before trying to change a tire. If you
cannot find a level, firm place off
the road, call a towing service for
assistance.
• Be sure to use the jack provided with
the vehicle.
• ALWAYS place the jack on the
designated jacking positions on the
vehicle and NEVER on the bumpers
or any other part of the vehicle for
jacking support.
• Do not start or run the engine while
the vehicle is on the jack.
• Do not allow anyone to remain in the
vehicle while it is on the jack.
• Keep children away from the road
and the vehicle. Follow these steps to change your
vehicle’s tire:
1. Park on a level, firm surface.
2. Move the shift button into P (Park)
or into R (Reverse) if equipped with
a manual transmission, apply the
parking brake, and place the ignition
switch in the LOCK/OFF position.
3. Press the hazard warning flasher button.
4. Remove the wheel lug nut wrench, jack, jack handle, and spare tire from
the vehicle.
ODN8A069089ODN8A069089[A] : Block
5. Block both the front and rear of the tire diagonally opposite of the tire you
are changing.
ODN8069090LODN8069090L
6. Loosen the wheel lug nuts counterclockwise one turn each in
the order shown above, but do not
remove any lug nuts until the tire has
been raised off of the ground.
Page 498 of 537

08
8-51
Driver’s side fuse panel
Fuse Name (A)Circuit Protected
MULTI MEDIA 15A Audio, A/V & Na
vigation Head Unit,
DC-DC Converter (AMP/Audio)
SUNROOF1 20A Panorama Sunroof
MODULE7 10A Front Console Switch, Lane Keeping Assist Unit, IBU,
Crash Pad Switch (Up/Down),
Parking Collision Avodance Assist Unit,
Remote Control Smart Parking Assist Unit
MODULE5 10A Stop Lamp Switch
MODULE8 10A Front Seat Warmer Control Module,
Front Air Ventilation Seat Control Module,
Passenger Seat Relax Unit, AMP,
Rear Seat Warmer Control Module, Driver IMS Module,
Audio, A/V & Navigation Head Unit
E-SHIFTER2 10A SCU, Electronic ATM Shift Lever
MODULE2 10A IAU, Parking Collision Avoidance Assist Unit,
Cooling Fan Motor, Passenger Seat Relax Unit,
Rear Seat Warmer Control Module
MDPS 7.5A MDPS Unit
A/C 7.5A A/C Control Module, A/C Switch,
E/R Junction Block (Blower Relay, PTC Heater Relay)
MODULE4 10A Front USB Charger, Rear USB Charger, AMP, IBU,
IAU, Parking Collision Avoidance Assist Unit, Audio,
DC-DC Converter (AMP/Audio), A/V & Navigation,
Head Unit, Surround View Monitor Unit
MODULE9 7.5A IBU
CLUSTER 10A Instrument Cluster, Head-Up DisplayWASHER 15A Multifunction Switch
START 7.5A PCM/ECM, E/R Junction Block (Start Relay),
ICU Junction Block (B/Alarm Relay)
POWER OUTLET 20A Front Power Outlet
IBU2 7.5A IBU
A/BAG IND 7.5A Instrument Cluster, Overhead Console Lamp (Lamp)