2020 Hyundai Ioniq Hybrid parking brake
[x] Cancel search: parking brakePage 532 of 613
7-14
Maintenance
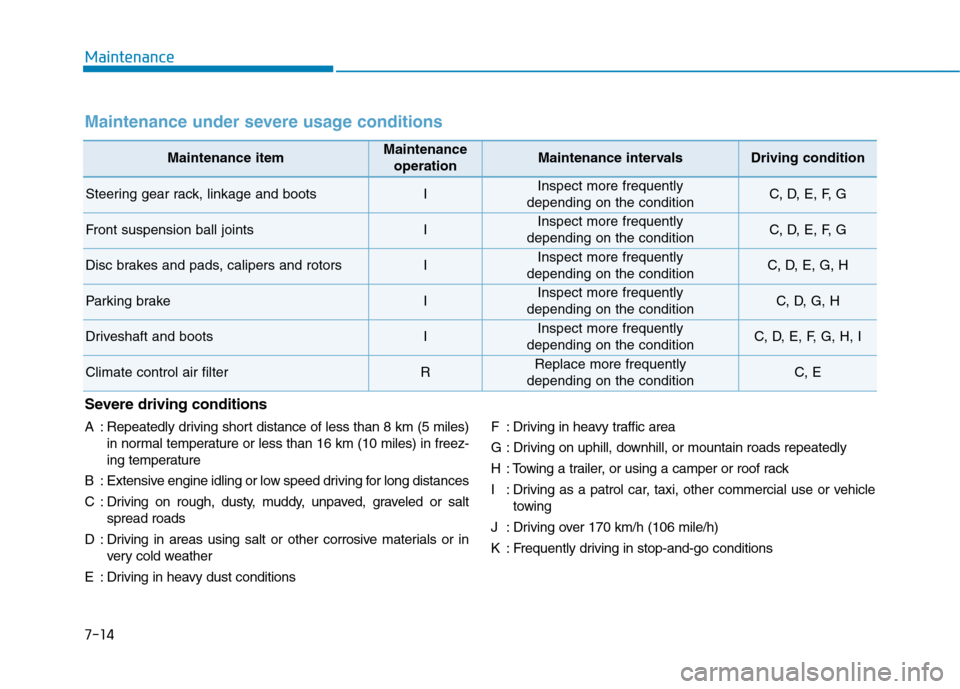
Maintenance itemMaintenance
operationMaintenance intervalsDriving condition
Steering gear rack, linkage and bootsIInspect more frequently
depending on the conditionC, D, E, F, G
Front suspension ball jointsIInspect more frequently
depending on the conditionC, D, E, F, G
Disc brakes and pads, calipers and rotorsIInspect more frequently
depending on the conditionC, D, E, G, H
Parking brakeIInspect more frequently
depending on the conditionC, D, G, H
Driveshaft and bootsIInspect more frequently
depending on the conditionC, D, E, F, G, H, I
Climate control air filterRReplace more frequently
depending on the conditionC, E
Maintenance under severe usage conditions
Severe driving conditions
A : Repeatedly driving short distance of less than 8 km (5 miles)
in normal temperature or less than 16 km (10 miles) in freez-
ing temperature
B : Extensive engine idling or low speed driving for long distances
C : Driving on rough, dusty, muddy, unpaved, graveled or salt
spread roads
D : Driving in areas using salt or other corrosive materials or in
very cold weather
E : Driving in heavy dust conditionsF : Driving in heavy traffic area
G : Driving on uphill, downhill, or mountain roads repeatedly
H : Towing a trailer, or using a camper or roof rack
I : Driving as a patrol car, taxi, other commercial use or vehicle
towing
J : Driving over 170 km/h (106 mile/h)
K : Frequently driving in stop-and-go conditions
Page 534 of 613
7-16
Maintenance
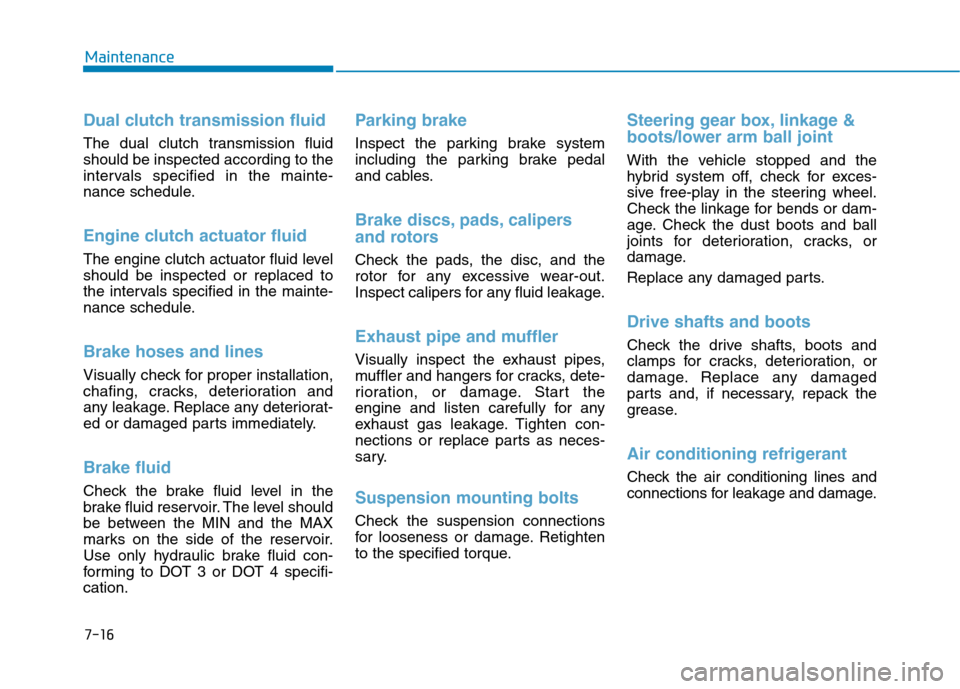
Dual clutch transmission fluid
The dual clutch transmission fluid
should be inspected according to the
intervals specified in the mainte-
nance schedule.
Engine clutch actuator fluid
The engine clutch actuator fluid level
should be inspected or replaced to
the intervals specified in the mainte-
nance schedule.
Brake hoses and lines
Visually check for proper installation,
chafing, cracks, deterioration and
any leakage. Replace any deteriorat-
ed or damaged parts immediately.
Brake fluid
Check the brake fluid level in the
brake fluid reservoir. The level should
be between the MIN and the MAX
marks on the side of the reservoir.
Use only hydraulic brake fluid con-
forming to DOT 3 or DOT 4 specifi-
cation.
Parking brake
Inspect the parking brake system
including the parking brake pedal
and cables.
Brake discs, pads, calipers
and rotors
Check the pads, the disc, and the
rotor for any excessive wear-out.
Inspect calipers for any fluid leakage.
Exhaust pipe and muffler
Visually inspect the exhaust pipes,
muffler and hangers for cracks, dete-
rioration, or damage. Start the
engine and listen carefully for any
exhaust gas leakage. Tighten con-
nections or replace parts as neces-
sary.
Suspension mounting bolts
Check the suspension connections
for looseness or damage. Retighten
to the specified torque.
Steering gear box, linkage &
boots/lower arm ball joint
With the vehicle stopped and the
hybrid system off, check for exces-
sive free-play in the steering wheel.
Check the linkage for bends or dam-
age. Check the dust boots and ball
joints for deterioration, cracks, or
damage.
Replace any damaged parts.
Drive shafts and boots
Check the drive shafts, boots and
clamps for cracks, deterioration, or
damage. Replace any damaged
parts and, if necessary, repack the
grease.
Air conditioning refrigerant
Check the air conditioning lines and
connections for leakage and damage.
Page 535 of 613
7-17
7
Maintenance
E EN
NG
GI
IN
NE
E
O
OI
IL
L
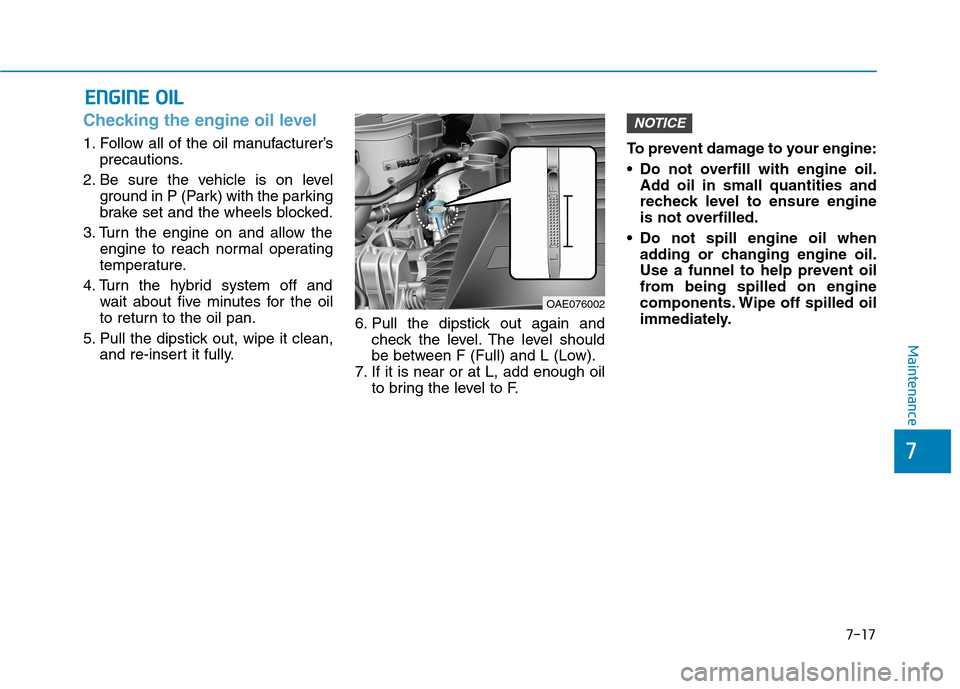
Checking the engine oil level
1. Follow all of the oil manufacturer’s
precautions.
2. Be sure the vehicle is on level
ground in P (Park) with the parking
brake set and the wheels blocked.
3. Turn the engine on and allow the
engine to reach normal operating
temperature.
4. Turn the hybrid system off and
wait about five minutes for the oil
to return to the oil pan.
5. Pull the dipstick out, wipe it clean,
and re-insert it fully.6. Pull the dipstick out again and
check the level. The level should
be between F (Full) and L (Low).
7. If it is near or at L, add enough oil
to bring the level to F.To prevent damage to your engine:
Do not overfill with engine oil.
Add oil in small quantities and
recheck level to ensure engine
is not overfilled.
Do not spill engine oil when
adding or changing engine oil.
Use a funnel to help prevent oil
from being spilled on engine
components. Wipe off spilled oil
immediately.
NOTICE
OAE076002
Page 543 of 613
7-25
7
Maintenance
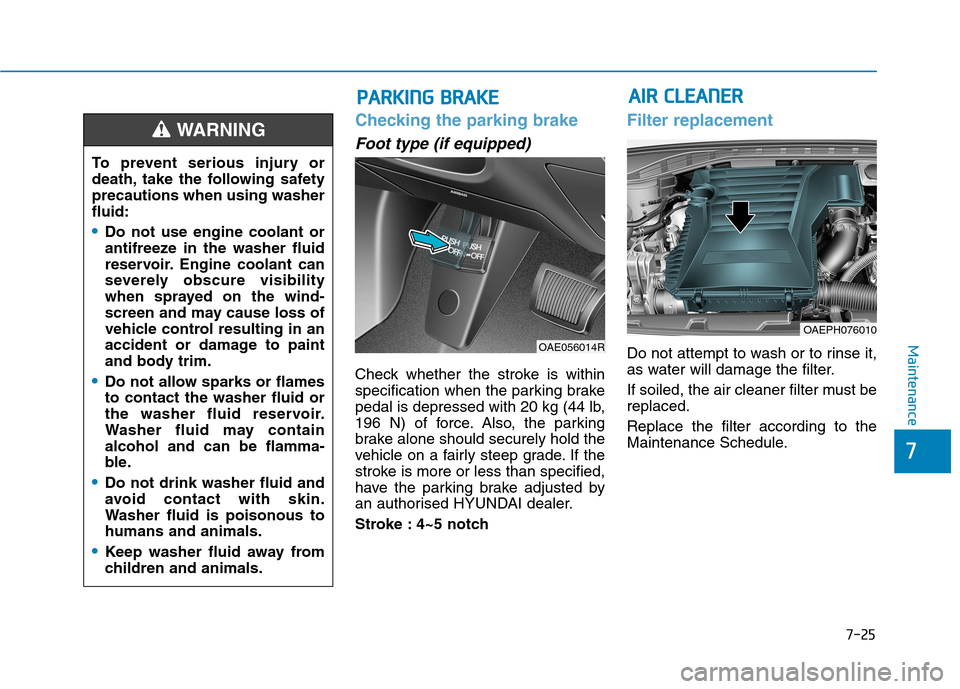
Checking the parking brake
Foot type (if equipped)
Check whether the stroke is within
specification when the parking brake
pedal is depressed with 20 kg (44 lb,
196 N) of force. Also, the parking
brake alone should securely hold the
vehicle on a fairly steep grade. If the
stroke is more or less than specified,
have the parking brake adjusted by
an authorised HYUNDAI dealer.
Stroke : 4~5 notch
Filter replacement
Do not attempt to wash or to rinse it,
as water will damage the filter.
If soiled, the air cleaner filter must be
replaced.
Replace the filter according to the
Maintenance Schedule.OAE056014R
P PA
AR
RK
KI
IN
NG
G
B
BR
RA
AK
KE
E
To prevent serious injury or
death, take the following safety
precautions when using washer
fluid:
Do not use engine coolant or
antifreeze in the washer fluid
reservoir. Engine coolant can
severely obscure visibility
when sprayed on the wind-
screen and may cause loss of
vehicle control resulting in an
accident or damage to paint
and body trim.
Do not allow sparks or flames
to contact the washer fluid or
the washer fluid reservoir.
Washer fluid may contain
alcohol and can be flamma-
ble.
Do not drink washer fluid and
avoid contact with skin.
Washer fluid is poisonous to
humans and animals.
Keep washer fluid away from
children and animals.
WARNING
A AI
IR
R
C
CL
LE
EA
AN
NE
ER
R
OAEPH076010
Page 579 of 613
7-61
7
Maintenance
L LI
IG
GH
HT
T
B
BU
UL
LB
BS
S
Consult an authorised HYUNDAI
dealer to replace most vehicle light
bulbs. It is difficult to replace vehicle
light bulbs because other parts of the
vehicle must be removed before you
can get to the bulb. This is especially
true for removing the headlamp
assembly to get to the bulb(s).
Removing/installing the headlamp
assembly can result in damage to
the vehicle.Be sure to replace the burned-out
bulb with one of the same wattage
rating. Otherwise, it may cause
damage to the fuse or electric
wiring system.
Information
The headlamp and tail lamp lenses
could appear frosty if the vehicle is
washed after driving or the vehicle is
driven at night in wet weather. This
condition is caused by temperature dif-
ference between the lamp inside and
outside and, it does not indicate a prob-
lem with your vehicle. When moisture
condenses in the lamp, it will be
removed after driving with the head-
lamp on. The removable level may dif-
fer depending on lamp size, lamp posi-
tion and environmental condition.
However, if moisture is not removed,
we recommend that your vehicle is
inspected by an authorised HYUNDAI
dealer.
Information
• A normally functioning lamp may
flicker momentarily to stabilize the
vehicle’s electrical control system.
However, if the lamp goes out after
flickering momentarily, or contin-
ues to flicker, we recommend the
system be checked by an authorised
HYUNDAI dealer.
• The position lamp may not turn on
when the position lamp switch is
turned on, but the position lamp and
headlamp switch may turn on when
the headlamp switch is turned on.
This may be caused by network fail-
ure or vehicle electrical control sys-
tem malfunction. If this occurs, we
recommend the system be checked
by an authorised HYUNDAI dealer.
i
i
NOTICE
Prior to working on a light, firmly
apply the parking brake, ensure
that the ignition switch is in the
LOCK/OFF position and turn off
the lights to avoid sudden move-
ment of the vehicle and burning
your fingers or receiving an elec-
tric shock.
WARNING
Page 603 of 613
7-85
7
Maintenance
P PR
RO
OC
CE
ED
DU
UR
RE
E
F
FO
OR
R
E
EN
NT
TE
ER
RI
IN
NG
G
F
FO
OR
RC
CE
ED
D
E
EN
NG
GI
IN
NE
E
A
AC
CT
TI
IV
VA
AT
TI
IO
ON
N
M
MO
OD
DE
E
If the engine needs to be kept run-
ning whilst the vehicle is stopped to
inspect emission gas or perform
vehicle maintenance, follow below
procedure to enter forced engine
activation mode.
1. Place the shift lever in P (Park)
position with the vehicle stopped.
Engage the parking brake. Then,
follow the steps (1) to (5).
Information
Below steps from (1) to (5) must be
completed within 60 sec. If not, the
process is reset and you must start
again from step (1).(1) Turn the ignition switch to the ON
position. Vehicles equipped with
the smart key, press the Engine
Start/Stop button twice without
depressing the brake pedal.
(2) Place the shift lever in P (Park)
position and depress the acceler-
ator pedal twice.
(3) Place the shift lever in N (Neutral)
position and depress the acceler-
ator pedal twice.
(4) Place the shift lever in P (Park)
position and depress the acceler-
ator pedal twice.
(5) With the brake pedal depressed,
start the engine, and maintain
idling state.
Information
The engine remains in idle state and
the forced engine activation mode is
maintained even when the gear is
shifted to a different position.2. " " indicator on the instrument
cluster blinks when the vehicle is
in forced engine activation mode.
Check the " " indicator blinking
to ensure that the forced engine
activation mode is correctly
entered.
Information
The " " indicator continues blink-
ing until the forced engine activation
mode is cancelled. When the mode is
cancelled the " " indicator will
stop blinking.
3. To cancel the forced engine acti-
vation mode, turn the vehicle off.
i
i
i