2020 Hyundai Ioniq Hybrid battery replacement
[x] Cancel search: battery replacementPage 153 of 613
![Hyundai Ioniq Hybrid 2020 Owners Manual - RHD (UK, Australia) 3-6
Remote key precautions
The remote key may not work if any
of the following occur:
The key is in the ignition switch.
You exceed the operating distance
limit (about 30 m [90 feet]).
The remote k Hyundai Ioniq Hybrid 2020 Owners Manual - RHD (UK, Australia) 3-6
Remote key precautions
The remote key may not work if any
of the following occur:
The key is in the ignition switch.
You exceed the operating distance
limit (about 30 m [90 feet]).
The remote k](/manual-img/35/14927/w960_14927-152.png)
3-6
Remote key precautions
The remote key may not work if any
of the following occur:
The key is in the ignition switch.
You exceed the operating distance
limit (about 30 m [90 feet]).
The remote key battery is weak.
Other vehicles or objects may be
blocking the signal.
The weather is extremely cold.
The remote key is close to a radio
transmitter such as a radio station
or an airport which can interfere
with normal operation of the remote
key.
When the remote key does not work
correctly, open and close the door
with the mechanical key. If you have a
problem with the remote key, it is rec-
ommended that you contact an autho-
rised HYUNDAI dealer.
If the remote key is in close proximity
to your mobile phone, the signal could
be blocked by your mobile phone's
normal operational signals.This is especially important when the
phone is active such as making and
receiving calls, text messaging,
and/or sending/receiving emails.
Avoid placing the remote key and your
mobile phone in the same location
and always try to maintain an ade-
quate distance between the two
devices.
Information
Changes or modifications not express-
ly approved by the party responsible
for compliance could void the user’s
authority to operate the equipment. If
the keyless entry system is inoperative
due to changes or modifications not
expressly approved by the party
responsible for compliance, it will not
be covered by your manufacturer’s
vehicle warranty.
Keep the remote key away from
electromagnetic materials that
block electromagnetic waves to
the key surface.
Battery replacement
If the remote key is not working prop-
erly, try replacing the battery with a
new one.
Battery Type: CR2032
To replace the battery:
1. Insert a slim tool into the slot and
gently pry open the cover.
2. Remove the old battery and insert
the new battery. Make sure the
battery position is correct.
3. Reinstall the rear cover of the
remote key.
NOTICE
i
Convenient features of your vehicle
OLM042302
Page 157 of 613
3-10
Convenient features of your vehicle
If the smart key is in close proximity
to your mobile phone, the signal
could be blocked by your mobile
phones normal operational signals.
This is especially important when the
phone is active such as making and
receiving calls, text messaging,
and/or sending/receiving emails.
Avoid placing the smart key and your
mobile phone in the same location
and always try to maintain an ade-
quate distance between the two
devices.
Information
Changes or modifications not express-
ly approved by the party responsible
for compliance could void the user’s
authority to operate the equipment. If
the keyless entry system is inoperative
due to changes or modifications not
expressly approved by the party
responsible for compliance, it will not
be covered by your manufacturer’s
vehicle warranty.
Keep the smart key away from
electromagnetic materials that
blocks electromagnetic waves to
the key surface.
Battery replacement
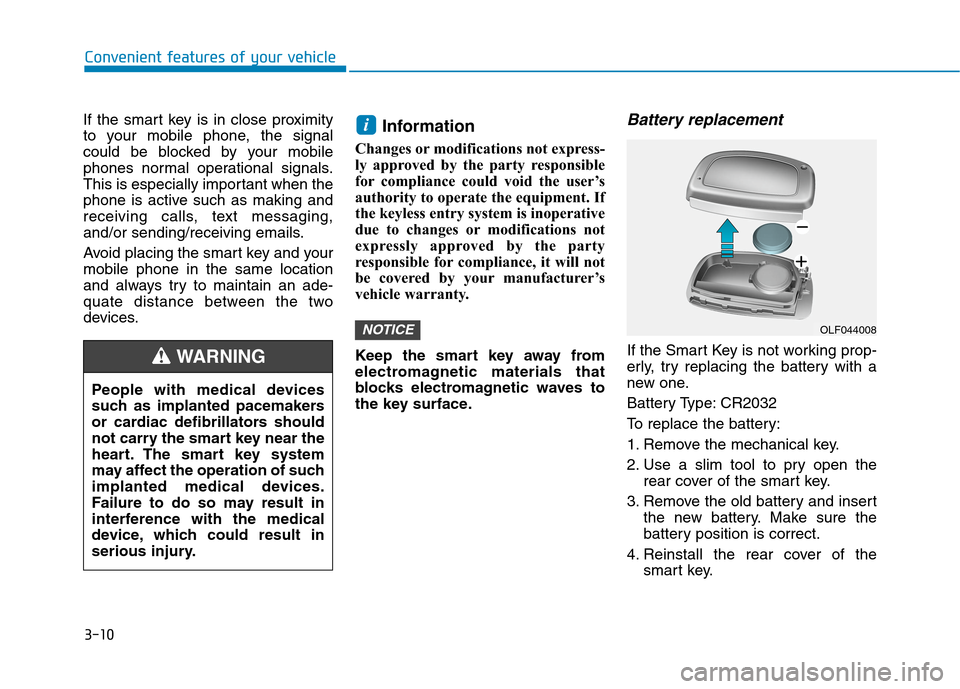
If the Smart Key is not working prop-
erly, try replacing the battery with a
new one.
Battery Type: CR2032
To replace the battery:
1. Remove the mechanical key.
2. Use a slim tool to pry open the
rear cover of the smart key.
3. Remove the old battery and insert
the new battery. Make sure the
battery position is correct.
4. Reinstall the rear cover of the
smart key.
NOTICE
i
OLF044008
People with medical devices
such as implanted pacemakers
or cardiac defibrillators should
not carry the smart key near the
heart. The smart key system
may affect the operation of such
implanted medical devices.
Failure to do so may result in
interference with the medical
device, which could result in
serious injury.
WARNING
Page 477 of 613
6-4
I IF
F
T
TH
HE
E
E
EN
NG
GI
IN
NE
E
W
WI
IL
LL
L
N
NO
OT
T
S
ST
TA
AR
RT
T
What to do in an emergency
Hybrid vehicle
Be sure the shift lever is in P
(Park). The vehicle starts only
when the shift lever is in P (Park).
This vehicle does not have a regu-
lar 12V battery that needs periodic
replacement. It is lithium ion poly-
mer type integrated into the HEV
high voltage battery. The vehicle
has a 12V battery protection sys-
tem that cuts 12V battery from
vehicle draw to prevent full dis-
charge. If vehicle will not start, first
try pressing the 12V Battery Reset
switch (left side of the steering
wheel near the fuel door open
switch) to reconnect the 12V bat-
tery, but you must start vehicle
within 15 seconds of pressing the
12V Battery Reset switch. After
starting vehicle, operate the vehi-
cle safely outdoors in ready mode
stopped and/or drive it for 30 min-
utes total to charge the 12V battery
fully. Check the fuel level and add fuel if
necessary.
If the vehicle still does not start, we
recommend that you call an autho-
rised HYUNDAI dealer for assis-
tance.
Plug-in hybrid vehicle
Be sure the shift lever is in P
(Park). The vehicle starts only
when the shift lever is in P (Park).
Check the battery connections to
be sure they are clean and tight.
Turn on the interior light. If the light
dims or goes out when you operate
the starter, the battery is drained.
Do not push or pull the vehicle to
start it. This could cause damage to
your vehicle.See instructions for
"Jump Starting" provided in this
chapter.
Check the fuel level and add fuel if
necessary.
If the vehicle still does not start, we
recommend that you call an autho-
rised HYUNDAI dealer for assis-
tance.Push or pull starting the vehicle
may cause the catalytic convert-
er to overload which can lead to
damage to the emission control
system.
CAUTION
Push or pull starting the vehicle
may cause the catalytic con-
verter to overload which can
lead to damage to the emission
control system.
CAUTION
Page 478 of 613
6-5
What to do in an emergency
Before jump starting
This vehicle does not have a regular
12V battery that needs periodic
replacement. It is lithium ion polymer
type integrated into the HEV high
voltage battery. The vehicle has a
12V battery protection system that
cuts 12V battery from vehicle draw to
prevent full discharge.
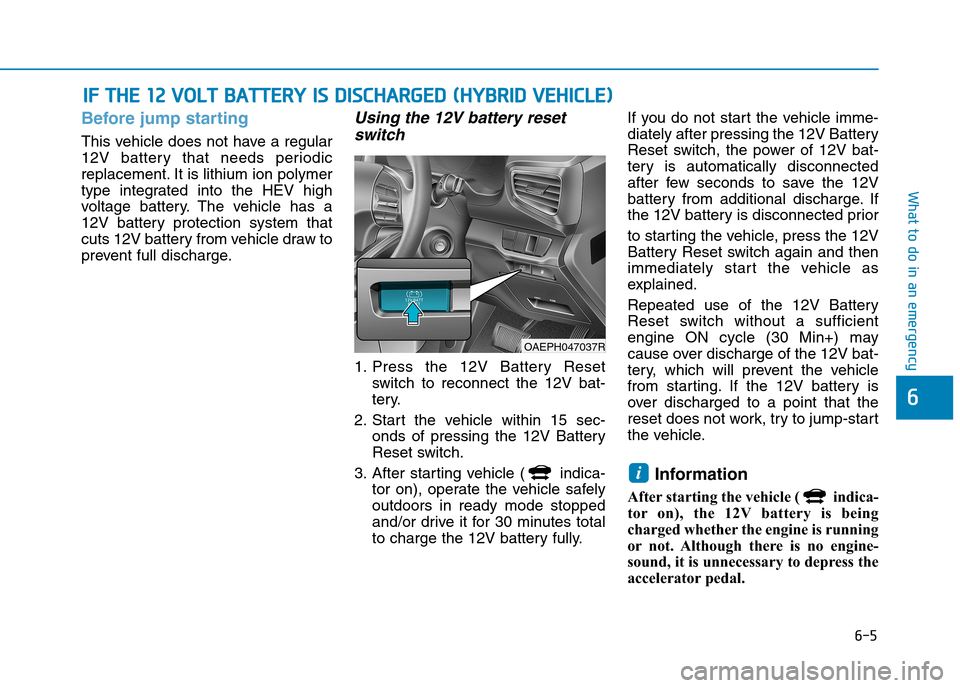
Using the 12V battery reset
switch
1. Press the 12V Battery Reset
switch to reconnect the 12V bat-
tery.
2. Start the vehicle within 15 sec-
onds of pressing the 12V Battery
Reset switch.
3. After starting vehicle ( indica-
tor on), operate the vehicle safely
outdoors in ready mode stopped
and/or drive it for 30 minutes total
to charge the 12V battery fully.If you do not start the vehicle imme-
diately after pressing the 12V Battery
Reset switch, the power of 12V bat-
tery is automatically disconnected
after few seconds to save the 12V
battery from additional discharge. If
the 12V battery is disconnected prior
to starting the vehicle, press the 12V
Battery Reset switch again and then
immediately start the vehicle as
explained.
Repeated use of the 12V Battery
Reset switch without a sufficient
engine ON cycle (30 Min+) may
cause over discharge of the 12V bat-
tery, which will prevent the vehicle
from starting. If the 12V battery is
over discharged to a point that the
reset does not work, try to jump-start
the vehicle.
Information
After starting the vehicle ( indica-
tor on), the 12V battery is being
charged whether the engine is running
or not. Although there is no engine-
sound, it is unnecessary to depress the
accelerator pedal.
i
I IF
F
T
TH
HE
E
1
12
2
V
VO
OL
LT
T
B
BA
AT
TT
TE
ER
RY
Y
I
IS
S
D
DI
IS
SC
CH
HA
AR
RG
GE
ED
D
(
(H
HY
YB
BR
RI
ID
D
V
VE
EH
HI
IC
CL
LE
E)
)
6
OAEPH047037R
Page 519 of 613
7
Maintenance
7
Maintenance
Engine compartment .............................................7-3
Maintenance services ...........................................7-5
Owner's responsibility ......................................................7-5
Owner maintenance precautions ..................................7-5
Owner maintenance ...............................................7-6
How to Disconnect the (-) Cable for
Regular Maintenance .......................................................7-6
Owner maintenance schedule ........................................7-7
Scheduled maintenance services.........................7-8
Normal maintenance schedule .......................................7-9
Maintenance under severe usage conditions ..........7-13
Explanation of scheduled maintenance items .7-15
Engine oil ..............................................................7-17
Checking the engine oil level .......................................7-17
Checking the engine oil and filter ..............................7-18
Engine coolant/inverter coolantz .....................7-19
Checking the coolant level ...........................................7-19
Changing coolant.............................................................7-22
Brake fluid ............................................................7-23
Checking the brake fluid level .....................................7-23
Hybrid Starter & Generator (HSG) belt ............7-23
Checking the hybrid starter & generator (HSG)
belt ......................................................................................7-23
Washer fluid .........................................................7-24
Checking the washer fluid level ..................................7-24
Air cleaner ............................................................7-25
Parking brake .......................................................7-25
Checking the parking brake .........................................7-25
Filter replacement ...........................................................7-25
Climate control air filter .....................................7-27
Filter inspection ...............................................................7-27
Wiper blades .........................................................7-29
Blade inspection ..............................................................7-29
Blade replacement ..........................................................7-29
Battery (12 volt, plug-in hybrid vehicle) .........7-32
For best battery service................................................7-33
Battery capacity label ....................................................7-34
Battery recharging .........................................................7-34
Reset features .................................................................7-35
7
Page 565 of 613
7-47
7
Maintenance
F FU
US
SE
ES
S
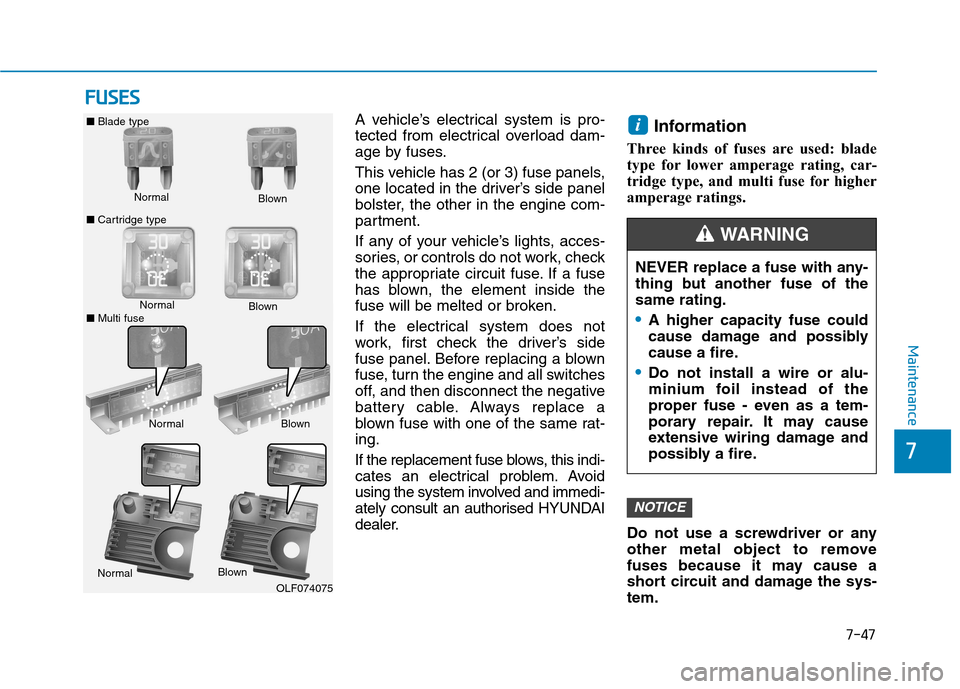
A vehicle’s electrical system is pro-
tected from electrical overload dam-
age by fuses.
This vehicle has 2 (or 3) fuse panels,
one located in the driver’s side panel
bolster, the other in the engine com-
partment.
If any of your vehicle’s lights, acces-
sories, or controls do not work, check
the appropriate circuit fuse. If a fuse
has blown, the element inside the
fuse will be melted or broken.
If the electrical system does not
work, first check the driver’s side
fuse panel. Before replacing a blown
fuse, turn the engine and all switches
off, and then disconnect the negative
battery cable. Always replace a
blown fuse with one of the same rat-
ing.
If the replacement fuse blows, this indi-
cates an electrical problem. Avoid
using the system involved and immedi-
ately consult an authorised HYUNDAI
dealer.Information
Three kinds of fuses are used: blade
type for lower amperage rating, car-
tridge type, and multi fuse for higher
amperage ratings.
Do not use a screwdriver or any
other metal object to remove
fuses because it may cause a
short circuit and damage the sys-
tem.
NOTICE
i
Normal ■Blade type
■Cartridge typeBlown
NormalBlown
NormalBlown
OLF074075
NEVER replace a fuse with any-
thing but another fuse of the
same rating.
A higher capacity fuse could
cause damage and possibly
cause a fire.
Do not install a wire or alu-
minium foil instead of the
proper fuse - even as a tem-
porary repair. It may cause
extensive wiring damage and
possibly a fire.
WARNING
Normal
Blown
■Multi fuse
Page 583 of 613
7-65
7
Maintenance
Information
HID lamps have superior perform-
ance vs. halogen bulbs.
HID lamps are estimated by the man-
ufacturer to last twice as long or
longer than halogen bulbs depending
on their frequency of use. They will
probably require replacement at some
point in the life of the vehicle. Cycling
the headlamps on and off more than
typical use will shorten HID lamps
life. HID lamps do not fail in the same
manner as halogen incandescent
lamps. If a headlamp goes out after a
period of operation but will immedi-
ately relight when the headlamp
switch is cycled it is likely the HID
lamp needs to be replaced. HID light-
ing components are more complex
than conventional halogen bulbs thus
have higher replacement cost.
Information
The headlamp aiming should be
adjusted after an accident or after the
headlamp assembly is reinstalled at an
authorised HYUNDAI dealer.
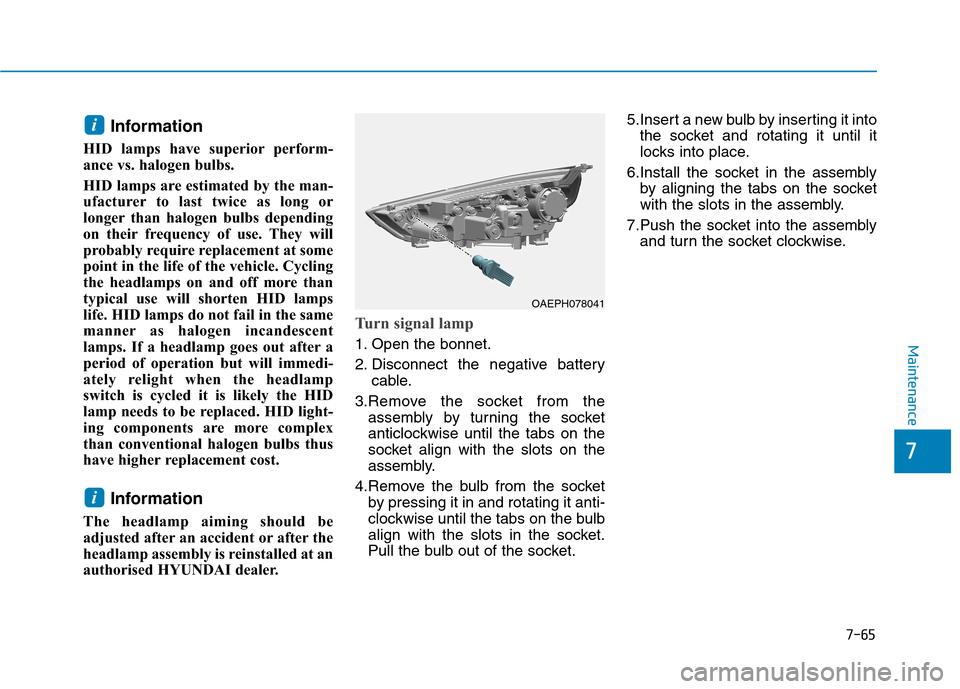
Turn signal lamp
1. Open the bonnet.
2. Disconnect the negative battery
cable.
3.Remove the socket from the
assembly by turning the socket
anticlockwise until the tabs on the
socket align with the slots on the
assembly.
4.Remove the bulb from the socket
by pressing it in and rotating it anti-
clockwise until the tabs on the bulb
align with the slots in the socket.
Pull the bulb out of the socket.5.Insert a new bulb by inserting it into
the socket and rotating it until it
locks into place.
6.Install the socket in the assembly
by aligning the tabs on the socket
with the slots in the assembly.
7.Push the socket into the assembly
and turn the socket clockwise.
i
i
OAEPH078041