Page 189 of 613
3-42
Information
Make sure to refuel your vehicle
according to the "Fuel Requirements"
suggested in the Introduction chapter.
Do not spill fuel on the exterior
surfaces of the vehicle. Any type
of fuel spilled on painted sur-
faces may damage the paint.
If the fuel filler cap requires
replacement, use only a genuine
HYUNDAI cap or the equivalent
specified for your vehicle. An
incorrect fuel filler cap can
result in a serious malfunction
of the fuel system or emission
control system.
Fuel filler door
(Plug-in hybrid vehicle)
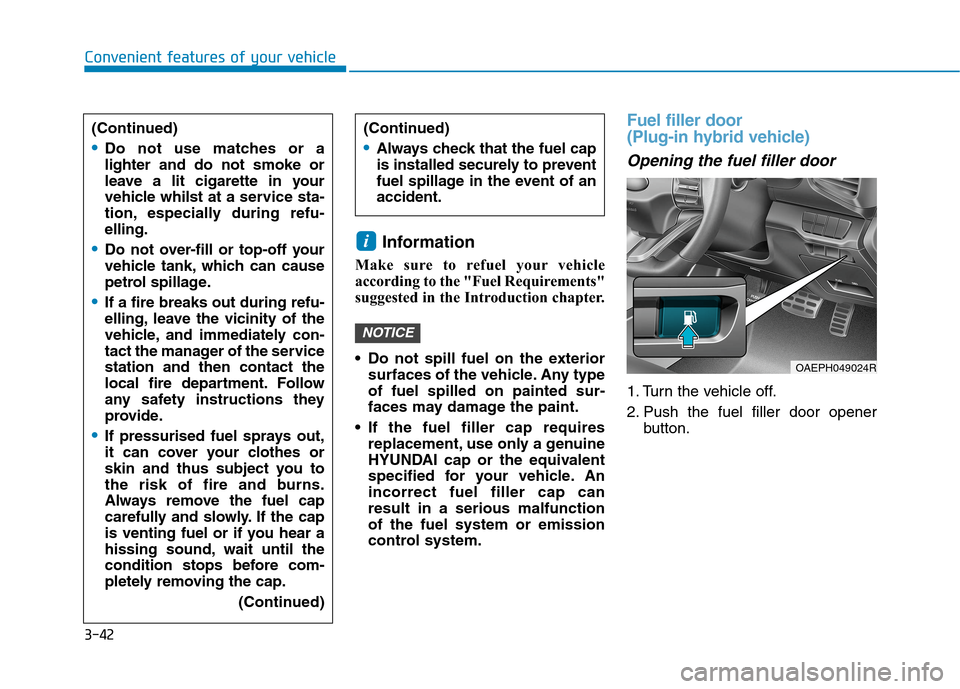
Opening the fuel filler door
1. Turn the vehicle off.
2. Push the fuel filler door opener
button.
NOTICE
i
Convenient features of your vehicle
(Continued)
Do not use matches or a
lighter and do not smoke or
leave a lit cigarette in your
vehicle whilst at a service sta-
tion, especially during refu-
elling.
Do not over-fill or top-off your
vehicle tank, which can cause
petrol spillage.
If a fire breaks out during refu-
elling, leave the vicinity of the
vehicle, and immediately con-
tact the manager of the service
station and then contact the
local fire department. Follow
any safety instructions they
provide.
If pressurised fuel sprays out,
it can cover your clothes or
skin and thus subject you to
the risk of fire and burns.
Always remove the fuel cap
carefully and slowly. If the cap
is venting fuel or if you hear a
hissing sound, wait until the
condition stops before com-
pletely removing the cap.
(Continued)
(Continued)
Always check that the fuel cap
is installed securely to prevent
fuel spillage in the event of an
accident.
OAEPH049024R
Page 192 of 613
3-45
Convenient features of your vehicle
Information
Make sure to refuel your vehicle
according to the "Fuel Requirements"
suggested in the Introduction chapter.
Do not spill fuel on the exterior
surfaces of the vehicle. Any type
of fuel spilled on painted sur-
faces may damage the paint.
If the fuel filler cap requires
replacement, use only a genuine
HYUNDAI cap or the equivalent
specified for your vehicle. An
incorrect fuel filler cap can
result in a serious malfunction
of the fuel system or emission
control system.
NOTICE
i3
(Continued)
Do not use matches or a
lighter and do not smoke or
leave a lit cigarette in your
vehicle whilst at a service sta-
tion, especially during refu-
elling.
Do not over-fill or top-off your
vehicle tank, which can cause
petrol spillage.
If a fire breaks out during refu-
elling, leave the vicinity of the
vehicle, and immediately con-
tact the manager of the service
station and then contact the
local fire department. Follow
any safety instructions they
provide.
If pressurised fuel sprays out,
it can cover your clothes or
skin and thus subject you to
the risk of fire and burns.
Always remove the fuel cap
carefully and slowly. If the cap
is venting fuel or if you hear a
hissing sound, wait until the
condition stops before com-
pletely removing the cap.
(Continued)
(Continued)
Always check that the fuel cap
is installed securely to prevent
fuel spillage in the event of an
accident.
Page 234 of 613
3-87
Convenient features of your vehicle
3
ItemsExplanation
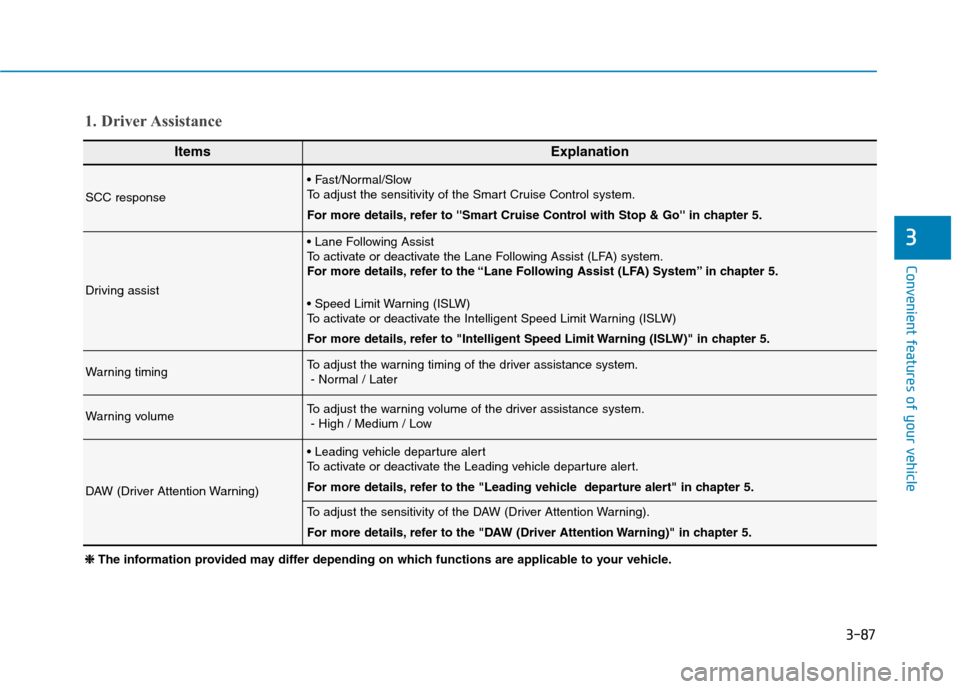
SCC response
To adjust the sensitivity of the Smart Cruise Control system.
For more details, refer to ''Smart Cruise Control with Stop & Go'' in chapter 5.
Driving assist
To activate or deactivate the Lane Following Assist (LFA) system.
For more details, refer to the “Lane Following Assist (LFA) System” in chapter 5.
To activate or deactivate the Intelligent Speed Limit Warning (ISLW)
For more details, refer to "Intelligent Speed Limit Warning (ISLW)" in chapter 5.
Warning timingTo adjust the warning timing of the driver assistance system.
- Normal / Later
Warning volumeTo adjust the warning volume of the driver assistance system.
- High / Medium / Low
DAW (Driver Attention Warning)
To activate or deactivate the Leading vehicle departure alert.
For more details, refer to the "Leading vehicle departure alert" in chapter 5.
To adjust the sensitivity of the DAW (Driver Attention Warning).
For more details, refer to the "DAW (Driver Attention Warning)" in chapter 5.
1. Driver Assistance
❈ ❈
The information provided may differ depending on which functions are applicable to your vehicle.
Page 259 of 613
3-112
Convenient features of your vehicle
Turn signals and lane change
signals
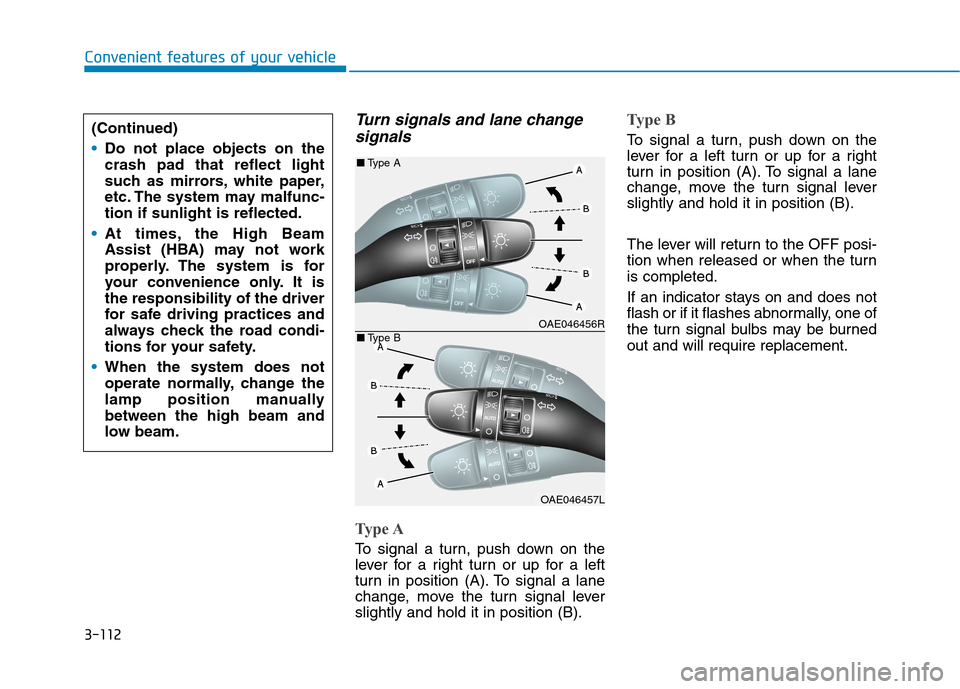
Type A
To signal a turn, push down on the
lever for a right turn or up for a left
turn in position (A). To signal a lane
change, move the turn signal lever
slightly and hold it in position (B).
Type B
To signal a turn, push down on the
lever for a left turn or up for a right
turn in position (A). To signal a lane
change, move the turn signal lever
slightly and hold it in position (B).
The lever will return to the OFF posi-
tion when released or when the turn
is completed.
If an indicator stays on and does not
flash or if it flashes abnormally, one of
the turn signal bulbs may be burned
out and will require replacement. (Continued)
Do not place objects on the
crash pad that reflect light
such as mirrors, white paper,
etc. The system may malfunc-
tion if sunlight is reflected.
At times, the High Beam
Assist (HBA) may not work
properly. The system is for
your convenience only. It is
the responsibility of the driver
for safe driving practices and
always check the road condi-
tions for your safety.
When the system does not
operate normally, change the
lamp position manually
between the high beam and
low beam.
OAE046456R
OAE046457L ■Type A
■Type B
Page 262 of 613
3-115
Convenient features of your vehicle
3
Daytime running light (DRL)
The Daytime Running Lights (DRL)
can make it easier for others to see
the front of your vehicle during the
day, especially after dawn and before
sunset.
The DRL system will turn the dedi-
cated lamp OFF when:
1. The headlamps are in the ON
position.
2. The engine is turned off.
Headlamp levelling device
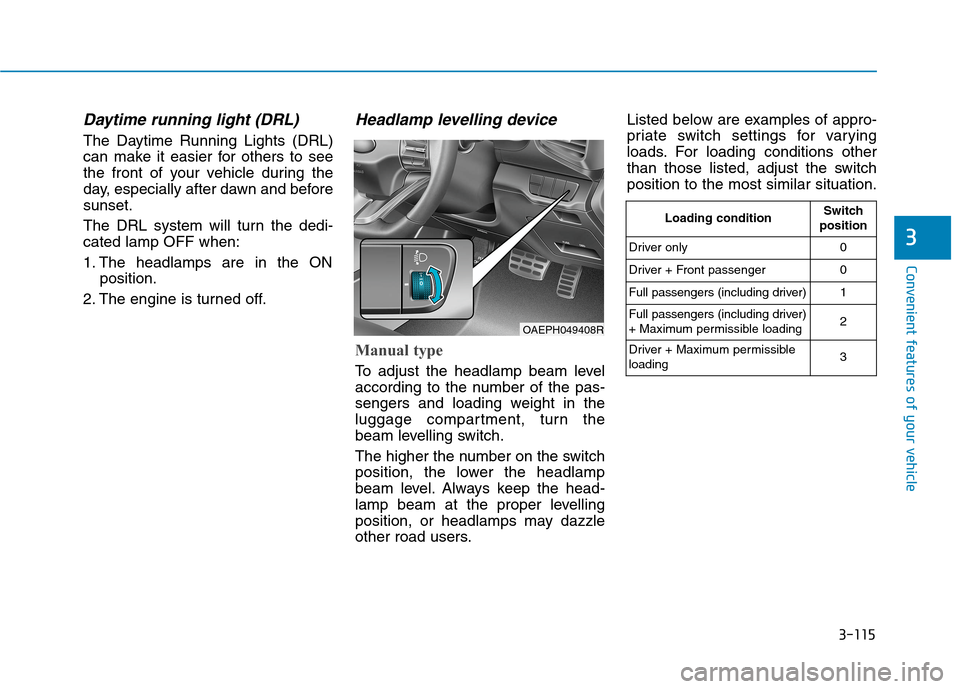
Manual type
To adjust the headlamp beam level
according to the number of the pas-
sengers and loading weight in the
luggage compartment, turn the
beam levelling switch.
The higher the number on the switch
position, the lower the headlamp
beam level. Always keep the head-
lamp beam at the proper levelling
position, or headlamps may dazzle
other road users.Listed below are examples of appro-
priate switch settings for varying
loads. For loading conditions other
than those listed, adjust the switch
position to the most similar situation.
OAEPH049408R
Loading conditionSwitch
position
Driver only 0
Driver + Front passenger 0
Full passengers (including driver) 1
Full passengers (including driver)
+ Maximum permissible loading2
Driver + Maximum permissible
loading 3
Page 272 of 613
3-125
Convenient features of your vehicle
3
This is a supplemental system that
provides a view of the area behind
the vehicle through the infotainment
system whilst the vehicle is in the R
(Reverse) position. Do not spray the camera or its
surrounding area directly with a
high pressure washer. Shock
applied from high pressure
water may cause the device to
not operate normally.
Do not use any cleanser con-
taining acid or alkaline deter-
gents when cleaning the lens.
Use only a mild soap or neutral
detergent, and rinse thoroughly
with water.
Information
Always keep the camera lens clean. The
camera may not work normally if the
lens is covered with dirt or snow.
i
NOTICE
The Rear View Monitor display
is not a safety device. It only
serves to assist the driver in
identifying objects directly
behind the middle of the vehi-
cle. The camera does NOT cover
the complete area behind the
vehicle.
WARNING
Never rely solely on the rear
camera display when backing-
up.
ALWAYS look around your
vehicle to make sure there are
no objects or obstacles
before moving the vehicle in
any direction to prevent a col-
lision.
Always pay close attention
when the vehicle is driven
close to objects, particularly
pedestrians, and especially
children.
WARNING
Page 274 of 613
3-127
Convenient features of your vehicle
Rear View Monitor - Top view
When you touch the icon on infotain-
ment system screen, the top view is
displayed on the screen and shows
the distance from the vehicle in the
back of your vehicle. Touch the icon
on infotainment system screen
again, to switch back to the previous
screen.
Reverse Parking Distance
Warning system (if equipped)
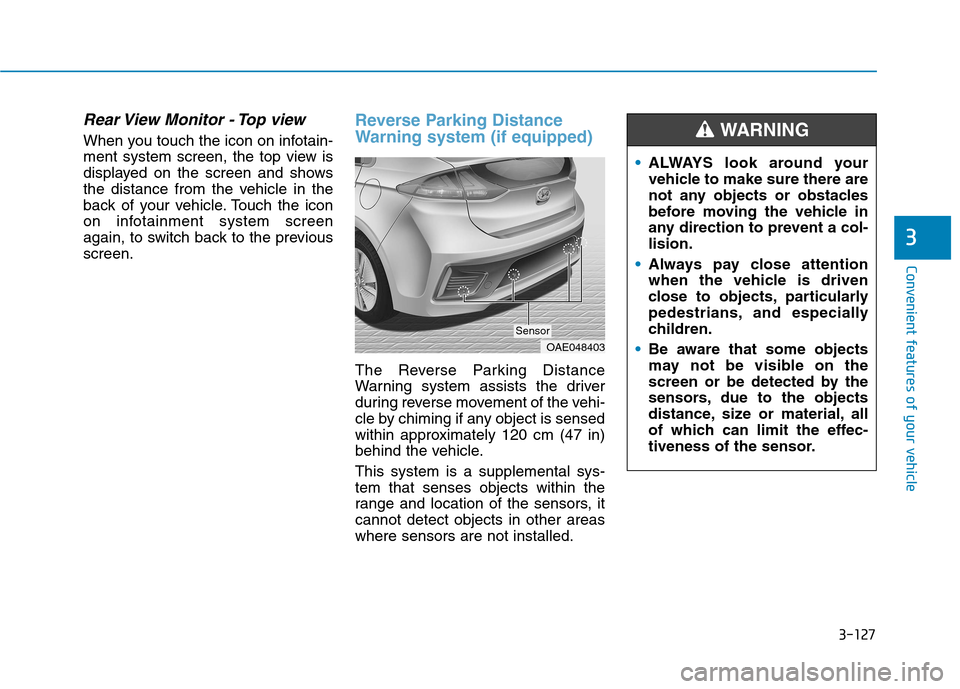
The Reverse Parking Distance
Warning system assists the driver
during reverse movement of the vehi-
cle by chiming if any object is sensed
within approximately 120 cm (47 in)
behind the vehicle.
This system is a supplemental sys-
tem that senses objects within the
range and location of the sensors, it
cannot detect objects in other areas
where sensors are not installed.
3
OAE048403
Sensor
ALWAYS look around your
vehicle to make sure there are
not any objects or obstacles
before moving the vehicle in
any direction to prevent a col-
lision.
Always pay close attention
when the vehicle is driven
close to objects, particularly
pedestrians, and especially
children.
Be aware that some objects
may not be visible on the
screen or be detected by the
sensors, due to the objects
distance, size or material, all
of which can limit the effec-
tiveness of the sensor.
WARNING
Page 278 of 613
3-131
Convenient features of your vehicle
3
This system is a supplemental sys-
tem that senses objects within the
range and location of the sensors, it
cannot detect objects in other areas
where sensors are not installed.Operation of the
Reverse/Forward Parking
Distance Warning system
Operating condition
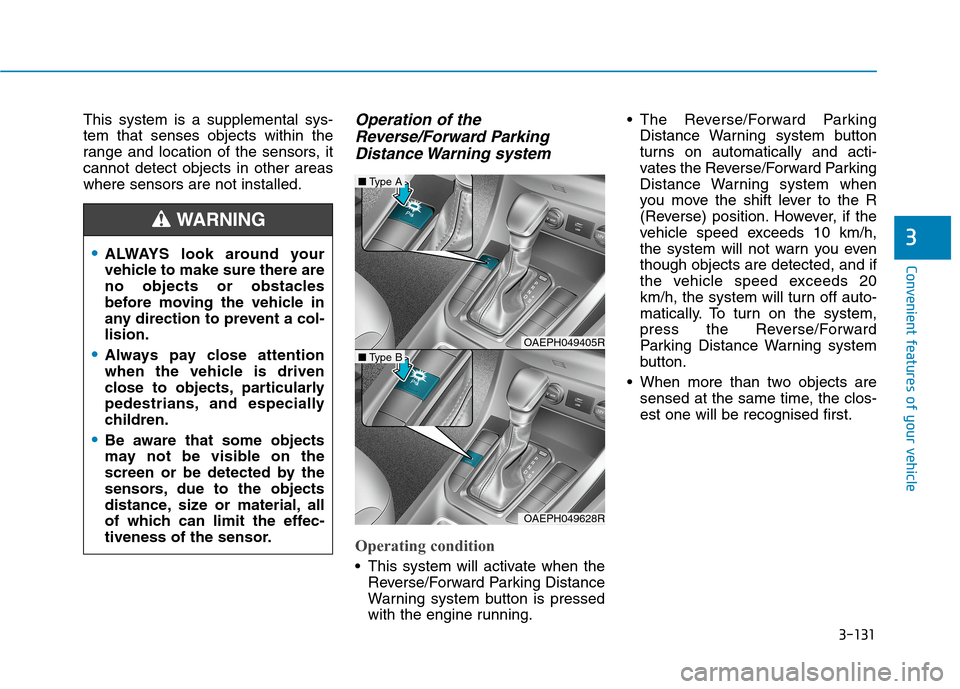
This system will activate when the
Reverse/Forward Parking Distance
Warning system button is pressed
with the engine running. The Reverse/Forward Parking
Distance Warning system button
turns on automatically and acti-
vates the Reverse/Forward Parking
Distance Warning system when
you move the shift lever to the R
(Reverse) position. However, if the
vehicle speed exceeds 10 km/h,
the system will not warn you even
though objects are detected, and if
the vehicle speed exceeds 20
km/h, the system will turn off auto-
matically. To turn on the system,
press the Reverse/Forward
Parking Distance Warning system
button.
When more than two objects are
sensed at the same time, the clos-
est one will be recognised first.
ALWAYS look around your
vehicle to make sure there are
no objects or obstacles
before moving the vehicle in
any direction to prevent a col-
lision.
Always pay close attention
when the vehicle is driven
close to objects, particularly
pedestrians, and especially
children.
Be aware that some objects
may not be visible on the
screen or be detected by the
sensors, due to the objects
distance, size or material, all
of which can limit the effec-
tiveness of the sensor.
WARNING
OAEPH049405R
■Type A
OAEPH049628R
■Type B