Page 39 of 613

H39
Check Hybrid system.
Do not start engine
This message is displayed when the
hybrid battery power (SOC) level is
low. A warning chime will sound until
the problem is solved.
In this case, we recommend that you
have your vehicle inspected by an
authorised HYUNDAI dealer.
Stop vehicle and check power
supply
This message is displayed when a
failure occurs in the power supply
system.
In this case, park the vehicle in a
safe location and we recommend
that you tow your vehicle to the near-
est authorised HYUNDAI dealer and
have the vehicle inspected.
Park with engine on to charge
battery
This message is displayed when the
hybrid battery power (SOC) level is
low.
In this case, park the vehicle in a
safe location and wait until the hybrid
battery is charged.
You can increase the hybrid battery
charging rate by holding the acceler-
ator pedal to the floor with transmis-
sion in P. The engine will rev high but
it will be limited for charging purpose
when you hold the pedal to the floor.
OAEPHQ049821LOAEPHQ049823LOAEPHQ049822L
Page 94 of 613
2-13
Safety system of your vehicle
2
To fold down the rear seatback:
1. Set the front seatback to the upright
position.
2. Lower the rear headrests down(2)
pushing the adjusting button(1).
3. Locate the seatbelt toward the
outboard position before folding
down the seatback to avoid the
seatbelt system interfering with
the seatback.4. Pull on the seatback folding lever
(1), then fold the seat toward the
front of the vehicle.
OAE036018
OAE036065L
OAE036019
OAE036020
OAE036021
Page 98 of 613
2-17
Safety system of your vehicle
2
Forward and rearward adjustment
(if equipped)
The headrest may be adjusted for-
ward to 3 different positions by
pulling the headrest forward to the
desired detent. To adjust the head-
rest to it’s furthest rearwards posi-
tion, pull it fully forward to the farthest
position and release it.If you recline the seatback towards
the front with the headrest and
seat cushion raised, the headrest
may come in contact with the sun-
visor or other parts of the vehicle.
Removal/Reinstall
To remove the headrest:
1. Recline the seatback (2) with using
the seatback angle lever or switch
(1).
2. Raise the headrest as far as it can
go.
NOTICE
OAE036012R
OAE036011R
■Type A
■Type BOLF034015OAE036009
Page 140 of 613
2-59
Safety system of your vehicle
2
Why didn’t my air bag go off in
a collision?
There are certain types of accidents
in which the air bag would not be
expected to provide additional protec-
tion. These include rear impacts, sec-
ond or third collisions in multiple
impact accidents, as well as low
speed impacts. Damage to the vehicle
indicates a collision energy absorp-
tion, and is not an indicator of whether
or not an air bag should have inflated.
Air bag collision sensors
To reduce the risk of an air bag
deploying unexpectedly and
causing serious injury or death:
Do not hit or allow any objects to
impact the locations where air
bags or sensors are installed.
Do not perform maintenance
on or around the air bag sen-
sors. If the location or angle of
the sensors is altered, the air
bags may deploy when they
should not or may not deploy
when they should.
Do not install bumper guards or
replace the bumper with a non-
genuine part. This may adverse-
ly affect the collision and air
bag deployment performance.
(Continued)
WARNING
(Continued)
Place the ignition switch to
the LOCK/OFF or ACC posi-
tion, when the vehicle is being
towed to prevent inadvertent
air bag deployment.
We recommend that all air bag
repairs are conducted by an
authorised HYUNDAI dealer.
Page 156 of 613
3-9
Convenient features of your vehicle
Start-up
You can start the engine without
inserting the key.For detailed infor-
mation refer to the Engine
Start/Stop button in chapter 5.
To prevent damaging the smart
key:
Keep the smart key away from
water or any liquid and fire. If the
inside of the smart key gets
damp (due to drinks or moisture),
or is heated, internal circuit may
malfunction and may void the
vehicle warranty.
Avoid dropping or throwing the
smart key.
Protect the smart key from
extreme temperatures.
Always have the smart key with
you when leaving the vehicle. If
the smart key is left near the vehi-
cle, the vehicle battery may be dis-
charged.
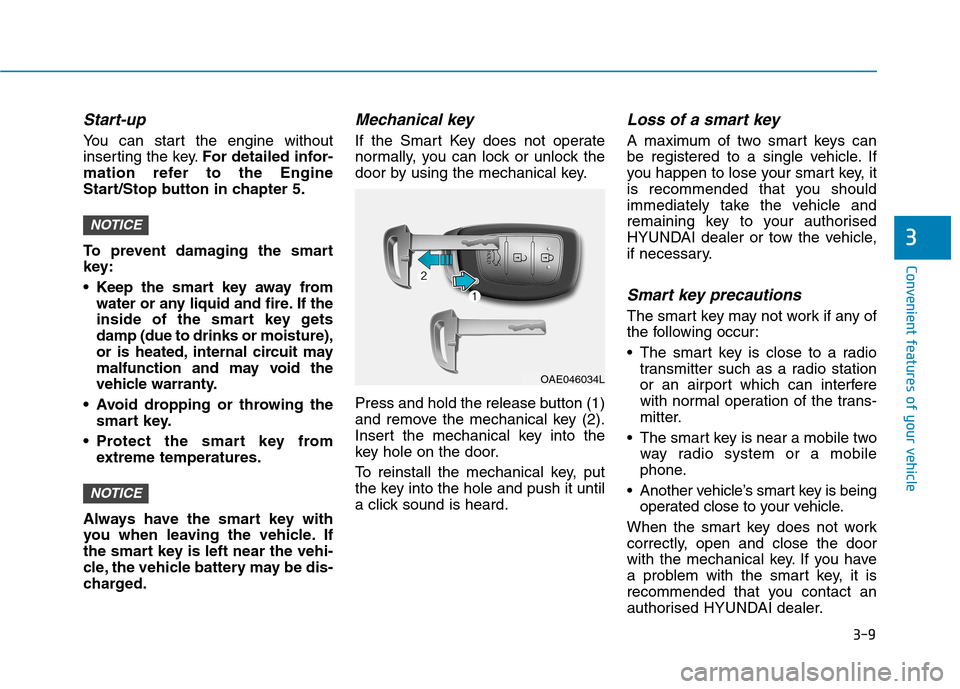
Mechanical key
If the Smart Key does not operate
normally, you can lock or unlock the
door by using the mechanical key.
Press and hold the release button (1)
and remove the mechanical key (2).
Insert the mechanical key into the
key hole on the door.
To reinstall the mechanical key, put
the key into the hole and push it until
a click sound is heard.
Loss of a smart key
A maximum of two smart keys can
be registered to a single vehicle. If
you happen to lose your smart key, it
is recommended that you should
immediately take the vehicle and
remaining key to your authorised
HYUNDAI dealer or tow the vehicle,
if necessary.
Smart key precautions
The smart key may not work if any of
the following occur:
The smart key is close to a radio
transmitter such as a radio station
or an airport which can interfere
with normal operation of the trans-
mitter.
The smart key is near a mobile two
way radio system or a mobile
phone.
Another vehicle’s smart key is being
operated close to your vehicle.
When the smart key does not work
correctly, open and close the door
with the mechanical key. If you have
a problem with the smart key, it is
recommended that you contact an
authorised HYUNDAI dealer.
NOTICE
NOTICE3
OAE046034L
Page 159 of 613
3-12
Operating door locks from
outside the vehicle
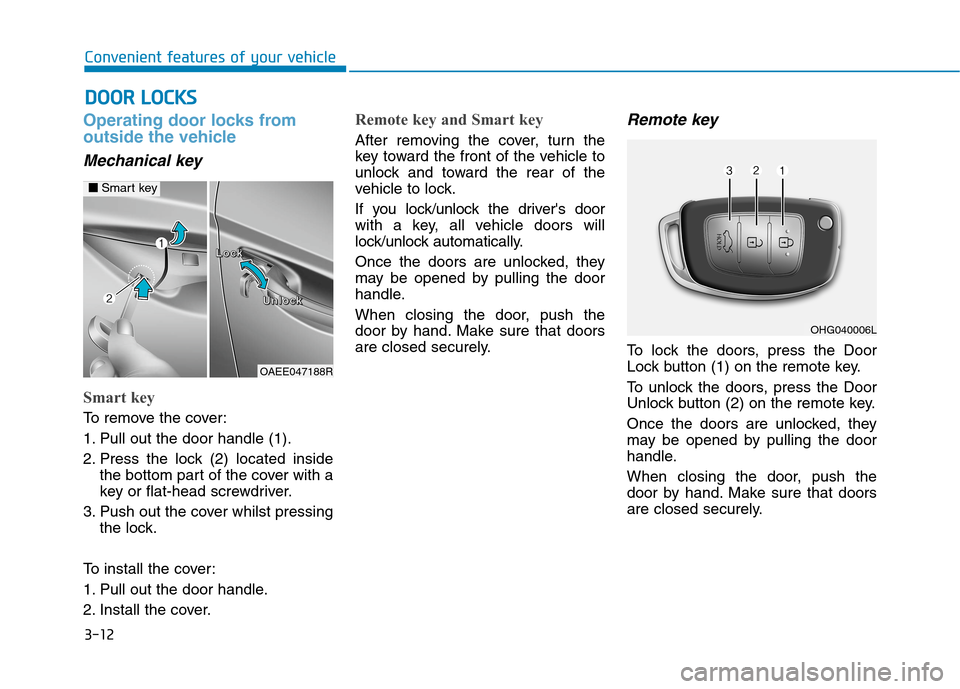
Mechanical key
Smart key
To remove the cover:
1. Pull out the door handle (1).
2. Press the lock (2) located inside
the bottom part of the cover with a
key or flat-head screwdriver.
3. Push out the cover whilst pressing
the lock.
To install the cover:
1. Pull out the door handle.
2. Install the cover.
Remote key and Smart key
After removing the cover, turn the
key toward the front of the vehicle to
unlock and toward the rear of the
vehicle to lock.
If you lock/unlock the driver's door
with a key, all vehicle doors will
lock/unlock automatically.
Once the doors are unlocked, they
may be opened by pulling the door
handle.
When closing the door, push the
door by hand. Make sure that doors
are closed securely.
Remote key
To lock the doors, press the Door
Lock button (1) on the remote key.
To unlock the doors, press the Door
Unlock button (2) on the remote key.
Once the doors are unlocked, they
may be opened by pulling the door
handle.
When closing the door, push the
door by hand. Make sure that doors
are closed securely.
D DO
OO
OR
R
L
LO
OC
CK
KS
S
Convenient features of your vehicle
OHG040006L
OAEE047188R
L L L L
o o o o
c c c c
k k k k
U U U U
n n n n
l l l l
o o o o
c c c c
k k k k
■
■
Smart key
Page 169 of 613
3-22
Convenient features of your vehicle
Tilt steering / Telescopic steer-
ing
Information
After adjustment, sometimes the lock-
release lever may not lock the steering
wheel.
It is not a malfunction. This occurs
when two gears are not engaged cor-
rectly. In this case, adjust the steering
wheel again and then lock the steering
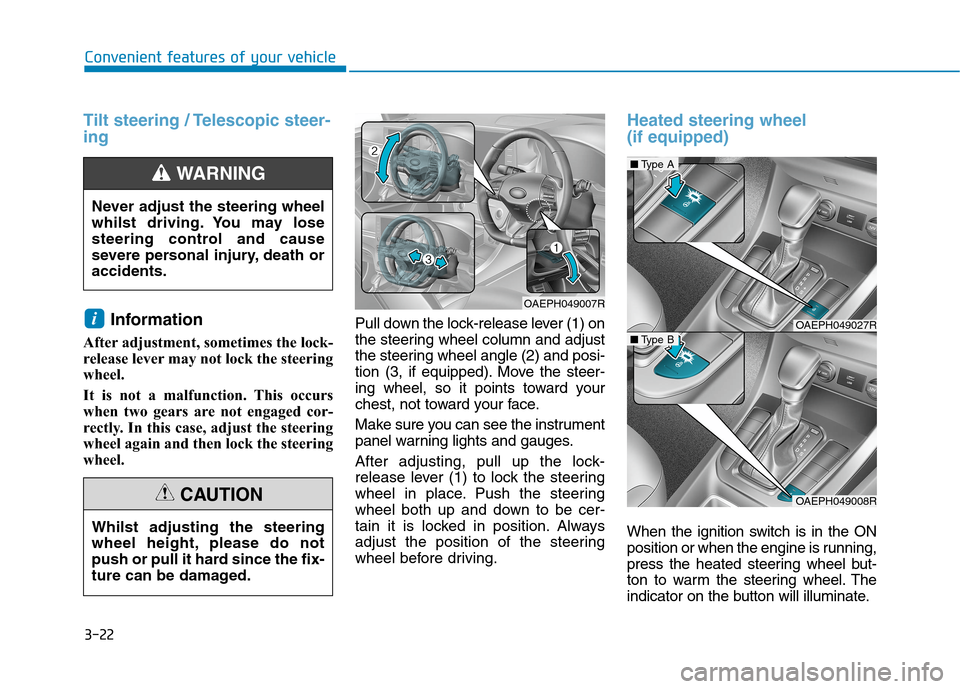
wheel.Pull down the lock-release lever (1) on
the steering wheel column and adjust
the steering wheel angle (2) and posi-
tion (3, if equipped). Move the steer-
ing wheel, so it points toward your
chest, not toward your face.
Make sure you can see the instrument
panel warning lights and gauges.
After adjusting, pull up the lock-
release lever (1) to lock the steering
wheel in place. Push the steering
wheel both up and down to be cer-
tain it is locked in position. Always
adjust the position of the steering
wheel before driving.
Heated steering wheel
(if equipped)
When the ignition switch is in the ON
position or when the engine is running,
press the heated steering wheel but-
ton to warm the steering wheel. The
indicator on the button will illuminate.
i
Never adjust the steering wheel
whilst driving. You may lose
steering control and cause
severe personal injury, death or
accidents.
WARNING
OAEPH049007R
OAEPH049027R
■Type A
OAEPH049008R
■Type B
Whilst adjusting the steering
wheel height, please do not
push or pull it hard since the fix-
ture can be damaged.
CAUTION
Page 171 of 613
3-24
Convenient features of your vehicle
When cleaning the mirror, use a
paper towel or similar material
dampened with glass cleaner. Do
not spray glass cleaner directly on
the mirror as that may cause the
liquid cleaner to enter the mirror
housing.
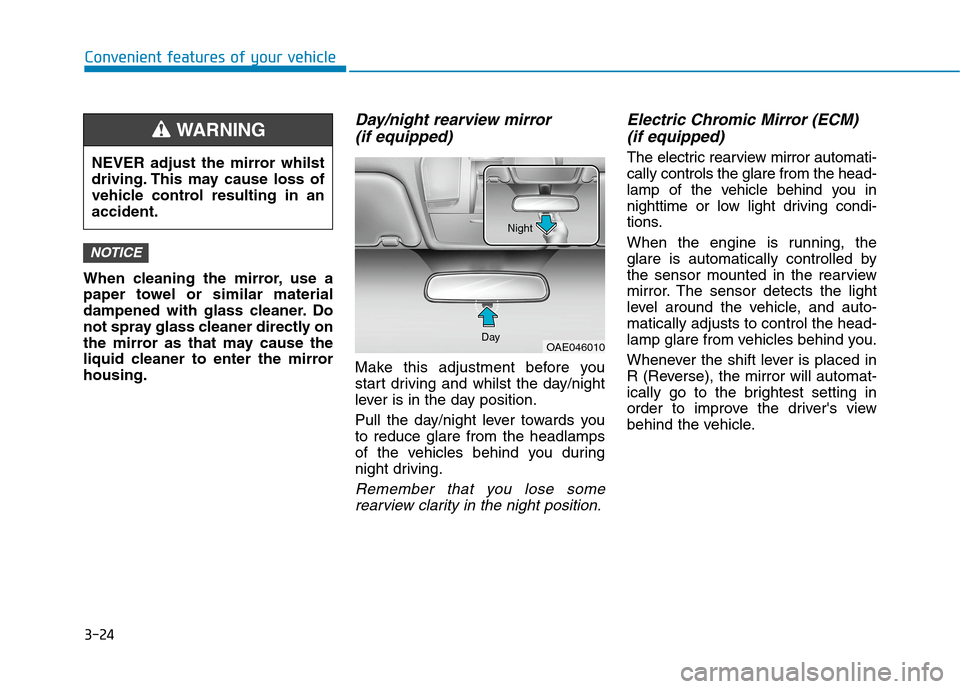
Day/night rearview mirror
(if equipped)
Make this adjustment before you
start driving and whilst the day/night
lever is in the day position.
Pull the day/night lever towards you
to reduce glare from the headlamps
of the vehicles behind you during
night driving.
Remember that you lose some
rearview clarity in the night position.
Electric Chromic Mirror (ECM)
(if equipped)
The electric rearview mirror automati-
cally controls the glare from the head-
lamp of the vehicle behind you in
nighttime or low light driving condi-
tions.
When the engine is running, the
glare is automatically controlled by
the sensor mounted in the rearview
mirror. The sensor detects the light
level around the vehicle, and auto-
matically adjusts to control the head-
lamp glare from vehicles behind you.
Whenever the shift lever is placed in
R (Reverse), the mirror will automat-
ically go to the brightest setting in
order to improve the driver's view
behind the vehicle.
NOTICE
NEVER adjust the mirror whilst
driving. This may cause loss of
vehicle control resulting in an
accident.
WARNING
OAE046010 DayNight