2020 FORD POLICE INTERCEPTOR warning light
[x] Cancel search: warning lightPage 238 of 395

3. Switch on the low beam headlamps
and open the hood. 4. On the wall or screen you will observe
a flat zone of high intensity light
located at the top of the beam pattern.
If the top edge of the flat zone of high
intensity light is not on the horizontal
reference line, adjust the aim of the
headlamp beam. 5. Use a suitable tool, for example a
screwdriver or socket wrench, to turn
the adjuster clockwise or
counterclockwise to adjust the vertical
aim of the headlamp. The horizontal
edge of the brighter light should touch
the horizontal reference line.
6. Close the hood and switch off the lamps.
CHANGING A BULB WARNING: Switch the lamps and
the ignition off. Failure to do so could
result in serious personal injury. WARNING: Bulbs can become hot.
Let the bulb cool down before removing
it. Failure to do so could result in
personal injury.
Use the correct specification bulb. See
Bulb Specification Chart
(page 305).
Install in the reverse order unless otherwise
stated.
Rear Direction Indicator and
Reversing Lamp 1.
Switch all of the lamps and the ignition
off.
2. Use a suitable tool, for example a screwdriver, to carefully remove the
access cover.
3. Remove the side cover.
235
Explorer (CTW) Police, Canada/United States of America, Police, enUSA, Edition date: 201902, Second-Printing MaintenanceE142465 E292172 E292168
Page 246 of 395

To clean the windshield and wiper blades:
•
Clean the windshield with a
non-abrasive glass cleaner. When
cleaning the interior of the windshield,
avoid getting any glass cleaner on the
instrument panel or door panels. Wipe
any glass cleaner off these surfaces
immediately.
• For windshields contaminated with
tree sap, chemicals, wax or bugs, clean
the entire windshield using steel wool
(no greater than 0000 grade) in a
circular motion and rinse with water.
• Clean the wiper blades with isopropyl
rubbing alcohol or windshield washer
concentrate.
Note: Do not use razor blades or other
sharp objects to clean or remove decals
from the inside of the heated rear window.
The vehicle warranty does not cover
damage caused to the heated rear window
grid lines.
CLEANING THE INTERIOR WARNING: Do not use cleaning
solvents, bleach or dye on the vehicle's
seatbelts, as these actions may weaken
the belt webbing. WARNING:
On vehicles equipped
with seat-mounted airbags, do not use
chemical solvents or strong detergents.
Such products could contaminate the
side airbag system and affect
performance of the side airbag in a crash. For fabric, carpets, cloth seats and seats
equipped with side airbags:
•
Remove dust and loose dirt with a
vacuum cleaner.
• Remove light stains and soil with
Motorcraft Professional Strength
Carpet & Upholstery Cleaner.
• If grease or tar is present on the
material, spot-clean the area first with
Motorcraft Spot and Stain Remover. In
Canada, use Motorcraft Multi-Purpose
Cleaner.
• If a ring forms on the fabric after spot
cleaning, clean the entire area
immediately (but do not oversaturate)
or the ring will set.
• Do not use household cleaning
products or glass cleaners, which can
stain and discolor the fabric and affect
the flame retardant abilities of the seat
materials.
Mirrors
Do not clean the housing or glass of any
mirror with harsh abrasives, fuel or other
petroleum or ammonia-based cleaning
products.
CLEANING THE INSTRUMENT
PANEL AND INSTRUMENT
CLUSTER LENS WARNING:
Do not use chemical
solvents or strong detergents when
cleaning the steering wheel or
instrument panel to avoid contamination
of the airbag system.
Note: Follow the same procedure as
cleaning leather seats for cleaning leather
instrument panels and leather interior trim
surfaces.
243
Explorer (CTW) Police, Canada/United States of America, Police, enUSA, Edition date: 201902, Second-Printing Vehicle Care
Page 257 of 395

The tire suppliers could have
additional markings, notes or
warnings such as standard load
or radial tubeless.
Additional Information
Contained on the Tire Sidewall
for LT Type Tires
Note:
Tire Quality Grades do not
apply to this type of tire. LT type tires have some additional
information beyond those of P
type tires; these differences are
described below.
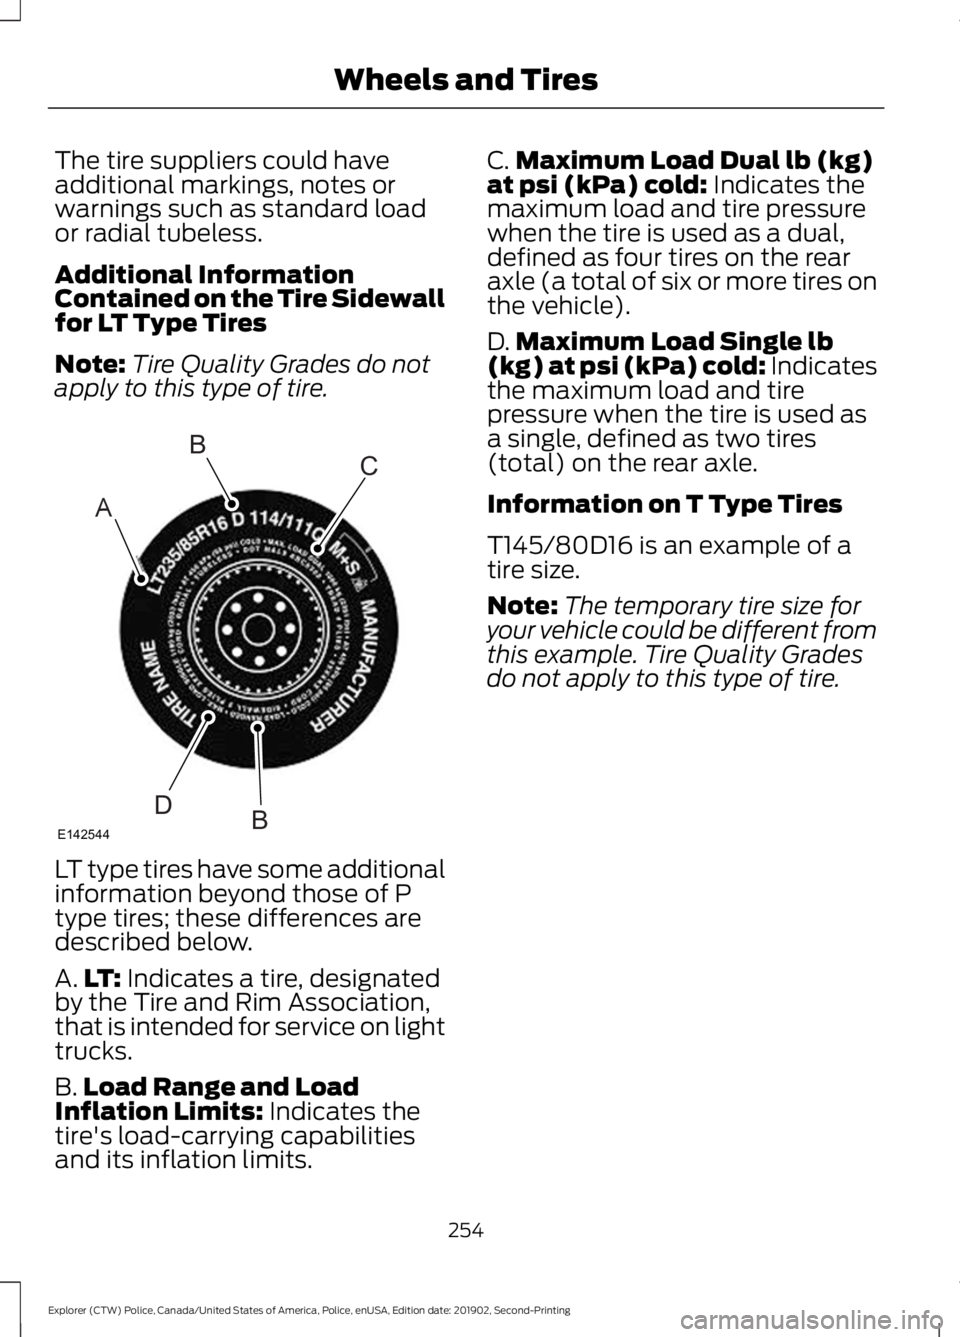
A.
LT: Indicates a tire, designated
by the Tire and Rim Association,
that is intended for service on light
trucks.
B. Load Range and Load
Inflation Limits:
Indicates the
tire's load-carrying capabilities
and its inflation limits. C.
Maximum Load Dual lb (kg)
at psi (kPa) cold:
Indicates the
maximum load and tire pressure
when the tire is used as a dual,
defined as four tires on the rear
axle (a total of six or more tires on
the vehicle).
D. Maximum Load Single lb
(kg) at psi (kPa) cold:
Indicates
the maximum load and tire
pressure when the tire is used as
a single, defined as two tires
(total) on the rear axle.
Information on T Type Tires
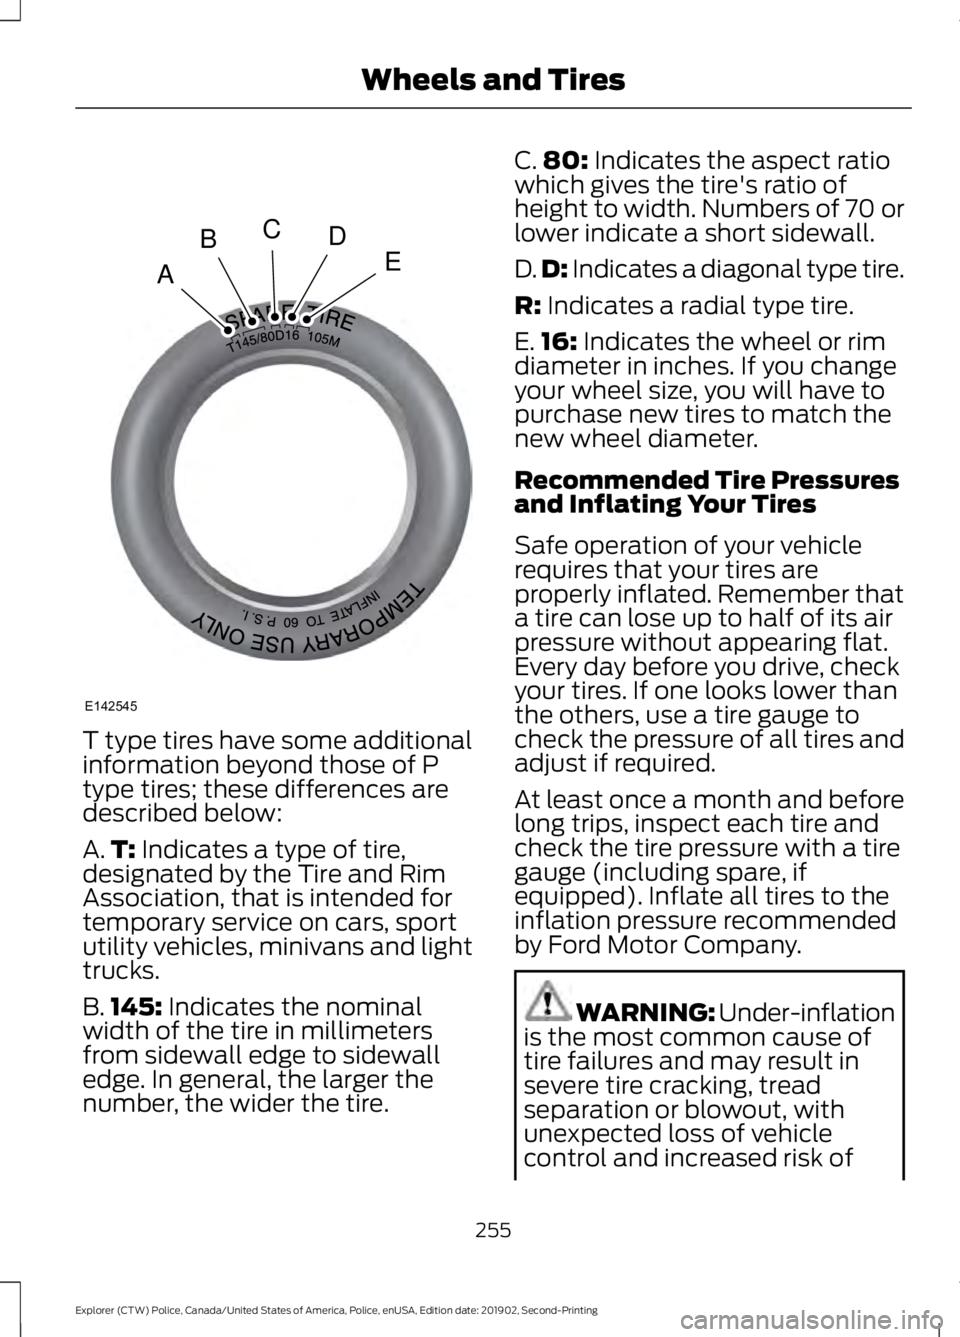
T145/80D16 is an example of a
tire size.
Note: The temporary tire size for
your vehicle could be different from
this example. Tire Quality Grades
do not apply to this type of tire.
254
Explorer (CTW) Police, Canada/United States of America, Police, enUSA, Edition date: 201902, Second-Printing Wheels and TiresA
BC
BDE142544
Page 258 of 395

T type tires have some additional
information beyond those of P
type tires; these differences are
described below:
A.
T: Indicates a type of tire,
designated by the Tire and Rim
Association, that is intended for
temporary service on cars, sport
utility vehicles, minivans and light
trucks.
B. 145:
Indicates the nominal
width of the tire in millimeters
from sidewall edge to sidewall
edge. In general, the larger the
number, the wider the tire. C.
80:
Indicates the aspect ratio
which gives the tire's ratio of
height to width. Numbers of 70 or
lower indicate a short sidewall.
D. D:
Indicates a diagonal type tire.
R:
Indicates a radial type tire.
E. 16:
Indicates the wheel or rim
diameter in inches. If you change
your wheel size, you will have to
purchase new tires to match the
new wheel diameter.
Recommended Tire Pressures
and Inflating Your Tires
Safe operation of your vehicle
requires that your tires are
properly inflated. Remember that
a tire can lose up to half of its air
pressure without appearing flat.
Every day before you drive, check
your tires. If one looks lower than
the others, use a tire gauge to
check the pressure of all tires and
adjust if required.
At least once a month and before
long trips, inspect each tire and
check the tire pressure with a tire
gauge (including spare, if
equipped). Inflate all tires to the
inflation pressure recommended
by Ford Motor Company. WARNING: Under-inflation
is the most common cause of
tire failures and may result in
severe tire cracking, tread
separation or blowout, with
unexpected loss of vehicle
control and increased risk of
255
Explorer (CTW) Police, Canada/United States of America, Police, enUSA, Edition date: 201902, Second-Printing Wheels and TiresA
BCDE
E142545
Page 268 of 395

2. This device must accept any
interference received, including
interference that could cause
undesired operation.
Note: Changes or modifications not
expressively approved by the party
responsible for compliance could void the
user's authority to operate the equipment.
The term "IC:" before the radio certification
number only signifies that Industry Canada
technical specifications were met.
Changing Tires With a Tire
Pressure Monitoring System Note:
Each road tire is equipped with a tire
pressure sensor located inside the wheel
and tire assembly cavity. The pressure
sensor is attached to the valve stem. The
pressure sensor is covered by the tire and is
not visible unless the tire is removed. Take
care when changing the tire to avoid
damaging the sensor.
You should always have your tires serviced
by an authorized dealer.
Check the tire pressure periodically (at
least monthly) using an accurate tire
gauge. See When Inflating Your Tires in
this chapter. Understanding Your Tire Pressure
Monitoring System
The tire pressure monitoring system
measures pressure in your road tires and
sends the tire pressure readings to your
vehicle. You can view the tire pressure
readings through the information display.
See
General Information (page 85). The
low tire pressure warning light will turn on
if the tire pressure is significantly low. Once
the light is illuminated, your tires are
under-inflated and need to be inflated to
the manufacturer ’s recommended tire
pressure. Even if the light turns on and a
short time later turns off, your tire pressure
still needs to be checked.
When Your Temporary Spare Tire is
Installed
When one of your road tires needs to be
replaced with the temporary spare, the
system will continue to identify an issue to
remind you that the damaged road wheel
and tire assembly needs to be repaired and
put back on your vehicle.
Some limited All Wheel Drive (AWD)
traction may be provided if a temporary
spare is installed on one of the front
wheels. If you are in driving conditions
where limited All Wheel Drive (AWD)
traction is needed while a temporary is
installed, it is recommended the temporary
spare be installed on the front axle.
265
Explorer (CTW) Police, Canada/United States of America, Police, enUSA, Edition date: 201902, Second-Printing Wheels and TiresE142549 E250820
Page 269 of 395

To restore the full function of the tire
pressure monitoring system, have the
damaged road wheel and tire assembly
repaired and remounted on your vehicle.
When You Believe Your System is Not
Operating Properly
The main function of the tire pressure
monitoring system is to warn you when
your tires need air. It can also warn you in
the event the system is no longer capable
of functioning as intended. See the
following chart for information concerning
your tire pressure monitoring system: Customer action required
Possible cause
Low tire pressure
warning light
Make sure tires are at the proper pres-
sure. See Inflating your tires in this
chapter. After inflating your tires to the
manufacturer’s recommended pressure
as shown on the Tire Label (located on
the edge of driver ’s door or the B-Pillar),
the vehicle must be driven for at least
two minutes over 20 mph (32 km/h)
before the light turns off.
Tire(s) under-inflated
Solid warning light Repair the damaged road wheel and tire
assembly and reinstall it on the vehicle
to restore system function. For a
description on how the system functions,
see When Your Temporary Spare Tire
is Installed
in this section.
Spare tire in use
If the tires are properly inflated and the
spare tire is not in use but the light
remains on, contact your authorized
dealer as soon as possible.
TPMS malfunction
266
Explorer (CTW) Police, Canada/United States of America, Police, enUSA, Edition date: 201902, Second-Printing Wheels and Tires
Page 270 of 395

Customer action required
Possible cause
Low tire pressure
warning light
On vehicles with different front and rear
tire pressures, the system must be
retrained following every tire rotation.
See Tire Pressure Monitoring System
Reset procedure later in this section.
Tire rotation without
sensor training
Repair the damaged road wheel and tire
assembly and reinstall it on the vehicle
to restore system function. For a
description on how the system functions,
see When Your Temporary Spare Tire
is Installed
in this section.
Spare tire in use
Flashing warning light
If the tires are properly inflated and the
spare tire is not in use but the light
remains on, contact your authorized
dealer as soon as possible.
TPMS malfunction
When Inflating Your Tires WARNING:
Do not use the tire
pressure displayed in the information
display as a tire pressure gauge. Failure
to follow this instruction could result in
personal injury or death.
When putting air into your tires (such as at
a gas station or in your garage), the tire
pressure monitoring system will not
respond immediately to the air added to
your tires.
It could take up to two minutes of driving
over 20 mph (32 km/h) for the light to turn
off after you have filled your tires to the
recommended inflation pressure. How Temperature Affects Your Tire
Pressure
The tire pressure monitoring system
monitors tire pressure in each pneumatic
tire. While driving in a normal manner, a
typical passenger tire inflation pressure
could increase about
2
–4 psi (14– 28 kPa)
from a cold start situation. If the vehicle is
stationary overnight with the outside
temperature significantly lower than the
daytime temperature, the tire pressure
could decrease about
3 psi (21 kPa) for a
drop of 30°F (17°C) in ambient
temperature. This lower pressure value
could be detected by the tire pressure
monitoring system as being significantly
lower than the recommended inflation
pressure and activate the system warning
light for low tire pressure. If the low tire
pressure warning light is on, visually check
each tire to verify that no tire is flat. If one
or more tires are flat, repair as necessary.
267
Explorer (CTW) Police, Canada/United States of America, Police, enUSA, Edition date: 201902, Second-Printing Wheels and Tires
Page 271 of 395

Check the air pressure in the road tires. If
any tire is under-inflated, carefully drive
the vehicle to the nearest location where
air can be added to the tires. Inflate all the
tires to the recommended inflation
pressure.
Tire Pressure Monitoring System Reset
Procedure
WARNING: To determine the
required pressure(s) for your vehicle, see
the Safety Compliance Certification
Label (on the door hinge pillar,
door-latch post or the door edge that
meets the door-latch post, next to the
driver seat) or the Tire Label on the
B-Pillar or the edge of the driver door.
Note: You need to perform the tire pressure
monitoring system reset procedure after
each tire rotation.
To provide the vehicle's load carrying
capability, some vehicles require different
recommended tire pressures in the front
tires as compared to the rear tires. The tire
pressure monitoring system equipped on
these vehicles is designed to illuminate the
low tire pressure warning light at two
different pressures; one for the front tires
and one for the rear tires.
Since tires need to be rotated to provide
consistent performance and maximum tire
life, the tire pressure monitoring system
needs to know when the tires are rotated
to determine which set of tires are on the
front and which are on the rear. With this
information, the system can detect and
properly warn of low tire pressures.
System reset tips: •
To reduce the chances of interference
from another vehicle, perform the
system reset procedure at least
3 ft
(1 m) away from another Ford Motor
Company vehicle undergoing the
system reset procedure at the same
time.
• Do not wait more than two minutes
between resetting each tire sensor or
the system can time-out and you have
to repeat the entire procedure on all
four wheels.
• A double horn sounds indicating the
need to repeat the procedure.
Performing the System Reset Procedure
Read the entire procedure before
attempting.
1. Drive the vehicle above
20 mph
(32 km/h) for at least two minutes,
then park in a safe location where you
can easily get to all four tires and have
access to an air pump.
2. Place the ignition in the off position and
keep the key in the ignition.
3. Cycle the ignition to the on position with the engine off.
4. Turn the hazard flashers on then off three times. You must accomplish this
within 10 seconds. If you successfully
enter the reset mode, the horn sounds
once, the system indicator flashes and
a message shows in the information
display. If this does not occur, please
try again starting at step 2. If after
repeated attempts to enter the reset
mode, the horn does not sound, the
system indicator does not flash and no
message shows in the information
display, seek service from your
authorized dealer.
268
Explorer (CTW) Police, Canada/United States of America, Police, enUSA, Edition date: 201902, Second-Printing Wheels and Tires