2020 FORD POLICE INTERCEPTOR warning light
[x] Cancel search: warning lightPage 74 of 395

Switching High Beam Headlamps
On and Off
Push the lever away from you to
switch the high beam on.
Push the lever forward again or pull the
lever toward you to switch the high beams
off.
Flashing High Beam Headlamps Pull the lever toward you and release it to
flash the high beam headlamps. AUTOLAMPS WARNING: The system does not
relieve you of your responsibility to drive
with due care and attention. You may
need to override the system if it does not
turn the headlamps on in low visibility
conditions, for example daytime fog.
Autolamps turn the headlamps on in low
light situations or when the wipers operate. Switch the lighting control to the
autolamps position.
The headlamps remain on for a period of
time after you switch the ignition off. Use
the information display controls to adjust
the period of time that the headlamps
remain on.
Note: If you switch the autolamps on, you
cannot switch the high beams on until the
system turns the low beams on.
Windshield Wiper Activated
Headlamps
When you switch the autolamps on, the
headlamps turn on within 10 seconds of
switching the wipers on. They turn off
approximately 60 seconds after you switch
the windshield wipers off.
The headlamps do not turn on with the
wipers:
• During a single wipe.
• When using the windshield washers.
• If the wipers are in intermittent mode.
Note: If you switch the autolamps and the
autowipers on, the headlamps turn on when
the windshield wipers continuously operate.
71
Explorer (CTW) Police, Canada/United States of America, Police, enUSA, Edition date: 201902, Second-Printing LightingE167827 E163268 E281240
Page 75 of 395

INSTRUMENT LIGHTING
DIMMER
The instrument lighting dimmer buttons
are on the lighting control.
Repeatedly press one of the
buttons to adjust the brightness.
DAYTIME RUNNING LAMPS -
VEHICLES WITH:
CONFIGURABLE DAYTIME
RUNNING LAMPS WARNING: The daytime running
lamps system does not activate the rear
lamps and may not provide adequate
lighting during low visibility driving
conditions. Make sure you switch the
headlamps on, as appropriate, during all
low visibility conditions. Failure to do so
may result in a crash.
Switch the daytime running lamps on or
off using the touchscreen:
1. Select
Settings.
2. Select
Vehicle.
3. Select
Lighting.
The daytime running lamps turn on when:
1. The lamps are on in the information display.
2. You switch the ignition on.
3. The transmission is not in park (P) for vehicles with automatic transmissions
or you release the parking brake for
vehicles with manual transmissions. 4.
The lighting control is in the autolamps
position.
5. The headlamps are off.
The other lighting control switch positions
do not turn on the daytime running lamps.
If the daytime running lamps are off in the
information display, the lamps stay off in
all switch positions.
DAYTIME RUNNING LAMPS -
VEHICLES WITH: DAYTIME
RUNNING LAMPS (DRL) WARNING:
The daytime running
lamps system does not activate the rear
lamps and may not provide adequate
lighting during low visibility driving
conditions. Make sure you switch the
headlamps on, as appropriate, during all
low visibility conditions. Failure to do so
may result in a crash.
The system turns the lamps on in daylight
conditions.
To switch the system on, switch the
lighting control to any position except
headlamps.
FRONT FOG LAMPS
(IF EQUIPPED)
Switching the Front Fog Lamps On
or Off
Only switch the front fog lamps on during
reduced visibility.
72
Explorer (CTW) Police, Canada/United States of America, Police, enUSA, Edition date: 201902, Second-Printing LightingE291299 E296433
Page 78 of 395

POWER WINDOWS
WARNING: Do not leave children
unattended in your vehicle and do not
let them play with the power windows.
Failure to follow this instruction could
result in personal injury. WARNING:
When closing the
power windows, verify they are free of
obstruction and make sure that children
and pets are not in the proximity of the
window openings. Note:
You may hear a pulsing noise when
just one of the windows is open. Lower the
opposite window slightly to reduce this
noise.
Press the switch to open the window.
Lift the switch to close the window.
One-Touch Down
Note: One-touch down applies to the front
windows only.
Press the switch fully and release it. Press
again or lift it to stop the window.
One-Touch Up
Note: One-touch up applies to the front
windows only. Lift the switch fully and release it. Press or
lift it again to stop the window.
Resetting One-Touch Up
Start the engine.
1. Lift and hold the window switch until
you fully close the door window.
Continue to hold the switch for a few
seconds after you close the window.
2. Release the window switch.
3. Press and hold the window switch until
you fully open the door window.
4. Release the window switch.
5. Lift and hold the window switch until you fully close the window.
6. Test for correct window operation by carrying out the one-touch down and
one-touch up features.
Bounce-Back
The window will stop automatically while
closing. It reverses some distance if there
is an obstacle in the way.
Overriding the Bounce-Back Feature WARNING:
If you override
bounce-back, the window does not
reverse if it detects an obstacle. Take
care when closing the windows to avoid
personal injury or damage to your
vehicle.
The window stops if you release the switch
before the window fully closes. Pull up the
window switch and hold within a few
seconds of the window reaching the
bounce-back position. The window travels
up with no bounce-back protection.
75
Explorer (CTW) Police, Canada/United States of America, Police, enUSA, Edition date: 201902, Second-Printing Windows and MirrorsE295317
Page 80 of 395

To adjust your mirrors, switch your vehicle
on with the ignition in accessory mode or
the engine running and then:
1. Select the mirror you want to adjust.
The control lights.
2. Use the adjustment control to adjust the position of the mirror.
3. Press the mirror control again. The control light turns off.
Fold-Away Exterior Mirrors
Push the mirror toward the door window
glass. Make sure that you fully engage the
mirror in its support when returning it to its
original position.
Heated Exterior Mirrors (If Equipped)
See
Heated Exterior Mirrors (page 106).
Integrated Blind Spot Mirror
(If
Equipped) WARNING:
Objects in the mirror
are closer than they appear.
Blind spot mirrors have an integrated
convex mirror built into the upper outboard
corner of the exterior mirrors. They can
assist you by increasing visibility along the
side of your vehicle.
Check the main mirror first before a lane
change, then check the blind spot mirror.
If no vehicles are present in the blind spot
mirror and the traffic in the adjacent lane
is at a safe distance, signal that you are
going to change lanes. Glance over your
shoulder to verify traffic is clear, and
carefully change lanes. The image of the approaching vehicle is
small and near the inboard edge of the
main mirror when it is at a distance. The
image becomes larger and begins to move
outboard across the main mirror as the
vehicle approaches (A). The image
transitions from the main mirror and begins
to appear in the blind spot mirror as the
vehicle approaches (B). The vehicle
transitions to your peripheral field of view
as it leaves the blind spot mirror (C).
Blind Spot Information System
(If
Equipped)
See
Blind Spot Information System
(page 168).
77
Explorer (CTW) Police, Canada/United States of America, Police, enUSA, Edition date: 201902, Second-Printing Windows and MirrorsA
B
C
E138665
Page 81 of 395

INTERIOR MIRROR
WARNING: Do not adjust the
mirrors when your vehicle is moving. This
could result in the loss of control of your
vehicle, serious personal injury or death.
Note: Do not clean the mirror housing or
glass with harsh abrasives, fuel or other
petroleum-based cleaning products.
You can adjust the interior mirror to your
preference. Some mirrors also have a
second pivot point. This lets you move the
mirror head up or down and from side to
side.
Manual Dimming Mirror
Pull the tab below the mirror toward you
to reduce the effect of bright light from
behind.
Automatic Dimming Mirror (If Equipped)
Note: Do not block the sensors on the front
and back of the mirror. A rear center
passenger or raised rear center head
restraint may also block light from reaching
the sensor.
The mirror dims to reduce the effect of
bright light from behind. It returns to
normal when the bright light from behind
is no longer present or if you shift into
reverse (R). SUN VISORS
Slide-on-rod
(If Equipped)
Rotate the sun visor toward the side
window and extend it rearward for extra
shade.
78
Explorer (CTW) Police, Canada/United States of America, Police, enUSA, Edition date: 201902, Second-Printing Windows and MirrorsE138666
Page 88 of 395

GENERAL INFORMATION
WARNING: Driving while
distracted can result in loss of vehicle
control, crash and injury. We strongly
recommend that you use extreme
caution when using any device that may
take your focus off the road. Your
primary responsibility is the safe
operation of your vehicle. We
recommend against the use of any
hand-held device while driving and
encourage the use of voice-operated
systems when possible. Make sure you
are aware of all applicable local laws
that may affect the use of electronic
devices while driving.
You can control various systems on your
vehicle using the quick action menu (QAM)
buttons on the right-hand side of the
steering wheel. The information display
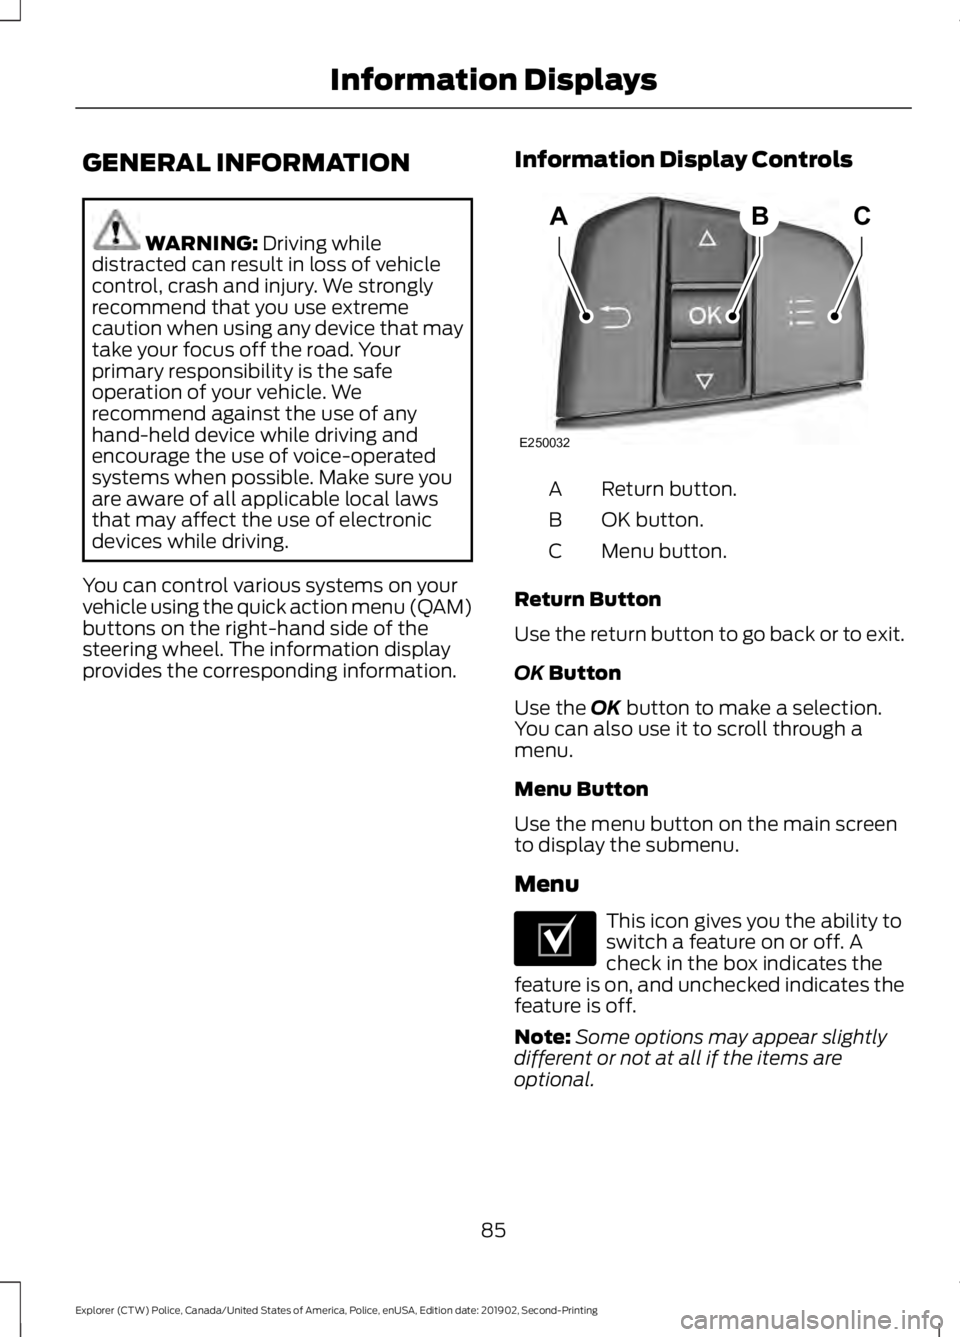
provides the corresponding information. Information Display Controls Return button.
A
OK button.
B
Menu button.
C
Return Button
Use the return button to go back or to exit.
OK
Button
Use the
OK button to make a selection.
You can also use it to scroll through a
menu.
Menu Button
Use the menu button on the main screen
to display the submenu.
Menu This icon gives you the ability to
switch a feature on or off. A
check in the box indicates the
feature is on, and unchecked indicates the
feature is off.
Note: Some options may appear slightly
different or not at all if the items are
optional.
85
Explorer (CTW) Police, Canada/United States of America, Police, enUSA, Edition date: 201902, Second-Printing Information DisplaysABC
E250032 E204495
Page 111 of 395

SITTING IN THE CORRECT
POSITION
WARNING: Sitting improperly, out
of position or with the seatback reclined
too far can take weight off the seat
cushion and affect the decision of the
passenger sensing system, resulting in
serious injury or death in the event of a
crash. Always sit upright against your
seat back, with your feet on the floor. WARNING:
Do not recline the
seatback too far as this can cause the
occupant to slide under the seatbelt,
resulting in serious injury in the event of
a collision. WARNING:
Do not place objects
higher than the top of the seat backrest.
Failure to follow this instruction could
result in personal injury or death in the
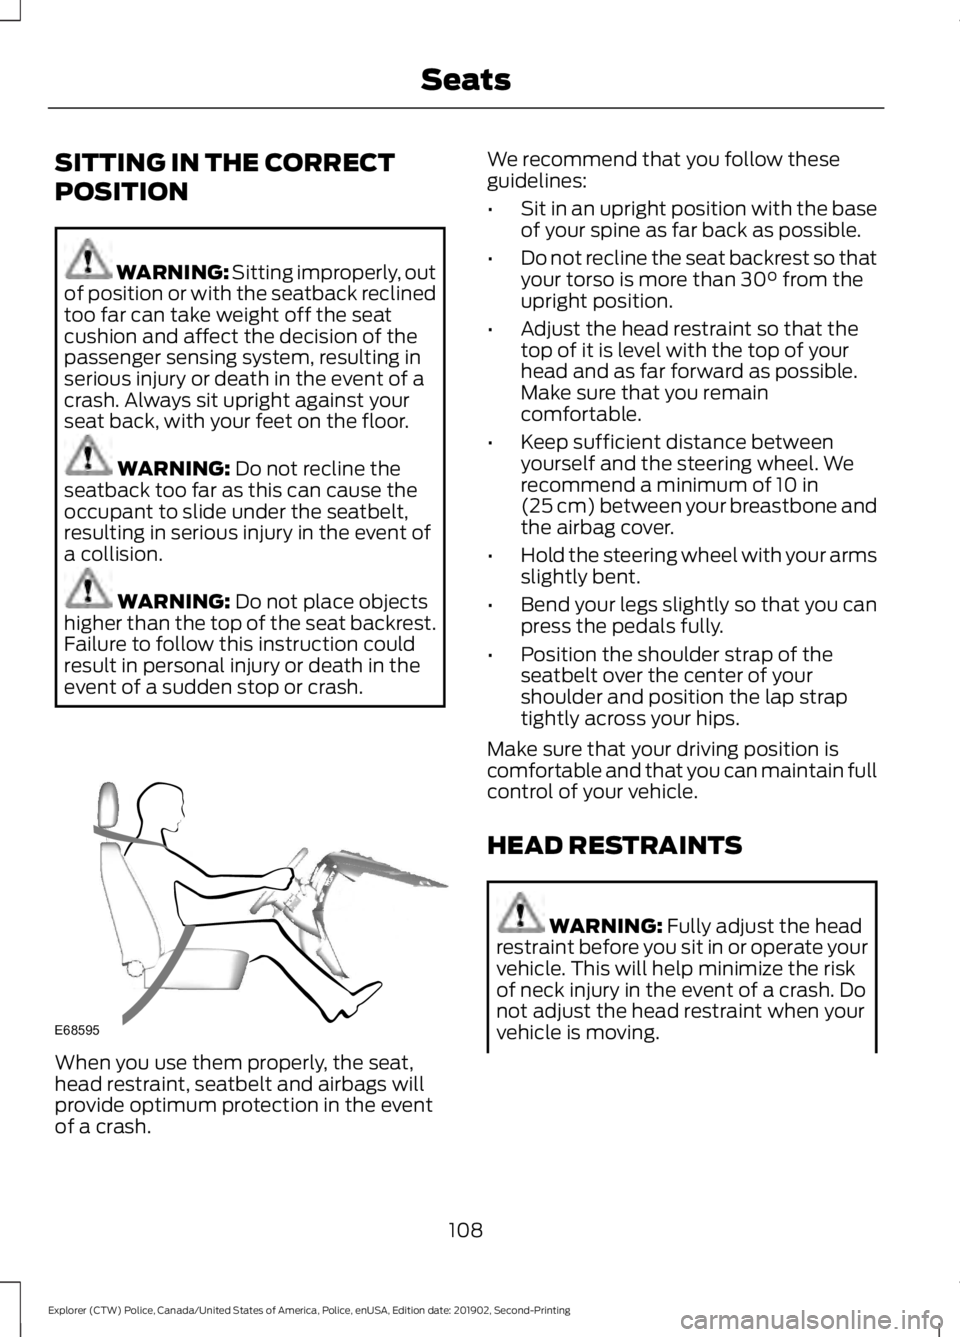
event of a sudden stop or crash. When you use them properly, the seat,
head restraint, seatbelt and airbags will
provide optimum protection in the event
of a crash. We recommend that you follow these
guidelines:
•
Sit in an upright position with the base
of your spine as far back as possible.
• Do not recline the seat backrest so that
your torso is more than
30° from the
upright position.
• Adjust the head restraint so that the
top of it is level with the top of your
head and as far forward as possible.
Make sure that you remain
comfortable.
• Keep sufficient distance between
yourself and the steering wheel. We
recommend a minimum of
10 in
(25 cm) between your breastbone and
the airbag cover.
• Hold the steering wheel with your arms
slightly bent.
• Bend your legs slightly so that you can
press the pedals fully.
• Position the shoulder strap of the
seatbelt over the center of your
shoulder and position the lap strap
tightly across your hips.
Make sure that your driving position is
comfortable and that you can maintain full
control of your vehicle.
HEAD RESTRAINTS WARNING:
Fully adjust the head
restraint before you sit in or operate your
vehicle. This will help minimize the risk
of neck injury in the event of a crash. Do
not adjust the head restraint when your
vehicle is moving.
108
Explorer (CTW) Police, Canada/United States of America, Police, enUSA, Edition date: 201902, Second-Printing SeatsE68595
Page 118 of 395

12 Volt DC Power Point
WARNING: Do not plug optional
electrical accessories into the cigar
lighter socket. Incorrect use of the cigar
lighter can cause damage not covered
by the vehicle warranty, and can result
in fire or serious injury.
Note: When you switch the ignition on, you
can use the socket to power 12 volt
appliances with a maximum current rating
of 15 amps.
Note: If the power supply does not work
after you switch the ignition off, switch the
ignition on.
Note: Do not hang any accessory from the
accessory plug.
Note: Do not use the power point over the
vehicle capacity of 12 volt DC 180 watts or
a fuse may blow.
Note: Always keep the power point caps
closed when not in use.
Do not insert objects other than an
accessory plug into the power point. This
damages the power point and may blow
the fuse.
Run the vehicle for full capacity use of the
power point.
To prevent the battery from running out of
charge:
• Do not use the power point longer than
necessary when the vehicle is not
running.
• Do not leave devices plugged in
overnight or when you park your vehicle
for extended periods. USB Port and Power Point
Locations
USB Ports and Power Points may be in the
following locations:
•
On the lower instrument panel.
• Inside the center console.
• On the front of the center console.
• On the rear of the center console.
• In the cargo area.
• On the passenger side floor panel.
• 3rd row on the quarter trim panels.
Note: Some of the USB ports may not have
data transfer capabilities.
Note: Incorrect use of the USB ports can
cause damage not covered by the vehicle
warranty.
110 Volt AC Power Point WARNING: Do not keep electrical
devices plugged in the power point
whenever the device is not in use. Do not
use any extension cord with the 110 volt
AC power point, since it will defeat the
safety protection design. Doing so may
cause the power point to overload due
to powering multiple devices that can
reach beyond the 150 watt load limit and
could result in fire or serious injury.
Note: The power point turns off when you
switch off the ignition, when the vehicle is
not in accessory mode or when the battery
voltage drops below 11 volts.
You can use the power point for electric
devices that require up to 150 watts. It is
on the rear of the center console.
115
Explorer (CTW) Police, Canada/United States of America, Police, enUSA, Edition date: 201902, Second-Printing Auxiliary Power Points