2020 FORD POLICE INTERCEPTOR display
[x] Cancel search: displayPage 104 of 395
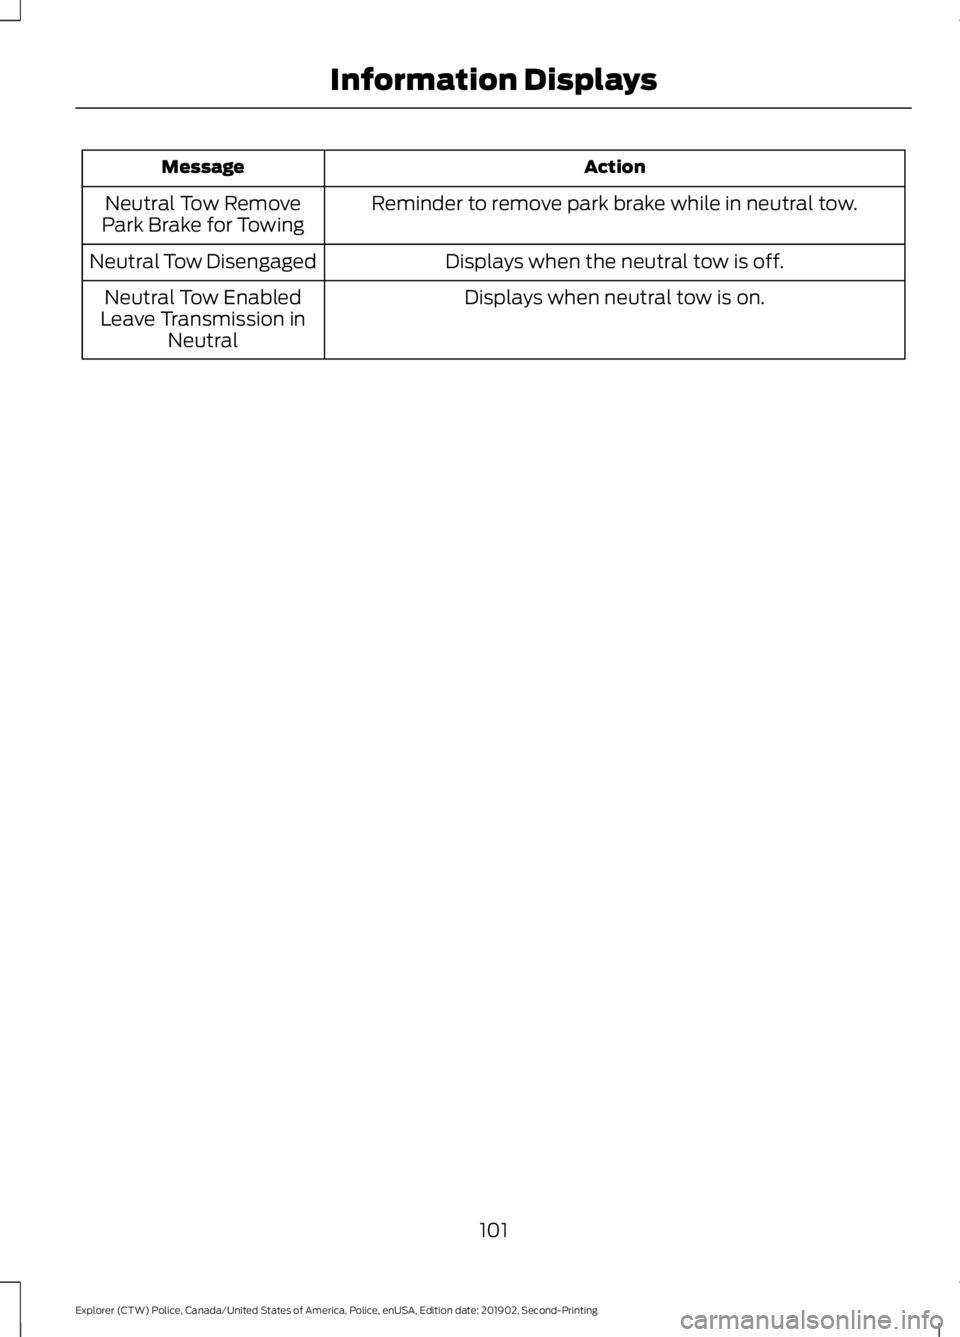
Action
Message
Reminder to remove park brake while in neutral tow.
Neutral Tow Remove
Park Brake for Towing
Displays when the neutral tow is off.
Neutral Tow Disengaged
Displays when neutral tow is on.
Neutral Tow Enabled
Leave Transmission in Neutral
101
Explorer (CTW) Police, Canada/United States of America, Police, enUSA, Edition date: 201902, Second-Printing Information Displays
Page 106 of 395
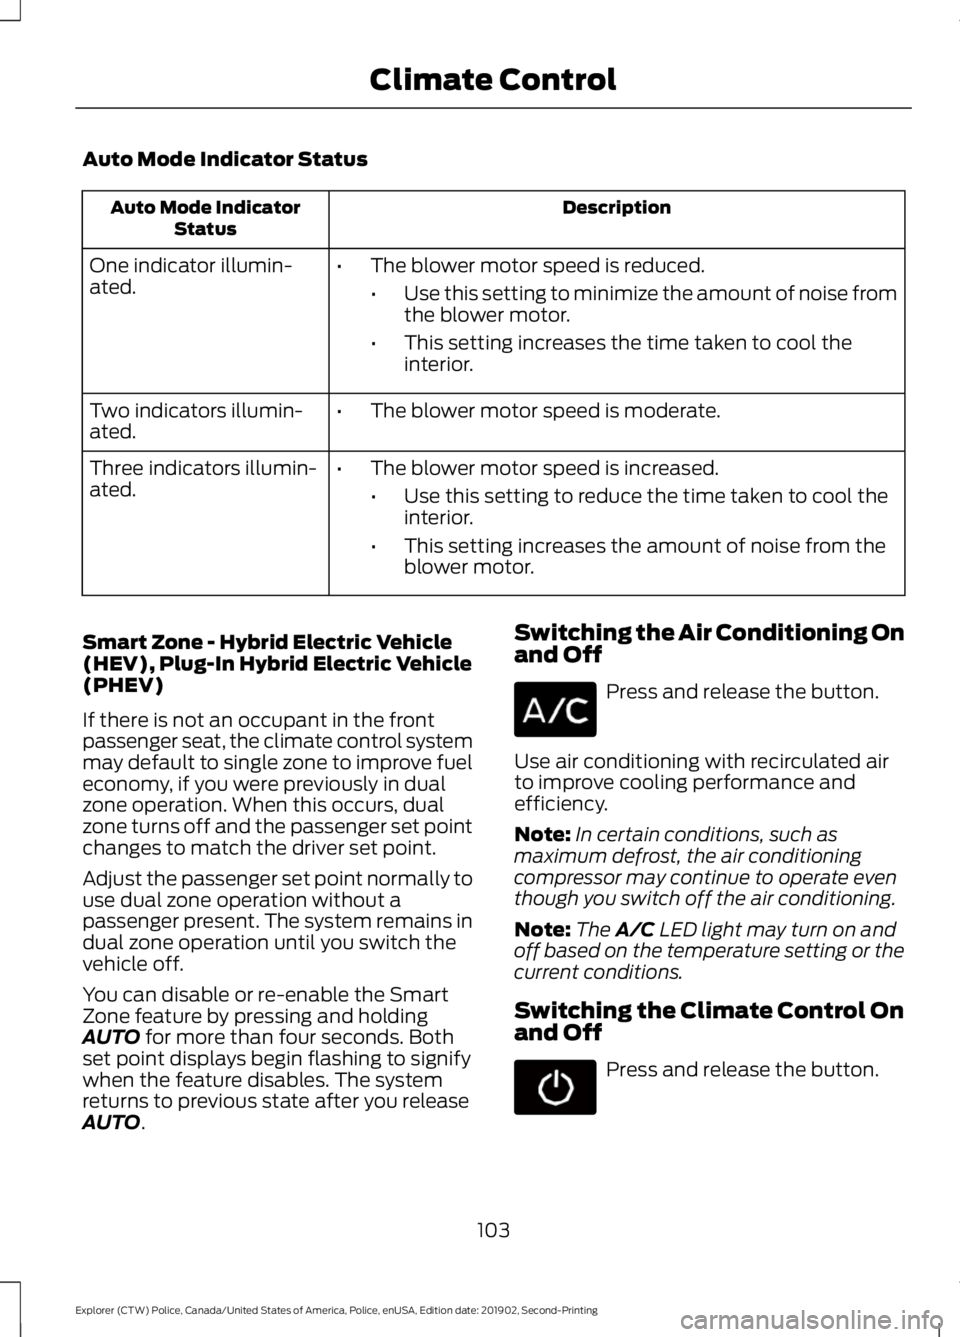
Auto Mode Indicator Status
Description
Auto Mode Indicator
Status
One indicator illumin-
ated. •
The blower motor speed is reduced.
•Use this setting to minimize the amount of noise from
the blower motor.
• This setting increases the time taken to cool the
interior.
Two indicators illumin-
ated. •
The blower motor speed is moderate.
Three indicators illumin-
ated. •
The blower motor speed is increased.
•Use this setting to reduce the time taken to cool the
interior.
• This setting increases the amount of noise from the
blower motor.
Smart Zone - Hybrid Electric Vehicle
(HEV), Plug-In Hybrid Electric Vehicle
(PHEV)
If there is not an occupant in the front
passenger seat, the climate control system
may default to single zone to improve fuel
economy, if you were previously in dual
zone operation. When this occurs, dual
zone turns off and the passenger set point
changes to match the driver set point.
Adjust the passenger set point normally to
use dual zone operation without a
passenger present. The system remains in
dual zone operation until you switch the
vehicle off.
You can disable or re-enable the Smart
Zone feature by pressing and holding
AUTO for more than four seconds. Both
set point displays begin flashing to signify
when the feature disables. The system
returns to previous state after you release
AUTO
. Switching the Air Conditioning On
and Off Press and release the button.
Use air conditioning with recirculated air
to improve cooling performance and
efficiency.
Note: In certain conditions, such as
maximum defrost, the air conditioning
compressor may continue to operate even
though you switch off the air conditioning.
Note: The
A/C LED light may turn on and
off based on the temperature setting or the
current conditions.
Switching the Climate Control On
and Off Press and release the button.
103
Explorer (CTW) Police, Canada/United States of America, Police, enUSA, Edition date: 201902, Second-Printing Climate Control
Page 122 of 395

Note:
You can crank the engine for a total
of 60 seconds without the engine starting
before the starting system temporarily
disables. The 60 seconds does not have to
be all at once. For example, if you crank the
engine three times for 20 seconds each
time, without the engine starting, you
reached the 60-second time limit. A
message appears in the information display
alerting you that you exceeded the cranking
time. You cannot attempt to start the
engine for at least 15 minutes. After 15
minutes, you are limited to a 15-second
engine cranking time. You need to wait 60
minutes before you can crank the engine for
60 seconds again.
Before starting your vehicle, check the
following:
• Make sure all occupants have fastened
their safety belts.
• Make sure the headlamps and
electrical accessories are off.
• Make sure the parking brake is on.
• Make sure the transmission is in park
(P).
• Switch the ignition key to position II.
Note: Do not touch the accelerator pedal.
1. Fully depress the brake pedal.
2. Turn the key to position
III to start the
engine.
Note: The engine may continue cranking
for up to 15 seconds or until it starts.
Note: If you cannot start the engine on the
first try, wait for a short period and try again.
Failure to Start
If you cannot start the engine after three
attempts, wait 10 seconds and follow this
procedure:
1. Fully depress the brake pedal.
2. Shift into park (P). 3.
Fully depress the accelerator pedal and
hold it there.
4. Start the engine.
Stopping the Engine When Your
Vehicle is Stationary
1. Shift into park (P).
2. Turn the key to position
0.
3. Apply the parking brake.
Stopping the Engine When Your
Vehicle is Moving WARNING:
Switching off the
engine when the vehicle is still moving
will result in a loss of brake and steering
assistance. The steering will not lock, but
higher effort will be required. When the
ignition is switched off, some electrical
circuits, including air bags, warning lamps
and indicators may also be off. If the
ignition was turned off accidentally, you
can shift into neutral (N) and re-start the
engine.
1. Shift into neutral and use the brakes to
bring your vehicle to a safe stop.
2. When your vehicle has stopped, shift into park (P) and turn the key to
position
0.
3. Apply the parking brake.
Guarding Against Exhaust Fumes WARNING:
If you smell exhaust
fumes inside your vehicle, have your
vehicle checked by your authorized
dealer immediately. Do not drive your
vehicle if you smell exhaust fumes.
Carbon monoxide is present in exhaust
fumes. Take precautions to avoid its
dangerous effects.
119
Explorer (CTW) Police, Canada/United States of America, Police, enUSA, Edition date: 201902, Second-Printing Starting and Stopping the Engine
Page 136 of 395

5. Operate the fuel pump nozzle within
the area shown. 6.
When you finish refueling slightly raise
the fuel pump nozzle and slowly
remove it.
7. Fully close the fuel filler door.
Do not attempt to start the engine if you
have filled the fuel tank with incorrect fuel.
Incorrect fuel use could cause damage not
covered by the vehicle Warranty. Have your
vehicle immediately checked.
Refueling System Warning (If Equipped)
If the fuel tank filler valve does not fully
close, a message could appear in the
information display. Message
Check Fuel Fill Inlet
If the message appears, do the following:
1. Stop your vehicle as soon as it is safe to do so and switch the engine off.
2. Shift into park (P) or neutral (N). 3. Apply the parking brake.
4. Fully open the fuel filler door.
5. Check the fuel tank filler valve for any
debris that may be restricting its
movement.
6. Remove any debris from the fuel tank filler valve.
7. Fully insert a fuel pump nozzle or the fuel filler funnel provided with your
vehicle into the fuel filler pipe. See
Fuel Filler Funnel Location (page
129). This action should dislodge any
debris that may be preventing the fuel
tank filler valve from fully closing.
8. Remove the fuel pump nozzle or fuel filler funnel from the fuel filler pipe.
9. Fully close the fuel filler door.
Note: The message may not immediately
reset. If the message continues to appear
and a warning lamp illuminates, have your
vehicle checked as soon as possible.
REFUELING - HYBRID
ELECTRIC VEHICLE (HEV) WARNING:
Do not overfill the fuel
tank. The pressure in an overfilled tank
may cause leakage and lead to fuel spray
and fire. WARNING:
Do not pry open the
fuel tank filler valve. This could damage
the fuel system. Failure to follow this
instruction could result in fire, personal
injury or death. WARNING: Do not remove the fuel
pump nozzle from its fully inserted
position when refueling.
133
Explorer (CTW) Police, Canada/United States of America, Police, enUSA, Edition date: 201902, Second-Printing Fuel and RefuelingE206912
AB E119081
Page 138 of 395
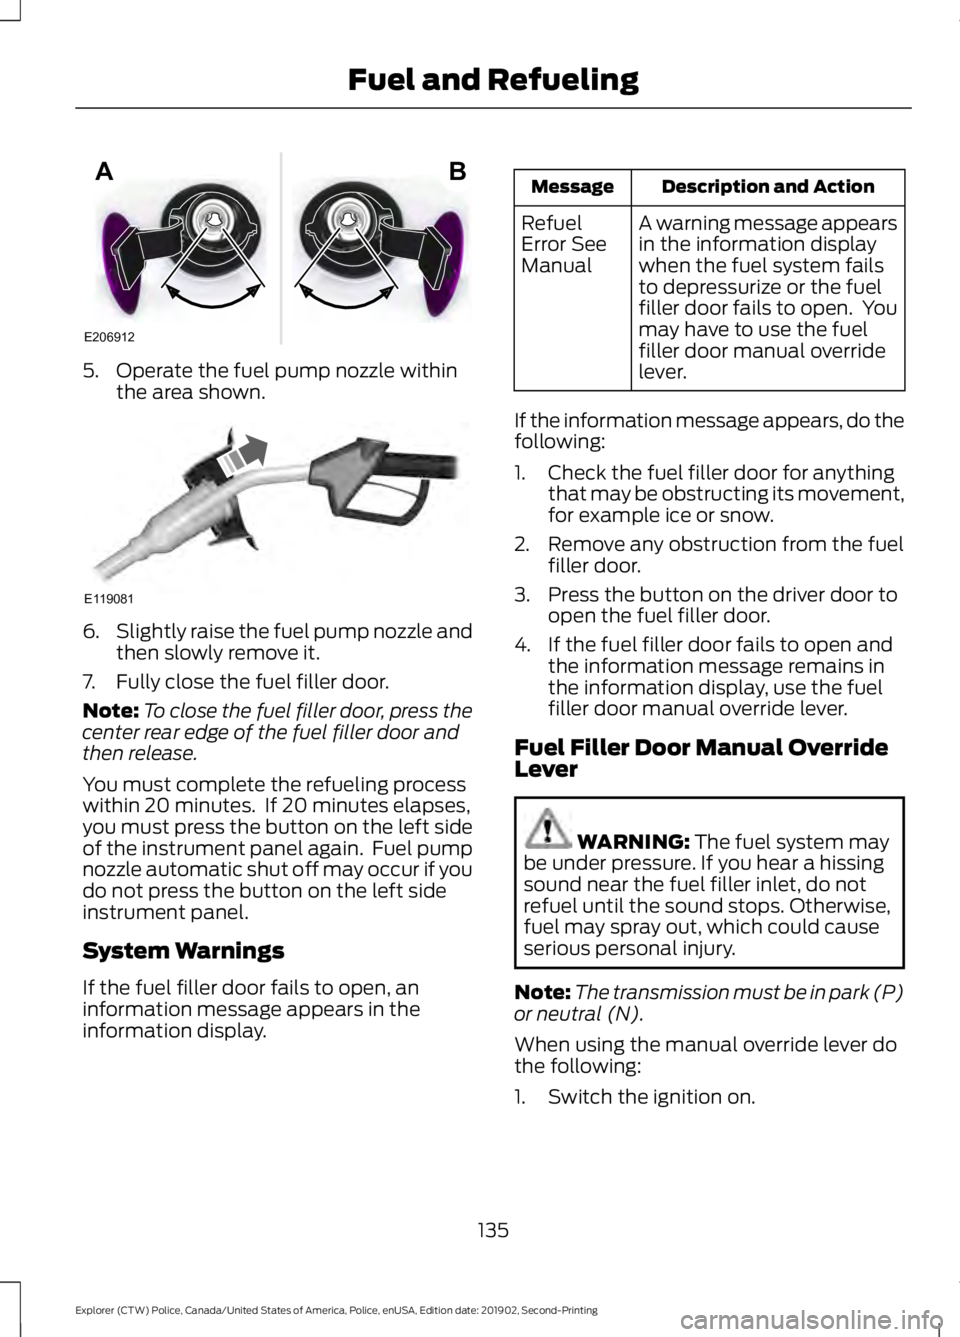
5. Operate the fuel pump nozzle within
the area shown. 6.
Slightly raise the fuel pump nozzle and
then slowly remove it.
7. Fully close the fuel filler door.
Note: To close the fuel filler door, press the
center rear edge of the fuel filler door and
then release.
You must complete the refueling process
within 20 minutes. If 20 minutes elapses,
you must press the button on the left side
of the instrument panel again. Fuel pump
nozzle automatic shut off may occur if you
do not press the button on the left side
instrument panel.
System Warnings
If the fuel filler door fails to open, an
information message appears in the
information display. Description and Action
Message
A warning message appears
in the information display
when the fuel system fails
to depressurize or the fuel
filler door fails to open. You
may have to use the fuel
filler door manual override
lever.
Refuel
Error See
Manual
If the information message appears, do the
following:
1. Check the fuel filler door for anything that may be obstructing its movement,
for example ice or snow.
2. Remove any obstruction from the fuel filler door.
3. Press the button on the driver door to open the fuel filler door.
4. If the fuel filler door fails to open and the information message remains in
the information display, use the fuel
filler door manual override lever.
Fuel Filler Door Manual Override
Lever WARNING: The fuel system may
be under pressure. If you hear a hissing
sound near the fuel filler inlet, do not
refuel until the sound stops. Otherwise,
fuel may spray out, which could cause
serious personal injury.
Note: The transmission must be in park (P)
or neutral (N).
When using the manual override lever do
the following:
1. Switch the ignition on.
135
Explorer (CTW) Police, Canada/United States of America, Police, enUSA, Edition date: 201902, Second-Printing Fuel and RefuelingE206912
AB E119081
Page 139 of 395
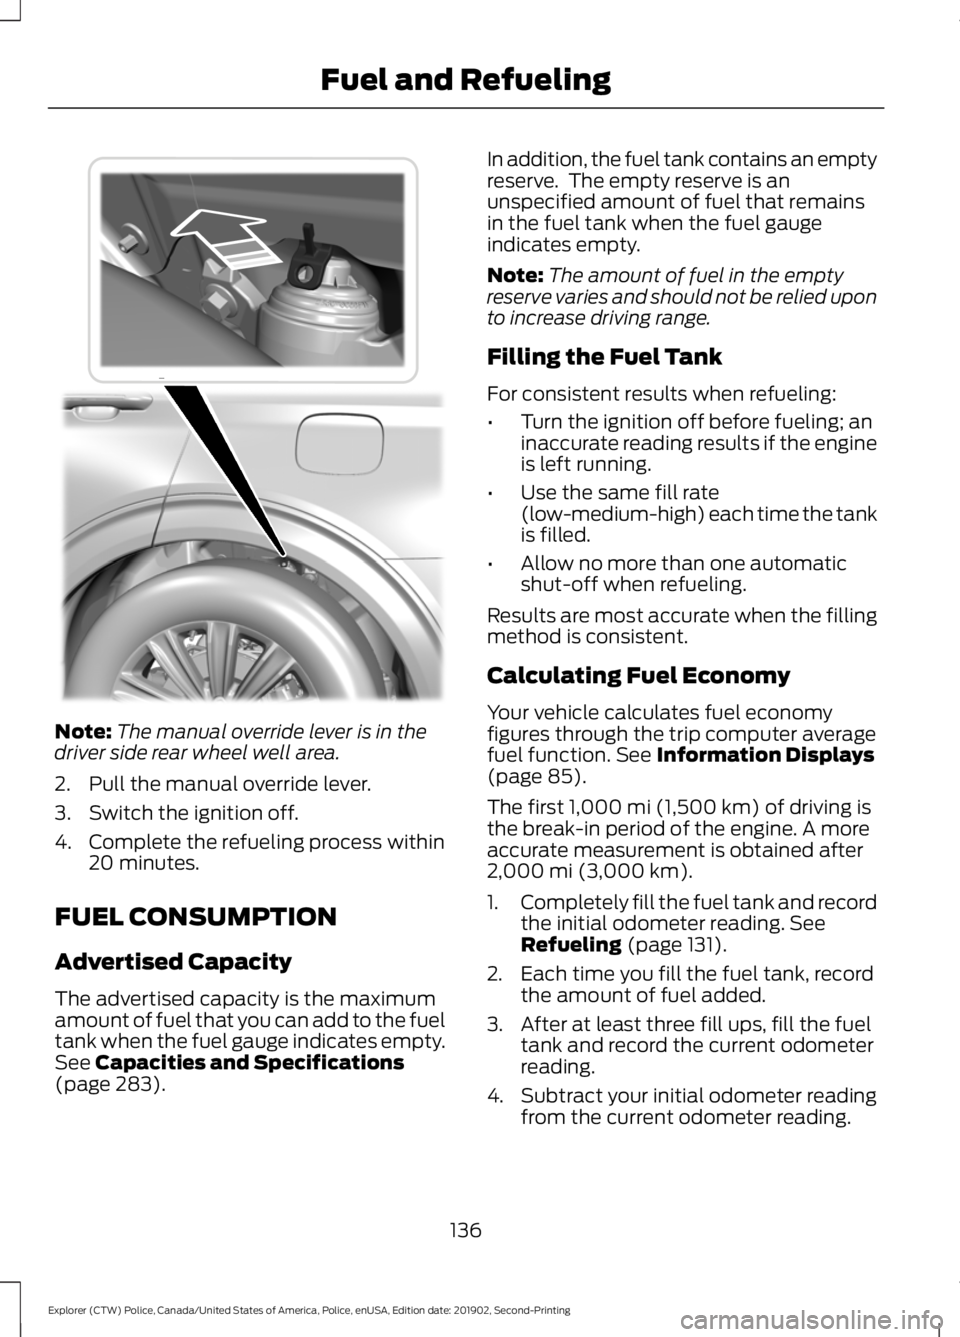
Note:
The manual override lever is in the
driver side rear wheel well area.
2. Pull the manual override lever.
3. Switch the ignition off.
4. Complete the refueling process within 20 minutes.
FUEL CONSUMPTION
Advertised Capacity
The advertised capacity is the maximum
amount of fuel that you can add to the fuel
tank when the fuel gauge indicates empty.
See Capacities and Specifications
(page 283). In addition, the fuel tank contains an empty
reserve. The empty reserve is an
unspecified amount of fuel that remains
in the fuel tank when the fuel gauge
indicates empty.
Note:
The amount of fuel in the empty
reserve varies and should not be relied upon
to increase driving range.
Filling the Fuel Tank
For consistent results when refueling:
• Turn the ignition off before fueling; an
inaccurate reading results if the engine
is left running.
• Use the same fill rate
(low-medium-high) each time the tank
is filled.
• Allow no more than one automatic
shut-off when refueling.
Results are most accurate when the filling
method is consistent.
Calculating Fuel Economy
Your vehicle calculates fuel economy
figures through the trip computer average
fuel function.
See Information Displays
(page 85).
The first
1,000 mi (1,500 km) of driving is
the break-in period of the engine. A more
accurate measurement is obtained after
2,000 mi (3,000 km)
.
1. Completely fill the fuel tank and record
the initial odometer reading.
See
Refueling (page 131).
2. Each time you fill the fuel tank, record the amount of fuel added.
3. After at least three fill ups, fill the fuel tank and record the current odometer
reading.
4. Subtract your initial odometer reading from the current odometer reading.
136
Explorer (CTW) Police, Canada/United States of America, Police, enUSA, Edition date: 201902, Second-Printing Fuel and RefuelingE297793
Page 146 of 395

AUTOMATIC TRANSMISSION
WARNING: Apply the parking
brake, shift into park (P), switch the
ignition off and remove the key before
you leave your vehicle. Failure to follow
this instruction could result in personal
injury or death. WARNING:
Do not apply the brake
pedal and accelerator pedal
simultaneously. Applying both pedals
simultaneously for more than a few
seconds will limit engine performance,
which may result in difficulty maintaining
speed in traffic and could lead to serious
injury.
Understanding the Positions of
Your Automatic Transmission
Putting your vehicle in or out of gear:
1. Fully press down the brake pedal.
2. Move the gearshift lever into the desired gear.
3. Come to a complete stop.
4. Move the gearshift lever and securely latch it in park (P). Park (P)
This position locks the transmission and
prevents the wheels from turning.
Reverse (R)
With the gearshift lever in reverse (R), your
vehicle moves backward. Always come to
a complete stop before shifting into and
out of reverse (R).
Neutral (N)
With the gearshift lever in neutral (N), you
can start your vehicle and it is free to roll.
Hold the brake pedal down while in this
position.
Drive (D)
Drive (D) is the normal driving position for
the best fuel economy. The overdrive
function allows automatic upshifts and
downshifts through gears 1 through 10.
Low (L)
The low (L) button is at the end of the
column shifter. Activating low (L) gear:
•
Provides maximum engine braking.
• Downshifts to the lowest available gear
for the current vehicle speed. Allows
for first gear when the vehicle reaches
lower speeds.
• Is not for use under extended or normal
driving conditions and results in lower
fuel economy.
The instrument cluster displays the current
gear.
If Your Vehicle Gets Stuck in Mud
or Snow
Note: Do not rock the vehicle if the engine
is not at normal operating temperature or
damage to the transmission could occur.
143
Explorer (CTW) Police, Canada/United States of America, Police, enUSA, Edition date: 201902, Second-Printing TransmissionE206672
Page 148 of 395
USING ALL-WHEEL DRIVE
WARNING: Vehicles with a higher
center of gravity (utility and four-wheel
drive vehicles) handle differently than
vehicles with a lower center of gravity
(passenger cars). Avoid sharp turns,
excessive speed and abrupt steering in
these vehicles. Failure to drive cautiously
increases the risk of losing control of your
vehicle, vehicle rollover, personal injury
and death.
All-wheel drive uses all four wheels to
power the vehicle. This increases traction,
enabling you to drive over terrain and road
conditions that a conventional two-wheel
drive vehicle cannot. The AWD system is
always active and requires no input from
the operator.
Note: Your AWD vehicle is not intended for
off-road use. The AWD feature gives your
vehicle some limited off-road capabilities
when driving surfaces are relatively level,
obstruction-free and otherwise similar to
normal on-road driving conditions.
Operating your vehicle under conditions
other than those could subject the vehicle
to excessive stress which could result in
damage not covered under your vehicle
warranty. Note:
The transfer case and front axle in
police vehicles does not require any normal
scheduled maintenance. The system is
electronically monitored and notifies you of
required service in the information display.
The front axle lube is more likely to require
a fluid change if the vehicle has experienced
extended periods of extreme/severe duty
cycle driving. Severe duty cycle driving such
as Driver Training or EVOC. See Scheduled
Maintenance (page 330). Do not check or
change the transfer case and front axle
lubricant unless the unit shows signs of
leakage or displays a message indicating
required service. Contact an authorized
dealer for service if the front driveline was
submerged in water and to reset any
driveline temperature lube life monitors.
When an AWD system fault is present, and
the system is overheated or if service is
required, there will be message that is
display in the information display of the
fault. The display messages, along with
the triggering actions and description of
the message, are shown in the following
table:
145
Explorer (CTW) Police, Canada/United States of America, Police, enUSA, Edition date: 201902, Second-Printing All-Wheel Drive