2020 FORD POLICE INTERCEPTOR Clock
[x] Cancel search: ClockPage 35 of 395

Note:
The child restraint must rest tightly
against the vehicle seat upon which it is
installed. It may be necessary to lift or
remove the head restraint. See Seats (page
108).
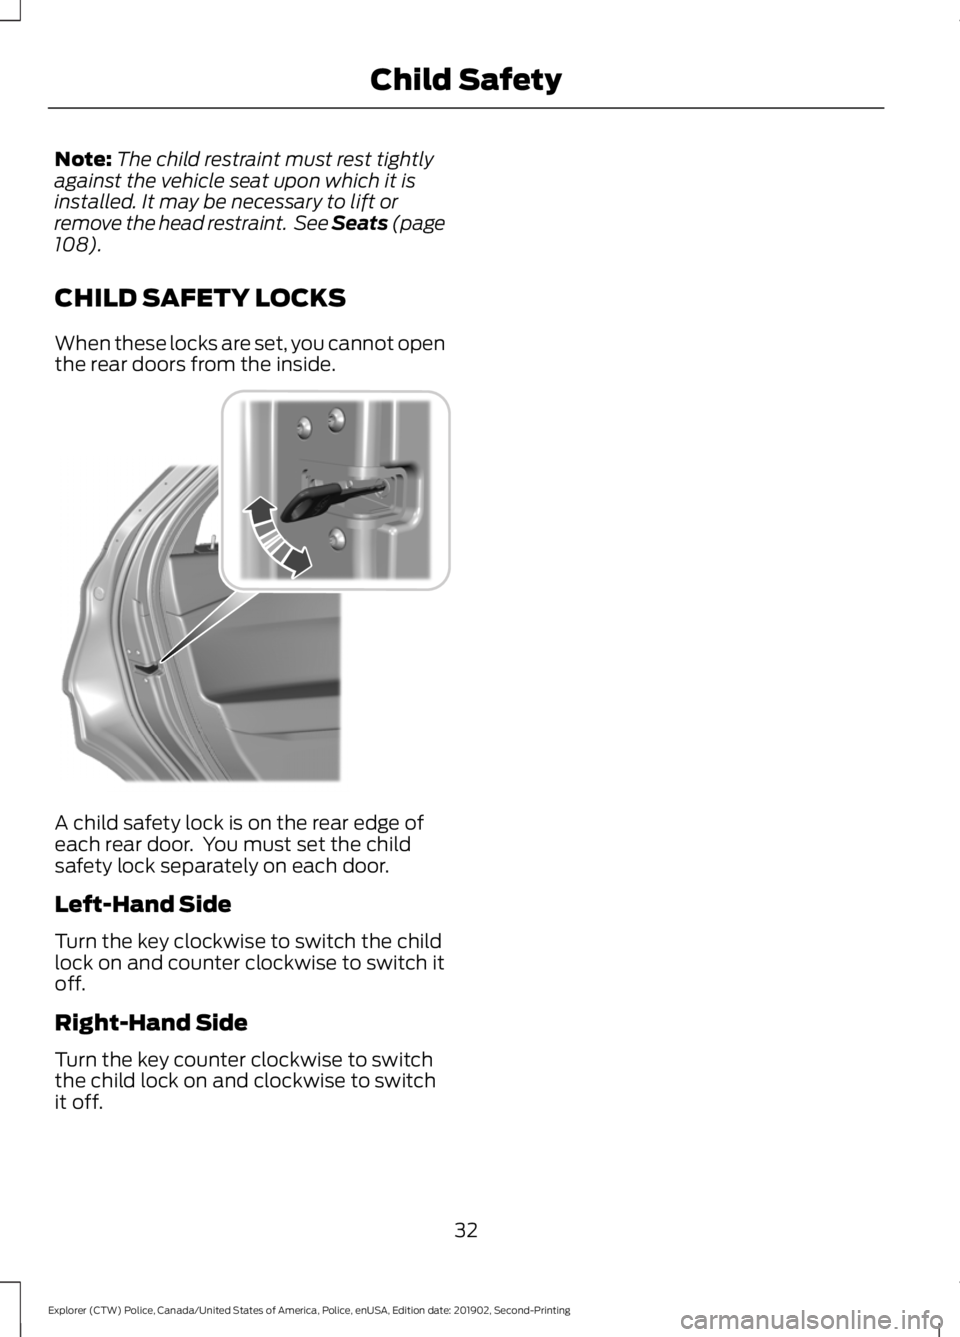
CHILD SAFETY LOCKS
When these locks are set, you cannot open
the rear doors from the inside. A child safety lock is on the rear edge of
each rear door. You must set the child
safety lock separately on each door.
Left-Hand Side
Turn the key clockwise to switch the child
lock on and counter clockwise to switch it
off.
Right-Hand Side
Turn the key counter clockwise to switch
the child lock on and clockwise to switch
it off.
32
Explorer (CTW) Police, Canada/United States of America, Police, enUSA, Edition date: 201902, Second-Printing Child SafetyE300933
Page 204 of 395

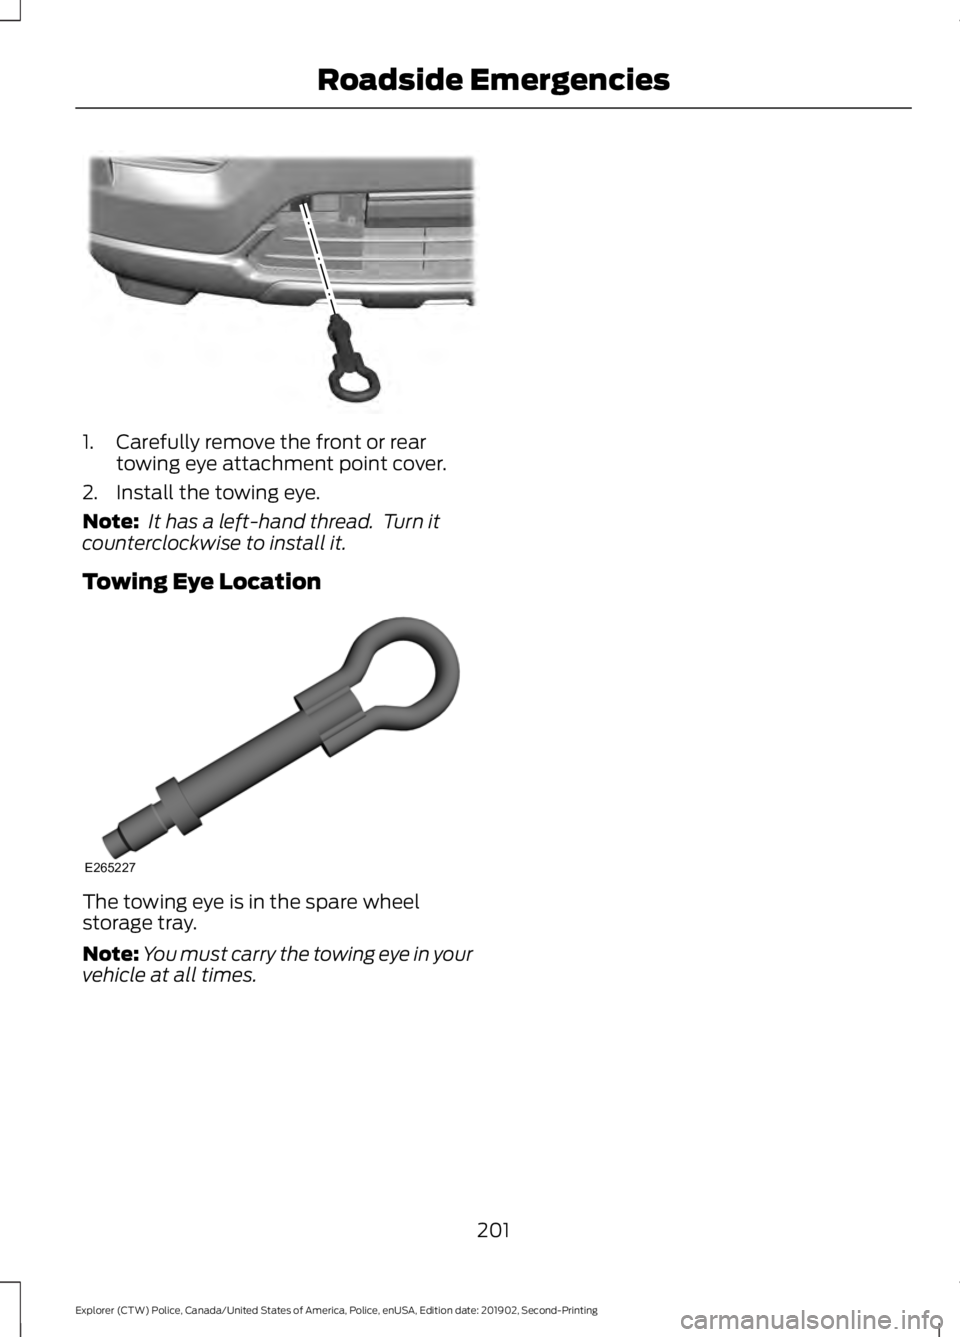
1. Carefully remove the front or rear
towing eye attachment point cover.
2. Install the towing eye.
Note: It has a left-hand thread. Turn it
counterclockwise to install it.
Towing Eye Location The towing eye is in the spare wheel
storage tray.
Note:
You must carry the towing eye in your
vehicle at all times.
201
Explorer (CTW) Police, Canada/United States of America, Police, enUSA, Edition date: 201902, Second-Printing Roadside EmergenciesE297842 E265227
Page 227 of 395

Only use oils certified for gasoline engines
by the American Petroleum Institute (API).
An oil with this trademark symbol
conforms to the current engine and
emission system protection standards and
fuel economy requirements of the
International Lubricants Specification
Advisory Committee (ILSAC).
To top up the engine oil level do the
following:
1. Clean the area surrounding the engine
oil filler cap before you remove it.
2. Remove the engine oil filler cap. See Under Hood Overview (page 221).
Turn it counterclockwise and remove
it.
3. Add engine oil that meets our specifications. See
Capacities and
Specifications (page 283). You may
have to use a funnel to pour the engine
oil into the opening.
4. Recheck the oil level.
5. If the oil level is correct, replace the dipstick and make sure it is fully seated.
6. Replace the engine oil filler cap. Turn it clockwise until you feel a strong
resistance.
Note: Do not add oil further than the
maximum mark. Oil levels above the
maximum mark may cause engine damage. Note:
Make sure you install the oil filler cap
correctly.
Note: Soak up any spillage with an
absorbent cloth immediately.
OIL CHANGE INDICATOR
RESET
Use the information display controls on
the steering wheel to reset the oil change
indicator.
From the main menu scroll to: Action and description
Message
Press the right arrow button,
then from this menu scroll
to the following message.
Settings
Press the right arrow button,
then from this menu scroll
to the following message.
Vehicle
Press the right arrow button,
then from this menu scroll
to the following message.
Oil Life
Press and hold the
OK
button until the instrument
cluster displays the
following message.
Hold OK to
Reset
Reset Successful
When the oil change indic-
ator resets the instrument
cluster displays 100%.
Remaining Life
{00}%
224
Explorer (CTW) Police, Canada/United States of America, Police, enUSA, Edition date: 201902, Second-Printing MaintenanceE142732
Page 229 of 395

Note:
Automotive fluids are not
interchangeable.
It is very important to use prediluted
coolant approved to the correct
specification in order to avoid plugging the
small passageways in the engine cooling
system. See Capacities and
Specifications (page 277). Do not mix
different colors or types of coolant in your
vehicle. Mixing of engine coolants or using
an incorrect coolant may harm the engine
or cooling system components and may
not be covered by the vehicle Warranty.
Note: If prediluted coolant is not available,
use the approved concentrated coolant
diluting it to 50/50 with distilled water. See
Capacities and Specifications
(page 277).
Using water that has not been deionised
may contribute to deposit formation,
corrosion and plugging of the small cooling
system passageways.
Note: Coolants marketed for all makes and
models may not be approved to our
specifications and may cause damage to
the cooling system. Resulting component
damage may not be covered by the vehicle
Warranty.
If the coolant level is at or below the
minimum mark, add prediluted coolant
immediately.
To top up the coolant level do the
following:
1. Unscrew the cap slowly. Any pressure escapes as you unscrew the cap.
2. Add prediluted coolant approved to the correct specification. See
Capacities and Specifications (page
277
).
3. Add enough prediluted coolant to reach the correct level.
4. Replace the coolant reservoir cap, turn
it clockwise until you feel a strong
resistance. 5. Check the coolant level in the coolant
reservoir the next few times you drive
your vehicle. If necessary, add enough
prediluted engine coolant to bring the
coolant level to the correct level.
If you have to add more than
1.1 qt (1 L) of
engine coolant per month, have your
vehicle checked as soon as possible.
Operating an engine with a low level of
coolant can result in engine overheating
and possible engine damage.
In case of emergency, you can add a large
amount of water without engine coolant
in order to reach a vehicle service location.
In this instance, qualified personnel:
1. Must drain the cooling system.
2. Chemically clean the coolant system.
3. Refill with engine coolant as soon as possible.
Water alone, without engine coolant, can
cause engine damage from corrosion,
overheating or freezing.
Do not use the following as a coolant
substitute:
• Alcohol.
• Methanol.
• Brine.
• Any coolant mixed with alcohol or
methanol antifreeze.
Alcohol and other liquids can cause engine
damage from overheating or freezing.
Do not add extra inhibitors or additives to
the coolant. These can be harmful and
compromise the corrosion protection of
the coolant.
Recycled Coolant
We do not recommend the use of recycled
coolant as an approved recycling process
is not yet available.
Note: Dispose of used coolant in the
appropriate manner.
226
Explorer (CTW) Police, Canada/United States of America, Police, enUSA, Edition date: 201902, Second-Printing Maintenance
Page 236 of 395

4. Disconnect the negative battery cable
terminal.
5. Disconnect the positive battery cable terminal.
6. Remove the battery securing clamp.
7. Remove the battery.
8. To install, reverse the removal procedure.
Note: Before reconnecting the battery,
make sure the ignition remains switched off.
Note: Make sure the battery cable terminals
are fully tightened.
If you disconnect or replace the vehicle
battery, you must reset the following
features:
• Window bounce-back. See Power
Windows (page 75).
• Clock Settings.
• Pre-set radio stations.
Battery Disposal Make sure that you dispose of
old batteries in an
environmentally friendly way.
Seek advice from your local authority
about recycling old batteries.
CHECKING THE WIPER
BLADES Run the tip of your fingers over the edge of
the blade to check for roughness. Clean the wiper blades with washer fluid
or water applied with a soft sponge or
cloth.
CHANGING THE FRONT WIPER
BLADES
You can improve poor wiper quality by
cleaning the wiper blades and the
windshield.
Replace the wiper blades at least annually
for optimum performance.
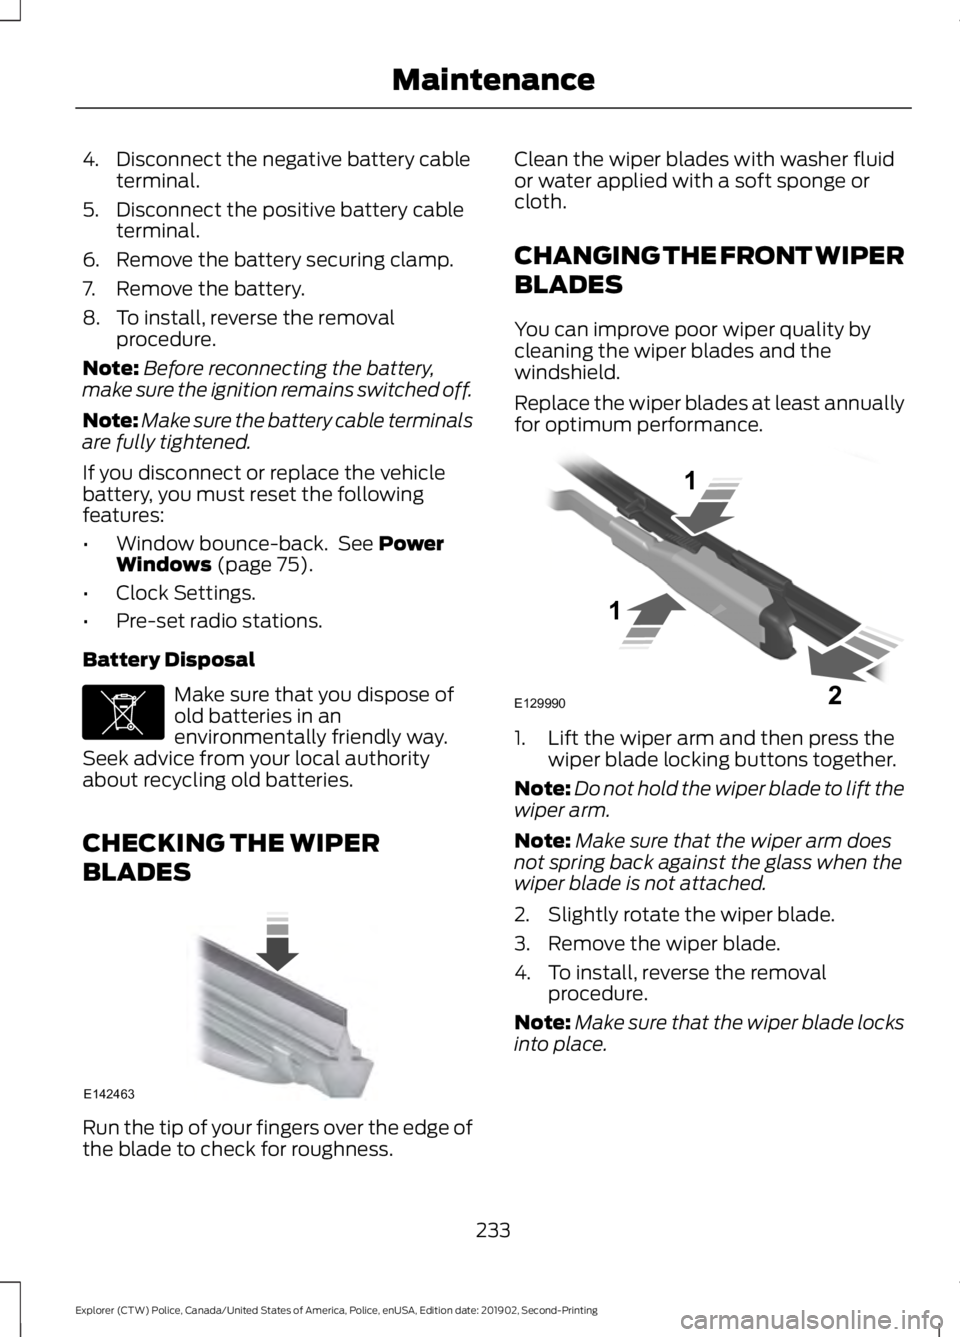
1. Lift the wiper arm and then press the
wiper blade locking buttons together.
Note: Do not hold the wiper blade to lift the
wiper arm.
Note: Make sure that the wiper arm does
not spring back against the glass when the
wiper blade is not attached.
2. Slightly rotate the wiper blade.
3. Remove the wiper blade.
4. To install, reverse the removal procedure.
Note: Make sure that the wiper blade locks
into place.
233
Explorer (CTW) Police, Canada/United States of America, Police, enUSA, Edition date: 201902, Second-Printing MaintenanceE107998 E142463 E129990
1
1 2
Page 238 of 395

3. Switch on the low beam headlamps
and open the hood. 4. On the wall or screen you will observe
a flat zone of high intensity light
located at the top of the beam pattern.
If the top edge of the flat zone of high
intensity light is not on the horizontal
reference line, adjust the aim of the
headlamp beam. 5. Use a suitable tool, for example a
screwdriver or socket wrench, to turn
the adjuster clockwise or
counterclockwise to adjust the vertical
aim of the headlamp. The horizontal
edge of the brighter light should touch
the horizontal reference line.
6. Close the hood and switch off the lamps.
CHANGING A BULB WARNING: Switch the lamps and
the ignition off. Failure to do so could
result in serious personal injury. WARNING: Bulbs can become hot.
Let the bulb cool down before removing
it. Failure to do so could result in
personal injury.
Use the correct specification bulb. See
Bulb Specification Chart
(page 305).
Install in the reverse order unless otherwise
stated.
Rear Direction Indicator and
Reversing Lamp 1.
Switch all of the lamps and the ignition
off.
2. Use a suitable tool, for example a screwdriver, to carefully remove the
access cover.
3. Remove the side cover.
235
Explorer (CTW) Police, Canada/United States of America, Police, enUSA, Edition date: 201902, Second-Printing MaintenanceE142465 E292172 E292168
Page 239 of 395

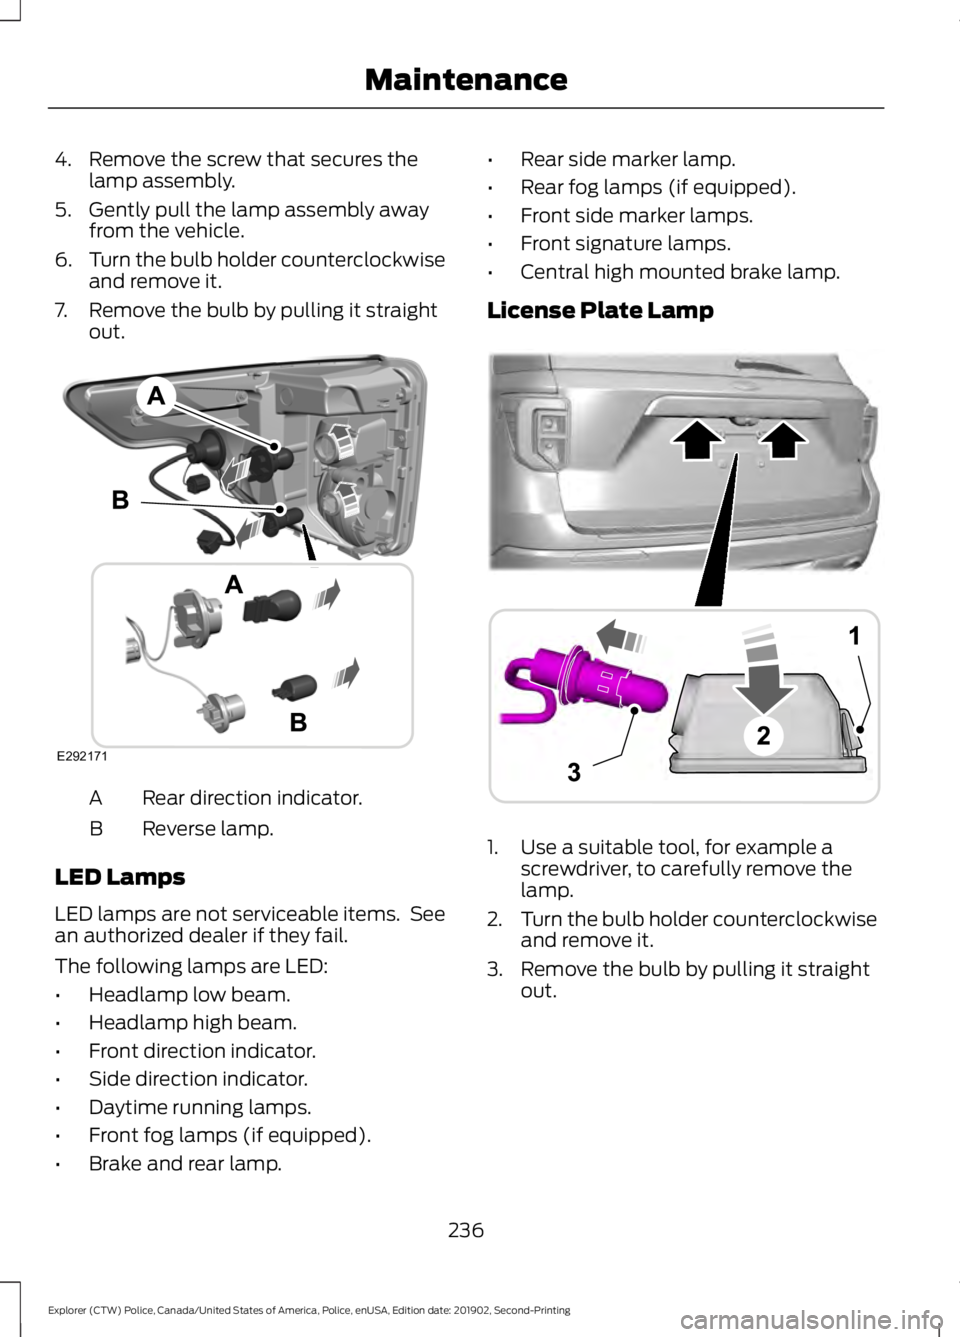
4. Remove the screw that secures the
lamp assembly.
5. Gently pull the lamp assembly away from the vehicle.
6. Turn the bulb holder counterclockwise
and remove it.
7. Remove the bulb by pulling it straight out. Rear direction indicator.
A
Reverse lamp.
B
LED Lamps
LED lamps are not serviceable items. See
an authorized dealer if they fail.
The following lamps are LED:
• Headlamp low beam.
• Headlamp high beam.
• Front direction indicator.
• Side direction indicator.
• Daytime running lamps.
• Front fog lamps (if equipped).
• Brake and rear lamp. •
Rear side marker lamp.
• Rear fog lamps (if equipped).
• Front side marker lamps.
• Front signature lamps.
• Central high mounted brake lamp.
License Plate Lamp 1. Use a suitable tool, for example a
screwdriver, to carefully remove the
lamp.
2. Turn the bulb holder counterclockwise
and remove it.
3. Remove the bulb by pulling it straight out.
236
Explorer (CTW) Police, Canada/United States of America, Police, enUSA, Edition date: 201902, Second-Printing MaintenanceE292171 A
B
A
12
203A
AE292276
Page 272 of 395

5. Train the tire pressure monitoring
system sensors in the tires using the
following system reset sequence
starting with the left front tire in the
following clockwise order: Left front -
driver side front tire, Right front -
passenger side front tire, Right rear -
passenger side rear tire, Left rear -
driver side rear tire.
6. Remove the valve cap from the valve stem on the left front tire. Decrease the
air pressure until the horn sounds.
Note: The single horn tone confirms that
the sensor identification code has been
learned by the module for this position. If a
double horn is heard, the reset procedure
was unsuccessful, and you must repeat it.
7. Remove the valve cap from the valve stem on the right front tire. Decrease
the air pressure until the horn sounds.
8. Remove the valve cap from the valve stem on the right rear tire. Decrease the
air pressure until the horn sounds.
9. Remove the valve cap from the valve stem on the left rear tire. Decrease the
air pressure until the horn sounds.
Training is complete after the horn
sounds for the last tire trained, driver
side rear tire, the system indicator
stops flashing, and a message shows
in the information display.
10. Turn the ignition off. If two short horn
beeps are heard, the reset procedure
was unsuccessful and you must
repeat it. If after repeating the
procedure and two short beeps are
heard when the ignition is turned to
off, seek assistance from your
authorized dealer. 11.
Set all four tires to the recommended
air pressure as indicated on the
Safety Compliance Certification
Label, affixed to either the door hinge
pillar, door-latch post, or the door
edge that meets the door-latch post,
next to the driver seating position or
Tire Label located on the B-Pillar or
the edge of the driver door.
CHANGING A ROAD WHEEL WARNING: If the tire pressure
monitor sensor becomes damaged it
may not function.
Note: You should only use tire sealants in
roadside emergencies as they may cause
damage to the tire pressure monitoring
system sensor.
Note: The tire pressure monitoring system
indicator light illuminates when the spare
tire is in use. To restore the full function of
the monitoring system, all road wheels
equipped with tire pressure monitoring
sensors must be mounted on the vehicle.
If you get a flat tire when driving, do not
apply the brake heavily. Instead, gradually
decrease your speed. Hold the steering
wheel firmly and slowly move to a safe
place on the side of the road.
Have a flat serviced by an authorized
dealer in order to prevent damage to the
tire pressure monitoring system sensors.
See
Tire Pressure Monitoring System
(page 264). Replace the spare tire with a
road tire as soon as possible. During
repairing or replacing of the flat tire, have
the authorized dealer inspect the tire
pressure monitoring system sensor for
damage.
269
Explorer (CTW) Police, Canada/United States of America, Police, enUSA, Edition date: 201902, Second-Printing Wheels and Tires